使用apache搭建文件服务器
2015-04-08 17:28
399 查看
前段时间在移动当农民工的时候,接到一个对存储客户开户时采集的照片的文件服务器改造的需求。当时采用的是apache服务来实现的,功能也简单,记录下基本操作权当备忘。
废话不多说直接上操作:
步骤:
1、安装jdk及apache-版本-操作系统-no_ssl.msi
2、在安装目录,conf目录下找到httpd.conf,进行如下修改:
#
# ServerName gives the name and port that the server uses to identify itself.
# This can often be determined automatically, but we recommend you specify
# it explicitly to prevent problems during startup.
#
# If your host doesn't have a registered DNS name, enter its IP address here.
#
ServerName 172.16.40.90:80 ServerName 去掉#注释
#
# DocumentRoot: The directory out of which you will serve your
# documents. By default, all requests are taken from this directory, but
# symbolic links and aliases may be used to point to other locations.
#
DocumentRoot "d:/test" DocumentRoot 改为你的文件目录的根目录
#
# Each directory to which Apache has access can be configured with respect
# to which services and features are allowed and/or disabled in that
# directory (and its subdirectories).
#
# First, we configure the "default" to be a very restrictive set of
# features.
#
<Directory />
Options FollowSymLinks 添加Indexes即Options Indexes FollowSymLinks目的:解决在浏览器中运行出现在You don't have permission to access / on this server.
AllowOverride None
Order deny,allow
deny from all deny 改为allow,即允许任何访问
</Directory>
3、在浏览器输入127.0.0.1(本地),显示

表示文件服务器已搭建好了。
下面来对文件服务器做一定的限制:比如限制访问的IP和MAC地址、访问需要口令认证等。
口令登陆:
设置步骤:
1、前置条件:让Apache支持.htaccess(参考文档:00004.Windows主机:Apache启用rewrite和.htaccess)
2、在需要认证目录下(如此文D:\test)建立 .htaccess 文件(此处是添加口令登陆认证的关键),加入下列内容:
AuthName "Login"
AuthType basic
AuthUserFile "D:\user.txt"
require valid-user
3、在非下载文件目录下创建用户密码信息文件(如此文保存在"D:\user.txt"),不要将它放在网站目录,以防被下载。
4、用Apache2\bin\htpasswd.exe 来生成密码,例如:
cd "定位你的apache安装目录\bin"
htpasswd -cmdps d:\user.txt(用户密码文件路径) limw(创建的用户名)
New password: ********(输入密码)
Re-type new password: ********(确认密码)
Adding password for user limw(表示用户密码创建成功)
如果要添加用户,则用命令:htpasswd -mdps d:\user.txt(用户密码文件路径) limw(创建的用户名)
5、验证
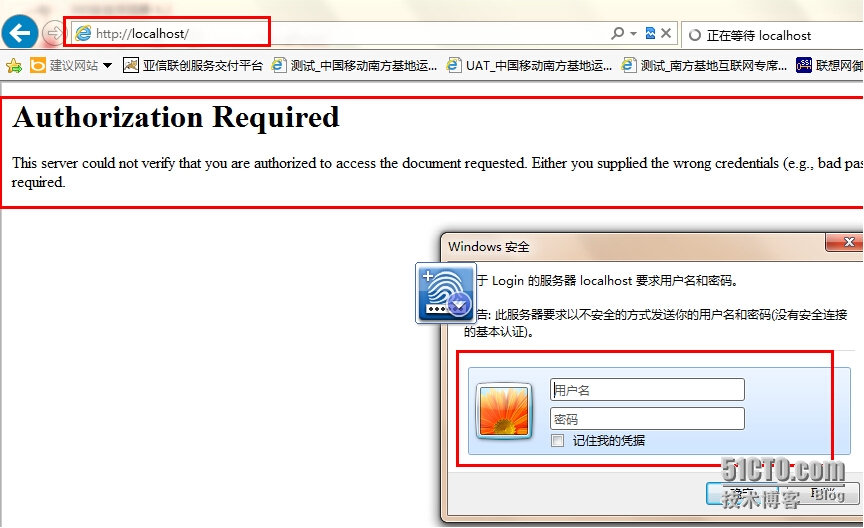
还是在浏览器输入127.0.0.1(本地),显示

如果不输入用户名和密码,就会提示Authorization Required,现在输入正确的用户名和密码,显示如下:

表示配置成功。
IP过滤:
<Directory "D:\wwwroot">
Options Indexes FollowSymLinks
allowoverride authconfig
Order deny,allow #顺序为先拒绝,后允许
Deny from all #拒绝所有
Allow from 192.168.90.12 #允许某IP、IP段访问
Allow from localhost #允许本机访问
AuthName "Login"
AuthType basic
AuthUserFile "D:\user.txt"
require valid-user
</Directory>
--------------------口令和IP控制同时实现----------------------------------
目的:部分主机、机群等需要口令登陆,部分主机、机群等直接访问
配置如下:
AuthName "Login" #随意
AuthType basic #认证方式
AuthUserFile "D:\user.txt" #用户密码文件
Order deny,allow
deny from all #先拒绝所有客户端访问
Allow from 127.0.0.1 #允许某个IP、主机、机群等访问,可以配置多个。可以是IP,也可以是网段如:192.168,还可以是一个域名如:example.com等。
require valid-user #允许口令正确的客户端访问
Satisfy any #口令和IP、主机、机群控制任选一种认证,有权限即可访问
当然还有很多限制可以进行配置,各种权限等,等待后续研究。
本文出自 “笑看IT生涯” 博客,请务必保留此出处http://limingwang.blog.51cto.com/2739029/1630107
废话不多说直接上操作:
步骤:
1、安装jdk及apache-版本-操作系统-no_ssl.msi
2、在安装目录,conf目录下找到httpd.conf,进行如下修改:
#
# ServerName gives the name and port that the server uses to identify itself.
# This can often be determined automatically, but we recommend you specify
# it explicitly to prevent problems during startup.
#
# If your host doesn't have a registered DNS name, enter its IP address here.
#
ServerName 172.16.40.90:80 ServerName 去掉#注释
#
# DocumentRoot: The directory out of which you will serve your
# documents. By default, all requests are taken from this directory, but
# symbolic links and aliases may be used to point to other locations.
#
DocumentRoot "d:/test" DocumentRoot 改为你的文件目录的根目录
#
# Each directory to which Apache has access can be configured with respect
# to which services and features are allowed and/or disabled in that
# directory (and its subdirectories).
#
# First, we configure the "default" to be a very restrictive set of
# features.
#
<Directory />
Options FollowSymLinks 添加Indexes即Options Indexes FollowSymLinks目的:解决在浏览器中运行出现在You don't have permission to access / on this server.
AllowOverride None
Order deny,allow
deny from all deny 改为allow,即允许任何访问
</Directory>
3、在浏览器输入127.0.0.1(本地),显示

表示文件服务器已搭建好了。
下面来对文件服务器做一定的限制:比如限制访问的IP和MAC地址、访问需要口令认证等。
口令登陆:
设置步骤:
1、前置条件:让Apache支持.htaccess(参考文档:00004.Windows主机:Apache启用rewrite和.htaccess)
2、在需要认证目录下(如此文D:\test)建立 .htaccess 文件(此处是添加口令登陆认证的关键),加入下列内容:
AuthName "Login"
AuthType basic
AuthUserFile "D:\user.txt"
require valid-user
3、在非下载文件目录下创建用户密码信息文件(如此文保存在"D:\user.txt"),不要将它放在网站目录,以防被下载。
4、用Apache2\bin\htpasswd.exe 来生成密码,例如:
cd "定位你的apache安装目录\bin"
htpasswd -cmdps d:\user.txt(用户密码文件路径) limw(创建的用户名)
New password: ********(输入密码)
Re-type new password: ********(确认密码)
Adding password for user limw(表示用户密码创建成功)
如果要添加用户,则用命令:htpasswd -mdps d:\user.txt(用户密码文件路径) limw(创建的用户名)
5、验证
还是在浏览器输入127.0.0.1(本地),显示

如果不输入用户名和密码,就会提示Authorization Required,现在输入正确的用户名和密码,显示如下:

表示配置成功。
IP过滤:
<Directory "D:\wwwroot">
Options Indexes FollowSymLinks
allowoverride authconfig
Order deny,allow #顺序为先拒绝,后允许
Deny from all #拒绝所有
Allow from 192.168.90.12 #允许某IP、IP段访问
Allow from localhost #允许本机访问
AuthName "Login"
AuthType basic
AuthUserFile "D:\user.txt"
require valid-user
</Directory>
--------------------口令和IP控制同时实现----------------------------------
目的:部分主机、机群等需要口令登陆,部分主机、机群等直接访问
配置如下:
AuthName "Login" #随意
AuthType basic #认证方式
AuthUserFile "D:\user.txt" #用户密码文件
Order deny,allow
deny from all #先拒绝所有客户端访问
Allow from 127.0.0.1 #允许某个IP、主机、机群等访问,可以配置多个。可以是IP,也可以是网段如:192.168,还可以是一个域名如:example.com等。
require valid-user #允许口令正确的客户端访问
Satisfy any #口令和IP、主机、机群控制任选一种认证,有权限即可访问
当然还有很多限制可以进行配置,各种权限等,等待后续研究。
本文出自 “笑看IT生涯” 博客,请务必保留此出处http://limingwang.blog.51cto.com/2739029/1630107
相关文章推荐
- 使用Apache FtpServer搭建FTP服务器
- Openssh服务器的搭建,并使用PSFTP实现文件自动上传,下载的script命令
- 使用apache的ftpserver搭建ftp服务器
- 使用Apache FtpServer搭建FTP服务器
- 搭建android版本更新服务器使用android系统自带的DownloadManager下载文件
- yum的安装的使用搭建简单的apache服务器
- PHP 开发环境的搭建和使用 01--apache服务器配置以及 IIS端口冲突解决
- 搭建常用的三种文件服务器,tomcat apache http nigx
- NFS攻略 - Linux文件服务器搭建与使用实例
- 文件服务器搭建与使用
- 使用Windows2003搭建文件服务器
- shopex后台提示服务器不是apache,无法使用htaccess文件.请手动启用rewrite,否则无法启用伪静态.
- 使用Apache FtpServer搭建FTP服务器 [FlashFXP]
- 使用ActiveMQ 传输文件 以及使用Jetty搭建内嵌文件服务器
- 使用Win Server 2003搭建安全文件服务器
- PowerDesign的使用与Linux下Apache服务器的搭建(1)
- shopex后台提示服务器不是apache,无法使用htaccess文件.请手动启用rewrite,否则无法启用伪静态.
- shopex后台提示服务器不是apache,无法使用htaccess文件.请手动启用rewri...
- 【Jena使用手册】用Python访问Apache Jena数据库 利用Fuseki搭建HTTP访问服务器
- php+apache+mySQL搭建服务器上传文件时失败
