【Android开发】范例1-使用表格布局与线性布局实现分类工具栏
2015-03-30 18:12
766 查看
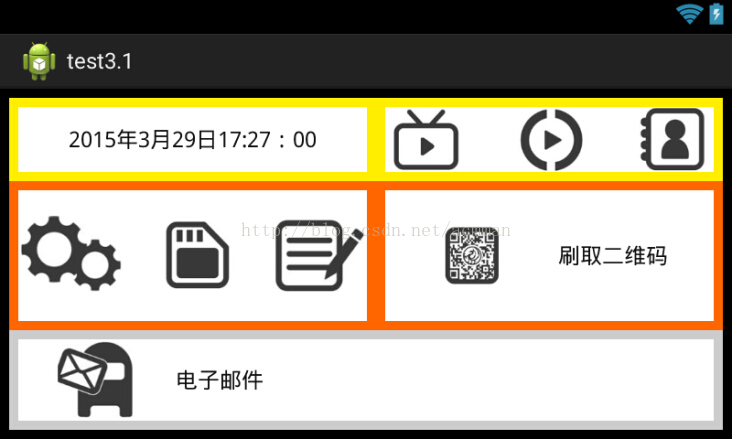
实现一个横屏的带有各种功能分类的主界面,效果如图:
素材:

实现代码:
MainActivity:
res/layout/main.xml:
res/values/strings.xml:
res/values/styles.xml:
素材:
实现代码:
MainActivity:
package com.example.test;

import android.app.Activity;
import android.os.Bundle;
import android.view.MotionEvent;
import android.view.View;
import android.view.View.OnTouchListener;
import android.widget.FrameLayout;

public class MainActivity extends Activity {

@Override
protected void onCreate(Bundle savedInstanceState) {
super.onCreate(savedInstanceState);
setContentView(R.layout.main);

}
}
res/layout/main.xml:
<TableLayout xmlns:android="http://schemas.android.com/apk/res/android"
xmlns:tools="http://schemas.android.com/tools"
android:id="@+id/tableLayout1"
android:layout_width="match_parent"
android:layout_height="match_parent"
android:background="#000000"
android:padding="10px"
android:screenOrientation="landscape" >

<!-- 表格TableRow行的android:layout_weight属性均设为1,
表示这三行平均分配整个视图空间-->

<!-- 第一行 -->

<TableRow
android:id="@+id/tableRow1"
android:layout_width="fill_parent"
android:layout_height="match_parent"
android:layout_weight="1"
android:background="#FFFFEE00" >

<LinearLayout android:id="@+id/linearlayout1"
android:layout_width="wrap_content"
android:layout_height="fill_parent"
android:layout_weight="1"
android:layout_margin="10px"
android:background="#FFFFFF">
<TextView android:id="@+id/textView1"
android:text="@string/time"
android:layout_width="fill_parent"
android:layout_height="fill_parent"
android:gravity="center"
style="@style/text"/>
</LinearLayout>

<LinearLayout android:id="@+id/linearlayout2"
android:layout_height="fill_parent"
android:layout_weight="1"
android:layout_margin="10px"
android:background="#FFFFFF">
<ImageView android:id="@+id/imageView1"
android:src="@drawable/img01"
android:layout_weight="1"
android:layout_width="wrap_content"
android:layout_height="fill_parent"/>
<ImageView android:id="@+id/imageView2"
android:src="@drawable/img02"
android:layout_weight="1"
android:layout_marginLeft="50px"
android:layout_width="wrap_content"
android:layout_height="fill_parent"/>
<ImageView android:id="@+id/imageView3"
android:src="@drawable/img03"
android:layout_weight="1"
android:layout_marginLeft="50px"
android:layout_width="wrap_content"
android:layout_height="fill_parent"/>
</LinearLayout>

</TableRow>

<!-- 第二行 -->
<TableRow android:id="@+id/tableRow2"
android:layout_width="fill_parent"
android:layout_weight="1"
android:background="#FFFF6600">

<LinearLayout android:id="@+id/linearlayout3"
android:layout_height="fill_parent"
android:layout_weight="1"
android:layout_margin="10px"
android:background="#FFFFFF">
<ImageView android:id="@+id/imageView4"
android:src="@drawable/img04"
android:layout_weight="1"
android:layout_width="wrap_content"
android:layout_height="fill_parent"/>
<ImageView android:id="@+id/imageView5"
android:src="@drawable/img05"
android:layout_weight="1"
android:layout_marginLeft="40px"
android:layout_width="wrap_content"
android:layout_height="fill_parent"/>
<ImageView android:id="@+id/imageView6"
android:src="@drawable/img06"
android:layout_weight="1"
android:layout_marginLeft="40px"
android:layout_width="wrap_content"
android:layout_height="fill_parent"/>
</LinearLayout>

<LinearLayout android:id="@+id/linearlayout4"
android:layout_height="fill_parent"
android:layout_weight="1"
android:layout_margin="10px"
android:background="#FFFFFF">
<ImageView android:id="@+id/imageView7"
android:src="@drawable/img07"
android:layout_weight="1"
android:layout_margin="40px"
android:layout_width="wrap_content"
android:layout_height="fill_parent"/>
<TextView android:id="@+id/textView2"
android:text="刷取二维码"
android:layout_width="wrap_content"
android:layout_height="fill_parent"
android:gravity="center_vertical"
android:layout_weight="3"
style="@style/text"/>
</LinearLayout>

</TableRow>

<!-- 第三行 -->
<TableRow android:id="@+id/tableRow3"
android:layout_width="fill_parent"
android:layout_weight="1"
android:background="#CCCCCC">

<LinearLayout android:id="@+id/linearlayout5"
android:layout_height="fill_parent"
android:layout_weight="1"
android:layout_margin="10px"
android:background="#FFFFFF">
<ImageView android:id="@+id/imageView8"
android:src="@drawable/img08"
android:layout_marginLeft="20px"
android:layout_width="wrap_content"
android:layout_height="fill_parent"/>
<TextView android:id="@+id/textView3"
android:text="电子邮件"
android:layout_marginLeft="20px"
android:layout_width="wrap_content"
android:layout_height="fill_parent"
android:gravity="center_vertical"
style="@style/text"/>
</LinearLayout>

</TableRow>
</TableLayout>
res/values/strings.xml:
<?xml version="1.0" encoding="utf-8"?>
<resources>

<string name="app_name">test3.1</string>
<string name="hello_world">Hello world!</string>
<string name="action_settings">Settings</string>
<string name="time">2015年3月29日17:27:00</string>

</resources>
res/values/styles.xml:
<resources xmlns:android="http://schemas.android.com/apk/res/android"> <style name="text"> <item name="android:textSize">24px</item> <item name="android:textColor">#111111</item> </style> <style name="AppBaseTheme" parent="android:Theme.Light"> </style> <style name="AppTheme" parent="AppBaseTheme"> </style> </resources>转载请注明出处:http://blog.csdn.net/acmman/article/details/44754519

相关文章推荐
- Android手机开发 使用线性布局和相对布局实现Button垂直水平居中
- android开发之&使用RecyclerView实现瀑布流布局(二)
- android开发之&使用RecyclerView实现瀑布流布局(一)
- Android开发记录二之线性、表格、相对布局
- Android 使用LinearLayout.getChildAt(i)获取一个线性布局的view,并实现content中实现方法
- Android 使用线性布局LinearLayout和Button实现一个点红块游戏
- Android开发历程_4(Activity线性布局和表格布局)
- Android应用开发之TableLayout (表格布局)+信息列表案例
- Android 程式开发:(四)使用Intent调用“内置”应用 —— 4.1范例
- android开发布局一_线性布局(LinearLayout)
- Android开发教程 --- 布局(线性布局 Linear Layout )(相对布局 Relative Layout)
- 使用IE条件注释 实现兼容 IE, Opera, Firefox 的 DIV+CSS 表格布局 By shawl.qiu
- Android开发中自定义View设定到FrameLayout布局中实现多组件显示
- 【转】在Android开发中使用Gallery实现“多级联动”
- 【Android 开发教程】TableLayout表格布局
- android游戏开发框架libgdx的使用(二十二)—利用TABLELAYOUT进行布局
- 关于android开发在布局中使用sharp时遇到的问题
- Android游戏开发之使用AnimationDrable实现Frame动画(三十一)
- [Android开发]Android之使用Http协议实现文件上传功能
- Android Layout中使用include标签实现UI布局重用