使用AES加密进行Android的SharedPreferences存储
2015-03-16 11:55
483 查看
1.概述
SharedPreferences是Android提供用来存储一些简单配置信息的机制,其以KEY-VALUE对的方式进行存储,以便我们可以方便进行读取和存储。主要可以用来存储应用程序的欢迎语、常量参数或登录账号密码等。
2.实例
(1)创建项目SharedPreferencesDemo项目
(2)编辑主界面的布局文件main.xml如下:
[xhtml] view
plaincopy
<?xml version="1.0" encoding="utf-8"?>
<LinearLayout xmlns:android="http://schemas.android.com/apk/res/android"
android:orientation="vertical"
android:layout_width="fill_parent"
android:layout_height="fill_parent"
>
<TextView
android:layout_width="fill_parent"
android:layout_height="wrap_content"
android:text="SharedPreferences,是Android提供用来存储一些简单的配置信息的一种机制。"
/>
<EditText android:layout_height="wrap_content" android:layout_width="fill_parent" android:id="@+id/edtAccount" android:text=""></EditText>
<EditText android:layout_height="wrap_content" android:layout_width="fill_parent" android:id="@+id/edtPassword" android:text=""></EditText>
<Button android:text="清空" android:id="@+id/btnClear" android:layout_width="fill_parent" android:layout_height="wrap_content"> </Button>
<Button android:text="退出" android:id="@+id/btnExit" android:layout_width="fill_parent" android:layout_height="wrap_content"></Button>
</LinearLayout>
(3)创建AES加解密工具类AESEncryptor.java
其中主要提供加密encrypt、解密decrypt两个方法。(AES加解密算法具体大家可以到网上搜索相关资料)
以下为该类文件的源码:
[java] view
plaincopy
package ni.demo.sharedpreferences;
import java.security.SecureRandom;
import javax.crypto.Cipher;
import javax.crypto.KeyGenerator;
import javax.crypto.SecretKey;
import javax.crypto.spec.SecretKeySpec;
/**
* AES加密器
* @author Eric_Ni
*
*/
public class AESEncryptor {
/**
* AES加密
*/
public static String encrypt(String seed, String cleartext) throws Exception {
byte[] rawKey = getRawKey(seed.getBytes());
byte[] result = encrypt(rawKey, cleartext.getBytes());
return toHex(result);
}
/**
* AES解密
*/
public static String decrypt(String seed, String encrypted) throws Exception {
byte[] rawKey = getRawKey(seed.getBytes());
byte[] enc = toByte(encrypted);
byte[] result = decrypt(rawKey, enc);
return new String(result);
}
private static byte[] getRawKey(byte[] seed) throws Exception {
KeyGenerator kgen = KeyGenerator.getInstance("AES");
SecureRandom sr = SecureRandom.getInstance("SHA1PRNG");
sr.setSeed(seed);
kgen.init(128, sr); // 192 and 256 bits may not be available
SecretKey skey = kgen.generateKey();
byte[] raw = skey.getEncoded();
return raw;
}
private static byte[] encrypt(byte[] raw, byte[] clear) throws Exception {
SecretKeySpec skeySpec = new SecretKeySpec(raw, "AES");
Cipher cipher = Cipher.getInstance("AES");
cipher.init(Cipher.ENCRYPT_MODE, skeySpec);
byte[] encrypted = cipher.doFinal(clear);
return encrypted;
}
private static byte[] decrypt(byte[] raw, byte[] encrypted) throws Exception {
SecretKeySpec skeySpec = new SecretKeySpec(raw, "AES");
Cipher cipher = Cipher.getInstance("AES");
cipher.init(Cipher.DECRYPT_MODE, skeySpec);
byte[] decrypted = cipher.doFinal(encrypted);
return decrypted;
}
public static String toHex(String txt) {
return toHex(txt.getBytes());
}
public static String fromHex(String hex) {
return new String(toByte(hex));
}
public static byte[] toByte(String hexString) {
int len = hexString.length()/2;
byte[] result = new byte[len];
for (int i = 0; i < len; i++)
result[i] = Integer.valueOf(hexString.substring(2*i, 2*i+2), 16).byteValue();
return result;
}
public static String toHex(byte[] buf) {
if (buf == null)
return "";
StringBuffer result = new StringBuffer(2*buf.length);
for (int i = 0; i < buf.length; i++) {
appendHex(result, buf[i]);
}
return result.toString();
}
private final static String HEX = "0123456789ABCDEF";
private static void appendHex(StringBuffer sb, byte b) {
sb.append(HEX.charAt((b>>4)&0x0f)).append(HEX.charAt(b&0x0f));
}
}
(4)编辑SharedPreferencesDemo.java
源码如下:
[java] view
plaincopy
package ni.demo.sharedpreferences;
import android.app.Activity;
import android.content.SharedPreferences;
import android.content.SharedPreferences.Editor;
import android.os.Bundle;
import android.view.View;
import android.view.View.OnClickListener;
import android.widget.Button;
import android.widget.EditText;
import android.widget.Toast;
public class SharedPreferencesDemo extends Activity {
public static final String MY_PREFERENCES = "MY_PREFERENCES"; //Preferences文件的名称
public static final String MY_ACCOUNT = "MY_ACCOUNT"; //
public static final String MY_PASSWORD = "MY_PASSWORD";
private EditText edtAccount;
private EditText edtPassword;
private Button btnClear;
private Button btnExit;
@Override
public void onCreate(Bundle savedInstanceState) {
super.onCreate(savedInstanceState);
setContentView(R.layout.main);
edtAccount = (EditText)findViewById(R.id.edtAccount);
edtPassword = (EditText)findViewById(R.id.edtPassword);
//获取名字为“MY_PREFERENCES”的参数文件对象,并获得MYACCOUNT、MY_PASSWORD元素的值。
SharedPreferences sp = this.getSharedPreferences(MY_PREFERENCES, 0);
String account = sp.getString(MY_ACCOUNT, "");
String password = sp.getString(MY_PASSWORD, "");
//对密码进行AES解密
try{
password = AESEncryptor.decrypt("41227677", password);
}catch(Exception ex){
Toast.makeText(this, "获取密码时产生解密错误!", Toast.LENGTH_SHORT);
password = "";
}
//将账号和密码显示在EditText控件上。
edtAccount.setText(account);
edtPassword.setText(password);
//获取"清空"按钮的对象,并为其绑定监听器,如被点击则清空账号和密码控件的值。
btnClear = (Button)findViewById(R.id.btnClear);
btnClear.setOnClickListener(new OnClickListener(){
@Override
public void onClick(View arg0) {
edtAccount.setText("");
edtPassword.setText("");
}
});
//获取“退出”按钮的对象,并为其绑定监听,如被点击则退出程序。
btnExit = (Button)findViewById(R.id.btnExit);
btnExit.setOnClickListener(new OnClickListener(){
@Override
public void onClick(View arg0) {
SharedPreferencesDemo.this.finish();
}
});
}
@Override
protected void onStop() {
super.onStop();
//获得账号、密码控件的值,并使用AES加密算法给密码加密。
String account = edtAccount.getText().toString();
String password = edtPassword.getText().toString();
try{
password = AESEncryptor.encrypt("41227677", password);
}catch(Exception ex){
Toast.makeText(this, "给密码加密时产生错误!", Toast.LENGTH_SHORT);
password = "";
}
//获取名字为“MY_PREFERENCES”的参数文件对象。
SharedPreferences sp = this.getSharedPreferences(MY_PREFERENCES, 0);
//使用Editor接口修改SharedPreferences中的值并提交。
Editor editor = sp.edit();
editor.putString(MY_ACCOUNT, account);
editor.putString(MY_PASSWORD,password);
editor.commit();
}
}
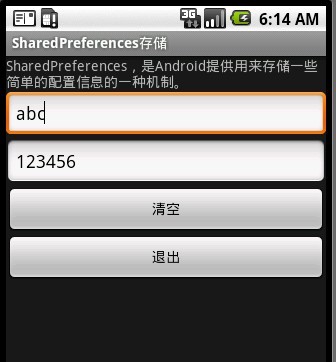
(5)效果测试
首先,在AVD我们可以看到如下界面,在两个控件上我们分别输入abc和123456。
接着,我们打开DDMS的File Explore可以看到在data->data->ni->shared_prefs下面产生了一个名字叫做MY_PREFERENCES.xml的文件,该文件就是用来存储我们刚才设置的账号和密码。
将其导出,并打开,可以看到如下内容:
<?xml version='1.0' encoding='utf-8' standalone='yes' ?>
<map>
<string name="MY_ACCOUNT">abc</string>
<string name="MY_PASSWORD">04B75FAD36E907BE50CE3222B0052B79</string>
</map>
这说明我们可以成功将账号和加密后的密码保存下来了。
最后,我们点击“退出”按钮将应用程序结束掉,再重新打开。我们又再次看到我们退出前的界面,账号密码已经被重新读取出来。
文章的最后,我们进入Android API手册,看看关于SharedPreferences的介绍:
Interface for accessing and modifying preference data returned by getSharedPreferences(String, int). For any particular set of preferences, there is a single instance of this class that all clients share. Modifications to the preferences must go through
an SharedPreferences.Editor object to ensure the preference values remain in a consistent state and control when they are committed to storage.
SharedPreferences是一个用来访问和修改选项数据的接口,通过getSharedPreferences(Stirng,int)来获得该接口。对于任何特别的选项集,只能有一个实例供所有客户端共享。针对选项参数的修改必须通过一个SharedPreferences.Editor对象来进行,以保证所有的选项值保持在一个始终如一的状态,并且通过该对象提交存储。
可见,SharedPreferences操作选项文件时是线程安全的。
1: //KeyGenerator kgen = KeyGenerator.getInstance("AES"); //android4.1以后会有bug,替换下边一句
SecureRandom sr = SecureRandom.getInstance("SHA1PRNG", "Crypto");
2: //Cipher cipher = Cipher.getInstance("AES"); //4.3以上有bug,用下边一句ok
Cipher cipher = Cipher.getInstance("AES/ECB/ZeroBytePadding");
SharedPreferences是Android提供用来存储一些简单配置信息的机制,其以KEY-VALUE对的方式进行存储,以便我们可以方便进行读取和存储。主要可以用来存储应用程序的欢迎语、常量参数或登录账号密码等。
2.实例
(1)创建项目SharedPreferencesDemo项目
(2)编辑主界面的布局文件main.xml如下:
[xhtml] view
plaincopy
<?xml version="1.0" encoding="utf-8"?>
<LinearLayout xmlns:android="http://schemas.android.com/apk/res/android"
android:orientation="vertical"
android:layout_width="fill_parent"
android:layout_height="fill_parent"
>
<TextView
android:layout_width="fill_parent"
android:layout_height="wrap_content"
android:text="SharedPreferences,是Android提供用来存储一些简单的配置信息的一种机制。"
/>
<EditText android:layout_height="wrap_content" android:layout_width="fill_parent" android:id="@+id/edtAccount" android:text=""></EditText>
<EditText android:layout_height="wrap_content" android:layout_width="fill_parent" android:id="@+id/edtPassword" android:text=""></EditText>
<Button android:text="清空" android:id="@+id/btnClear" android:layout_width="fill_parent" android:layout_height="wrap_content"> </Button>
<Button android:text="退出" android:id="@+id/btnExit" android:layout_width="fill_parent" android:layout_height="wrap_content"></Button>
</LinearLayout>
(3)创建AES加解密工具类AESEncryptor.java
其中主要提供加密encrypt、解密decrypt两个方法。(AES加解密算法具体大家可以到网上搜索相关资料)
以下为该类文件的源码:
[java] view
plaincopy
package ni.demo.sharedpreferences;
import java.security.SecureRandom;
import javax.crypto.Cipher;
import javax.crypto.KeyGenerator;
import javax.crypto.SecretKey;
import javax.crypto.spec.SecretKeySpec;
/**
* AES加密器
* @author Eric_Ni
*
*/
public class AESEncryptor {
/**
* AES加密
*/
public static String encrypt(String seed, String cleartext) throws Exception {
byte[] rawKey = getRawKey(seed.getBytes());
byte[] result = encrypt(rawKey, cleartext.getBytes());
return toHex(result);
}
/**
* AES解密
*/
public static String decrypt(String seed, String encrypted) throws Exception {
byte[] rawKey = getRawKey(seed.getBytes());
byte[] enc = toByte(encrypted);
byte[] result = decrypt(rawKey, enc);
return new String(result);
}
private static byte[] getRawKey(byte[] seed) throws Exception {
KeyGenerator kgen = KeyGenerator.getInstance("AES");
SecureRandom sr = SecureRandom.getInstance("SHA1PRNG");
sr.setSeed(seed);
kgen.init(128, sr); // 192 and 256 bits may not be available
SecretKey skey = kgen.generateKey();
byte[] raw = skey.getEncoded();
return raw;
}
private static byte[] encrypt(byte[] raw, byte[] clear) throws Exception {
SecretKeySpec skeySpec = new SecretKeySpec(raw, "AES");
Cipher cipher = Cipher.getInstance("AES");
cipher.init(Cipher.ENCRYPT_MODE, skeySpec);
byte[] encrypted = cipher.doFinal(clear);
return encrypted;
}
private static byte[] decrypt(byte[] raw, byte[] encrypted) throws Exception {
SecretKeySpec skeySpec = new SecretKeySpec(raw, "AES");
Cipher cipher = Cipher.getInstance("AES");
cipher.init(Cipher.DECRYPT_MODE, skeySpec);
byte[] decrypted = cipher.doFinal(encrypted);
return decrypted;
}
public static String toHex(String txt) {
return toHex(txt.getBytes());
}
public static String fromHex(String hex) {
return new String(toByte(hex));
}
public static byte[] toByte(String hexString) {
int len = hexString.length()/2;
byte[] result = new byte[len];
for (int i = 0; i < len; i++)
result[i] = Integer.valueOf(hexString.substring(2*i, 2*i+2), 16).byteValue();
return result;
}
public static String toHex(byte[] buf) {
if (buf == null)
return "";
StringBuffer result = new StringBuffer(2*buf.length);
for (int i = 0; i < buf.length; i++) {
appendHex(result, buf[i]);
}
return result.toString();
}
private final static String HEX = "0123456789ABCDEF";
private static void appendHex(StringBuffer sb, byte b) {
sb.append(HEX.charAt((b>>4)&0x0f)).append(HEX.charAt(b&0x0f));
}
}
(4)编辑SharedPreferencesDemo.java
源码如下:
[java] view
plaincopy
package ni.demo.sharedpreferences;
import android.app.Activity;
import android.content.SharedPreferences;
import android.content.SharedPreferences.Editor;
import android.os.Bundle;
import android.view.View;
import android.view.View.OnClickListener;
import android.widget.Button;
import android.widget.EditText;
import android.widget.Toast;
public class SharedPreferencesDemo extends Activity {
public static final String MY_PREFERENCES = "MY_PREFERENCES"; //Preferences文件的名称
public static final String MY_ACCOUNT = "MY_ACCOUNT"; //
public static final String MY_PASSWORD = "MY_PASSWORD";
private EditText edtAccount;
private EditText edtPassword;
private Button btnClear;
private Button btnExit;
@Override
public void onCreate(Bundle savedInstanceState) {
super.onCreate(savedInstanceState);
setContentView(R.layout.main);
edtAccount = (EditText)findViewById(R.id.edtAccount);
edtPassword = (EditText)findViewById(R.id.edtPassword);
//获取名字为“MY_PREFERENCES”的参数文件对象,并获得MYACCOUNT、MY_PASSWORD元素的值。
SharedPreferences sp = this.getSharedPreferences(MY_PREFERENCES, 0);
String account = sp.getString(MY_ACCOUNT, "");
String password = sp.getString(MY_PASSWORD, "");
//对密码进行AES解密
try{
password = AESEncryptor.decrypt("41227677", password);
}catch(Exception ex){
Toast.makeText(this, "获取密码时产生解密错误!", Toast.LENGTH_SHORT);
password = "";
}
//将账号和密码显示在EditText控件上。
edtAccount.setText(account);
edtPassword.setText(password);
//获取"清空"按钮的对象,并为其绑定监听器,如被点击则清空账号和密码控件的值。
btnClear = (Button)findViewById(R.id.btnClear);
btnClear.setOnClickListener(new OnClickListener(){
@Override
public void onClick(View arg0) {
edtAccount.setText("");
edtPassword.setText("");
}
});
//获取“退出”按钮的对象,并为其绑定监听,如被点击则退出程序。
btnExit = (Button)findViewById(R.id.btnExit);
btnExit.setOnClickListener(new OnClickListener(){
@Override
public void onClick(View arg0) {
SharedPreferencesDemo.this.finish();
}
});
}
@Override
protected void onStop() {
super.onStop();
//获得账号、密码控件的值,并使用AES加密算法给密码加密。
String account = edtAccount.getText().toString();
String password = edtPassword.getText().toString();
try{
password = AESEncryptor.encrypt("41227677", password);
}catch(Exception ex){
Toast.makeText(this, "给密码加密时产生错误!", Toast.LENGTH_SHORT);
password = "";
}
//获取名字为“MY_PREFERENCES”的参数文件对象。
SharedPreferences sp = this.getSharedPreferences(MY_PREFERENCES, 0);
//使用Editor接口修改SharedPreferences中的值并提交。
Editor editor = sp.edit();
editor.putString(MY_ACCOUNT, account);
editor.putString(MY_PASSWORD,password);
editor.commit();
}
}
(5)效果测试
首先,在AVD我们可以看到如下界面,在两个控件上我们分别输入abc和123456。
接着,我们打开DDMS的File Explore可以看到在data->data->ni->shared_prefs下面产生了一个名字叫做MY_PREFERENCES.xml的文件,该文件就是用来存储我们刚才设置的账号和密码。
将其导出,并打开,可以看到如下内容:
<?xml version='1.0' encoding='utf-8' standalone='yes' ?>
<map>
<string name="MY_ACCOUNT">abc</string>
<string name="MY_PASSWORD">04B75FAD36E907BE50CE3222B0052B79</string>
</map>
这说明我们可以成功将账号和加密后的密码保存下来了。
最后,我们点击“退出”按钮将应用程序结束掉,再重新打开。我们又再次看到我们退出前的界面,账号密码已经被重新读取出来。
文章的最后,我们进入Android API手册,看看关于SharedPreferences的介绍:
Interface for accessing and modifying preference data returned by getSharedPreferences(String, int). For any particular set of preferences, there is a single instance of this class that all clients share. Modifications to the preferences must go through
an SharedPreferences.Editor object to ensure the preference values remain in a consistent state and control when they are committed to storage.
SharedPreferences是一个用来访问和修改选项数据的接口,通过getSharedPreferences(Stirng,int)来获得该接口。对于任何特别的选项集,只能有一个实例供所有客户端共享。针对选项参数的修改必须通过一个SharedPreferences.Editor对象来进行,以保证所有的选项值保持在一个始终如一的状态,并且通过该对象提交存储。
可见,SharedPreferences操作选项文件时是线程安全的。
在DES解密时候出现pad block corrupted错误
我这里遇见了两种情况的bug,分别用如下两种方法解决1: //KeyGenerator kgen = KeyGenerator.getInstance("AES"); //android4.1以后会有bug,替换下边一句
SecureRandom sr = SecureRandom.getInstance("SHA1PRNG", "Crypto");
2: //Cipher cipher = Cipher.getInstance("AES"); //4.3以上有bug,用下边一句ok
Cipher cipher = Cipher.getInstance("AES/ECB/ZeroBytePadding");

相关文章推荐
- 使用AES加密进行Android的SharedPreferences存储
- 使用AES加密进行Android的SharedPreferences存储
- 使用AES加密进行Android的SharedPreferences存储
- 使用AES加密进行Android的SharedPreferences存储
- 使用AES加密进行Android的SharedPreferences存储
- Android进阶----使用AES+RSA对http请求进行加密
- 使用AES加密进行Android的SharedPreferences存储
- 使用AES加密进行Android的SharedPreferences存储
- 【Android数据加密与完整性校验之使用MessageDigest类进行MD5/SHA1】MessageDigest类对文件或字符串生成加密摘要进行完整性校验(三)
- Android 使用MD5对SharedPreferences密码进行加密
- 【Android数据加密与完整性校验之使用MessageDigest类进行MD5/SHA1】MessageDigest简介(二)
- AES加密进行Android的SharedPreferences存储
- Android 中对称加密算法DES,DESede,AES的加密和解密 的工具类的使用
- Android使用SQLCipher对SQLite数据库进行加密
- 关于Android中使用AES加密解密的问题
- C语言编程实现使用AES对文件进行加密
- Android使用NDK调用C语言写的SO进行加密
- android中采用AES进行加密
- 使用Python进行AES加密和解密的示例代码
- 我的Android进阶之旅------>Android采用AES+RSA的加密机制对http请求进行加密