ASP.NET Identity 2.0 Change Primary Key from String to Integer
2015-02-28 12:40
525 查看
Introduction
User’s entry tracking is essential for some project. A common example is accounting software. Asp.net identity framework 1.0 use string (128 char) as userId. If an application work with huge amount of data then retrieve informationwith user’s info may slow because of string matching. In that case Integer is the best solution.
Latest Identity framework 2.0 comes with some new features. One of them is generic primary key. So now, we can make primary key integer or whatever we like. Identity 2.0 included in Visual
Studio 2013 update 2 (released May 12, 2014).
Using the code
In this article we are going to change primary key data type from string to int with bellow stepsCreate a MVC project using Visual Studio 2013 update 2
Create & change Identity classes
Change account controller to work with new primary key
Create a MVC project using Visual Studio 2013 update 2
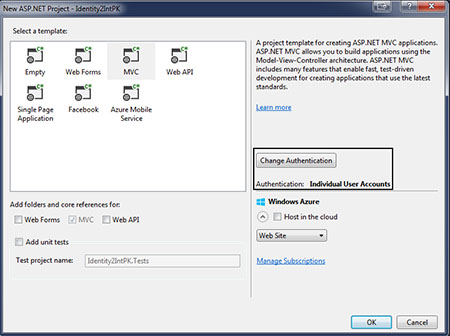
Lets create a new ASP.Net web application named Identity2IntPK using Visual Studio 2013. Next select MVCwith Individual User Account.
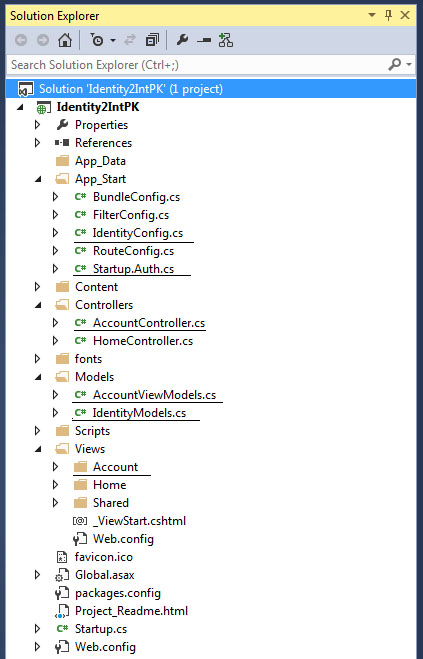
Visual Studio 2013 MVC template will create a structure like this image.
IdentityConfig file contain a class ApplicationUserManager where we can set password strength.
Startup.Auth contain a partial class Startup. Here we can set 3rd party login provider like facebook, google etc.
IdentityModels contain ApplicationUser & ApplicationDbContext. Basically we are going to change this file.
AccountViewModels contain some classes uses for data transfer & validation.
AccountController has only AccountController class which responsible for login, registration, password reset & others.
Account this folder contain some view files such as Login.cshtml, Register.cshtml, ResetPassword.cshtml.
Create & change Identity classes
We have to change bellow files to finish this task.IdentityModels.cs
IdentityConfig.cs
Startup.Auth.cs
1. IdentityModels.cs : Open file form Modules folder & add UserRoleIntPk, UserClaimIntPk, UserLoginIntPk, RoleIntPk, UserStoreIntPk, RoleStoreIntPk classes.
Collapse
| Copy
Code
//New drived classes public class UserRoleIntPk : IdentityUserRole<int> { } public class UserClaimIntPk : IdentityUserClaim<int> { } public class UserLoginIntPk : IdentityUserLogin<int> { } public class RoleIntPk : IdentityRole<int, UserRoleIntPk> { public RoleIntPk() { } public RoleIntPk(string name) { Name = name; } } public class UserStoreIntPk : UserStore<ApplicationUser, RoleIntPk, int, UserLoginIntPk, UserRoleIntPk, UserClaimIntPk> { public UserStoreIntPk(ApplicationDbContext context) : base(context) { } } public class RoleStoreIntPk : RoleStore<RoleIntPk, int, UserRoleIntPk> { public RoleStoreIntPk(ApplicationDbContext context) : base(context) { } }Also change ApplicationUser & ApplicationDbContext in same file.
Copy Code
//change bellow classes public class ApplicationUser : IdentityUser<int, UserLoginIntPk, UserRoleIntPk, UserClaimIntPk> { public async Task<ClaimsIdentity> GenerateUserIdentityAsync(ApplicationUserManager manager) { var userIdentity = await manager.CreateIdentityAsync(this, DefaultAuthenticationTypes.ApplicationCookie); // Add custom user claims here return userIdentity; } } public class ApplicationDbContext : IdentityDbContext<ApplicationUser, RoleIntPk, int, UserLoginIntPk, UserRoleIntPk, UserClaimIntPk> { public ApplicationDbContext() : base("DefaultConnection") { } public static ApplicationDbContext Create() { return new ApplicationDbContext(); } }2. IdentityConfig.cs: Open this file from App_Start folder & change ApplicationUserManagerclass. After
change ApplicationUserManager will looks like:
Collapse
| Copy
Code
public class ApplicationUserManager : UserManager<ApplicationUser, int> { public ApplicationUserManager(IUserStore<ApplicationUser, int> store) : base(store) { } public static ApplicationUserManager Create(IdentityFactoryOptions<ApplicationUserManager> options, IOwinContext context) { var manager = new ApplicationUserManager(new UserStoreIntPk(context.Get<ApplicationDbContext>())); // Configure validation logic for usernames manager.UserValidator = new UserValidator<ApplicationUser, int>(manager) { AllowOnlyAlphanumericUserNames = false, RequireUniqueEmail = true }; // Configure validation logic for passwords manager.PasswordValidator = new PasswordValidator { RequiredLength = 6, //RequireNonLetterOrDigit = true, //RequireDigit = true, //RequireLowercase = true, //RequireUppercase = true, }; manager.RegisterTwoFactorProvider("PhoneCode", new PhoneNumberTokenProvider<ApplicationUser, int> { MessageFormat = "Your security code is: {0}" }); manager.RegisterTwoFactorProvider("EmailCode", new EmailTokenProvider<ApplicationUser, int> { Subject = "Security Code", BodyFormat = "Your security code is: {0}" }); manager.EmailService = new EmailService(); manager.SmsService = new SmsService(); var dataProtectionProvider = options.DataProtectionProvider; if (dataProtectionProvider != null) { manager.UserTokenProvider = new DataProtectorTokenProvider<ApplicationUser, int> (dataProtectionProvider.Create("ASP.NET Identity")); } return manager; } }Here we replace <ApplicationUser> with <ApplicationUser,
int>
3. Startup.Auth.cs: Open this file from App_Start folder & change old code with new code.
Copy Code
//old code OnValidateIdentity = SecurityStampValidator.OnValidateIdentity<ApplicationUserManager, ApplicationUser>( validateInterval: TimeSpan.FromMinutes(30), regenerateIdentity: (manager, user) => user.GenerateUserIdentityAsync(manager))
Copy Code
//New code OnValidateIdentity = SecurityStampValidator.OnValidateIdentity<ApplicationUserManager, ApplicationUser, int> ( validateInterval: TimeSpan.FromMinutes(30), regenerateIdentityCallback: (manager, user) => user.GenerateUserIdentityAsync(manager), getUserIdCallback: (id) => (Int32.Parse(id.GetUserId())) )
Change account controller to work with new primary key
Our work is almost done. If you compile your code you get almost 16 errors & all are in AccountController.csfile. So we have to change thisfile to work with new system.
Open AccountController.cs & change all userId type from string to int.
Then replace allUser.Identity.GetUserId() with int.Parse(User.Identity.GetUserId()) except LinkLogin function.
Also LinkLoginCallback change to
Copy Code
//// GET: /Account/LinkLoginCallbackpublic async Task<ActionResult> LinkLoginCallback(){ var loginInfo = await AuthenticationManager.GetExternalLoginInfoAsync(XsrfKey, User.Identity.GetUserId()); if (loginInfo == null) { return RedirectToAction("Manage", new { Message = ManageMessageId.Error }); } IdentityResult result = await UserManager.AddLoginAsync(int.Parse(User.Identity.GetUserId()), loginInfo.Login); if (result.Succeeded) { return RedirectToAction("Manage"); } return RedirectToAction("Manage", new { Message = ManageMessageId.Error });}Running the Application
Now compile your project & if everything is fine then run it. Click register from navigation menu & add an user.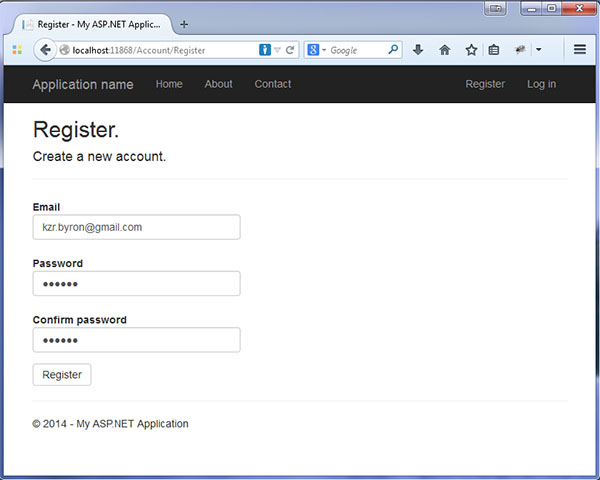
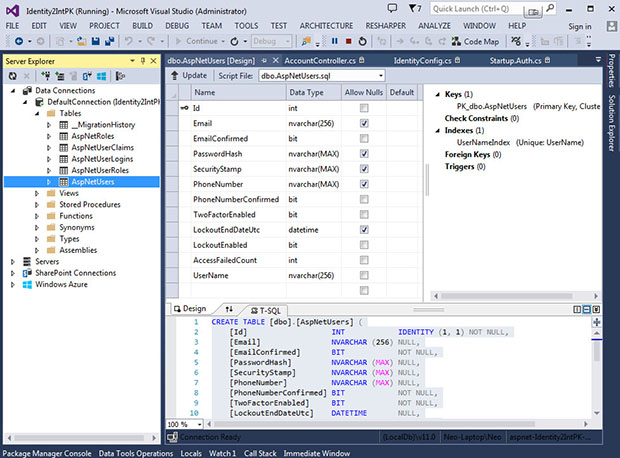
Entity framework will create a database for you with AspNet authorization tables. If you like to check what happened in database then open DefaultConnection from server explorer. right click on AspNetUsers table & select open
table definition, you will see id is now int instead of string.
Points of Interest
Identity 2 is great because it comes with a lot of useful things. But default identity system may not all time compatible with all application. That is why this article may helpful for those who want more extensibility.http://www.codeproject.com/Articles/777733/ASP-NET-Identity-Change-Primary-Key

相关文章推荐
- Upgrading from ASP.NET 1.1 to 2.0
- Beginning ASP.NET 2.0 in C# 2005: From Novice to Professional (Beginning: from Novice to Professiona
- Beginning ASP.NET 2.0 in VB 2005: From Novice to Professional
- Web Parts: From SharePoint to ASP.NET 2.0
- 小tips:asp.net 2.0中在gridview中使用DataFromatString
- 小tips:asp.net 2.0中在gridview中使用DataFromatString
- 小tips:asp.net 2.0中在gridview中使用DataFromatString
- Beginning ASP .NET 2.0 E-Commerce in C# 2005: From Novice to Professional
- 电子书下载:Beginning ASP.NET 2.0 Databases From Novice to Professional
- Beginning ASP.NET 2.0 Databases: From Novice to Professional
- Migrating an Existing Website from SQL Membership to ASP.NET Identity
- ASP.NET 2.0中在gridview中使用DataFromatString的小技巧
- Read ConnectionString from web.config in ASP.NET 2.0
- 小tips:asp.net 2.0中在gridview中使用DataFromatString
- ASP.NET 2.0 – 为什么替GridView的BoundField设定的DataFormatString没有效?
- How to make Apache run ASP.NET / ASP.NET 2.0 (转)
- HttpSecureCookie, A Way to Encrypt Cookies with ASP.NET 2.0
- 在Asp.Net 2.0中应用DataFormatString
- 在Asp.Net 2.0中应用DataFormatString
- 4 ways to send a PDF file to the IE Client in ASP.NET 2.0