Nginx+Keepalived+Tomcat之动静分离的web集群
2015-02-06 08:42
627 查看
为小公司提供大概一天持续在100万/日之间访问的高性能、高可用、高并发访问及动静分离的web集群方案
Nginx+Keepalived 高可用、反向代理
Nginx+PHP 高并发、动态解析
Tomcat JSP 动态解析
Apache 稳定的HTML静态访问
一、整体介绍:
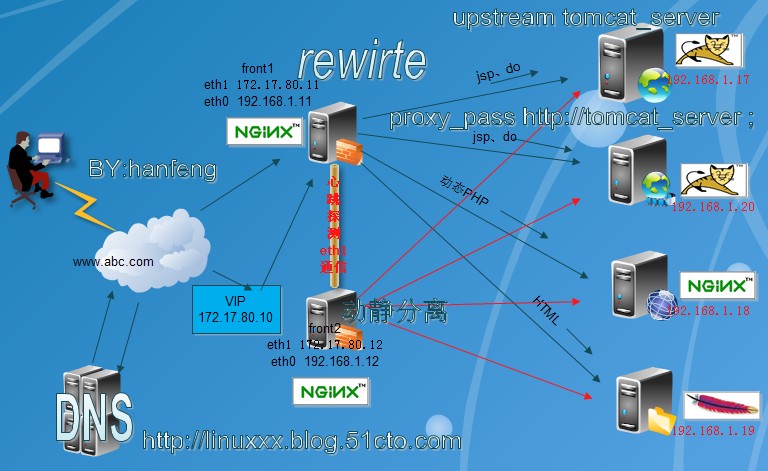
1.架构图
本文涉及的几个知识点:
①:Nginx ②:FastCGI ③:Keepalived ④:tomcat ⑤:LAMP ⑥:Squid ⑦:memcache //后两个目前不涉及
2.为什么要用 nginx
Nginx ("engine x") 是一个高性能的 HTTP 和 反向代理 服务器,也是一个 IMAP/POP3/SMTP 代理服务器 。 Nginx 是由 Igor Sysoev 为俄罗斯访问量第二的Rambler.ru 站点开发的,它已经在该站点运行超过四年多了。Igor 将源代码以类BSD许可证的形式发布。自Nginx 发布四年来,Nginx 已经因为它的稳定性、丰富的功能集、示例配置文件和低系统资源的消耗而闻名了。目前国内各大门户网站已经部署了Nginx,如新浪、网易、腾讯等;国内几个重要的视频分享网站也部署了Nginx,如六房间、酷6等。新近发现Nginx
技术在国内日趋火热,越来越多的网站开始部署Nginx。
3.Nginx 发布
当前开发版: Nginx 1.1.5 | Nginx/windows 1.1.5 (更新记录) (2011年10月6日)
当前稳定版: Nginx 1.0.8 | Nginx/windows 1.0.8 (更新记录) (2011年10月1日)
历史稳定版: Nginx 0.8.54 | Nginx/windows 0.8.55 (更新记录) (2011年7月19日)
历史稳定版: Nginx 0.7.69 | Nginx/windows 0.7.69 (更新记录) (2011年7月19日)
4.笔者谈Nginx
Nginx有低内存占用,高性能高并发访问,使得很多新平台的搭建、旧应用的迁移开始应用nginx,话说nginx不得不说张宴,就像谈LVS不得不说章文嵩一样;
张宴简历:
张宴,就职于北京金山软件公司,金山游戏官方网站──逍遥网系统架构师,技术支持部平台组组长。曾在新浪网、赶集网等公司任系统工程师、系统架构师,工作内容主要涉及:服务器系统架构设计与部署、系统运维与调优、网络故障解决、网站后端以及接口类PHP程序开发、Unix开源软件二次开发、服务器监控系统开发、系统运维与平台研发团队管理。
5.学习Nginx用书
一本《实战Nginx:取代Apache的高性能Web服务器》通俗易懂,不过有些读者看到后,即说起此书无非就是配置文件的讲解,我到反驳,道:nginx之所以这么强盛的应用,简单的配置文件和灵活的模块也是一大亮点,如果你能将部分模块应用好,那么你的web服务,将会在访问速度、服务器性能、硬件成本胜过了竞争对手;
二、Nginx软件应用部署
1.安装环境
采用 五台Centos 5.4 kernel:2.6.18-164.el5xen Server、一台XP sp3 Client
IP地址分配:
提供域名 www.abc.com
解析地址 VIP:172.17.80.10
front1 内网IP 192.168.1.11
front2 内网IP 192.168.1.12
WebServer集群:tomcat 192.168.1.17、20 nginx 192.168.1.18 apache 192.168.1.19
前端:Nginx 只做高可用和代理
后端:web集群有 nginx PHP 请求;tomcat 动态jsp .do文件;apache 静态html 等
析:nginx 静态访问比较好,apache+php作动态,此处只为说明LNMP架构的构建!
软件版本:
nginx: nginx-1.1.6.tar.gz // 下载:www.nginx.org
tomcat: apache-tomcat-7.0.21.tar.gz
JDK: jdk-1_5_0_16-linux-i586.bin
PHP: php-5.3.8.tar.gz //提供FastCGI
apache: httpd-2.2.3-31.el5 // yum install httpd php
2.安装部署 系统环境:
Centos 5.4 制作本地yum源
#mkdir /mnt/cdrom{1,2}
#mount /dev/cdrom /mnt/cdrom1
#cp -r /mnt/cdrom1/* /mnt/cdrom2
#cd /mnt/cdrom2
#rpm -ivh createrepo-0.4.11-3.el5.noarch.rpm
#createrepo -g /mnt/cdrom/repodata/repomd.xml /mnt/cdrom/CentOS/
#vi /etc/yum.repos.d/server.repo
[CentOS]
name=CentOS
baseurl=file:///mnt/cdrom/CentOS
gpgcheck=0
enable=1
#yum -y install gcc openssl-devel zlib-devel pcre-devel
#yum -y install gcc gcc-c++ autoconf automake //安装编译gcc环境
3.nginx的安装
#tar zxvf nginx-1.1.6.tar.gz
#cd nginx-1.1.6
#useradd -s /sbin/nologin -M nginx //添加nginx 用户,没有登录shell,没有家目录
#./configure \
--prefix=/usr/local/nginx \ //安装路径
--sbin-path=/usr/sbin/nginx \ //可执行文件路径
--conf-path=/etc/nginx/nginx.conf \ //默认为<prefix>/conf/nginx.conf 最好定义到/etc下
--pid-path=/var/run/nginx/nginx.pid \ //pid文件存放位置,后面将会用到
--error-log-path=/var/log/nginx/error.log \ //错误日志文件,默认为<prefix>/logs/error.log
--http-log-path=/var/log/nginx/access.log \ //访问日志,默认为<prefix>/logs/access.log
--lock-path=/var/lock/nginx.lock \
--user=nginx \
--group=nginx \
--with-http_stub_status_module \ //以取得一些nginx的运行状态
--with-http_ssl_module \ //支持https加密连接
--with-http_gzip_static_module \ //静态缓存模块
--with-http_realip_module \ //让Nginx透明获取客户端IP
--http-client-body-temp-path=/var/tmp/nginx/client/ \ //指定http客户端请求缓存文件存放目录
--http-proxy-temp-path=/var/tmp/nginx/proxy/ \ //指定http反向代理缓存文件存放目录
--http-fastcgi-temp-path=/var/tmp/nginx/fcgi/ //指定FastCGI缓存文件存放目录
#make && make install //安装nginx
4.编写SystemV风格的启动脚本
#vim /etc/init.d/nginxd
############################################
#!/bin/bash
#BY hanfeng
#datetime 20111031
. /etc/rc.d/init.d/functions
# Source networking configuration.
. /etc/sysconfig/network
# Check that networking is up.
[ "$NETWORKING" = "no" ] && exit 0
nginx="/usr/sbin/nginx"
prog=$(basename $nginx)
NGINX_CONF_FILE="/etc/nginx/nginx.conf"
[ -f /etc/sysconfig/nginx ] && . /etc/sysconfig/nginx
lockfile=/var/lock/subsys/nginx
make_dirs() {
# make required directories
user=`nginx -V 2>&1 | grep "configure arguments:" | sed 's/[^*]*--user=\([^ ]*\).*/\1/g' -`
options=`$nginx -V 2>&1 | grep 'configure arguments:'`
for opt in $options; do
if [ `echo $opt | grep '.*-temp-path'` ]; then
value=`echo $opt | cut -d "=" -f 2`
if [ ! -d "$value" ]; then
# echo "creating" $value
mkdir -p $value && chown -R $user $value
fi
fi
done
}
start() {
[ -x $nginx ] || exit 5
[ -f $NGINX_CONF_FILE ] || exit 6
make_dirs
echo -n $"Starting $prog: "
daemon $nginx -c $NGINX_CONF_FILE
retval=$?
echo
[ $retval -eq 0 ] && touch $lockfile
return $retval
}
stop() {
echo -n $"Stopping $prog: "
killproc $prog -QUIT
retval=$?
echo
[ $retval -eq 0 ] && rm -f $lockfile
return $retval
}
restart() {
configtest || return $?
stop
sleep 1
start
}
reload() {
configtest || return $?
echo -n $"Reloading $prog: "
killproc $nginx -HUP
RETVAL=$?
echo
}
force_reload() {
restart
}
configtest() {
$nginx -t -c $NGINX_CONF_FILE
}
rh_status() {
status $prog
}
rh_status_q() {
rh_status >/dev/null 2>&1
}
case "$1" in
start)
rh_status_q && exit 0
$1
;;
stop)
rh_status_q || exit 0
$1
;;
restart|configtest)
$1
;;
reload)
rh_status_q || exit 7
$1
;;
force-reload)
force_reload
;;
status)
rh_status
;;
condrestart|try-restart)
rh_status_q || exit 0
;;
*)
echo $"Usage: $0 {start|stop|status|restart|condrestart|try-restart|reload|force-reload|configtest}"
exit 2
esac
############################################
保存nginxd脚本,赋予执行权限,添加服务和开机启动
#chmod +x /etc/init.d/nginxd
#chkconfig --add nginxd
// 如果不支持,则添加一下2行即可
// # chkconfig: - 85 15 #为必须字符
// # description: nginx is a World Wide Web server. It is used to serve
#chkconfig --level 2345 nginxd on
#service nginxd start //先启动nginx 看看,没问题的话就OK了
Starting nginx: [ OK ]
5.在Client上访问front1上的nginx
http://172.17.80.11

6.将 front1上的nginx scp到front2上,并同样部署并在安装后将nginx.conf文件对拷
#scp nginx-1.1.6.tar.gz root@192.168.1.11:/root
#scp /etc/nginx/nginx.conf root@192.168.1.11:/etc/nginx/nginx.conf
三、nginx的动静分离和负载均衡
1.在front1 、front2 配置
A:动静分离说明:
有前置nginx 做反向代理,采用nginx的location做动静分离,将静态HTML网页、图片、JS、CSS等使用后端nginx或apache处理,以便得到更快的速度;将.jsp、.jspx、.do等交给后端tomcat来处理,
从而实现动静分离的应用;
B:负载均衡的说明:
此处采用nginx的proxy_pass将location做动静分离后的jsp、do等jsp程序文件分发到后端upstreamd模块中tomcat集群上,rewrite做正则分发,此时也将应用到nginx经典之处的IP哈希(ip_hash)模块,这样每个访客固定访问一个后端web服务器,可以解决session的问题;
2.分别在front1和front2上配置nginx动静分离和负载均衡
#vi /etc/nginx/nginx.conf
############################################
user nginx nginx;
worker_processes 4;
events {
worker_connections 1024;
}
http {
include mime.types;
default_type application/octet-stream;
sendfile on;
keepalive_timeout 65;
gzip on;
upstream tomcat_server {
# ip_hash;
server 192.168.1.17 weight=2;
server 192.168.1.20 max_fails=2 fail_timeout=30s;
}
upstream apache_server {
ip_hash;
server 192.168.1.19;
}
upstream nginx_server {
ip_hash;
server 192.168.1.18;
}
server
{
listen 80;
server_name www.abc.com;
location / {
index index.html index.php index.htm index.jsp index.do default.do;
root html;
if (-d $request_filename)
###############################################
{
rewrite ^/(.*)([^/])$ http://$host/$1$2/ permanent;
}
location ~ \.(jsp|jspx|do)?$ {
proxy_set_header Host %host;
proxy_set_header X-Forwarded-For $remote_addr;
proxy_pass http://tomcat_server;
}
###############################################
location ~ \.(php|php5)?$ {
proxy_set_header Host %host;
proxy_set_header X-Forwarded-For $remote_addr;
proxy_pass http://nginx_server;
}
#############################################
location ~ \.(html|htm)?$ {
proxy_set_header Host %host;
proxy_set_header X-Forwarded-For $remote_addr;
proxy_pass http://apache_server;
}
#############################################
location ~ .*\.(gif|jpg|jpeg|png|bmp|swf)$ {
expires 30d;
}
location ~ .*\.(js|css)?$ {
expires 1h;
}
#############################################
}
error_page 404 /404.html;
error_page 500 502 503 504 /50x.html;
location = /50x.html {
root html;
}
}
}
############################################
3.重启nginx服务
#service nginxd restart
Shutting down interface eth0: [ OK ]
Shutting down interface eth1: [ OK ]
Shutting down loopback interface: [ OK ]
Bringing up loopback interface: [ OK ]
Bringing up interface eth0: [ OK ]
Bringing up interface eth1: [ OK ]
四、接下来配置高可用组建keepalived
1.为什么使用keepalived
软件官网:http://www.keepalived.org
软件获得:#wget http://www.keepalived.org/software/keepalived-1.2.2.tar.gz
keepalived是一个类似于layer3, 4 & 5交换机制的软件,也就是我们平时说的第3层、第4层和第5层交换。Keepalived的作用是检测web服务器的状态,如果有一台web服务器死机,或工作出现故障,
Keepalived将检测到,并将有故障的web服务器从系统中剔除,当web服务器工作正常后Keepalived自动将web服务器加入到服务器群中,这些工作全部自动完成,不需要人工干涉,需要人工做的只是修复故障的web服务器。
keepalived和heartbeat的广泛应用足以说明了两者估计是因为本质不同而已!
2.分别在front1和front2部署keepalived需要却分主从关系
#vim /etc/hosts //修改front1 和front2 的hosts文件,保证文件信息相同
172.17.80.11 front1.ha.com front1
172.17.80.12 front2.ha.com front2
3.编译安装keepalived
#tar zxvf keepalived-1.2.2.tar.gz
#cd keepalived-1.2.2
#./configure --prefix=/usr/local/keepalived
#make && make install
4.修改Keepalived配置文件
#mkdir /etc/keepalived
#cp /usr/local/keepalived/etc/keepalived/keepalived.conf /etc/keepalived/keepalived.conf
#cp /usr/local/keepalived/etc/rc.d/init.d/keepalived /etc/init.d/
#cp /usr/local/keepalived/etc/sysconfig/keepalived /etc/sysconfig/
#cp /usr/local/keepalived/sbin/keepalived /usr/sbin/
#chkconfig --level 2345 keepalived on
############################################
@front1上的keepalived.conf
#vim /etc/keepalived/keepalived.conf
! Configuration File for keepalived
global_defs {
notification_email {
hanfeng@qq.com
}
notification_email_from hanfeng@qq.com
smtp_server 127.0.0.1
smtp_connect_timeout 30
router_id LVS_DEVEL
}
vrrp_instance VI_1 {
state MASTER
interface eth1
virtual_router_id 51
mcast_src_ip 192.168.1.11
priority 200
advert_int 1
authentication {
auth_type PASS
auth_pass 1111
}
virtual_ipaddress {
172.17.80.10
}
}
############################################
@front2上的keepalived.conf
! Configuration File for keepalived
global_defs {
notification_email {
sysadmin@firewall.loc
}
notification_email_from Alexandre.Cassen@firewall.loc
smtp_server 127.0.0.1
smtp_connect_timeout 30
router_id LVS_DEVEL
}
vrrp_instance VI_1 {
state BACKUP
interface eth1
virtual_router_id 51
mcast_src_ip 192.168.1.12
priority 100
advert_int 1
authentication {
auth_type PASS
auth_pass 1111
}
virtual_ipaddress {
172.17.80.10
}
}
############################################
#service keepalived start //启动keepalived,如果没有错误高可用到此配置完成
五、重量级web集群资源
1.安装WebServer之Nginx+PHP
配置服务器IP为:192.168.1.18
在nginx的基础上安装FastCGIのPHP 使其支持动态PHP请求
说明:此处为 yum install mysql-devel mysql-server php-mysql perl-DBD-MySQL libxml2-devel libart_lgpl libart_lgpl-devel 简单安装mysql
安装后的PHP为nginx提供php-fpm
①:libevent 事件触发网络库
libevent-2.0.15-stable.tar.gz
#tar zxvf libevent-2.0.15-stable.tar.gz
#cd libevent-2.0.15-stable
#./configure && make && make install
②:libiconv字符编码转换
libconv-1.13.1.tar.gz
#tar zxvf libconv-1.13.1.tar.gz
#cd libconv-1.13.1
#./configure && make && make install
③:FastCGIのPHP
php-5.3.8.tar.gz
#tar zxvf php-5.3.8.tar.gz
#cd php-5.3.8
#./configure --prefix=/usr/local/php --with-mysql=/usr/local/mysql --with-mysqli=/usr/local/mysql/bin/mysql_config --with-openssl --enable-fpm --with-libevent-dir=/usr/local/lib --
enable-mbstring --with-freetype-dir --with-jpeg-dir --with-png-dir --with-zlib --with-libxml-dir=/usr --enable-xml --with-iconv-dir=/usr/local
@ 你将会看到:Thank you for using PHP
@error while loading shared libraries: libiconv.so.2: cannot open shared object file: No such file or directory
#ln -s /usr/local/lib/libiconv.so.2 /usr/lib/libiconv.so.2 //做个连接防止make时缺少libiconv.so.2
#ln -s /usr/local/lib/libiconv.so.2 /usr/local/libiconv.so.2
#make ZEND_EXTRA_LIBS='-liconv'
@说明:make的时候加参数ZEND_EXTRA_LIBS='-liconv'是因为编译时需要iconv库, 但是configure的时候没有写到Makefile中, 还有一种方法是直接修改Makefile, 在链接库的地方(应该在100行左右)加
上-liconv;或者sed -i 's#-lz -lm -lxml2 -lz -lm -lxml2 -lz -lm -lcrypt#& -liconv#' Makefile;
@久等之后将会看到:Build complete. Don't forget to run 'make test'. 不等test了,直接make install 安装
#make install
#cp php-5.3.8/php.ini-production /usr/local/php/etc/php.ini
④接下来配置PHP及其他文件
#cp /usr/local/php/etc/php-fpm.conf.default /usr/local/php/etc/php-fpm.conf
#vi /usr/local/php/etc/php-fpm.conf
@开启以下几项
pm.max_children = 50
pm.start_servers = 20
pm.min_spare_servers = 5
pm.max_spare_servers = 35
⑤在后台启动 php-fpm,并ps查看进程运行情况
#/usr/local/php/sbin/php-fpm &
#ps -ef |grep php-fpm
@将其添加到开机自动启动
#echo "/usr/local/php/sbin/php-fpm &" >> /etc/rc.d/rc.local
⑥.接下来在nginx中配置fastcgi_params 文件
#vi /etc/nginx/fastcgi.conf
@将里面内容替换为
fastcgi_param GATEWAY_INTERFACE CGI/1.1;
fastcgi_param SERVER_SOFTWARE nginx;
fastcgi_param QUERY_STRING $query_string;
fastcgi_param REQUEST_METHOD $request_method;
fastcgi_param CONTENT_TYPE $content_type;
fastcgi_param CONTENT_LENGTH $content_length;
fastcgi_param SCRIPT_FILENAME $document_root$fastcgi_script_name;
fastcgi_param SCRIPT_NAME $fastcgi_script_name;
fastcgi_param REQUEST_URI $request_uri;
fastcgi_param DOCUMENT_URI $document_uri;
fastcgi_param DOCUMENT_ROOT $document_root;
fastcgi_param SERVER_PROTOCOL $server_protocol;
fastcgi_param REMOTE_ADDR $remote_addr;
fastcgi_param REMOTE_PORT $remote_port;
fastcgi_param SERVER_ADDR $server_addr;
fastcgi_param SERVER_PORT $server_port;
fastcgi_param SERVER_NAME $server_name;
# PHP only, required if PHP was built with --enable-force-cgi-redirect
fastcgi_param REDIRECT_STATUS 200;
#vi /etc/ngnix/nginx.conf
#####
location ~ \.php$ {
root /www;
fastcgi_pass 127.0.0.1:9000;
fastcgi_index index.php;
fastcgi_param SCRIPT_FILENAME /scripts$fastcgi_script_name;
include fastcgi_params;
}
#####
location / {
root /html;
index index.php index.html index.htm;
}
##################################
#vi /usr/local/nginx/index.php
<?php
$link=mysql_connect("localhost","root","123456");
if(!$link) echo "FAILD!";
else echo "OK!";
phpinfo();
?>
#service nginxd restart
@优化linux内核参数:
#vi /etc/sysctl.conf // 增加一下内容,并是修改生效
net.ipv4.tcp_max_syn_backlog = 65536
net.core.netdev_max_backlog = 32768
net.core.somaxconn = 32768
net.core.wmem_default = 8388608
net.core.rmem_default = 8388608
net.core.rmem_max = 16777216
net.core.wmem_max = 16777216
net.ipv4.tcp_timestamps = 0
net.ipv4.tcp_synack_retries = 2
net.ipv4.tcp_syn_retries = 2
net.ipv4.tcp_tw_recycle = 1
net.ipv4.tcp_tw.reuse = 1
net.ipv4.tcp_mem = 94500000 915000000 927000000
net.ipv4.tcp_max_orphans = 3276800
net.ipv4.ip_local_port_range = 1024 65535
#sysctl -p //使其及时生效
##################################
问题处理:phpinfo 页面date的解析显示乱码!
Warning: phpinfo() [function.phpinfo]:。。。。。。。。。
We selected 'Asia/Chongqing' for 'CST/8.0/no DST' instead in /usr/local/nginx/html/index.php on line 8
解析:以下是三种方法(任选一种都行):
a、在页头使用date_default_timezone_set()设置 date_default_timezone_set('PRC'); //东八时区 echo date('Y-m-d H:i:s');
b、在页头使用 ini_set('date.timezone','Asia/Shanghai');
c、修改php.ini。打开php.ini查找date.timezone 去掉前面的分号修改成为:date.timezone =PRC
重启http服务(如apache2或iis等)即可。
XXX可以任意正确的值。在我国内:Asia/Chongqing ,Asia/Shanghai ,Asia/Urumqi (依次为重庆,上海,乌鲁木齐)港台地区可用:Asia/Macao ,Asia/Hong_Kong ,Asia/Taipei (依次为澳门,香港,台北),新加坡:Asia/Singapore,PRC可以。
===================================
2.安装WebServer之tomcat+JDK 使其支持动态jsp程序和.do文件
配置服务器IP地址为:192.168.1.17/20
①:JDK的安装和部署
#chmod +x jdk-1_5_0_16-linux-i586.bin
#./jdk-1_5_0_16-linux-i586.bin
#mv jdk1.5.0_16 /usr/local/jdk1.5.0_16
#vi .bash_profile //修改环境变量文件,增加一下内容
JAVA_HOME="/usr/local/jdk1.5.0_16"
CLASS_PATH="$JAVA_HOME/bin"
CATALINA_HOME="/usr/local/tomcat-6.0.18"
export JAVA_HOME CATALINA_HOME
#source .bash_profile //使修改的环境变量生效
#tar zxvf apache-tomcat-6.0.18.tar.gz
#mv apache-tomcat-6.0.18 /usr/local/tomcat-6.0.18
#cd /usr/local/tomcat-6.0.18/bin
#./startup.sh
#ps -ef |grep java //启动tomcat,如果JDK版本支持且环境变量正确的话,此时你的tomcat已经成功了!
3.安装WebServer之Apache 使其能够很好提供HTML等静态访问请求!
说明:此处的Apache 作为WebServer 只要yum 安装即可!你也可以编译安装并且组成LAMP架构!笔者不多说了。。。
六、测试。。。
测试环境准备
1.将测试域名www.abc.com解析到前置机front1、front2的虚拟(virtual)IP上!
在XP客户端使用浏览器http://www.abc.com/index.*测试首页测试
2.测试要求
测试页面分别针对前置机nginx的动静分离和到tomcat上负载均衡
3.分别在对应的WebServer 上制作测试页面,并用不同IE在客户端测试
①:index.html
This is a html test page, the server address is 192.168.1.19
②:index.php
This is a php test page, the server address is 192.168.1.18
③:index.jsp 和index.do 只做测试页面,不做具体动态程序
This is a jsp test page, the server address is 192.168.1.17/20
This is a do test page, the server address is 192.168.1.17/20
4.测试故障
此时在客户机上ping www.abc.com -t 并将front1 的eth1 给ifdown掉!观察至丢失了一个数据包即恢复了域名到服务器的访问!
5.在linux 使用ab命令,对前置front1、front2做简单的压力测试!
#ab -c 1000 -n 100000 http://www.abc.com/index.*测试页
至此一篇基于nginx的高可用、高性能、高并发访问的动静分离的web集群方案出炉!谢谢查阅
提供技术支持,hanfeng#qq.com //请将#改为@
本文出自 “寒枫” 博客,请务必保留此出处/article/4332390.html
Nginx+Keepalived 高可用、反向代理
Nginx+PHP 高并发、动态解析
Tomcat JSP 动态解析
Apache 稳定的HTML静态访问
一、整体介绍:
1.架构图
本文涉及的几个知识点:
①:Nginx ②:FastCGI ③:Keepalived ④:tomcat ⑤:LAMP ⑥:Squid ⑦:memcache //后两个目前不涉及
2.为什么要用 nginx
Nginx ("engine x") 是一个高性能的 HTTP 和 反向代理 服务器,也是一个 IMAP/POP3/SMTP 代理服务器 。 Nginx 是由 Igor Sysoev 为俄罗斯访问量第二的Rambler.ru 站点开发的,它已经在该站点运行超过四年多了。Igor 将源代码以类BSD许可证的形式发布。自Nginx 发布四年来,Nginx 已经因为它的稳定性、丰富的功能集、示例配置文件和低系统资源的消耗而闻名了。目前国内各大门户网站已经部署了Nginx,如新浪、网易、腾讯等;国内几个重要的视频分享网站也部署了Nginx,如六房间、酷6等。新近发现Nginx
技术在国内日趋火热,越来越多的网站开始部署Nginx。
3.Nginx 发布
当前开发版: Nginx 1.1.5 | Nginx/windows 1.1.5 (更新记录) (2011年10月6日)
当前稳定版: Nginx 1.0.8 | Nginx/windows 1.0.8 (更新记录) (2011年10月1日)
历史稳定版: Nginx 0.8.54 | Nginx/windows 0.8.55 (更新记录) (2011年7月19日)
历史稳定版: Nginx 0.7.69 | Nginx/windows 0.7.69 (更新记录) (2011年7月19日)
4.笔者谈Nginx
Nginx有低内存占用,高性能高并发访问,使得很多新平台的搭建、旧应用的迁移开始应用nginx,话说nginx不得不说张宴,就像谈LVS不得不说章文嵩一样;
张宴简历:
张宴,就职于北京金山软件公司,金山游戏官方网站──逍遥网系统架构师,技术支持部平台组组长。曾在新浪网、赶集网等公司任系统工程师、系统架构师,工作内容主要涉及:服务器系统架构设计与部署、系统运维与调优、网络故障解决、网站后端以及接口类PHP程序开发、Unix开源软件二次开发、服务器监控系统开发、系统运维与平台研发团队管理。
5.学习Nginx用书
一本《实战Nginx:取代Apache的高性能Web服务器》通俗易懂,不过有些读者看到后,即说起此书无非就是配置文件的讲解,我到反驳,道:nginx之所以这么强盛的应用,简单的配置文件和灵活的模块也是一大亮点,如果你能将部分模块应用好,那么你的web服务,将会在访问速度、服务器性能、硬件成本胜过了竞争对手;
二、Nginx软件应用部署
1.安装环境
采用 五台Centos 5.4 kernel:2.6.18-164.el5xen Server、一台XP sp3 Client
IP地址分配:
提供域名 www.abc.com
解析地址 VIP:172.17.80.10
front1 内网IP 192.168.1.11
front2 内网IP 192.168.1.12
WebServer集群:tomcat 192.168.1.17、20 nginx 192.168.1.18 apache 192.168.1.19
前端:Nginx 只做高可用和代理
后端:web集群有 nginx PHP 请求;tomcat 动态jsp .do文件;apache 静态html 等
析:nginx 静态访问比较好,apache+php作动态,此处只为说明LNMP架构的构建!
软件版本:
nginx: nginx-1.1.6.tar.gz // 下载:www.nginx.org
tomcat: apache-tomcat-7.0.21.tar.gz
JDK: jdk-1_5_0_16-linux-i586.bin
PHP: php-5.3.8.tar.gz //提供FastCGI
apache: httpd-2.2.3-31.el5 // yum install httpd php
2.安装部署 系统环境:
Centos 5.4 制作本地yum源
#mkdir /mnt/cdrom{1,2}
#mount /dev/cdrom /mnt/cdrom1
#cp -r /mnt/cdrom1/* /mnt/cdrom2
#cd /mnt/cdrom2
#rpm -ivh createrepo-0.4.11-3.el5.noarch.rpm
#createrepo -g /mnt/cdrom/repodata/repomd.xml /mnt/cdrom/CentOS/
#vi /etc/yum.repos.d/server.repo
[CentOS]
name=CentOS
baseurl=file:///mnt/cdrom/CentOS
gpgcheck=0
enable=1
#yum -y install gcc openssl-devel zlib-devel pcre-devel
#yum -y install gcc gcc-c++ autoconf automake //安装编译gcc环境
3.nginx的安装
#tar zxvf nginx-1.1.6.tar.gz
#cd nginx-1.1.6
#useradd -s /sbin/nologin -M nginx //添加nginx 用户,没有登录shell,没有家目录
#./configure \
--prefix=/usr/local/nginx \ //安装路径
--sbin-path=/usr/sbin/nginx \ //可执行文件路径
--conf-path=/etc/nginx/nginx.conf \ //默认为<prefix>/conf/nginx.conf 最好定义到/etc下
--pid-path=/var/run/nginx/nginx.pid \ //pid文件存放位置,后面将会用到
--error-log-path=/var/log/nginx/error.log \ //错误日志文件,默认为<prefix>/logs/error.log
--http-log-path=/var/log/nginx/access.log \ //访问日志,默认为<prefix>/logs/access.log
--lock-path=/var/lock/nginx.lock \
--user=nginx \
--group=nginx \
--with-http_stub_status_module \ //以取得一些nginx的运行状态
--with-http_ssl_module \ //支持https加密连接
--with-http_gzip_static_module \ //静态缓存模块
--with-http_realip_module \ //让Nginx透明获取客户端IP
--http-client-body-temp-path=/var/tmp/nginx/client/ \ //指定http客户端请求缓存文件存放目录
--http-proxy-temp-path=/var/tmp/nginx/proxy/ \ //指定http反向代理缓存文件存放目录
--http-fastcgi-temp-path=/var/tmp/nginx/fcgi/ //指定FastCGI缓存文件存放目录
#make && make install //安装nginx
4.编写SystemV风格的启动脚本
#vim /etc/init.d/nginxd
############################################
#!/bin/bash
#BY hanfeng
#datetime 20111031
. /etc/rc.d/init.d/functions
# Source networking configuration.
. /etc/sysconfig/network
# Check that networking is up.
[ "$NETWORKING" = "no" ] && exit 0
nginx="/usr/sbin/nginx"
prog=$(basename $nginx)
NGINX_CONF_FILE="/etc/nginx/nginx.conf"
[ -f /etc/sysconfig/nginx ] && . /etc/sysconfig/nginx
lockfile=/var/lock/subsys/nginx
make_dirs() {
# make required directories
user=`nginx -V 2>&1 | grep "configure arguments:" | sed 's/[^*]*--user=\([^ ]*\).*/\1/g' -`
options=`$nginx -V 2>&1 | grep 'configure arguments:'`
for opt in $options; do
if [ `echo $opt | grep '.*-temp-path'` ]; then
value=`echo $opt | cut -d "=" -f 2`
if [ ! -d "$value" ]; then
# echo "creating" $value
mkdir -p $value && chown -R $user $value
fi
fi
done
}
start() {
[ -x $nginx ] || exit 5
[ -f $NGINX_CONF_FILE ] || exit 6
make_dirs
echo -n $"Starting $prog: "
daemon $nginx -c $NGINX_CONF_FILE
retval=$?
echo
[ $retval -eq 0 ] && touch $lockfile
return $retval
}
stop() {
echo -n $"Stopping $prog: "
killproc $prog -QUIT
retval=$?
echo
[ $retval -eq 0 ] && rm -f $lockfile
return $retval
}
restart() {
configtest || return $?
stop
sleep 1
start
}
reload() {
configtest || return $?
echo -n $"Reloading $prog: "
killproc $nginx -HUP
RETVAL=$?
echo
}
force_reload() {
restart
}
configtest() {
$nginx -t -c $NGINX_CONF_FILE
}
rh_status() {
status $prog
}
rh_status_q() {
rh_status >/dev/null 2>&1
}
case "$1" in
start)
rh_status_q && exit 0
$1
;;
stop)
rh_status_q || exit 0
$1
;;
restart|configtest)
$1
;;
reload)
rh_status_q || exit 7
$1
;;
force-reload)
force_reload
;;
status)
rh_status
;;
condrestart|try-restart)
rh_status_q || exit 0
;;
*)
echo $"Usage: $0 {start|stop|status|restart|condrestart|try-restart|reload|force-reload|configtest}"
exit 2
esac
############################################
保存nginxd脚本,赋予执行权限,添加服务和开机启动
#chmod +x /etc/init.d/nginxd
#chkconfig --add nginxd
// 如果不支持,则添加一下2行即可
// # chkconfig: - 85 15 #为必须字符
// # description: nginx is a World Wide Web server. It is used to serve
#chkconfig --level 2345 nginxd on
#service nginxd start //先启动nginx 看看,没问题的话就OK了
Starting nginx: [ OK ]
5.在Client上访问front1上的nginx
http://172.17.80.11
6.将 front1上的nginx scp到front2上,并同样部署并在安装后将nginx.conf文件对拷
#scp nginx-1.1.6.tar.gz root@192.168.1.11:/root
#scp /etc/nginx/nginx.conf root@192.168.1.11:/etc/nginx/nginx.conf
三、nginx的动静分离和负载均衡
1.在front1 、front2 配置
A:动静分离说明:
有前置nginx 做反向代理,采用nginx的location做动静分离,将静态HTML网页、图片、JS、CSS等使用后端nginx或apache处理,以便得到更快的速度;将.jsp、.jspx、.do等交给后端tomcat来处理,
从而实现动静分离的应用;
B:负载均衡的说明:
此处采用nginx的proxy_pass将location做动静分离后的jsp、do等jsp程序文件分发到后端upstreamd模块中tomcat集群上,rewrite做正则分发,此时也将应用到nginx经典之处的IP哈希(ip_hash)模块,这样每个访客固定访问一个后端web服务器,可以解决session的问题;
2.分别在front1和front2上配置nginx动静分离和负载均衡
#vi /etc/nginx/nginx.conf
############################################
user nginx nginx;
worker_processes 4;
events {
worker_connections 1024;
}
http {
include mime.types;
default_type application/octet-stream;
sendfile on;
keepalive_timeout 65;
gzip on;
upstream tomcat_server {
# ip_hash;
server 192.168.1.17 weight=2;
server 192.168.1.20 max_fails=2 fail_timeout=30s;
}
upstream apache_server {
ip_hash;
server 192.168.1.19;
}
upstream nginx_server {
ip_hash;
server 192.168.1.18;
}
server
{
listen 80;
server_name www.abc.com;
location / {
index index.html index.php index.htm index.jsp index.do default.do;
root html;
if (-d $request_filename)
###############################################
{
rewrite ^/(.*)([^/])$ http://$host/$1$2/ permanent;
}
location ~ \.(jsp|jspx|do)?$ {
proxy_set_header Host %host;
proxy_set_header X-Forwarded-For $remote_addr;
proxy_pass http://tomcat_server;
}
###############################################
location ~ \.(php|php5)?$ {
proxy_set_header Host %host;
proxy_set_header X-Forwarded-For $remote_addr;
proxy_pass http://nginx_server;
}
#############################################
location ~ \.(html|htm)?$ {
proxy_set_header Host %host;
proxy_set_header X-Forwarded-For $remote_addr;
proxy_pass http://apache_server;
}
#############################################
location ~ .*\.(gif|jpg|jpeg|png|bmp|swf)$ {
expires 30d;
}
location ~ .*\.(js|css)?$ {
expires 1h;
}
#############################################
}
error_page 404 /404.html;
error_page 500 502 503 504 /50x.html;
location = /50x.html {
root html;
}
}
}
############################################
3.重启nginx服务
#service nginxd restart
Shutting down interface eth0: [ OK ]
Shutting down interface eth1: [ OK ]
Shutting down loopback interface: [ OK ]
Bringing up loopback interface: [ OK ]
Bringing up interface eth0: [ OK ]
Bringing up interface eth1: [ OK ]
四、接下来配置高可用组建keepalived
1.为什么使用keepalived
软件官网:http://www.keepalived.org
软件获得:#wget http://www.keepalived.org/software/keepalived-1.2.2.tar.gz
keepalived是一个类似于layer3, 4 & 5交换机制的软件,也就是我们平时说的第3层、第4层和第5层交换。Keepalived的作用是检测web服务器的状态,如果有一台web服务器死机,或工作出现故障,
Keepalived将检测到,并将有故障的web服务器从系统中剔除,当web服务器工作正常后Keepalived自动将web服务器加入到服务器群中,这些工作全部自动完成,不需要人工干涉,需要人工做的只是修复故障的web服务器。
keepalived和heartbeat的广泛应用足以说明了两者估计是因为本质不同而已!
2.分别在front1和front2部署keepalived需要却分主从关系
#vim /etc/hosts //修改front1 和front2 的hosts文件,保证文件信息相同
172.17.80.11 front1.ha.com front1
172.17.80.12 front2.ha.com front2
3.编译安装keepalived
#tar zxvf keepalived-1.2.2.tar.gz
#cd keepalived-1.2.2
#./configure --prefix=/usr/local/keepalived
#make && make install
4.修改Keepalived配置文件
#mkdir /etc/keepalived
#cp /usr/local/keepalived/etc/keepalived/keepalived.conf /etc/keepalived/keepalived.conf
#cp /usr/local/keepalived/etc/rc.d/init.d/keepalived /etc/init.d/
#cp /usr/local/keepalived/etc/sysconfig/keepalived /etc/sysconfig/
#cp /usr/local/keepalived/sbin/keepalived /usr/sbin/
#chkconfig --level 2345 keepalived on
############################################
@front1上的keepalived.conf
#vim /etc/keepalived/keepalived.conf
! Configuration File for keepalived
global_defs {
notification_email {
hanfeng@qq.com
}
notification_email_from hanfeng@qq.com
smtp_server 127.0.0.1
smtp_connect_timeout 30
router_id LVS_DEVEL
}
vrrp_instance VI_1 {
state MASTER
interface eth1
virtual_router_id 51
mcast_src_ip 192.168.1.11
priority 200
advert_int 1
authentication {
auth_type PASS
auth_pass 1111
}
virtual_ipaddress {
172.17.80.10
}
}
############################################
@front2上的keepalived.conf
! Configuration File for keepalived
global_defs {
notification_email {
sysadmin@firewall.loc
}
notification_email_from Alexandre.Cassen@firewall.loc
smtp_server 127.0.0.1
smtp_connect_timeout 30
router_id LVS_DEVEL
}
vrrp_instance VI_1 {
state BACKUP
interface eth1
virtual_router_id 51
mcast_src_ip 192.168.1.12
priority 100
advert_int 1
authentication {
auth_type PASS
auth_pass 1111
}
virtual_ipaddress {
172.17.80.10
}
}
############################################
#service keepalived start //启动keepalived,如果没有错误高可用到此配置完成
五、重量级web集群资源
1.安装WebServer之Nginx+PHP
配置服务器IP为:192.168.1.18
在nginx的基础上安装FastCGIのPHP 使其支持动态PHP请求
说明:此处为 yum install mysql-devel mysql-server php-mysql perl-DBD-MySQL libxml2-devel libart_lgpl libart_lgpl-devel 简单安装mysql
安装后的PHP为nginx提供php-fpm
①:libevent 事件触发网络库
libevent-2.0.15-stable.tar.gz
#tar zxvf libevent-2.0.15-stable.tar.gz
#cd libevent-2.0.15-stable
#./configure && make && make install
②:libiconv字符编码转换
libconv-1.13.1.tar.gz
#tar zxvf libconv-1.13.1.tar.gz
#cd libconv-1.13.1
#./configure && make && make install
③:FastCGIのPHP
php-5.3.8.tar.gz
#tar zxvf php-5.3.8.tar.gz
#cd php-5.3.8
#./configure --prefix=/usr/local/php --with-mysql=/usr/local/mysql --with-mysqli=/usr/local/mysql/bin/mysql_config --with-openssl --enable-fpm --with-libevent-dir=/usr/local/lib --
enable-mbstring --with-freetype-dir --with-jpeg-dir --with-png-dir --with-zlib --with-libxml-dir=/usr --enable-xml --with-iconv-dir=/usr/local
@ 你将会看到:Thank you for using PHP
@error while loading shared libraries: libiconv.so.2: cannot open shared object file: No such file or directory
#ln -s /usr/local/lib/libiconv.so.2 /usr/lib/libiconv.so.2 //做个连接防止make时缺少libiconv.so.2
#ln -s /usr/local/lib/libiconv.so.2 /usr/local/libiconv.so.2
#make ZEND_EXTRA_LIBS='-liconv'
@说明:make的时候加参数ZEND_EXTRA_LIBS='-liconv'是因为编译时需要iconv库, 但是configure的时候没有写到Makefile中, 还有一种方法是直接修改Makefile, 在链接库的地方(应该在100行左右)加
上-liconv;或者sed -i 's#-lz -lm -lxml2 -lz -lm -lxml2 -lz -lm -lcrypt#& -liconv#' Makefile;
@久等之后将会看到:Build complete. Don't forget to run 'make test'. 不等test了,直接make install 安装
#make install
#cp php-5.3.8/php.ini-production /usr/local/php/etc/php.ini
④接下来配置PHP及其他文件
#cp /usr/local/php/etc/php-fpm.conf.default /usr/local/php/etc/php-fpm.conf
#vi /usr/local/php/etc/php-fpm.conf
@开启以下几项
pm.max_children = 50
pm.start_servers = 20
pm.min_spare_servers = 5
pm.max_spare_servers = 35
⑤在后台启动 php-fpm,并ps查看进程运行情况
#/usr/local/php/sbin/php-fpm &
#ps -ef |grep php-fpm
@将其添加到开机自动启动
#echo "/usr/local/php/sbin/php-fpm &" >> /etc/rc.d/rc.local
⑥.接下来在nginx中配置fastcgi_params 文件
#vi /etc/nginx/fastcgi.conf
@将里面内容替换为
fastcgi_param GATEWAY_INTERFACE CGI/1.1;
fastcgi_param SERVER_SOFTWARE nginx;
fastcgi_param QUERY_STRING $query_string;
fastcgi_param REQUEST_METHOD $request_method;
fastcgi_param CONTENT_TYPE $content_type;
fastcgi_param CONTENT_LENGTH $content_length;
fastcgi_param SCRIPT_FILENAME $document_root$fastcgi_script_name;
fastcgi_param SCRIPT_NAME $fastcgi_script_name;
fastcgi_param REQUEST_URI $request_uri;
fastcgi_param DOCUMENT_URI $document_uri;
fastcgi_param DOCUMENT_ROOT $document_root;
fastcgi_param SERVER_PROTOCOL $server_protocol;
fastcgi_param REMOTE_ADDR $remote_addr;
fastcgi_param REMOTE_PORT $remote_port;
fastcgi_param SERVER_ADDR $server_addr;
fastcgi_param SERVER_PORT $server_port;
fastcgi_param SERVER_NAME $server_name;
# PHP only, required if PHP was built with --enable-force-cgi-redirect
fastcgi_param REDIRECT_STATUS 200;
#vi /etc/ngnix/nginx.conf
#####
location ~ \.php$ {
root /www;
fastcgi_pass 127.0.0.1:9000;
fastcgi_index index.php;
fastcgi_param SCRIPT_FILENAME /scripts$fastcgi_script_name;
include fastcgi_params;
}
#####
location / {
root /html;
index index.php index.html index.htm;
}
##################################
#vi /usr/local/nginx/index.php
<?php
$link=mysql_connect("localhost","root","123456");
if(!$link) echo "FAILD!";
else echo "OK!";
phpinfo();
?>
#service nginxd restart
@优化linux内核参数:
#vi /etc/sysctl.conf // 增加一下内容,并是修改生效
net.ipv4.tcp_max_syn_backlog = 65536
net.core.netdev_max_backlog = 32768
net.core.somaxconn = 32768
net.core.wmem_default = 8388608
net.core.rmem_default = 8388608
net.core.rmem_max = 16777216
net.core.wmem_max = 16777216
net.ipv4.tcp_timestamps = 0
net.ipv4.tcp_synack_retries = 2
net.ipv4.tcp_syn_retries = 2
net.ipv4.tcp_tw_recycle = 1
net.ipv4.tcp_tw.reuse = 1
net.ipv4.tcp_mem = 94500000 915000000 927000000
net.ipv4.tcp_max_orphans = 3276800
net.ipv4.ip_local_port_range = 1024 65535
#sysctl -p //使其及时生效
##################################
问题处理:phpinfo 页面date的解析显示乱码!
Warning: phpinfo() [function.phpinfo]:。。。。。。。。。
We selected 'Asia/Chongqing' for 'CST/8.0/no DST' instead in /usr/local/nginx/html/index.php on line 8
解析:以下是三种方法(任选一种都行):
a、在页头使用date_default_timezone_set()设置 date_default_timezone_set('PRC'); //东八时区 echo date('Y-m-d H:i:s');
b、在页头使用 ini_set('date.timezone','Asia/Shanghai');
c、修改php.ini。打开php.ini查找date.timezone 去掉前面的分号修改成为:date.timezone =PRC
重启http服务(如apache2或iis等)即可。
XXX可以任意正确的值。在我国内:Asia/Chongqing ,Asia/Shanghai ,Asia/Urumqi (依次为重庆,上海,乌鲁木齐)港台地区可用:Asia/Macao ,Asia/Hong_Kong ,Asia/Taipei (依次为澳门,香港,台北),新加坡:Asia/Singapore,PRC可以。
===================================
2.安装WebServer之tomcat+JDK 使其支持动态jsp程序和.do文件
配置服务器IP地址为:192.168.1.17/20
①:JDK的安装和部署
#chmod +x jdk-1_5_0_16-linux-i586.bin
#./jdk-1_5_0_16-linux-i586.bin
#mv jdk1.5.0_16 /usr/local/jdk1.5.0_16
#vi .bash_profile //修改环境变量文件,增加一下内容
JAVA_HOME="/usr/local/jdk1.5.0_16"
CLASS_PATH="$JAVA_HOME/bin"
CATALINA_HOME="/usr/local/tomcat-6.0.18"
export JAVA_HOME CATALINA_HOME
#source .bash_profile //使修改的环境变量生效
#tar zxvf apache-tomcat-6.0.18.tar.gz
#mv apache-tomcat-6.0.18 /usr/local/tomcat-6.0.18
#cd /usr/local/tomcat-6.0.18/bin
#./startup.sh
#ps -ef |grep java //启动tomcat,如果JDK版本支持且环境变量正确的话,此时你的tomcat已经成功了!
3.安装WebServer之Apache 使其能够很好提供HTML等静态访问请求!
说明:此处的Apache 作为WebServer 只要yum 安装即可!你也可以编译安装并且组成LAMP架构!笔者不多说了。。。
六、测试。。。
测试环境准备
1.将测试域名www.abc.com解析到前置机front1、front2的虚拟(virtual)IP上!
在XP客户端使用浏览器http://www.abc.com/index.*测试首页测试
2.测试要求
测试页面分别针对前置机nginx的动静分离和到tomcat上负载均衡
3.分别在对应的WebServer 上制作测试页面,并用不同IE在客户端测试
①:index.html
This is a html test page, the server address is 192.168.1.19
②:index.php
This is a php test page, the server address is 192.168.1.18
③:index.jsp 和index.do 只做测试页面,不做具体动态程序
This is a jsp test page, the server address is 192.168.1.17/20
This is a do test page, the server address is 192.168.1.17/20
4.测试故障
此时在客户机上ping www.abc.com -t 并将front1 的eth1 给ifdown掉!观察至丢失了一个数据包即恢复了域名到服务器的访问!
5.在linux 使用ab命令,对前置front1、front2做简单的压力测试!
#ab -c 1000 -n 100000 http://www.abc.com/index.*测试页
至此一篇基于nginx的高可用、高性能、高并发访问的动静分离的web集群方案出炉!谢谢查阅
提供技术支持,hanfeng#qq.com //请将#改为@
本文出自 “寒枫” 博客,请务必保留此出处/article/4332390.html

相关文章推荐
- Nginx+Keepalived+Tomcat之动静分离的web集群
- Nginx+Keepalived+Tomcat之动静分离的web集群
- Nginx+Keepalived+Tomcat之动静分离的web集群
- Nginx+Keepalived+Tomcat之动静分离的web集群
- Nginx+Keepalived+Tomcat之动静分离的web集群
- 【Linux运维-集群技术进阶】Nginx+Tomcat实现动静分离、负载均衡
- Tomcat(三) Tomcat安装配置:Tomcat+Nginx+keepalived 实现动静分离、Session会话保持的高可用集群
- Nginx+Tomcat实现负载均衡动静分离集群
- nginx反向代理tomcat集群实现动静分离
- Nginx+Tomcat+Keepalived+Memcache 负载均衡动静分离技术
- Nginx+Tomcat+Keepalived+Memcache 负载均衡动静分离技术
- keepalived+nginx+tomcat搭建高性能web服务器集群
- Tomcat(三) Tomcat安装配置: Tomcat+Nginx+keepalived 实现动静分离、Session会话保持的高可用集群
- 高性能Web服务之Nginx+Tomcat实现负债均衡反向代理及动静分离
- Apache+tomcat实现负载均衡集群和session共享、tengine+tomcat实现web动静分离
- nginx+keepalived+tomcat配置高可用web集群
- nginx+ tomcat集群+动静资源分离
- nginx反向代理tomcat集群实现动静分离
- keepalived+haproxy 实现对web的动静分离和负载均衡