openssl建立私有CA的过程
2015-01-30 15:05
357 查看
openssl建立私有CA: 1.生成密钥; 2.自签署证书;
通信节点: 1.生成密钥对儿; 2.生成证书签署请求; 3.把请求发送给CA;
CA: 1.验证请求者信息; 2.签署证书 3.把签好的证书发送给请求者;
简单通信结构图
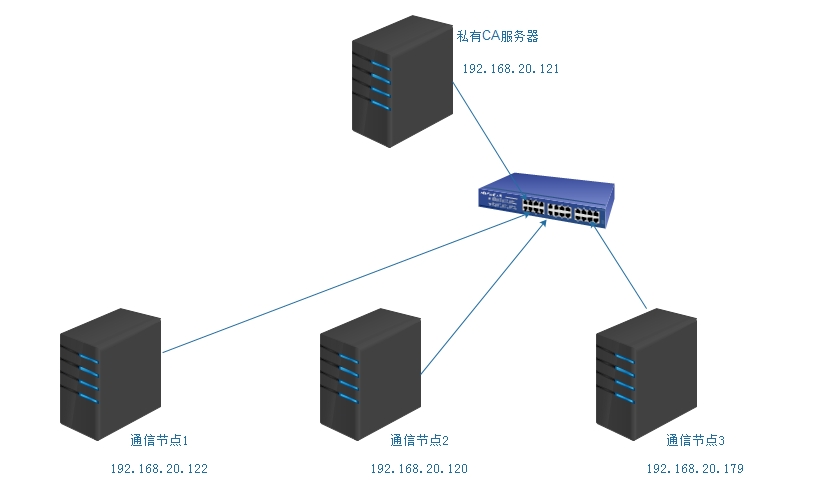
在系统上的/etc/pki/CA目录下有存放CA的相关信息文件 [root@kvm ~]# ls /etc/pki/CA/
certs/ crl/ newcerts/ private/
openssl默认是安装了的,查看openssl安装后生成的配置文件: [root@kvm ~]# rpm -qc openssl
/etc/pki/tls/openssl.cnf 查看配置文件的手册
[root@kvm ~]# man openssl.cnf 下面是部分openssl配置文件内容####################################################################
[ ca ]
default_ca = CA_default # The default ca section
####################################################################
[ CA_default ]
dir = /etc/pki/CA # Where everything is kept
certs = $dir/certs # Where the issued certs are kept
crl_dir = $dir/crl # Where the issued crl are kept
database = $dir/index.txt # database index file.
#unique_subject = no # Set to 'no' to allow creation of
# several ctificates with same subject.
new_certs_dir = $dir/newcerts # default place for new certs.
certificate = $dir/cacert.pem # The CA certificate
serial = $dir/serial # The current serial number
crlnumber = $dir/crlnumber # the current crl number
# must be commented out to leave a V1 CRL
crl = $dir/crl.pem # The current CRL
private_key = $dir/private/cakey.pem # The private key
RANDFILE = $dir/private/.rand # private random number file
x509_extensions = usr_cert # The extentions to add to the cert
# Comment out the following two lines for the "traditional"
# (and highly broken) format.
name_opt = ca_default # Subject Name options
cert_opt = ca_default # Certificate field options
# Extension copying option: use with caution.
# copy_extensions = copy
# Extensions to add to a CRL. Note: Netscape communicator chokes on V2 CRLs
# so this is commented out by default to leave a V1 CRL.
# crlnumber must also be commented out to leave a V1 CRL.
# crl_extensions = crl_ext
default_days = 365 # how long to certify for
default_crl_days= 30 # how long before next CRL
default_md = default # use public key default MD
preserve = no # keep passed DN ordering
# A few difference way of specifying how similar the request should look
# For type CA, the listed attributes must be the same, and the optional
# and supplied fields are just that :-)
policy = policy_match
# For the CA policy
[ policy_match ]
countryName = match
stateOrProvinceName = match
organizationName = match
organizationalUnitName = optional
commonName = supplied
emailAddress = optional
# For the 'anything' policy
# At this point in time, you must list all acceptable 'object'
# types.
[ policy_anything ]
countryName = optional
stateOrProvinceName = optional
localityName = optional
organizationName = optional
organizationalUnitName = optional
commonName = supplied
emailAddress = optional
####################################################################
[ req ]
default_bits = 2048
default_md = sha1
default_keyfile = privkey.pem
distinguished_name = req_distinguished_name
attributes = req_attributes
x509_extensions = v3_ca # The extentions to add to the self signed cert
# Passwords for private keys if not present they will be prompted for
# input_password = secret
# output_password = secret
# This sets a mask for permitted string types. There are several options.
# default: PrintableString, T61String, BMPString.
# pkix : PrintableString, BMPString (PKIX recommendation before 2004)
# utf8only: only UTF8Strings (PKIX recommendation after 2004).
# nombstr : PrintableString, T61String (no BMPStrings or UTF8Strings).
# MASK:XXXX a literal mask value.
# WARNING: ancient versions of Netscape crash on BMPStrings or UTF8Strings.
string_mask = utf8only
# req_extensions = v3_req # The extensions to add to a certificate request
[ req_distinguished_name ]
countryName = Country Name (2 letter code)
countryName_default = XX
countryName_min = 2
countryName_max = 2
stateOrProvinceName = State or Province Name (full name)
#stateOrProvinceName_default = Default Province
localityName = Locality Name (eg, city)
localityName_default = Default City
0.organizationName = Organization Name (eg, company)
0.organizationName_default = Default Company Ltd
# we can do this but it is not needed normally :-)
#1.organizationName = Second Organization Name (eg, company)
#1.organizationName_default = World Wide Web Pty Ltd
organizationalUnitName = Organizational Unit Name (eg, section)
#organizationalUnitName_default =
commonName = Common Name (eg, your name or your server\'s hostname)
commonName_max = 64
emailAddress = Email Address
emailAddress_max = 64
# SET-ex3 = SET extension number 3
[ req_attributes ]
challengePassword = A challenge password
challengePassword_min = 4
challengePassword_max = 20
unstructuredName = An optional company name
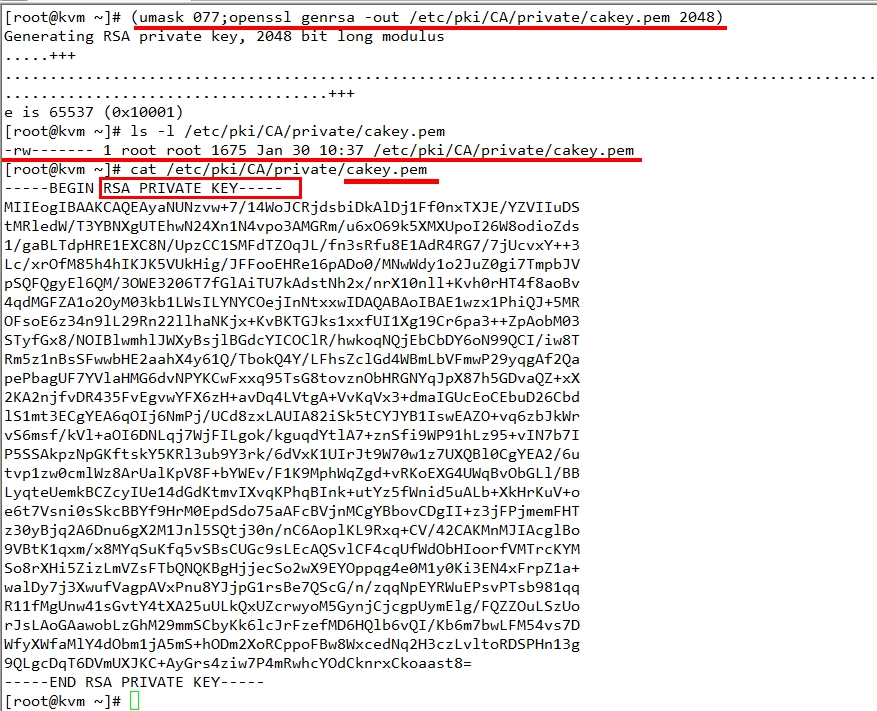
一、建立CA服务器: 1.生成密钥 # (umask 077; openssl genrsa -out /etc/pki/CA/private/cakey.pem 2048)
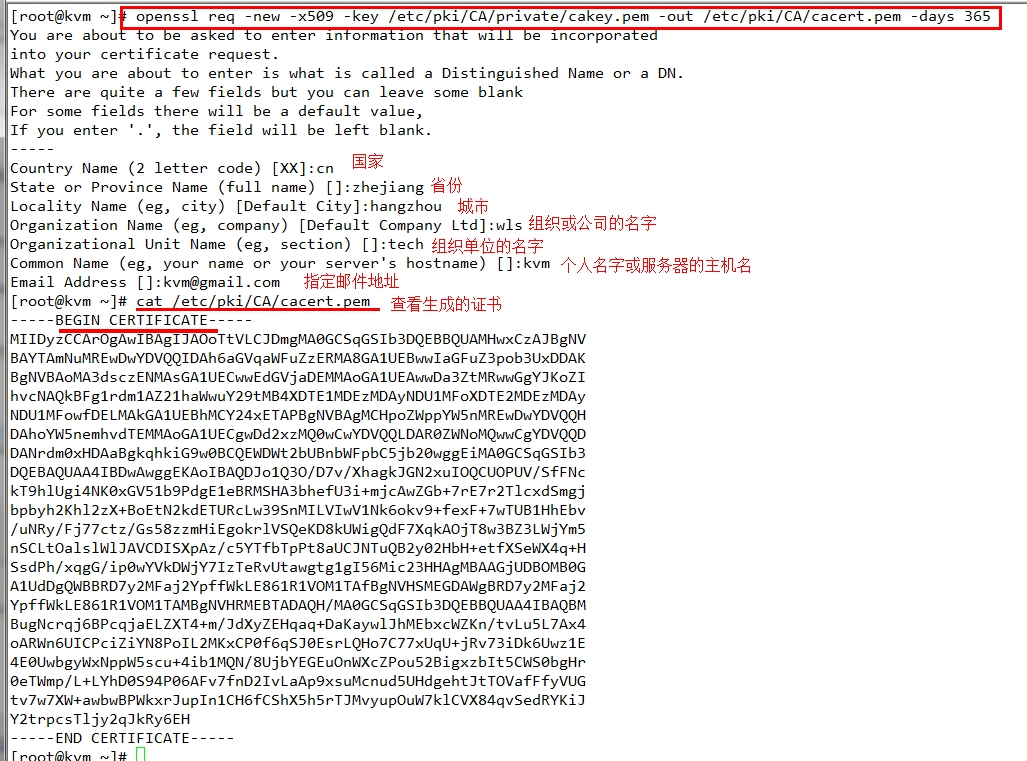
2.自签署证书 # openssl req -new -x509 -key /etc/pki/CA/private/cakey.pem -out /etc/pki/CA/cacert.pem -days 3655
req: 生成证书签署请求
-news: 生成新请求
-key /path/to/keyfile: 指定私钥文件
-out /path/to/somefile: 指定证书文件
-x509: 生成自签署证书
-days n: 有效天数
3.初始化工作环境 # touch /etc/pki/CA/{index.txt,serial} index.txt 是数据库索引文件 serial 序列号文件,指定序列号从哪里开始,配置文件中有说明
# echo 01 > /etc/pki/CA/serial

二、通信节点申请证书: (一)节点生成请求
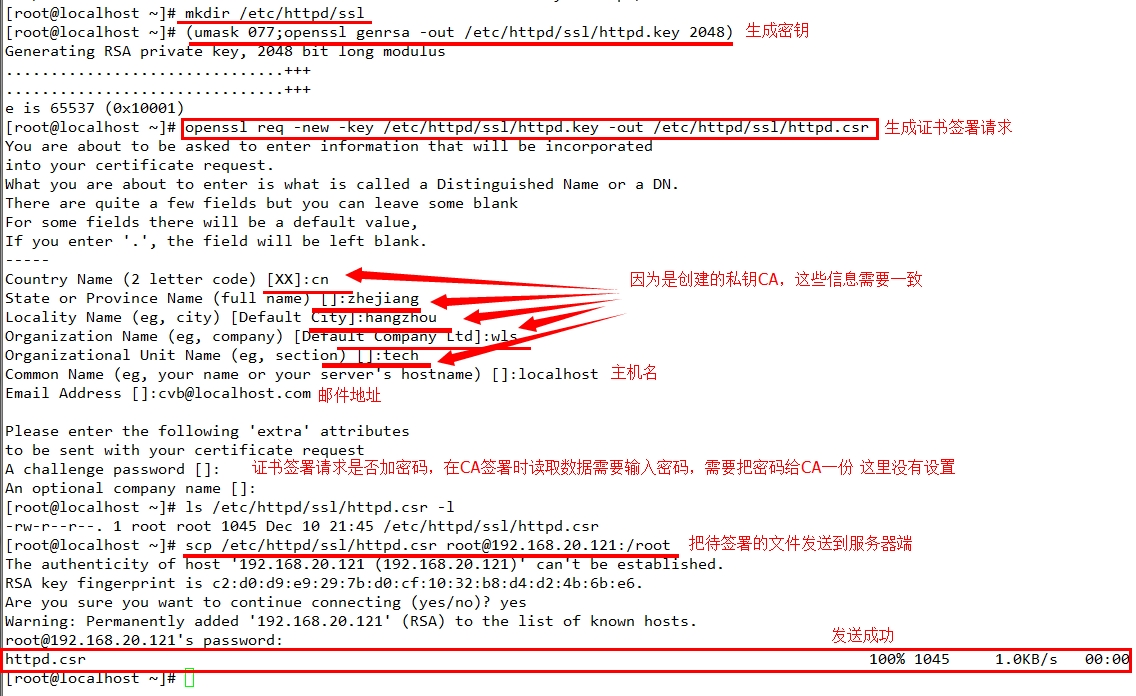
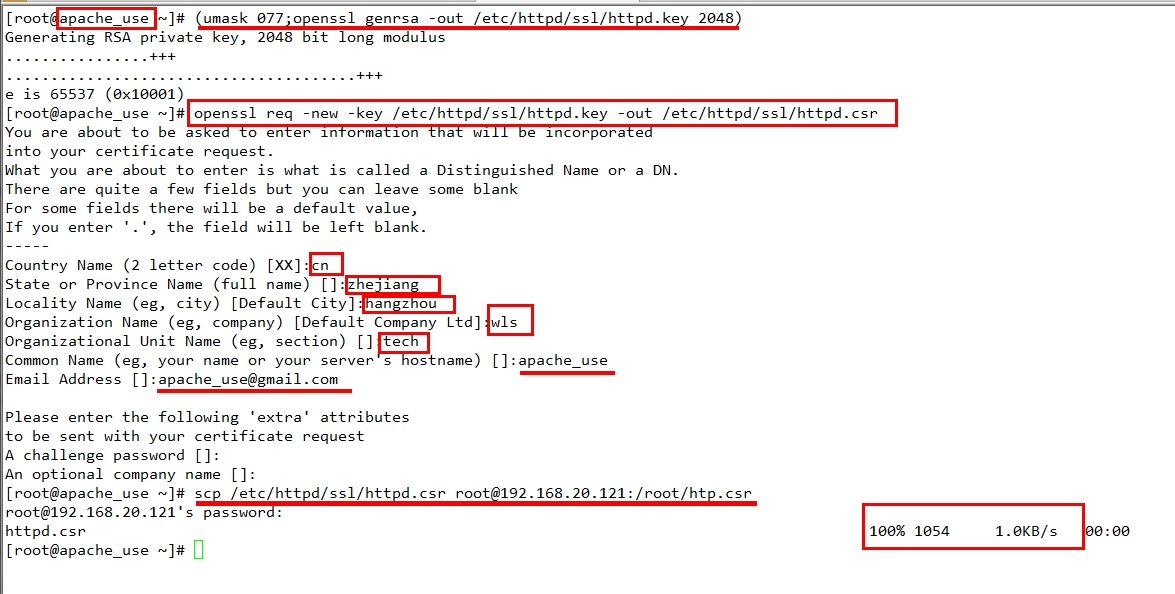
1、生成密钥对 #(umask 077;openssl genrsa -out /etc/httpd/ssl/httpd.key 2048)
2、生成证书签署请求 #openssl req -new -key /etc/httpd/ssl/httpd.key -out /etc/httpd/ssl/httpd.csr
3、把签署请求文件发送给CA服务器
#scp /etc/httpd/ssl/httpd.csr root@ipaddr:/path/to/file
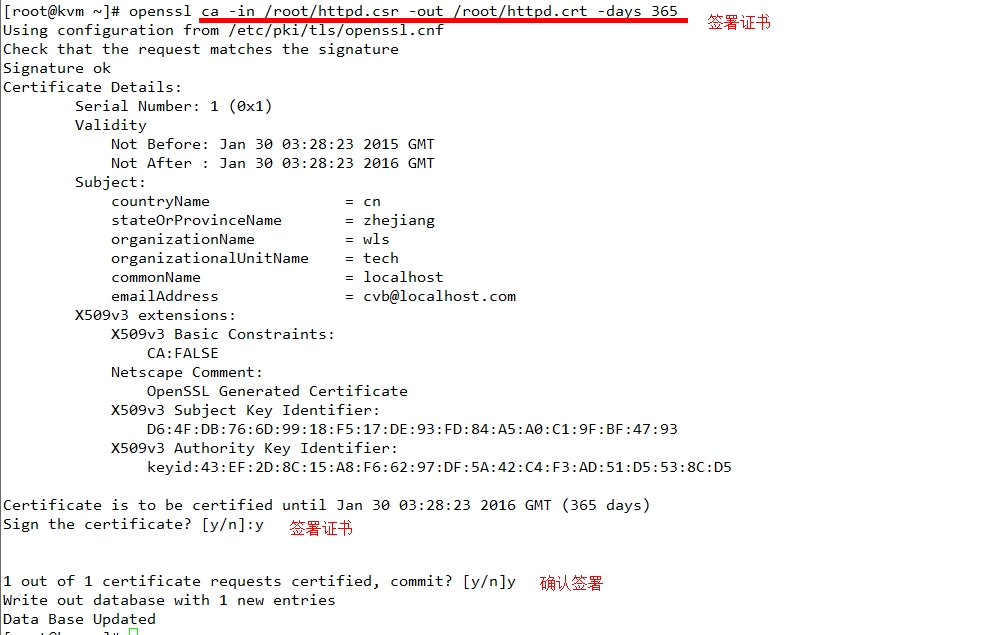
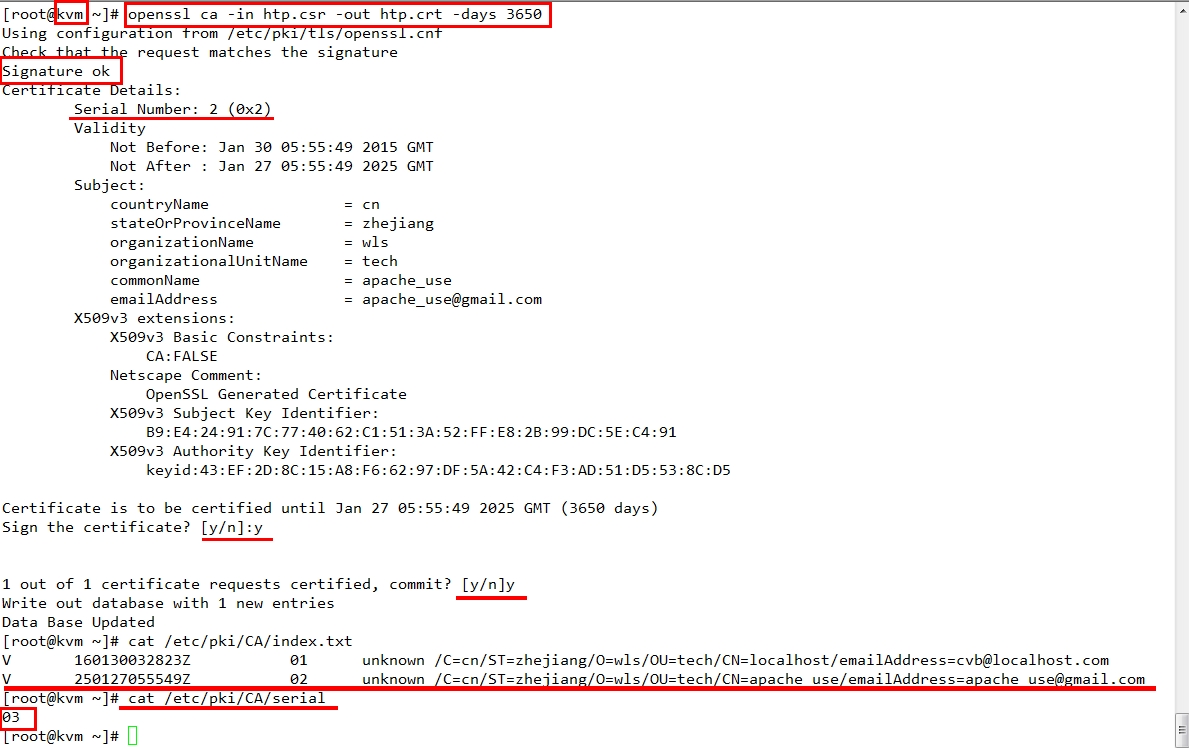
(二)CA签署证书 1、验证证书中的信息; 2、签署证书; #openssl ca -in /path/to/somefile.csr -out /path/to/somefile.crt -days N 3、发送签署证书给请求者 scp /path/to/file root@ipaddr:/path/to/file
[root@kvm ~]# cat /etc/pki/CA/serial 文件内数据没有成功定向到,刚修改过了,用echo 01 > /etc/pki/CA/serial
01

再用同样的方法添加192.168.20.120实现认证
三、吊销证书 当主机的私钥丢失时,预防别人拿着证书做破坏,就需要把其证书置为无效。
(一)节点 1、获取证书serial #openssl x509 -in /path/to/certificate_file.crt -noout -serial -subject x509 - Certificate display and signing utility 证书和签名工具显示 -noout
this option prevents output of the encoded version of the request. 这个选项可以防止输出编码版本的请求 -serial
outputs the certificate serial number. 输出证书序列号 -subject
outputs the subject name. 输出主题名称


(二)CA 2、根据节点提交的serial和subject信息来验证与index.txt文件中的信息是否一致; 一致,则回收证书

3、吊销证书 #openssl ca -revoke /etc/pki/CA/newcerts/SERIAL.pem -revoke filename
a filename containing a certificate to revoke. 证书文件内容吊销


4.生成吊销证书的编号(如果是第一次吊销) #echo 00 > /etc/pki/CA/crlnumber
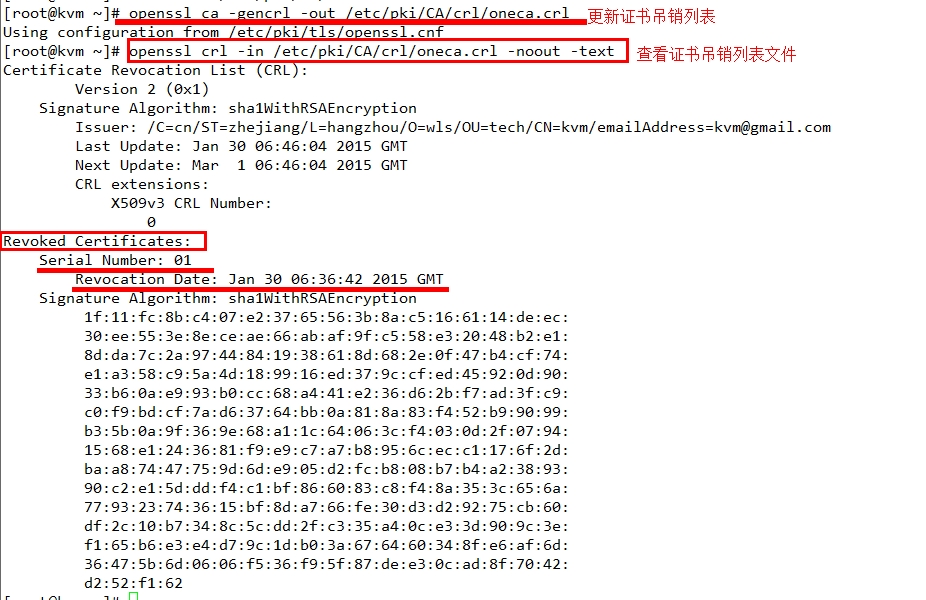
[root@kvm ~]# echo 00 > /etc/pki/CA/crlnumber 5.更新证书吊销列表 #openssl ca -gencrl -out thisca.crl(可以自己取名) -gencrl
this option generates a CRL based on information in the index file. 该选项生成CRL基于索引文件中的信息。 如果需要查看crl文件的内容(真正使用时,crl是pem的格式,火狐浏览器(支持der格式)是不支持这种格 式的):CA端把证书吊销列表文件生成以后,用一种服务把其共享出来,使用者就可以经常更新这个文件到本地,导入到浏览器中浏览器验证时会自动识别证书是否被吊销。 #openssl crl -in /path/to/crlfile.crl -noout -text
-text
print out the CRL in text form.
以文本格式输出CRL。
本文出自 “快乐就好” 博客,请务必保留此出处http://wdllife.blog.51cto.com/6615958/1610000
通信节点: 1.生成密钥对儿; 2.生成证书签署请求; 3.把请求发送给CA;
CA: 1.验证请求者信息; 2.签署证书 3.把签好的证书发送给请求者;
简单通信结构图
在系统上的/etc/pki/CA目录下有存放CA的相关信息文件 [root@kvm ~]# ls /etc/pki/CA/
certs/ crl/ newcerts/ private/
openssl默认是安装了的,查看openssl安装后生成的配置文件: [root@kvm ~]# rpm -qc openssl
/etc/pki/tls/openssl.cnf 查看配置文件的手册
[root@kvm ~]# man openssl.cnf 下面是部分openssl配置文件内容####################################################################
[ ca ]
default_ca = CA_default # The default ca section
####################################################################
[ CA_default ]
dir = /etc/pki/CA # Where everything is kept
certs = $dir/certs # Where the issued certs are kept
crl_dir = $dir/crl # Where the issued crl are kept
database = $dir/index.txt # database index file.
#unique_subject = no # Set to 'no' to allow creation of
# several ctificates with same subject.
new_certs_dir = $dir/newcerts # default place for new certs.
certificate = $dir/cacert.pem # The CA certificate
serial = $dir/serial # The current serial number
crlnumber = $dir/crlnumber # the current crl number
# must be commented out to leave a V1 CRL
crl = $dir/crl.pem # The current CRL
private_key = $dir/private/cakey.pem # The private key
RANDFILE = $dir/private/.rand # private random number file
x509_extensions = usr_cert # The extentions to add to the cert
# Comment out the following two lines for the "traditional"
# (and highly broken) format.
name_opt = ca_default # Subject Name options
cert_opt = ca_default # Certificate field options
# Extension copying option: use with caution.
# copy_extensions = copy
# Extensions to add to a CRL. Note: Netscape communicator chokes on V2 CRLs
# so this is commented out by default to leave a V1 CRL.
# crlnumber must also be commented out to leave a V1 CRL.
# crl_extensions = crl_ext
default_days = 365 # how long to certify for
default_crl_days= 30 # how long before next CRL
default_md = default # use public key default MD
preserve = no # keep passed DN ordering
# A few difference way of specifying how similar the request should look
# For type CA, the listed attributes must be the same, and the optional
# and supplied fields are just that :-)
policy = policy_match
# For the CA policy
[ policy_match ]
countryName = match
stateOrProvinceName = match
organizationName = match
organizationalUnitName = optional
commonName = supplied
emailAddress = optional
# For the 'anything' policy
# At this point in time, you must list all acceptable 'object'
# types.
[ policy_anything ]
countryName = optional
stateOrProvinceName = optional
localityName = optional
organizationName = optional
organizationalUnitName = optional
commonName = supplied
emailAddress = optional
####################################################################
[ req ]
default_bits = 2048
default_md = sha1
default_keyfile = privkey.pem
distinguished_name = req_distinguished_name
attributes = req_attributes
x509_extensions = v3_ca # The extentions to add to the self signed cert
# Passwords for private keys if not present they will be prompted for
# input_password = secret
# output_password = secret
# This sets a mask for permitted string types. There are several options.
# default: PrintableString, T61String, BMPString.
# pkix : PrintableString, BMPString (PKIX recommendation before 2004)
# utf8only: only UTF8Strings (PKIX recommendation after 2004).
# nombstr : PrintableString, T61String (no BMPStrings or UTF8Strings).
# MASK:XXXX a literal mask value.
# WARNING: ancient versions of Netscape crash on BMPStrings or UTF8Strings.
string_mask = utf8only
# req_extensions = v3_req # The extensions to add to a certificate request
[ req_distinguished_name ]
countryName = Country Name (2 letter code)
countryName_default = XX
countryName_min = 2
countryName_max = 2
stateOrProvinceName = State or Province Name (full name)
#stateOrProvinceName_default = Default Province
localityName = Locality Name (eg, city)
localityName_default = Default City
0.organizationName = Organization Name (eg, company)
0.organizationName_default = Default Company Ltd
# we can do this but it is not needed normally :-)
#1.organizationName = Second Organization Name (eg, company)
#1.organizationName_default = World Wide Web Pty Ltd
organizationalUnitName = Organizational Unit Name (eg, section)
#organizationalUnitName_default =
commonName = Common Name (eg, your name or your server\'s hostname)
commonName_max = 64
emailAddress = Email Address
emailAddress_max = 64
# SET-ex3 = SET extension number 3
[ req_attributes ]
challengePassword = A challenge password
challengePassword_min = 4
challengePassword_max = 20
unstructuredName = An optional company name
一、建立CA服务器: 1.生成密钥 # (umask 077; openssl genrsa -out /etc/pki/CA/private/cakey.pem 2048)
2.自签署证书 # openssl req -new -x509 -key /etc/pki/CA/private/cakey.pem -out /etc/pki/CA/cacert.pem -days 3655
req: 生成证书签署请求
-news: 生成新请求
-key /path/to/keyfile: 指定私钥文件
-out /path/to/somefile: 指定证书文件
-x509: 生成自签署证书
-days n: 有效天数
3.初始化工作环境 # touch /etc/pki/CA/{index.txt,serial} index.txt 是数据库索引文件 serial 序列号文件,指定序列号从哪里开始,配置文件中有说明
# echo 01 > /etc/pki/CA/serial
二、通信节点申请证书: (一)节点生成请求
1、生成密钥对 #(umask 077;openssl genrsa -out /etc/httpd/ssl/httpd.key 2048)
2、生成证书签署请求 #openssl req -new -key /etc/httpd/ssl/httpd.key -out /etc/httpd/ssl/httpd.csr
3、把签署请求文件发送给CA服务器
#scp /etc/httpd/ssl/httpd.csr root@ipaddr:/path/to/file
(二)CA签署证书 1、验证证书中的信息; 2、签署证书; #openssl ca -in /path/to/somefile.csr -out /path/to/somefile.crt -days N 3、发送签署证书给请求者 scp /path/to/file root@ipaddr:/path/to/file
[root@kvm ~]# cat /etc/pki/CA/serial 文件内数据没有成功定向到,刚修改过了,用echo 01 > /etc/pki/CA/serial
01
再用同样的方法添加192.168.20.120实现认证
三、吊销证书 当主机的私钥丢失时,预防别人拿着证书做破坏,就需要把其证书置为无效。
(一)节点 1、获取证书serial #openssl x509 -in /path/to/certificate_file.crt -noout -serial -subject x509 - Certificate display and signing utility 证书和签名工具显示 -noout
this option prevents output of the encoded version of the request. 这个选项可以防止输出编码版本的请求 -serial
outputs the certificate serial number. 输出证书序列号 -subject
outputs the subject name. 输出主题名称
(二)CA 2、根据节点提交的serial和subject信息来验证与index.txt文件中的信息是否一致; 一致,则回收证书
3、吊销证书 #openssl ca -revoke /etc/pki/CA/newcerts/SERIAL.pem -revoke filename
a filename containing a certificate to revoke. 证书文件内容吊销
4.生成吊销证书的编号(如果是第一次吊销) #echo 00 > /etc/pki/CA/crlnumber
[root@kvm ~]# echo 00 > /etc/pki/CA/crlnumber 5.更新证书吊销列表 #openssl ca -gencrl -out thisca.crl(可以自己取名) -gencrl
this option generates a CRL based on information in the index file. 该选项生成CRL基于索引文件中的信息。 如果需要查看crl文件的内容(真正使用时,crl是pem的格式,火狐浏览器(支持der格式)是不支持这种格 式的):CA端把证书吊销列表文件生成以后,用一种服务把其共享出来,使用者就可以经常更新这个文件到本地,导入到浏览器中浏览器验证时会自动识别证书是否被吊销。 #openssl crl -in /path/to/crlfile.crl -noout -text
-text
print out the CRL in text form.
以文本格式输出CRL。
本文出自 “快乐就好” 博客,请务必保留此出处http://wdllife.blog.51cto.com/6615958/1610000

相关文章推荐
- 加密、解密,以及OpenSSL建立私有CA
- 用Openssl建立私有CA并颁发证书
- openssl原理的初步理解与私有CA服务器的建立
- 使用OpenSSL建立根CA及自签名证书制作过程 [转载]
- 用Openssl建立私有CA并颁发证书
- openssl建立私有CA
- Openssl、加密、解密和私有CA的实现过程 推荐
- 加密、解密以及OpenSSL建立私有CA
- 加密、解密,以及OpenSSL建立私有CA
- openssl生成私有CA过程
- 加密、解密 以及OpenSSL建立私有CA
- 加密解密与OPENSSL建立私有CA
- 用Openssl建立私有CA并颁发证书
- linux网络数据传输的加密,解密以及基于openssl的私有CA的建立
- 基于ssl协议和openssl工具建立私有CA
- 使用OpenSSL建立根CA及自签名证书制作过程
- 加密,解密,以及openssl建立私有ca
- openssl建立私有CA
- openssl加解密原理及私有CA的建立
- 精心为您准备的Openssl实现私有CA的详细过程,以及如何配置安装证书 推荐