android开发之自定义属性、View和使用
2015-01-24 23:14
627 查看
“自定义”这三字听起来就像是一个高级程序员所拥有的一样!太不接地气了!come on,baby,让我们成为高级程序员吧!哈哈!
第一步:首先创建一个工程项目,在项目中的res/values/下创建atts.xml文件,在该文件中:
值得注意的是,要记得写<declare-styleable name="xxx">和<attr name="xxx" format="xxx">.
那么,再此我还得说说:format它所拥有哪些类型以及如何使用它:
--------------------------------------自定义属性先讲到这里,当然后面还会讲,接下来将给大家介绍自定义View-----------------------------------
第一步:创建以类继承View(及其它的子View),在这里将继承RelativeLayout,同时在类中声明我们的自定义属性:
在此,我将和大家聊聊这三个构造方法的区别:
C2:多了一个AttributeSet类型的参数,在通过布局文件xml引用自定义VIew时,这个参数会将xml里引用的自定义View所设定的属性传递给构造函数;如果采用xml inflate的方法却没有在code里实现C2,那么运行时就会报错!
C3:多了一个defStyle的int参数,关于这个参数doc里是这样描述的:
从字面上翻译:这个参数似乎是用来指定View的默认的style,如果是0,那么就不会应用任何默认(或者叫缺省)的style。另外这个参数可以是一个属性指定的style引用的,也可以直接是一个显示 的style资源。
1、C3什么时候被调用?
C1是代码创建View时,C2是xml创建View时,那么C3呢?既然defStyle是一个与指定style有关的参数,那么一个比较自然的猜想是,当在xml里通过某种方式指定了View的Style时,C3在该View被inflate时调用,并将传入给defStyle;
那么,在xml里面指定style有几种方式呢?
第一种:直接在布局文件中该自定义View标签里使用:
第二种:采用指定theme的方式,在AndroidManifest.xml的application标签里使用:
回到C3的问题上来,那么这两种指定style的方式会不会触发C3呢?很遗憾,不会,那么C3到底什么时候调用呢?答案是当你显示调用它的时候也就是通常在C1和C2里调用:
2、defStyle接受什么样的值?
在doc上说明:这个参数可以是一个属性指定的style引用,也可以直接是一个显示的style资源,那我们就试验一下看看:
首先在res/values/styles.xml里定义一个style:
接下来引用我们定义的style:
这样的话View的背景变成了紫色,但如果你log一下就会发现,调用的还是C2。
下面我们就来研究defStyle到底接受什么样的参数:
首先把style和theme的引用都去掉,还原到黑色背景的View,这样在程序里R.style.purple就是这个style的显式引用,那么,理论上我们把R.style.purple当作defStyle传给C3,是不是就能做到设定View默认背景为紫色呢?
我们试试另外一种方式,传入一个引用style资源的属性(类似R.attr.buttonStyle)。这先要创建一个res/values/attrs.xml的文件,这个文件用来定义某个View里可以出现的属性:
现在我们就可以在程序里引用这个属性并把这个参数传给defStyle。
当然,在这之前我们先要把purple这个style赋值给ourstyle。给一个view的属性赋值,就和给android:layout_width赋值一样,除了命名空间不同(layout/main.xml的LinearLayout标签里有命名空间的声明):
子styles.xml里另外定义一个style作为theme:
在AndroidManifest.xml的application标签中应用theme:
那么直接在标签里赋值的属性怎么引用呢?
直接在标签里赋值的属性,都会在xml inflate时通过AttributeSet这个参数传给C2,所以我们可以通过AttributeSet类提供的getAttributeResourceValue方法来获取属性的值。但是很可惜的是,我们只能获取到属性的值,而无法获取包含这个值的属性的引用(getAttributeNameResource方法返回的是和R.attr.ourstyle一样的值,但这时R.attr.ourstyle并未指向@style/purple),这些乱七八糟的方法的各种值之间具体差别可以参考以下代码的log结果,相信仔细揣摩不难明白其中奥妙:
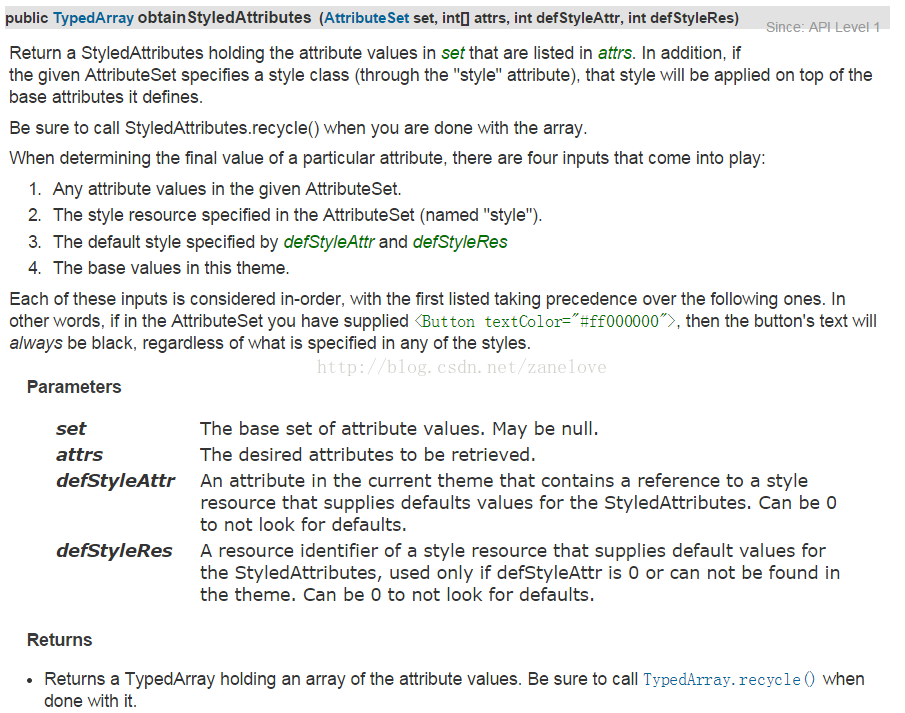
这就是view基类的构造函数C3,它在接受defStyle参数后利用context.obtainStyledAttributes这个方法来构造一个完整的属性数组,几个参数综合起来提供了从主题、样式里继承来的和直接在标签里定义的所有属性,具体可以看这个方法的doc:
于是我就纳闷了,显式的资源调用难道不是应该通过defStyleRes这个参数么?为什么这里直接就写成0了呢?这里写成0,那当然defStyle只能采取defStryleAttr的方式了。google了一下,还真在android的google code project里发现了一个developer提交的Issue 12683提到了这种情况,不过也没人comment,不知道究竟是不是这样……
免责声明:此处转载http://blog.csdn.net/z103594643/article/details/6755017#comments
----------------------------------------------------------好了,说了大半天终于把自定义View的三个构造方法说清楚了------------------------------------------
那么,近下来就给大家继续说说,如何将自定义View中的控件和自定义属性联系在一起呢?之前我们有将属性写在atts.xml文件当中,有自定义的View;那么,如何将它们紧密联系在一起呢?
基本的思路就是:将在第二个参数的构造函数中,进行操作,接下来我们来看代码:
那么,现在我们回忆一下,我们都做了什么?
第一步:自定义属性,在项目中的res/values/下创建atts.xml文件,同时弄明白了format格式类型。
第二步:自定义View,并且在第二个参数的构造函数中将自定义属性和控件紧密联系在了一起,同时详细的讲解了三个构造函数的区别和使用范围。
1、自定义View:首先继承View或者子View。
2、覆写其构造方法,在其构造方法中将自定义属性和值赋给自定义View中的控件。
3、使用LayoutParams的方式把一个控件添加到ViewGroup中,而所有的布局属性都是在LayoutParams当中设置的。
第三步:引用自定义View和自定义属性:
1、引用自定义View:<com.zanelove.topbardemo.TopBar/>
2、引用自定义属性:
①在Eclipse中:需要跟上完整的包名
xmlns:custom="http://schema.android.com/apk/res/com.zanelove.topbardemo
//完整的包名
②在Studio中:xmlns:custom="http://schema.android.com/apk/res-auto"//只需这样写即可
人总是那么不知足,就想着:如何给leftButton和rightButton动态增加点击事件呢?
接口回调机制实现了,那怎么去使用呢?以上代码都是写在自定义View类中,那么,接下来的代码将写在其他类中,进行对接口回调的使用:
public class MyActivity extends Activity {
@Override
public void onCreate(Bundle savedInstanceState) {
super.onCreate(savedInstanceState);
setContentView(R.layout.main);
//使用接口回调
TopBar topBar = (TopBar) this.findViewById(R.id.topbar);
topBar.setOnTopBarClickListener(new TopBar.OnTopBarClickListener() {
@Override
public void leftClick() {
//点击leftButton,处理事件
}
@Override
public void rightClick() {
//点击rightButton,处理事件
}
});
// topBar.setLeftButtonIsVisible(true);
}
}在IT界中,懒惰,只为了更好的懒惰!
第一步:首先创建一个工程项目,在项目中的res/values/下创建atts.xml文件,在该文件中:
<?xml version="1.0" encoding="utf-8"?>
<resources>
<declare-styleable name="名称">
<attr name="title" format="string"/>
<attr name="titleTextSize" format="dimension"/>
<attr name="titleTextColor" format="color"/>
<attr name="leftTextColor" format="color"/>
<attr name="leftBackground" format="reference|color"/>
<attr name="leftText" format="string"/>
<attr name="rightTextColor" format="color"/>
<attr name="rightBackground" format="reference|color"/>
<attr name="rightText" format="string"/>
</declare-styleable>
</resources>
值得注意的是,要记得写<declare-styleable name="xxx">和<attr name="xxx" format="xxx">.
那么,再此我还得说说:format它所拥有哪些类型以及如何使用它:
1. reference:参考某一资源ID。
    (1)属性定义:
            <declare-styleable name = "名称">
                   <attr name = "background" format = "reference" />
            </declare-styleable>
    (2)属性使用:
             <ImageView
                     android:layout_width = "42dip"
                     android:layout_height = "42dip"
                     android:background = "@drawable/图片ID"
                     />
2. color:颜色值。
    (1)属性定义:
            <declare-styleable name = "名称">
                   <attr name = "textColor" format = "color" />
            </declare-styleable>
    (2)属性使用:
            <TextView
                     android:layout_width = "42dip"
                     android:layout_height = "42dip"
                     android:textColor = "#00FF00"
                     />
3. boolean:布尔值。
    (1)属性定义:
            <declare-styleable name = "名称">
                   <attr name = "focusable" format = "boolean" />
            </declare-styleable>
    (2)属性使用:
            <Button
                    android:layout_width = "42dip"
                    android:layout_height = "42dip"
                    android:focusable = "true"
                    />
4. dimension:尺寸值。
    (1)属性定义:
            <declare-styleable name = "名称">
                   <attr name = "layout_width" format = "dimension" />
            </declare-styleable>
    (2)属性使用:
            <Button
                    android:layout_width = "42dip"
                    android:layout_height = "42dip"
                    />
5. float:浮点值。
    (1)属性定义:
            <declare-styleable name = "AlphaAnimation">
                   <attr name = "fromAlpha" format = "float" />
                   <attr name = "toAlpha" format = "float" />
            </declare-styleable>
    (2)属性使用:
            <alpha
                   android:fromAlpha = "1.0"
                   android:toAlpha = "0.7"
                   />
6. integer:整型值。
    (1)属性定义:
            <declare-styleable name = "AnimatedRotateDrawable">
                   <attr name = "visible" />
                   <attr name = "frameDuration" format="integer" />
                   <attr name = "framesCount" format="integer" />
                   <attr name = "pivotX" />
                   <attr name = "pivotY" />
                   <attr name = "drawable" />
            </declare-styleable>
    (2)属性使用:
            <animated-rotate
                   xmlns:android = "http://schemas.android.com/apk/res/android"
                   android:drawable = "@drawable/图片ID"
                   android:pivotX = "50%"
                   android:pivotY = "50%"
                   android:framesCount = "12"
                   android:frameDuration = "100"
                   />
7. string:字符串。
    (1)属性定义:
            <declare-styleable name = "MapView">
                   <attr name = "apiKey" format = "string" />
            </declare-styleable>
    (2)属性使用:
            <com.google.android.maps.MapView
                    android:layout_width = "fill_parent"
                    android:layout_height = "fill_parent"
                    android:apiKey = "0jOkQ80oD1JL9C6HAja99uGXCRiS2CGjKO_bc_g"
                    />
8. fraction:百分数。
    (1)属性定义:
            <declare-styleable name="RotateDrawable">
                   <attr name = "visible" />
                   <attr name = "fromDegrees" format = "float" />
                   <attr name = "toDegrees" format = "float" />
                   <attr name = "pivotX" format = "fraction" />
                   <attr name = "pivotY" format = "fraction" />
                   <attr name = "drawable" />
            </declare-styleable>
    (2)属性使用:
            <rotate
                   xmlns:android = "http://schemas.android.com/apk/res/android"
               android:interpolator = "@anim/动画ID"
                   android:fromDegrees = "0"
               android:toDegrees = "360"
                   android:pivotX = "200%"
                   android:pivotY = "300%"
               android:duration = "5000"
                   android:repeatMode = "restart"
                   android:repeatCount = "infinite"
                   />
9. enum:枚举值。
    (1)属性定义:
            <declare-styleable name="名称">
                   <attr name="orientation">
                          <enum name="horizontal" value="0" />
                          <enum name="vertical" value="1" />
                   </attr>
            </declare-styleable>
    (2)属性使用:
            <LinearLayout
                    xmlns:android = "http://schemas.android.com/apk/res/android"
                    android:orientation = "vertical"
                    android:layout_width = "fill_parent"
                    android:layout_height = "fill_parent"
                    >
            </LinearLayout>
10. flag:位或运算。
     (1)属性定义:
             <declare-styleable name="名称">
                    <attr name="windowSoftInputMode">
                            <flag name = "stateUnspecified" value = "0" />
                            <flag name = "stateUnchanged" value = "1" />
                            <flag name = "stateHidden" value = "2" />
                            <flag name = "stateAlwaysHidden" value = "3" />
                            <flag name = "stateVisible" value = "4" />
                            <flag name = "stateAlwaysVisible" value = "5" />
                            <flag name = "adjustUnspecified" value = "0x00" />
                            <flag name = "adjustResize" value = "0x10" />
                            <flag name = "adjustPan" value = "0x20" />
                            <flag name = "adjustNothing" value = "0x30" />
                     </attr>
             </declare-styleable>
     (2)属性使用:
            <activity
                   android:name = ".StyleAndThemeActivity"
                   android:label = "@string/app_name"
                   android:windowSoftInputMode = "stateUnspecified | stateUnchanged | stateHidden">
                   <intent-filter>
                          <action android:name = "android.intent.action.MAIN" />
                          <category android:name = "android.intent.category.LAUNCHER" />
                   </intent-filter>
             </activity>
     注意:
     属性定义时可以指定多种类型值。
    (1)属性定义:
            <declare-styleable name = "名称">
                   <attr name = "background" format = "reference|color" />
            </declare-styleable>
    (2)属性使用:
             <ImageView
                     android:layout_width = "42dip"
                     android:layout_height = "42dip"
                     android:background = "@drawable/图片ID|#00FF00"
                     />
免责声明:此处转载http://www.cnblogs.com/tiantianbyconan/archive/2012/06/06/2538528.html
--------------------------------------自定义属性先讲到这里,当然后面还会讲,接下来将给大家介绍自定义View-----------------------------------
第一步:创建以类继承View(及其它的子View),在这里将继承RelativeLayout,同时在类中声明我们的自定义属性:
public class TopBar extends RelativeLayout {

private Button leftButton,rightButton;
private TextView tv_title;

private String title;
private float titleTextSize;
private int titleTextColor;

private int leftTextColor;
private Drawable leftBackground;
private String leftText;

private int rightTextColor;
private Drawable rightBackground;
private String rightText;

public TopBar(Context context) {
super(context);
}

public TopBar(Context context, AttributeSet attrs) {
super(context, attrs);
}

public TopBar(Context context, AttributeSet attrs, int defStyle) {
super(context, attrs, defStyle);
}
}
在此,我将和大家聊聊这三个构造方法的区别:
public void CustomView(Context context) {} //代号C1
public void CustomView(Context context, AttributeSet attrs) {} //代号C2
public void CustomView(Context context, AttributeSet attrs, int defStyle) {} //代号C3
C1:用code动态创建一个View而不使用布局文件xml inflate,那么实现C1就可以了!C2:多了一个AttributeSet类型的参数,在通过布局文件xml引用自定义VIew时,这个参数会将xml里引用的自定义View所设定的属性传递给构造函数;如果采用xml inflate的方法却没有在code里实现C2,那么运行时就会报错!
C3:多了一个defStyle的int参数,关于这个参数doc里是这样描述的:
The default style to apply to this view. If 0, no style will be applied (beyond what is included in the theme). This may either be an attribute resource, whose value will be retrieved from the current theme, or an explicit style resource.
从字面上翻译:这个参数似乎是用来指定View的默认的style,如果是0,那么就不会应用任何默认(或者叫缺省)的style。另外这个参数可以是一个属性指定的style引用的,也可以直接是一个显示 的style资源。
1、C3什么时候被调用?
C1是代码创建View时,C2是xml创建View时,那么C3呢?既然defStyle是一个与指定style有关的参数,那么一个比较自然的猜想是,当在xml里通过某种方式指定了View的Style时,C3在该View被inflate时调用,并将传入给defStyle;
那么,在xml里面指定style有几种方式呢?
第一种:直接在布局文件中该自定义View标签里使用:
style="@style/customstyle"
第二种:采用指定theme的方式,在AndroidManifest.xml的application标签里使用:
android:theme="@style/customstyle<span style="font-family: Arial, Helvetica, sans-serif;">"</span>这两种方式都需要在res/values./styles.xml里定义customstyle:
<?xml version="1.0" encoding="utf-8"?>
<resources>
<style name="customstyle">
<item name="android:background">@drawable/bg</item>
[... or other style code...]
</style>
</resources>
注:使用theme时,标准的theme定义方式是把style放在themes.xml,但实际上R.java在生成时无论是themes.xml和style.xml里的style都是同质的,都存在R.style下。
回到C3的问题上来,那么这两种指定style的方式会不会触发C3呢?很遗憾,不会,那么C3到底什么时候调用呢?答案是当你显示调用它的时候也就是通常在C1和C2里调用:
public void CustomView(Context context, AttributeSet attrs) {
this(context, attrs, resid);
}通过这样的方式将真正构造函数的实现转移到C3里,并由resid指定defStyle,作为默认style。2、defStyle接受什么样的值?
在doc上说明:这个参数可以是一个属性指定的style引用,也可以直接是一个显示的style资源,那我们就试验一下看看:
首先在res/values/styles.xml里定义一个style:
<?xml version="1.0" encoding="utf-8"?>
<resources>
<style name="purple">
<item name="android:background">#FFFF00FF</item>
</style>
</resources>
然后自定义一个View(或者SurfaceView也是可以的),CustomView.java:
public class CustomView extends View {

//C1
public CustomView(Context context) {
super(context);
}

//C2
public CustomView(Context context, AttributeSet attrs) {
this(context, attrs, 0);
}

//C3
public CustomView(Context context, AttributeSet attrs, int defStyle) {
super(context, attrs, defStyle);
}
}接着在创建一份布局文件资源:<?xml version="1.0" encoding="utf-8"?> <LinearLayout xmlns:android="http://schemas.android.com/apk/res/android" <strong><span style="color:#ff0000;">xmlns:myxmlns="http://schemas.android.com/apk/res/com.zanelove.test"//引用自定义属性请在此处声明</span></strong> android:orientation="vertical" android:layout_width="fill_parent" android:layout_height="fill_parent" > <com.zanelove.test.CustomView android:layout_width="100px" android:layout_height="100px" /> </LinearLayout>最后在MainActivity中:
public class Test extends Activity {
@Override
public void onCreate(Bundle savedInstanceState) {
super.onCreate(savedInstanceState);
setContentView(R.layout.main);
}
}
接下来引用我们定义的style:
<com.zanelove.test.CustomView android:layout_width="100px"
android:layout_height="100px"
<strong><span style="color:#ff0000;">style="@style/purple"</span></strong>
/>
这样的话View的背景变成了紫色,但如果你log一下就会发现,调用的还是C2。
下面我们就来研究defStyle到底接受什么样的参数:
首先把style和theme的引用都去掉,还原到黑色背景的View,这样在程序里R.style.purple就是这个style的显式引用,那么,理论上我们把R.style.purple当作defStyle传给C3,是不是就能做到设定View默认背景为紫色呢?
public CustomView(Context context, AttributeSet attrs) {
this(context, attrs, R.style.purple);
}如果你log一下,就会发现,C2确实执行了,甚至R.style,purple也成功传给C3里的defStyle了,但是,View的背景还是黑色。我们试试另外一种方式,传入一个引用style资源的属性(类似R.attr.buttonStyle)。这先要创建一个res/values/attrs.xml的文件,这个文件用来定义某个View里可以出现的属性:
<?xml version="1.0" encoding="utf-8"?>
<resources>
<declare-styleable name="CustomView">
<attr name="ourstyle" format="reference" />
<attr name="atext" format="string" />
</declare-styleable>
</resources>
现在我们为CustomView增加了两个可以出现的自定义属性,ourstyle和atext,前者就是我们打算用来引用一个style资源的属性,后者是一个没什么用的字符串属性,放在这里只是为了后面做测试。
现在我们就可以在程序里引用这个属性并把这个参数传给defStyle。
当然,在这之前我们先要把purple这个style赋值给ourstyle。给一个view的属性赋值,就和给android:layout_width赋值一样,除了命名空间不同(layout/main.xml的LinearLayout标签里有命名空间的声明):
<com.zanelove.test.CustomView android:layout_width="100px"
android:layout_height="100px"
myxmlns:ourstyle="@style/purple"
myxmlns:atext="test string"
/>
也可以用指定theme的方法,在theme里给所有的CustomView都赋予一个相同的默认的ourstyle的值,然后应用这个theme:
子styles.xml里另外定义一个style作为theme:
<style name="purpletheme">
<item name="ourstyle">@style/purple</item>
</style>
在AndroidManifest.xml的application标签中应用theme:
android:theme="style/purpletheme"这两种指定属性的方法不同,在程序里引用这个属性的方法也不同。theme指定的属性,可以直接用R.attr.ourstyle来引用,也可以用R.styleable.CustomView[R.styleable.CustomView_ourstyle]来引用,于是:
public CustomView(Context context, AttributeSet attrs) {
this(context, attrs, R.attr.ourstyle );
}这样就成功地让defStyle生效了。那么直接在标签里赋值的属性怎么引用呢?
直接在标签里赋值的属性,都会在xml inflate时通过AttributeSet这个参数传给C2,所以我们可以通过AttributeSet类提供的getAttributeResourceValue方法来获取属性的值。但是很可惜的是,我们只能获取到属性的值,而无法获取包含这个值的属性的引用(getAttributeNameResource方法返回的是和R.attr.ourstyle一样的值,但这时R.attr.ourstyle并未指向@style/purple),这些乱七八糟的方法的各种值之间具体差别可以参考以下代码的log结果,相信仔细揣摩不难明白其中奥妙:
public CustomView(Context context, AttributeSet attrs) {
this(context, attrs, attrs.getAttributeNameResource(2));
String a1 = ((Integer)R.attr.ourstyle).toString();
String a2 = ((Integer)R.styleable.CustomView_ourstyle).toString();
String a3 = ((Integer)R.styleable.CustomView[R.styleable.CustomView_ourstyle]).toString();
String a4 = ((Integer)R.style.purple).toString();
String a5 = ((Integer)attrs.getAttributeNameResource(2)).toString();
String a6 = ((Integer)attrs.getAttributeResourceValue(2,0)).toString();
String a7 = ((Integer)R.attr.atext).toString();
String a8 = ((Integer)R.styleable.CustomView[R.styleable.CustomView_atext]).toString();
String a9 = attrs.getAttributeValue(2);
String a10 = attrs.getAttributeValue(3);
}log一下a1-10,示例结果如下:a1 = 2130771968 a2 = 0 a3 = 2130771968 a4 = 2131034112 a5 = 2130771968 a6 = 2131034112 a7 = 2130771969 a8 = 2130771969 a9 = @2131034112 a10 = test string凡是值相同的其实是一种意思,a1, a3, a5都指的是attrs.xml里属性的引用,这个引用id只有在theme里赋值才有效,直接在标签里赋值是无效的。而传这个id给defStyle就正符合doc里写的第一种情况。而a4, a6则直接代表了@style/purple的id,即doc里写的第二种情况,但是,回到我们最初的问题,传R.style.purple,也就是2131034112这个id给defStyle是没有效果的,为什么呢?这个原因只能到android源码的view.java里去看个究竟了:
public View(Context context, AttributeSet attrs, int defStyle) {
this(context);
TypedArray a = context.obtainStyledAttributes(attrs, com.android.internal.R.styleable.View,defStyle, 0);
[...other code...]
这就是view基类的构造函数C3,它在接受defStyle参数后利用context.obtainStyledAttributes这个方法来构造一个完整的属性数组,几个参数综合起来提供了从主题、样式里继承来的和直接在标签里定义的所有属性,具体可以看这个方法的doc:
于是我就纳闷了,显式的资源调用难道不是应该通过defStyleRes这个参数么?为什么这里直接就写成0了呢?这里写成0,那当然defStyle只能采取defStryleAttr的方式了。google了一下,还真在android的google code project里发现了一个developer提交的Issue 12683提到了这种情况,不过也没人comment,不知道究竟是不是这样……
免责声明:此处转载http://blog.csdn.net/z103594643/article/details/6755017#comments
----------------------------------------------------------好了,说了大半天终于把自定义View的三个构造方法说清楚了------------------------------------------
那么,近下来就给大家继续说说,如何将自定义View中的控件和自定义属性联系在一起呢?之前我们有将属性写在atts.xml文件当中,有自定义的View;那么,如何将它们紧密联系在一起呢?
基本的思路就是:将在第二个参数的构造函数中,进行操作,接下来我们来看代码:
public class TopBar extends RelativeLayout {

private Button leftButton,rightButton;
private TextView tv_title;

private String title;
private float titleTextSize;
private int titleTextColor;

private int leftTextColor;
private Drawable leftBackground;
private String leftText;

private int rightTextColor;
private Drawable rightBackground;
private String rightText;

private LayoutParams leftParams,rightParams,titleParams;

public TopBar(Context context) {
super(context);
}

public TopBar(Context context, AttributeSet attrs) {
super(context, attrs);
TypedArray ta = context.obtainStyledAttributes(attrs,R.styleable.TopBar);
leftTextColor = ta.getColor(R.styleable.TopBar_leftTextColor,0);
leftBackground = ta.getDrawable(R.styleable.TopBar_leftBackground);
leftText = ta.getString(R.styleable.TopBar_leftText);

title = ta.getString(R.styleable.TopBar_title);
titleTextColor = ta.getColor(R.styleable.TopBar_titleTextColor,0);
titleTextSize = ta.getDimension(R.styleable.TopBar_titleTextSize,0);

rightBackground = ta.getDrawable(R.styleable.TopBar_rightBackground);
rightTextColor = ta.getColor(R.styleable.TopBar_leftTextColor,0);
rightText = ta.getString(R.styleable.TopBar_rightText);

ta.recycle();//回收资源,避免缓存数据错误

leftButton = new Button(context);
rightButton = new Button(context);
tv_title = new TextView(context);

leftButton.setTextColor(leftTextColor);
leftButton.setBackground(leftBackground);
leftButton.setText(leftText);

rightButton.setTextColor(rightTextColor);
rightButton.setBackground(rightBackground);
rightButton.setText(rightText);

tv_title.setText(title);
tv_title.setTextColor(titleTextColor);
tv_title.setTextSize(titleTextSize);
tv_title.setGravity(Gravity.CENTER);

setBackgroundColor(0xFFF59563);//设置背景颜色

leftParams = new LayoutParams(ViewGroup.LayoutParams.WRAP_CONTENT, ViewGroup.LayoutParams.WRAP_CONTENT);
leftParams.addRule(RelativeLayout.ALIGN_PARENT_LEFT,TRUE);
addView(leftButton,leftParams);

rightParams = new LayoutParams(ViewGroup.LayoutParams.WRAP_CONTENT, ViewGroup.LayoutParams.WRAP_CONTENT);
rightParams.addRule(RelativeLayout.ALIGN_PARENT_RIGHT,TRUE);
addView(rightButton,rightParams);

titleParams = new LayoutParams(ViewGroup.LayoutParams.WRAP_CONTENT, ViewGroup.LayoutParams.WRAP_CONTENT);
titleParams.addRule(RelativeLayout.CENTER_IN_PARENT,TRUE);
addView(tv_title,titleParams);
}

public TopBar(Context context, AttributeSet attrs, int defStyle) {
super(context, attrs, defStyle);
}
}
那么,现在我们回忆一下,我们都做了什么?
第一步:自定义属性,在项目中的res/values/下创建atts.xml文件,同时弄明白了format格式类型。
第二步:自定义View,并且在第二个参数的构造函数中将自定义属性和控件紧密联系在了一起,同时详细的讲解了三个构造函数的区别和使用范围。
1、自定义View:首先继承View或者子View。
2、覆写其构造方法,在其构造方法中将自定义属性和值赋给自定义View中的控件。
3、使用LayoutParams的方式把一个控件添加到ViewGroup中,而所有的布局属性都是在LayoutParams当中设置的。
第三步:引用自定义View和自定义属性:
1、引用自定义View:<com.zanelove.topbardemo.TopBar/>
2、引用自定义属性:
①在Eclipse中:需要跟上完整的包名
xmlns:custom="http://schema.android.com/apk/res/com.zanelove.topbardemo
//完整的包名
②在Studio中:xmlns:custom="http://schema.android.com/apk/res-auto"//只需这样写即可
<?xml version="1.0" encoding="utf-8"?>
<!--引用自定义Viewxmlns:custom="http://schemas.android.com/apk/res-auto"-->
<LinearLayout xmlns:android="http://schemas.android.com/apk/res/android"
xmlns:custom="http://schemas.android.com/apk/res-auto"
android:orientation="vertical"
android:layout_width="fill_parent"
android:layout_height="fill_parent"
>
<!--引用自定义View:com.zanelove.topbardemo.TopBar-->
<com.zanelove.topbardemo.TopBar
android:id="@+id/topbar"
android:layout_width="match_parent"
android:layout_height="40dp"
custom:leftBackground="@drawable/ic_launcher"
custom:leftText="Back"
custom:leftTextColor="#ffffff"
custom:rightBackground="@drawable/ic_launcher"
custom:rightText="More"
custom:rightTextColor="#ffffff"
custom:title="自定义标题"
custom:titleTextColor="#123456"
custom:titleTextSize="10sp"
/>

</LinearLayout>
人总是那么不知足,就想着:如何给leftButton和rightButton动态增加点击事件呢?
leftButton.setOnClickListener(new OnClickListener() {
@Override
public void onClick(View view) {

}
});

rightButton.setOnClickListener(new OnClickListener() {
@Override
public void onClick(View view) {

}
});但是,这样写的话,就失去了作为模板的意义了!那如何让子类动态的设置自个的点击事件呢?--答案很简单,接口回调机制!public OnTopBarClickListener listener;
public interface OnTopBarClickListener{
public void leftClick();
public void rightClick();
}
public void setOnTopBarClickListener(OnTopBarClickListener listener){
this.listener = listener;
}leftButton.setOnClickListener(new OnClickListener() {
@Override
public void onClick(View view) {
listener.leftClick();
}
});
rightButton.setOnClickListener(new OnClickListener() {
@Override
public void onClick(View view) {
listener.rightClick();
}
});接口回调机制实现了,那怎么去使用呢?以上代码都是写在自定义View类中,那么,接下来的代码将写在其他类中,进行对接口回调的使用:
public class MyActivity extends Activity {
@Override
public void onCreate(Bundle savedInstanceState) {
super.onCreate(savedInstanceState);
setContentView(R.layout.main);
//使用接口回调
TopBar topBar = (TopBar) this.findViewById(R.id.topbar);
topBar.setOnTopBarClickListener(new TopBar.OnTopBarClickListener() {
@Override
public void leftClick() {
//点击leftButton,处理事件
}
@Override
public void rightClick() {
//点击rightButton,处理事件
}
});
// topBar.setLeftButtonIsVisible(true);
}
}在IT界中,懒惰,只为了更好的懒惰!

相关文章推荐
- 【android 开发知识积累】——属性(Attribute)资源的使用和自定义View组件
- android开发之自定义TextView设置字间距以及通过TextView控件属性设置行间距
- Android开发-使用自定义View实现loading效果
- Android 自定义View时使用TypedArray配置样式属性详细介绍
- Android中的自定义view和自定义属性TypedArray的使用
- Android开发自定义View之滑动按钮与自定义属性
- android MVVM开发框架——(4)DataBinding绑定view自定义属性
- android中如何使用自定义view,自定义控件属性,及动态自定义控件
- Android自定义View时使用TypedArray配置样式属性
- Android开发自定义View之滑动按钮与自定义属性
- Android自定义View中的自定义属性(attrs.xml,TypedArray的使用)
- android 属性动画(view普通使用 和 自定义view使用)
- Android开发(二)——自定义圆形控件的使用CircleImageView
- Android开发之自定义属性的使用
- Android 笔记:自定义view的属性TypedArray的使用方法
- Android开发使用自定义view实现ListView下拉的视差特效功能
- android-在开发中使用自定义属性名
- Android中如何使用自定义view 自定义控件属性及动态自定义控件
- Android开发实战2----圆点导航指示器(使用自定义View实现)
- Android开发使用自定义View将圆角矩形绘制在Canvas上的方法