Linux驱动修炼之道-SPI驱动框架源码分析(中)
2015-01-21 11:32
288 查看
来自:http://blog.csdn.net/woshixingaaa/article/details/6574220
这篇来分析spi子系统的建立过程。
嵌入式微处理器访问SPI设备有两种方式:使用GPIO模拟SPI接口的工作时序或者使用SPI控制器。使用GPIO模拟SPI接口的工作时序是非常容易实现的,但是会导致大量的时间耗费在模拟SPI接口的时序上,访问效率比较低,容易成为系统瓶颈。这里主要分析使用SPI控制器的情况。
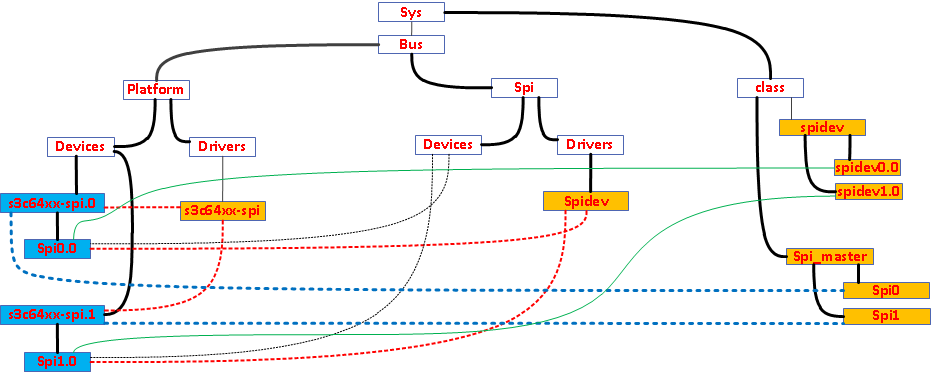
这个是由sys文件系统导出的spi子系统在内核中的视图了。
首先了解一下Linux内核中的几个文件:spi.c也就是spi子系统的核心了,spi_s3c24xx.c是s3c24xx系列芯片的SPI controller驱动,它向更上层的SPI核心层(spi.c)提供接口用来控制芯片的SPI controller,是一个被其他驱动使用的驱动。而spidev.c是在核心层基础之上将SPI controller模拟成一个字符型的驱动,向文件系统提供标准的文件系统接口,用来操作对应的SPI
controller。
下面我们来看看spi子系统是怎么注册进内核的:
view
plain
static int __init spi_init(void)
{
int status;
buf = kmalloc(SPI_BUFSIZ, GFP_KERNEL);
if (!buf) {
status = -ENOMEM;
goto err0;
}
status = bus_register(&spi_bus_type);
if (status < 0)
goto err1;
status = class_register(&spi_master_class);
if (status < 0)
goto err2;
return 0;
err2:
bus_unregister(&spi_bus_type);
err1:
kfree(buf);
buf = NULL;
err0:
return status;
}
postcore_initcall(spi_init);
这里注册了一个spi_bus_type,也就是一个spi总线,和一个spi_master的class。分别对应上图中sys/bus/下的spi目录和sys/class/下的spi_master目录。
下面来分析SPI controller驱动的注册与初始化过程,首先执行的是s3c24xx_spi_init。
view
plain
static int __init s3c24xx_spi_init(void)
{
return platform_driver_probe(&s3c24xx_spi_driver, s3c24xx_spi_probe);
}
platform_driver_probe中完成了s3c24xx_spi_driver这个平台驱动的注册,相应的平台设备在devs.c中定义,在smdk2440_devices中添加&s3c_device_spi0,&s3c_device_spi1,这就生成了图中所示的s3c24xx-spi.0与s3c24xx-spi.1,当然了这图是在网上找的,不是我画的,所以是6410的。这里s3c24xx-spi.0表示s3c2440的spi controller的0号接口,s3c24xx-spi.1表示s3c2440的spi
controller的1号接口。注册了s3c24xx_spi_driver后,赋值了平台驱动的probe函数为s3c24xx_spi_probe。所以当match成功后,调用s3c24xx_spi_probe,这里看其实现:
view
plain
<span style="font-size:18px;">static int __init s3c24xx_spi_probe(struct platform_device *pdev)
{
struct s3c2410_spi_info *pdata;
struct s3c24xx_spi *hw;
struct spi_master *master;
struct resource *res;
int err = 0;
/*分配struct spi_master+struct s3c24xx_spi大小的数据,把s3c24xx_spi设为spi_master的私有数据*/
master = spi_alloc_master(&pdev->dev, sizeof(struct s3c24xx_spi));
if (master == NULL) {
dev_err(&pdev->dev, "No memory for spi_master\n");
err = -ENOMEM;
goto err_nomem;
}
/*从master中获得s3c24xx_spi*/
hw = spi_master_get_devdata(master);
memset(hw, 0, sizeof(struct s3c24xx_spi));
hw->master = spi_master_get(master);
/*驱动移植的时候需要实现的重要结构,初始化为&s3c2410_spi0_platdata*/
hw->pdata = pdata = pdev->dev.platform_data;
hw->dev = &pdev->dev;
if (pdata == NULL) {
dev_err(&pdev->dev, "No platform data supplied\n");
err = -ENOENT;
goto err_no_pdata;
}
/*设置平台的私有数据为s3c24xx_spi*/
platform_set_drvdata(pdev, hw);
init_completion(&hw->done);
/* setup the master state. */
/*该总线上的设备数*/
master->num_chipselect = hw->pdata->num_cs;
/*总线号*/
master->bus_num = pdata->bus_num;
/* setup the state for the bitbang driver */
/*spi_bitbang专门负责数据的传输*/
hw->bitbang.master = hw->master;
hw->bitbang.setup_transfer = s3c24xx_spi_setupxfer;
hw->bitbang.chipselect = s3c24xx_spi_chipsel;
hw->bitbang.txrx_bufs = s3c24xx_spi_txrx;
hw->bitbang.master->setup = s3c24xx_spi_setup;
dev_dbg(hw->dev, "bitbang at %p\n", &hw->bitbang);
。。。。。。。。。。。。。。。。。。。。。。。。
/*初始化设置寄存器,包括对SPIMOSI,SPIMISO,SPICLK引脚的设置*/
s3c24xx_spi_initialsetup(hw);
/* register our spi controller */
err = spi_bitbang_start(&hw->bitbang);
。。。。。。。。。。。。。。。。。。。。。
}
spi controller的register在spi_bitbang_start函数中实现:
int spi_bitbang_start(struct spi_bitbang *bitbang)
{
int status;
if (!bitbang->master || !bitbang->chipselect)
return -EINVAL;
/*动态创建一个work_struct结构,它的处理函数是bitbang_work*/
INIT_WORK(&bitbang->work, bitbang_work);
spin_lock_init(&bitbang->lock);
INIT_LIST_HEAD(&bitbang->queue);
/*spi的数据传输就是用这个方法*/
if (!bitbang->master->transfer)
bitbang->master->transfer = spi_bitbang_transfer;
if (!bitbang->txrx_bufs) {
bitbang->use_dma = 0;
/*spi_s3c24xx.c中有spi_bitbang_bufs方法,在bitbang_work中被调用*/
bitbang->txrx_bufs = spi_bitbang_bufs;
if (!bitbang->master->setup) {
if (!bitbang->setup_transfer)
bitbang->setup_transfer =
spi_bitbang_setup_transfer;
/*在spi_s3c24xx.c中有setup的处理方法,在spi_new_device中被调用*/
bitbang->master->setup = spi_bitbang_setup;
bitbang->master->cleanup = spi_bitbang_cleanup;
}
} else if (!bitbang->master->setup)
return -EINVAL;
/* this task is the only thing to touch the SPI bits */
bitbang->busy = 0;
/调用create_singlethread_workqueue创建单个工作线程/
bitbang->workqueue = create_singlethread_workqueue(
dev_name(bitbang->master->dev.parent));
if (bitbang->workqueue == NULL) {
status = -EBUSY;
goto err1;
}
status = spi_register_master(bitbang->master);
if (status < 0)
goto err2;
return status;
err2:
destroy_workqueue(bitbang->workqueue);
err1:
return status;
}</span>
然后看这里是怎样注册spi主机控制器驱动的:
view
plain
int spi_register_master(struct spi_master *master)
{
。。。。。。。。。。。。。。。。
/*将spi添加到内核,这也是sys/class/Spi_master下产生Spi0,Spi1的原因*/
dev_set_name(&master->dev, "spi%u", master->bus_num);
status = device_add(&master->dev);
scan_boardinfo(master);
}
这里跟踪scan_boardinfo函数:
view
plain
static void scan_boardinfo(struct spi_master *master)
{
struct boardinfo *bi;
mutex_lock(&board_lock);
/*遍历所有挂在board_list上的struct boardinfo*/
list_for_each_entry(bi, &board_list, list) {
struct spi_board_info *chip = bi->board_info;
unsigned n;
/*遍历每个boardinfo管理的spi_board_info,如果设备的总线号与控制器的总线好相等,则创建新设备*/
for (n = bi->n_board_info; n > 0; n--, chip++) {
if (chip->bus_num != master->bus_num)
continue;
(void) spi_new_device(master, chip);
}
}
mutex_unlock(&board_lock);
}
在移植的时候我们会在mach-smdk2440.c中的smdk2440_machine_init中添加spi_register_board_info
这个函数完成了将spi_board_info交由boardinfo管理,并把boardinfo挂载到board_list链表上。也就是说在系统初始化的时候将spi_device交由到挂在board_list上的boardinfo管理,在spi controller的driver注册的时候不但注册这个主机控制器的驱动,还要遍历这个主机控制器的总线上的spi_device,将总线上的spi_device全部注册进内核。当注册进内核并且spi_driver已经注册的时候,如果总线match成功,则会调用spi_driver的probe函数,这个将在后边进行分析。
view
plain
<span style="font-size:18px;">int __init
spi_register_board_info(struct spi_board_info const *info, unsigned n)
{
struct boardinfo *bi;
bi = kmalloc(sizeof(*bi) + n * sizeof *info, GFP_KERNEL);
if (!bi)
return -ENOMEM;
bi->n_board_info = n;
memcpy(bi->board_info, info, n * sizeof *info);
mutex_lock(&board_lock);
list_add_tail(&bi->list, &board_list);
mutex_unlock(&board_lock);
return 0;
}</span>
看一下创建新设备的函数:
view
plain
<span style="font-size:18px;">struct spi_device *spi_new_device(struct spi_master *master,
struct spi_board_info *chip)
{
struct spi_device *proxy;
int status;
proxy = spi_alloc_device(master);
if (!proxy)
return NULL;
WARN_ON(strlen(chip->modalias) >= sizeof(proxy->modalias));
/*初始化spi_device的各个字段*/
proxy->chip_select = chip->chip_select;
proxy->max_speed_hz = chip->max_speed_hz;
proxy->mode = chip->mode;
proxy->irq = chip->irq;
/*这里获得了spi_device的名字,这个modalias也是在我们移植时在mach-smdk2440.c中的s3c2410_spi0_board中设定的*/
strlcpy(proxy->modalias, chip->modalias, sizeof(proxy->modalias));
proxy->dev.platform_data = (void *) chip->platform_data;
proxy->controller_data = chip->controller_data;
proxy->controller_state = NULL;
/*主要完成将spi_device添加到内核*/
status = spi_add_device(proxy);
if (status < 0) {
spi_dev_put(proxy);
return NULL;
}
return proxy;
}</span>
下面来看分配spi_alloc_device的函数,主要完成了分配spi_device,并初始化spi->dev的一些字段。
view
plain
struct spi_device *spi_alloc_device(struct spi_master *master)
{
struct spi_device *spi;
struct device *dev = master->dev.parent;
if (!spi_master_get(master))
return NULL;
spi = kzalloc(sizeof *spi, GFP_KERNEL);
if (!spi) {
dev_err(dev, "cannot alloc spi_device\n");
spi_master_put(master);
return NULL;
}
spi->master = master;
spi->dev.parent = dev;
/*设置总线是spi_bus_type,下面会讲到spi_device与spi_driver是怎样match上的*/
spi->dev.bus = &spi_bus_type;
spi->dev.release = spidev_release;
device_initialize(&spi->dev);
return spi;
}
下面来看分配的这个spi_device是怎样注册进内核的:
view
plain
int spi_add_device(struct spi_device *spi)
{
static DEFINE_MUTEX(spi_add_lock);
struct device *dev = spi->master->dev.parent;
int status;
/*spi_device的片选号不能大于spi控制器的片选数*/
if (spi->chip_select >= spi->master->num_chipselect) {
dev_err(dev, "cs%d >= max %d\n",
spi->chip_select,
spi->master->num_chipselect);
return -EINVAL;
}
/*这里设置是spi_device在Linux设备驱动模型中的name,也就是图中的spi0.0,而在/dev/下设备节点的名字是proxy->modalias中的名字*/
dev_set_name(&spi->dev, "%s.%u", dev_name(&spi->master->dev),
spi->chip_select);
mutex_lock(&spi_add_lock);
/*如果总线上挂的设备已经有这个名字,则设置状态忙碌,并退出*/
if (bus_find_device_by_name(&spi_bus_type, NULL, dev_name(&spi->dev))
!= NULL) {
dev_err(dev, "chipselect %d already in use\n",
spi->chip_select);
status = -EBUSY;
goto done;
}
/对spi_device的时钟等进行设置/
status = spi->master->setup(spi);
if (status < 0) {
dev_err(dev, "can't %s %s, status %d\n",
"setup", dev_name(&spi->dev), status);
goto done;
}
/*添加到内核*/
status = device_add(&spi->dev);
if (status < 0)
dev_err(dev, "can't %s %s, status %d\n",
"add", dev_name(&spi->dev), status);
else
dev_dbg(dev, "registered child %s\n", dev_name(&spi->dev));
done:
mutex_unlock(&spi_add_lock);
return status;
}
static int s3c24xx_spi_setup(struct spi_device *spi)
{
。。。。。。。。。。。。。。
ret = s3c24xx_spi_setupxfer(spi, NULL);
。。。。。。。。。。。。。。
}
static int s3c24xx_spi_setupxfer(struct spi_device *spi,
struct spi_transfer *t)
{
struct s3c24xx_spi *hw = to_hw(spi);
unsigned int bpw;
unsigned int hz;
unsigned int div;
/*设置了每字长的位数,发送速度*/
bpw = t ? t->bits_per_word : spi->bits_per_word;
hz = t ? t->speed_hz : spi->max_speed_hz;
if (bpw != 8) {
dev_err(&spi->dev, "invalid bits-per-word (%d)\n", bpw);
return -EINVAL;
}
/*色黄志分频值*/
div = clk_get_rate(hw->clk) / hz;
/* is clk = pclk / (2 * (pre+1)), or is it
* clk = (pclk * 2) / ( pre + 1) */
div /= 2;
if (div > 0)
div -= 1;
if (div > 255)
div = 255;
dev_dbg(&spi->dev, "setting pre-scaler to %d (hz %d)\n", div, hz);
writeb(div, hw->regs + S3C2410_SPPRE);
spin_lock(&hw->bitbang.lock);
if (!hw->bitbang.busy) {
hw->bitbang.chipselect(spi, BITBANG_CS_INACTIVE);
/* need to ndelay for 0.5 clocktick ? */
}
spin_unlock(&hw->bitbang.lock);
return 0;
}
下面来看这个spi_driver是怎样注册的,又是与spi_device怎样match上的。
在spidev.c中:
view
plain
static int __init spidev_init(void)
{
int status;
BUILD_BUG_ON(N_SPI_MINORS > 256);
status = register_chrdev(SPIDEV_MAJOR, "spi", &spidev_fops);
if (status < 0)
return status;
spidev_class = class_create(THIS_MODULE, "spidev");
if (IS_ERR(spidev_class)) {
unregister_chrdev(SPIDEV_MAJOR, spidev_spi.driver.name);
return PTR_ERR(spidev_class);
}
status = spi_register_driver(&spidev_spi);
if (status < 0) {
class_destroy(spidev_class);
unregister_chrdev(SPIDEV_MAJOR, spidev_spi.driver.name);
}
return status;
}
注册了名为”spi”的字符驱动,然后注册了spidev_spi驱动,这个就是图中sys/Bus/Spi/Drivers/下的spidev。
view
plain
static struct spi_driver spidev_spi = {
.driver = {
.name = "spidev",
.owner = THIS_MODULE,
},
.probe = spidev_probe,
.remove = __devexit_p(spidev_remove),
};
view
plain
static struct spi_driver spidev_spi = {
.driver = {
.name = "spidev",
.owner = THIS_MODULE,
},
.probe = spidev_probe,
.remove = __devexit_p(spidev_remove),
};
这里来看__driver_attach这个函数,其中分别调用了driver_match_device,driver_probe_device函数。如果匹配成果调用probe函数,否则返回。
view
plain
static int __driver_attach(struct device *dev, void *data)
{
struct device_driver *drv = data;
if (!driver_match_device(drv, dev))
return 0;
if (dev->parent) /* Needed for USB */
down(&dev->parent->sem);
down(&dev->sem);
if (!dev->driver)
driver_probe_device(drv, dev);
up(&dev->sem);
if (dev->parent)
up(&dev->parent->sem);
return 0;
}
匹配的时候调用的bus的match函数。
view
plain
struct bus_type spi_bus_type = {
.name = "spi",
.dev_attrs = spi_dev_attrs,
.match = spi_match_device,
.uevent = spi_uevent,
.suspend = spi_suspend,
.resume = spi_resume,
};
static int spi_match_device(struct device *dev, struct device_driver *drv)
{
const struct spi_device *spi = to_spi_device(dev);
return strcmp(spi->modalias, drv->name) == 0;
}
可以看到这里根据驱动和设备的名字进行匹配,匹配成功后调用驱动的probe函数。
view
plain
static int spi_drv_probe(struct device *dev)
{
const struct spi_driver *sdrv = to_spi_driver(dev->driver);
return sdrv->probe(to_spi_device(dev));
}
可以看大调用了具体的probe函数,这里实现了把spidev添加到device_list,这样这个虚拟的字符驱动就注册并初始化完毕。
view
plain
static int spidev_remove(struct spi_device *spi)
{
struct spidev_data *spidev = spi_get_drvdata(spi);
/* make sure ops on existing fds can abort cleanly */
spin_lock_irq(&spidev->spi_lock);
spidev->spi = NULL;
spi_set_drvdata(spi, NULL);
spin_unlock_irq(&spidev->spi_lock);
/* prevent new opens */
mutex_lock(&device_list_lock);
list_del(&spidev->device_entry);
device_destroy(spidev_class, spidev->devt);
clear_bit(MINOR(spidev->devt), minors);
if (spidev->users == 0)
kfree(spidev);
mutex_unlock(&device_list_lock);
return 0;
}
在spidev的注册函数中注册了文件操作集合file_operations,为用户空间提供了操作SPI controller的接口。
view
plain
static struct file_operations spidev_fops = {
.owner = THIS_MODULE,
/* REVISIT switch to aio primitives, so that userspace
* gets more complete API coverage. It'll simplify things
* too, except for the locking.
*/
.write = spidev_write,
.read = spidev_read,
.unlocked_ioctl = spidev_ioctl,
.open = spidev_open,
.release = spidev_release,
};
到此为止spi子系统与spi_master,spi_device,spi_driver这个Linux设备驱动模型已经建立完了。
这篇来分析spi子系统的建立过程。
嵌入式微处理器访问SPI设备有两种方式:使用GPIO模拟SPI接口的工作时序或者使用SPI控制器。使用GPIO模拟SPI接口的工作时序是非常容易实现的,但是会导致大量的时间耗费在模拟SPI接口的时序上,访问效率比较低,容易成为系统瓶颈。这里主要分析使用SPI控制器的情况。
这个是由sys文件系统导出的spi子系统在内核中的视图了。
首先了解一下Linux内核中的几个文件:spi.c也就是spi子系统的核心了,spi_s3c24xx.c是s3c24xx系列芯片的SPI controller驱动,它向更上层的SPI核心层(spi.c)提供接口用来控制芯片的SPI controller,是一个被其他驱动使用的驱动。而spidev.c是在核心层基础之上将SPI controller模拟成一个字符型的驱动,向文件系统提供标准的文件系统接口,用来操作对应的SPI
controller。
下面我们来看看spi子系统是怎么注册进内核的:
view
plain
static int __init spi_init(void)
{
int status;
buf = kmalloc(SPI_BUFSIZ, GFP_KERNEL);
if (!buf) {
status = -ENOMEM;
goto err0;
}
status = bus_register(&spi_bus_type);
if (status < 0)
goto err1;
status = class_register(&spi_master_class);
if (status < 0)
goto err2;
return 0;
err2:
bus_unregister(&spi_bus_type);
err1:
kfree(buf);
buf = NULL;
err0:
return status;
}
postcore_initcall(spi_init);
这里注册了一个spi_bus_type,也就是一个spi总线,和一个spi_master的class。分别对应上图中sys/bus/下的spi目录和sys/class/下的spi_master目录。
下面来分析SPI controller驱动的注册与初始化过程,首先执行的是s3c24xx_spi_init。
view
plain
static int __init s3c24xx_spi_init(void)
{
return platform_driver_probe(&s3c24xx_spi_driver, s3c24xx_spi_probe);
}
platform_driver_probe中完成了s3c24xx_spi_driver这个平台驱动的注册,相应的平台设备在devs.c中定义,在smdk2440_devices中添加&s3c_device_spi0,&s3c_device_spi1,这就生成了图中所示的s3c24xx-spi.0与s3c24xx-spi.1,当然了这图是在网上找的,不是我画的,所以是6410的。这里s3c24xx-spi.0表示s3c2440的spi controller的0号接口,s3c24xx-spi.1表示s3c2440的spi
controller的1号接口。注册了s3c24xx_spi_driver后,赋值了平台驱动的probe函数为s3c24xx_spi_probe。所以当match成功后,调用s3c24xx_spi_probe,这里看其实现:
view
plain
<span style="font-size:18px;">static int __init s3c24xx_spi_probe(struct platform_device *pdev)
{
struct s3c2410_spi_info *pdata;
struct s3c24xx_spi *hw;
struct spi_master *master;
struct resource *res;
int err = 0;
/*分配struct spi_master+struct s3c24xx_spi大小的数据,把s3c24xx_spi设为spi_master的私有数据*/
master = spi_alloc_master(&pdev->dev, sizeof(struct s3c24xx_spi));
if (master == NULL) {
dev_err(&pdev->dev, "No memory for spi_master\n");
err = -ENOMEM;
goto err_nomem;
}
/*从master中获得s3c24xx_spi*/
hw = spi_master_get_devdata(master);
memset(hw, 0, sizeof(struct s3c24xx_spi));
hw->master = spi_master_get(master);
/*驱动移植的时候需要实现的重要结构,初始化为&s3c2410_spi0_platdata*/
hw->pdata = pdata = pdev->dev.platform_data;
hw->dev = &pdev->dev;
if (pdata == NULL) {
dev_err(&pdev->dev, "No platform data supplied\n");
err = -ENOENT;
goto err_no_pdata;
}
/*设置平台的私有数据为s3c24xx_spi*/
platform_set_drvdata(pdev, hw);
init_completion(&hw->done);
/* setup the master state. */
/*该总线上的设备数*/
master->num_chipselect = hw->pdata->num_cs;
/*总线号*/
master->bus_num = pdata->bus_num;
/* setup the state for the bitbang driver */
/*spi_bitbang专门负责数据的传输*/
hw->bitbang.master = hw->master;
hw->bitbang.setup_transfer = s3c24xx_spi_setupxfer;
hw->bitbang.chipselect = s3c24xx_spi_chipsel;
hw->bitbang.txrx_bufs = s3c24xx_spi_txrx;
hw->bitbang.master->setup = s3c24xx_spi_setup;
dev_dbg(hw->dev, "bitbang at %p\n", &hw->bitbang);
。。。。。。。。。。。。。。。。。。。。。。。。
/*初始化设置寄存器,包括对SPIMOSI,SPIMISO,SPICLK引脚的设置*/
s3c24xx_spi_initialsetup(hw);
/* register our spi controller */
err = spi_bitbang_start(&hw->bitbang);
。。。。。。。。。。。。。。。。。。。。。
}
spi controller的register在spi_bitbang_start函数中实现:
int spi_bitbang_start(struct spi_bitbang *bitbang)
{
int status;
if (!bitbang->master || !bitbang->chipselect)
return -EINVAL;
/*动态创建一个work_struct结构,它的处理函数是bitbang_work*/
INIT_WORK(&bitbang->work, bitbang_work);
spin_lock_init(&bitbang->lock);
INIT_LIST_HEAD(&bitbang->queue);
/*spi的数据传输就是用这个方法*/
if (!bitbang->master->transfer)
bitbang->master->transfer = spi_bitbang_transfer;
if (!bitbang->txrx_bufs) {
bitbang->use_dma = 0;
/*spi_s3c24xx.c中有spi_bitbang_bufs方法,在bitbang_work中被调用*/
bitbang->txrx_bufs = spi_bitbang_bufs;
if (!bitbang->master->setup) {
if (!bitbang->setup_transfer)
bitbang->setup_transfer =
spi_bitbang_setup_transfer;
/*在spi_s3c24xx.c中有setup的处理方法,在spi_new_device中被调用*/
bitbang->master->setup = spi_bitbang_setup;
bitbang->master->cleanup = spi_bitbang_cleanup;
}
} else if (!bitbang->master->setup)
return -EINVAL;
/* this task is the only thing to touch the SPI bits */
bitbang->busy = 0;
/调用create_singlethread_workqueue创建单个工作线程/
bitbang->workqueue = create_singlethread_workqueue(
dev_name(bitbang->master->dev.parent));
if (bitbang->workqueue == NULL) {
status = -EBUSY;
goto err1;
}
status = spi_register_master(bitbang->master);
if (status < 0)
goto err2;
return status;
err2:
destroy_workqueue(bitbang->workqueue);
err1:
return status;
}</span>
然后看这里是怎样注册spi主机控制器驱动的:
view
plain
int spi_register_master(struct spi_master *master)
{
。。。。。。。。。。。。。。。。
/*将spi添加到内核,这也是sys/class/Spi_master下产生Spi0,Spi1的原因*/
dev_set_name(&master->dev, "spi%u", master->bus_num);
status = device_add(&master->dev);
scan_boardinfo(master);
}
这里跟踪scan_boardinfo函数:
view
plain
static void scan_boardinfo(struct spi_master *master)
{
struct boardinfo *bi;
mutex_lock(&board_lock);
/*遍历所有挂在board_list上的struct boardinfo*/
list_for_each_entry(bi, &board_list, list) {
struct spi_board_info *chip = bi->board_info;
unsigned n;
/*遍历每个boardinfo管理的spi_board_info,如果设备的总线号与控制器的总线好相等,则创建新设备*/
for (n = bi->n_board_info; n > 0; n--, chip++) {
if (chip->bus_num != master->bus_num)
continue;
(void) spi_new_device(master, chip);
}
}
mutex_unlock(&board_lock);
}
在移植的时候我们会在mach-smdk2440.c中的smdk2440_machine_init中添加spi_register_board_info
这个函数完成了将spi_board_info交由boardinfo管理,并把boardinfo挂载到board_list链表上。也就是说在系统初始化的时候将spi_device交由到挂在board_list上的boardinfo管理,在spi controller的driver注册的时候不但注册这个主机控制器的驱动,还要遍历这个主机控制器的总线上的spi_device,将总线上的spi_device全部注册进内核。当注册进内核并且spi_driver已经注册的时候,如果总线match成功,则会调用spi_driver的probe函数,这个将在后边进行分析。
view
plain
<span style="font-size:18px;">int __init
spi_register_board_info(struct spi_board_info const *info, unsigned n)
{
struct boardinfo *bi;
bi = kmalloc(sizeof(*bi) + n * sizeof *info, GFP_KERNEL);
if (!bi)
return -ENOMEM;
bi->n_board_info = n;
memcpy(bi->board_info, info, n * sizeof *info);
mutex_lock(&board_lock);
list_add_tail(&bi->list, &board_list);
mutex_unlock(&board_lock);
return 0;
}</span>
看一下创建新设备的函数:
view
plain
<span style="font-size:18px;">struct spi_device *spi_new_device(struct spi_master *master,
struct spi_board_info *chip)
{
struct spi_device *proxy;
int status;
proxy = spi_alloc_device(master);
if (!proxy)
return NULL;
WARN_ON(strlen(chip->modalias) >= sizeof(proxy->modalias));
/*初始化spi_device的各个字段*/
proxy->chip_select = chip->chip_select;
proxy->max_speed_hz = chip->max_speed_hz;
proxy->mode = chip->mode;
proxy->irq = chip->irq;
/*这里获得了spi_device的名字,这个modalias也是在我们移植时在mach-smdk2440.c中的s3c2410_spi0_board中设定的*/
strlcpy(proxy->modalias, chip->modalias, sizeof(proxy->modalias));
proxy->dev.platform_data = (void *) chip->platform_data;
proxy->controller_data = chip->controller_data;
proxy->controller_state = NULL;
/*主要完成将spi_device添加到内核*/
status = spi_add_device(proxy);
if (status < 0) {
spi_dev_put(proxy);
return NULL;
}
return proxy;
}</span>
下面来看分配spi_alloc_device的函数,主要完成了分配spi_device,并初始化spi->dev的一些字段。
view
plain
struct spi_device *spi_alloc_device(struct spi_master *master)
{
struct spi_device *spi;
struct device *dev = master->dev.parent;
if (!spi_master_get(master))
return NULL;
spi = kzalloc(sizeof *spi, GFP_KERNEL);
if (!spi) {
dev_err(dev, "cannot alloc spi_device\n");
spi_master_put(master);
return NULL;
}
spi->master = master;
spi->dev.parent = dev;
/*设置总线是spi_bus_type,下面会讲到spi_device与spi_driver是怎样match上的*/
spi->dev.bus = &spi_bus_type;
spi->dev.release = spidev_release;
device_initialize(&spi->dev);
return spi;
}
下面来看分配的这个spi_device是怎样注册进内核的:
view
plain
int spi_add_device(struct spi_device *spi)
{
static DEFINE_MUTEX(spi_add_lock);
struct device *dev = spi->master->dev.parent;
int status;
/*spi_device的片选号不能大于spi控制器的片选数*/
if (spi->chip_select >= spi->master->num_chipselect) {
dev_err(dev, "cs%d >= max %d\n",
spi->chip_select,
spi->master->num_chipselect);
return -EINVAL;
}
/*这里设置是spi_device在Linux设备驱动模型中的name,也就是图中的spi0.0,而在/dev/下设备节点的名字是proxy->modalias中的名字*/
dev_set_name(&spi->dev, "%s.%u", dev_name(&spi->master->dev),
spi->chip_select);
mutex_lock(&spi_add_lock);
/*如果总线上挂的设备已经有这个名字,则设置状态忙碌,并退出*/
if (bus_find_device_by_name(&spi_bus_type, NULL, dev_name(&spi->dev))
!= NULL) {
dev_err(dev, "chipselect %d already in use\n",
spi->chip_select);
status = -EBUSY;
goto done;
}
/对spi_device的时钟等进行设置/
status = spi->master->setup(spi);
if (status < 0) {
dev_err(dev, "can't %s %s, status %d\n",
"setup", dev_name(&spi->dev), status);
goto done;
}
/*添加到内核*/
status = device_add(&spi->dev);
if (status < 0)
dev_err(dev, "can't %s %s, status %d\n",
"add", dev_name(&spi->dev), status);
else
dev_dbg(dev, "registered child %s\n", dev_name(&spi->dev));
done:
mutex_unlock(&spi_add_lock);
return status;
}
static int s3c24xx_spi_setup(struct spi_device *spi)
{
。。。。。。。。。。。。。。
ret = s3c24xx_spi_setupxfer(spi, NULL);
。。。。。。。。。。。。。。
}
static int s3c24xx_spi_setupxfer(struct spi_device *spi,
struct spi_transfer *t)
{
struct s3c24xx_spi *hw = to_hw(spi);
unsigned int bpw;
unsigned int hz;
unsigned int div;
/*设置了每字长的位数,发送速度*/
bpw = t ? t->bits_per_word : spi->bits_per_word;
hz = t ? t->speed_hz : spi->max_speed_hz;
if (bpw != 8) {
dev_err(&spi->dev, "invalid bits-per-word (%d)\n", bpw);
return -EINVAL;
}
/*色黄志分频值*/
div = clk_get_rate(hw->clk) / hz;
/* is clk = pclk / (2 * (pre+1)), or is it
* clk = (pclk * 2) / ( pre + 1) */
div /= 2;
if (div > 0)
div -= 1;
if (div > 255)
div = 255;
dev_dbg(&spi->dev, "setting pre-scaler to %d (hz %d)\n", div, hz);
writeb(div, hw->regs + S3C2410_SPPRE);
spin_lock(&hw->bitbang.lock);
if (!hw->bitbang.busy) {
hw->bitbang.chipselect(spi, BITBANG_CS_INACTIVE);
/* need to ndelay for 0.5 clocktick ? */
}
spin_unlock(&hw->bitbang.lock);
return 0;
}
下面来看这个spi_driver是怎样注册的,又是与spi_device怎样match上的。
在spidev.c中:
view
plain
static int __init spidev_init(void)
{
int status;
BUILD_BUG_ON(N_SPI_MINORS > 256);
status = register_chrdev(SPIDEV_MAJOR, "spi", &spidev_fops);
if (status < 0)
return status;
spidev_class = class_create(THIS_MODULE, "spidev");
if (IS_ERR(spidev_class)) {
unregister_chrdev(SPIDEV_MAJOR, spidev_spi.driver.name);
return PTR_ERR(spidev_class);
}
status = spi_register_driver(&spidev_spi);
if (status < 0) {
class_destroy(spidev_class);
unregister_chrdev(SPIDEV_MAJOR, spidev_spi.driver.name);
}
return status;
}
注册了名为”spi”的字符驱动,然后注册了spidev_spi驱动,这个就是图中sys/Bus/Spi/Drivers/下的spidev。
view
plain
static struct spi_driver spidev_spi = {
.driver = {
.name = "spidev",
.owner = THIS_MODULE,
},
.probe = spidev_probe,
.remove = __devexit_p(spidev_remove),
};
view
plain
static struct spi_driver spidev_spi = {
.driver = {
.name = "spidev",
.owner = THIS_MODULE,
},
.probe = spidev_probe,
.remove = __devexit_p(spidev_remove),
};
这里来看__driver_attach这个函数,其中分别调用了driver_match_device,driver_probe_device函数。如果匹配成果调用probe函数,否则返回。
view
plain
static int __driver_attach(struct device *dev, void *data)
{
struct device_driver *drv = data;
if (!driver_match_device(drv, dev))
return 0;
if (dev->parent) /* Needed for USB */
down(&dev->parent->sem);
down(&dev->sem);
if (!dev->driver)
driver_probe_device(drv, dev);
up(&dev->sem);
if (dev->parent)
up(&dev->parent->sem);
return 0;
}
匹配的时候调用的bus的match函数。
view
plain
struct bus_type spi_bus_type = {
.name = "spi",
.dev_attrs = spi_dev_attrs,
.match = spi_match_device,
.uevent = spi_uevent,
.suspend = spi_suspend,
.resume = spi_resume,
};
static int spi_match_device(struct device *dev, struct device_driver *drv)
{
const struct spi_device *spi = to_spi_device(dev);
return strcmp(spi->modalias, drv->name) == 0;
}
可以看到这里根据驱动和设备的名字进行匹配,匹配成功后调用驱动的probe函数。
view
plain
static int spi_drv_probe(struct device *dev)
{
const struct spi_driver *sdrv = to_spi_driver(dev->driver);
return sdrv->probe(to_spi_device(dev));
}
可以看大调用了具体的probe函数,这里实现了把spidev添加到device_list,这样这个虚拟的字符驱动就注册并初始化完毕。
view
plain
static int spidev_remove(struct spi_device *spi)
{
struct spidev_data *spidev = spi_get_drvdata(spi);
/* make sure ops on existing fds can abort cleanly */
spin_lock_irq(&spidev->spi_lock);
spidev->spi = NULL;
spi_set_drvdata(spi, NULL);
spin_unlock_irq(&spidev->spi_lock);
/* prevent new opens */
mutex_lock(&device_list_lock);
list_del(&spidev->device_entry);
device_destroy(spidev_class, spidev->devt);
clear_bit(MINOR(spidev->devt), minors);
if (spidev->users == 0)
kfree(spidev);
mutex_unlock(&device_list_lock);
return 0;
}
在spidev的注册函数中注册了文件操作集合file_operations,为用户空间提供了操作SPI controller的接口。
view
plain
static struct file_operations spidev_fops = {
.owner = THIS_MODULE,
/* REVISIT switch to aio primitives, so that userspace
* gets more complete API coverage. It'll simplify things
* too, except for the locking.
*/
.write = spidev_write,
.read = spidev_read,
.unlocked_ioctl = spidev_ioctl,
.open = spidev_open,
.release = spidev_release,
};
到此为止spi子系统与spi_master,spi_device,spi_driver这个Linux设备驱动模型已经建立完了。

相关文章推荐
- Linux驱动修炼之道-SPI驱动框架源码分析(中)
- Linux驱动修炼之道-SPI驱动框架源码分析(中)
- Linux驱动修炼之道-SPI驱动框架源码分析(下)
- Linux驱动修炼之道-SPI驱动框架源码分析(中)
- Linux驱动修炼之道-SPI驱动框架源码分析(下)
- Linux驱动修炼之道-SPI驱动框架源码分析(下)
- Linux驱动修炼之道-SPI驱动框架源码分析(中)
- Linux驱动修炼之道-SPI驱动框架源码分析(中) .
- Linux驱动修炼之道-SPI驱动框架源码分析(下)
- Linux驱动修炼之道-SPI驱动框架源码分析(上)
- Linux驱动修炼之道-SPI驱动框架源码分析
- Linux驱动修炼之道-SPI驱动框架源码分析
- Linux驱动修炼之道-SPI驱动框架源码分析(下-续)
- Linux驱动修炼之道-SPI驱动框架源码分析(中)
- Linux驱动修炼之道-SPI驱动框架源码分析(中)
- Linux驱动修炼之道-SPI驱动框架源码分析(上)
- Linux驱动修炼之道-SPI驱动框架源码分析(中-续)
- Linux驱动修炼之道-SPI驱动框架源码分析
- Linux驱动修炼之道-SPI驱动框架源码分析(上)
- Linux驱动修炼之道-SPI驱动框架源码分析(下) .