OpenCV学习:基本绘图
2014-12-31 11:10
218 查看
opencv_tutorials学习
基本绘图
学习知识点:
Point定义2D点
Scalar使用
line绘制直线
ellipse绘制椭圆
rectangle绘制矩形
circle绘制圆
fillPoly绘制填充的多边形
代码说明:
Point——数据结构表示由图像坐标X和Y指定的2D点,可以定义为
或者
Scalar——表示具有4个元素的数组。在Opencv中被大量用于传递像素值。
用它来表示RGB颜色值(三个参数)。如果用不到第四个参数,则无需定义。
颜色参数表达式:
代码分析:
Myline函数
在图像img上画直线
画一条从点star到点end的直线段
线的颜色由Scalar(0,0,0)来定义,(0,0,0)对应的RGB值为黑色
线的粗细由thickness设定
lineType设定线型,这里为8连通
MyEllipse函数
在img图像上绘制椭圆
椭圆中心由point(w/2.0,w/2.0)指定
大小位于矩形(w/4.0,w/16.0)内
angle定义椭圆的旋转角度
椭圆扩展的弧度从0度到360度
图形颜色为 Scalar( 255, 255, 0) ,既蓝色
绘椭圆的线粗为 thickness ,此处是2
lineType指定线型
MyFilledCircle函数
MyFilledCircle函数调用circle函数:
圆将被画到图像 ( img )上
圆心由点 center 定义
圆的半径为: w/32.0
圆的颜色为: Scalar(0, 0, 255) ,按BGR的格式为 红色
线粗定义为 thickness = -1, 因此次圆将被填充
MyPolygon函数
MyPolygon函数调用fillPoly函数:
多边形将被画到图像 img 上
多边形的顶点集为 ppt
要绘制的多边形顶点数目为 npt
要绘制的多边形数量仅为 1
多边形的颜色定义为 Scalar( 255, 255, 255), 既BGR值为 白色
rentangle函数
矩形将被画到图像 rook_image 上
矩形两个对角顶点为 Point( 0, 7*w/8.0 ) 和 Point( w, w)
矩形的颜色为 Scalar(0, 255, 255) ,既BGR格式下的 黄色
由于线粗为 -1, 此矩形将被填充
附录:opencv提供的函数实现(自己写的注释,请谨慎参考)
基本绘图
学习知识点:
Point定义2D点
Scalar使用
line绘制直线
ellipse绘制椭圆
rectangle绘制矩形
circle绘制圆
fillPoly绘制填充的多边形
代码说明:
Point——数据结构表示由图像坐标X和Y指定的2D点,可以定义为
Point pt;
pt.x = 10;
pt.y = 8;
或者
Point pt = Point(10, 8);
Scalar——表示具有4个元素的数组。在Opencv中被大量用于传递像素值。
用它来表示RGB颜色值(三个参数)。如果用不到第四个参数,则无需定义。
颜色参数表达式:
Scalar( a, b, c )那么定义的RGB颜色值为:Red = c, Green = b and Blue = a(注意定义中的顺序!!)
代码分析:
Myline函数
void MyLine( Mat img, Point start, Point end )
{
int thickness = 2;
int lineType = 8;
line( img,
start,
end,
Scalar( 0, 0, 0 ),
thickness,
lineType );
}Myline调用函数line来实现操作:在图像img上画直线
画一条从点star到点end的直线段
线的颜色由Scalar(0,0,0)来定义,(0,0,0)对应的RGB值为黑色
线的粗细由thickness设定
lineType设定线型,这里为8连通
MyEllipse函数
void MyEllipse( Mat img, double angle )
{
int thickness = 2;
int lineType = 8;

ellipse( img,
Point( w/2.0, w/2.0 ),
Size( w/4.0, w/16.0 ),
angle,
0,
360,
Scalar( 255, 0, 0 ),
thickness,
lineType );
}MyEllipse调用函数ellipse绘制椭圆:在img图像上绘制椭圆
椭圆中心由point(w/2.0,w/2.0)指定
大小位于矩形(w/4.0,w/16.0)内
angle定义椭圆的旋转角度
椭圆扩展的弧度从0度到360度
图形颜色为 Scalar( 255, 255, 0) ,既蓝色
绘椭圆的线粗为 thickness ,此处是2
lineType指定线型
MyFilledCircle函数
void MyFilledCircle( Mat img, Point center )
{
int thickness = -1;
int lineType = 8;

circle( img,
center,
w/32.0,
Scalar( 0, 0, 255 ),
thickness,
lineType );
}
MyFilledCircle函数调用circle函数:
圆将被画到图像 ( img )上
圆心由点 center 定义
圆的半径为: w/32.0
圆的颜色为: Scalar(0, 0, 255) ,按BGR的格式为 红色
线粗定义为 thickness = -1, 因此次圆将被填充
MyPolygon函数
void MyPolygon( Mat img )
{
int lineType = 8;

/** 创建一些点 */
Point rook_points[1][20];
rook_points[0][0] = Point( w/4.0, 7*w/8.0 );
rook_points[0][1] = Point( 3*w/4.0, 7*w/8.0 );
rook_points[0][2] = Point( 3*w/4.0, 13*w/16.0 );
rook_points[0][3] = Point( 11*w/16.0, 13*w/16.0 );
rook_points[0][4] = Point( 19*w/32.0, 3*w/8.0 );
rook_points[0][5] = Point( 3*w/4.0, 3*w/8.0 );
rook_points[0][6] = Point( 3*w/4.0, w/8.0 );
rook_points[0][7] = Point( 26*w/40.0, w/8.0 );
rook_points[0][8] = Point( 26*w/40.0, w/4.0 );
rook_points[0][9] = Point( 22*w/40.0, w/4.0 );
rook_points[0][10] = Point( 22*w/40.0, w/8.0 );
rook_points[0][11] = Point( 18*w/40.0, w/8.0 );
rook_points[0][12] = Point( 18*w/40.0, w/4.0 );
rook_points[0][13] = Point( 14*w/40.0, w/4.0 );
rook_points[0][14] = Point( 14*w/40.0, w/8.0 );
rook_points[0][15] = Point( w/4.0, w/8.0 );
rook_points[0][16] = Point( w/4.0, 3*w/8.0 );
rook_points[0][17] = Point( 13*w/32.0, 3*w/8.0 );
rook_points[0][18] = Point( 5*w/16.0, 13*w/16.0 );
rook_points[0][19] = Point( w/4.0, 13*w/16.0) ;

const Point* ppt[1] = { rook_points[0] };
int npt[] = { 20 };

fillPoly( img,
ppt,
npt,
1,
Scalar( 255, 255, 255 ),
lineType );
}
MyPolygon函数调用fillPoly函数:
多边形将被画到图像 img 上
多边形的顶点集为 ppt
要绘制的多边形顶点数目为 npt
要绘制的多边形数量仅为 1
多边形的颜色定义为 Scalar( 255, 255, 255), 既BGR值为 白色
rentangle函数
rectangle( rook_image,
Point( 0, 7*w/8.0 ),
Point( w, w),
Scalar( 0, 255, 255 ),
-1,
8 );
rentangle函数:
矩形将被画到图像 rook_image 上
矩形两个对角顶点为 Point( 0, 7*w/8.0 ) 和 Point( w, w)
矩形的颜色为 Scalar(0, 255, 255) ,既BGR格式下的 黄色
由于线粗为 -1, 此矩形将被填充
附录:opencv提供的函数实现(自己写的注释,请谨慎参考)
/**
* @file Drawing_1.cpp
* @brief Simple sample code
*/
#include <opencv2/core/core.hpp>
#include <opencv2/highgui/highgui.hpp>
#define w 400
using namespace cv;
/// Function headers
void MyEllipse( Mat img, double angle );
void MyFilledCircle( Mat img, Point center );
void MyPolygon( Mat img );
void MyLine( Mat img, Point start, Point end );
/**
* @function main
* @brief Main function
*/
int main( void ){
/// Windows names
char atom_window[] = "Drawing 1: Atom";//创建两个窗口
char rook_window[] = "Drawing 2: Rook";
/// Create black empty images
Mat atom_image = Mat::zeros( w, w, CV_8UC3 );//创建两个图像,用0黑色填充
Mat rook_image = Mat::zeros( w, w, CV_8UC3 );
/// 1. Draw a simple atom:
/// -----------------------
/// 1.a. Creating ellipses
MyEllipse( atom_image, 90 );//绘制椭圆,参数一是在哪个图像上画,参数二是椭圆的角度
MyEllipse( atom_image, 0 );
MyEllipse( atom_image, 45 );
MyEllipse( atom_image, -45 );
/// 1.b. Creating circles
MyFilledCircle( atom_image, Point( w/2, w/2) );//绘制圆形,参数一指定画图的图像,参数二指定圆的中心
/// 2. Draw a rook
/// ------------------
/// 2.a. Create a convex polygon
MyPolygon( rook_image ); //创建一个凸多边形
/// 2.b. Creating rectangles 创建一个矩形:两个point是矩形的左上角和右下角坐标
rectangle( rook_image,
Point( 0, 7*w/8 ),
Point( w, w),
Scalar( 0, 255, 255 ),
-1,
8 );
/// 2.c. Create a few lines
MyLine( rook_image, Point( 0, 15*w/16 ), Point( w, 15*w/16 ) ); //绘制直线:两个piont是直线的两个端点坐标
MyLine( rook_image, Point( w/4, 7*w/8 ), Point( w/4, w ) );
MyLine( rook_image, Point( w/2, 7*w/8 ), Point( w/2, w ) );
MyLine( rook_image, Point( 3*w/4, 7*w/8 ), Point( 3*w/4, w ) );
/// 3. Display your stuff!
imshow( atom_window, atom_image );
moveWindow( atom_window, 0, 200 ); //移动显示窗口
imshow( rook_window, rook_image );
moveWindow( rook_window, w, 200 );
waitKey( 0 );
return(0);
}
/// Function Declaration
/**
* @function MyEllipse
* @brief Draw a fixed-size ellipse with different angles
*/
void MyEllipse( Mat img, double angle ) //画椭圆的函数,参数是:画椭圆的图像,椭圆的角度
{
int thickness = 2;
int lineType = 8;
ellipse( img, //在img图像上绘制椭圆
Point( w/2, w/2 ), //椭圆中心位置
Size( w/4, w/16 ), //椭圆位于矩形( w/4, w/16 )内
angle, //椭圆的旋转角度angle
0, //椭圆扩展弧度范围0度到360度
360,
Scalar( 0, 255, 0 ), //椭圆颜色,绿色
thickness, //指定椭圆线粗
lineType ); //指定椭圆线型,8连通
}
/**
* @function MyFilledCircle
* @brief Draw a fixed-size filled circle
*/
void MyFilledCircle( Mat img, Point center )
{
int thickness = -1;
int lineType = 8;
circle( img, //圆将被画到img图像上
center, //圆心位置由center定义
w/32, //圆的半径
Scalar( 0, 0, 255 ), //圆的颜色,红色
thickness, //圆的线宽定义为-1,所以圆会被填充
lineType );
}
/**
* @function MyPolygon
* @function Draw a simple concave polygon (rook)
*/
void MyPolygon( Mat img ) //绘制多边形
{
int lineType = 8;
/** Create some points */
Point rook_points[1][20];
rook_points[0][0] = Point( w/4, 7*w/8 );
rook_points[0][1] = Point( 3*w/4, 7*w/8 );
rook_points[0][2] = Point( 3*w/4, 13*w/16 );
rook_points[0][3] = Point( 11*w/16, 13*w/16 );
rook_points[0][4] = Point( 19*w/32, 3*w/8 );
rook_points[0][5] = Point( 3*w/4, 3*w/8 );
rook_points[0][6] = Point( 3*w/4, w/8 );
rook_points[0][7] = Point( 26*w/40, w/8 );
rook_points[0][8] = Point( 26*w/40, w/4 );
rook_points[0][9] = Point( 22*w/40, w/4 );
rook_points[0][10] = Point( 22*w/40, w/8 );
rook_points[0][11] = Point( 18*w/40, w/8 );
rook_points[0][12] = Point( 18*w/40, w/4 );
rook_points[0][13] = Point( 14*w/40, w/4 );
rook_points[0][14] = Point( 14*w/40, w/8 );
rook_points[0][15] = Point( w/4, w/8 );
rook_points[0][16] = Point( w/4, 3*w/8 );
rook_points[0][17] = Point( 13*w/32, 3*w/8 );
rook_points[0][18] = Point( 5*w/16, 13*w/16 );
rook_points[0][19] = Point( w/4, 13*w/16 );
const Point* ppt[1] = { rook_points[0] };
int npt[] = { 20 };
//绘制多边形函数
fillPoly( img, //多边形将被画到图像img上
ppt, //多边形的顶点集为ppt
npt, //要绘制的多边形定点数目为npt
1, //绘制多边形数目
Scalar( 255, 255, 255 ), //多边形的颜色,白色
lineType );
}
/**
* @function MyLine
* @brief Draw a simple line
*/
//画一条从点star到点end的线段的函数
void MyLine( Mat img, Point start, Point end )
{
int thickness = 2;
int lineType = 8;
line( img, //线段将被画到图像img上
start, //线段起点
end, //线段终点
Scalar( 0, 0, 0 ), //线的颜色,黑色
thickness, //线的粗细
lineType ); //线型:8连通
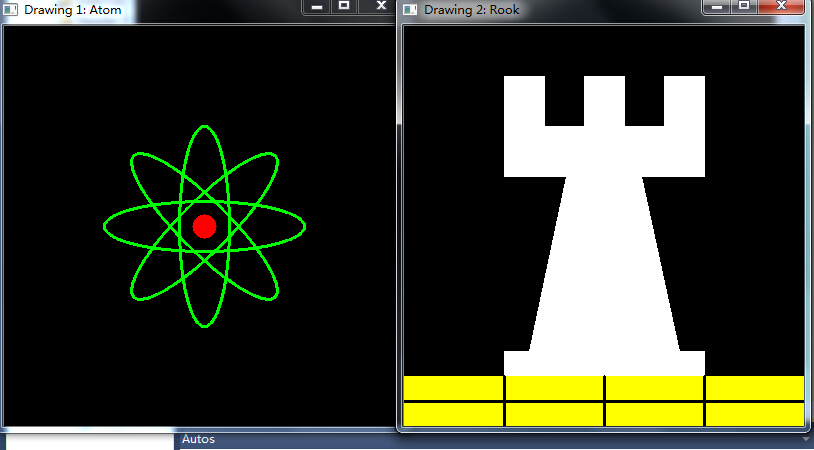
}运行结果:

相关文章推荐
- OpenCV3学习笔记-数据结构和基本绘图
- 学习OpenCV范例(六)——基本绘图
- Python OpenCV学习笔记之:基本绘图
- OpenCv学习笔记(七)---OpenCv中的基本绘图函数,圆,椭圆,线段,矩形,多边形的绘制(1)
- OpenCV 学习记录3 数据结构和基本绘图
- 【OpenCV学习笔记】七、基本绘图函数
- opencv学习笔记——数据结构与基本绘图
- 基础学习笔记之opencv(13):基本绘图
- OpenCV 学习笔记---基本数据类型
- OpenCV学习——基本矩阵
- 学习opencv第三章 基本数据类型 ,矩阵创建,操作,访问
- opencv学习笔记[9]:Opencv的基本数据类型和矩阵结构
- 【OpenCV学习】基本数据结构
- 【OpenCV学习】矩阵基本操作
- OpenCV学习——基本矩阵
- OpenCV学习笔记(一)—OpenCV的基本数据类型和矩阵
- Asymptote 学习记录(1):基本的安装以及用批处理模式和交互模式绘图
- 基础学习笔记之opencv(8):Mat - 基本图像容器
- opencv学习-2-0初探-基本类型数据
- 【OpenCV学习】用绘图函数画一个奥运志愿者笑脸徽章