学习ios蓝牙技术,仿写lightblue
2014-12-26 17:11
375 查看

bluetooth
上一次我们研究完iBeacon,发现iBeacon是基于蓝牙4.0的一个封装而已。那么,今天我们来研究ios的蓝牙4.0的应用。最出名的app当属lightblue,我们不妨来仿写一个lightblue,这样基本的ios蓝牙编程就算入门了。
基本理论
框架与概念
在ios中使用蓝牙技术,会用到CoreBluetooth框架。里面对设备有2个定义:周边(peripeheral)设备 与 中央(central)设备。发送蓝牙信号的是周边设备,接收蓝牙信号的是中央设备。
可以这样理解,周边设备是服务端,中央设备是客户端。中央设备可以去搜索周边有哪些服务端,可以选择连接上其中一台,进行信息获取。
支持蓝牙4.0的手机,可以作为周边设备,也可以作为中央设备,但是不能同时既为周边设备又为中央设备。
类解读
中央设备用 CBCentralManager这个类管理。
周边设备用
CBPeripheralManager这个类管理;
周边设备里面还有服务类
CBService,服务里面有各种各样的特性类
CBCharacteristic。
仿写lightblue
基本流程
假设我们有2台以上可用设备。其中一台作为调试机,用来搜索其它设备,并连接上去。所以,是中央设备
central。
其它设备设置为蓝牙发射器,即是周边设备
peripheral。
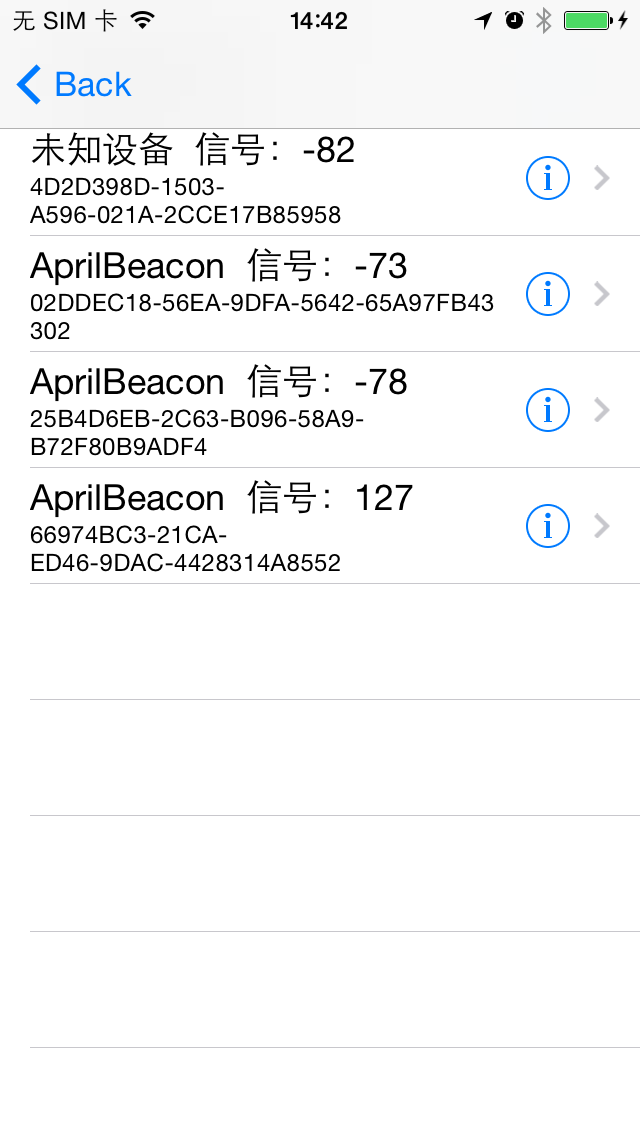
调试机先扫描周边设备,用UITableView展示所扫描到的周边设备。
点击其中一台设备,进行连接
connect。
连接上后,获取其中的所有服务
services。
对其中每个服务进行遍历,获取所有的特性
Characteristic。
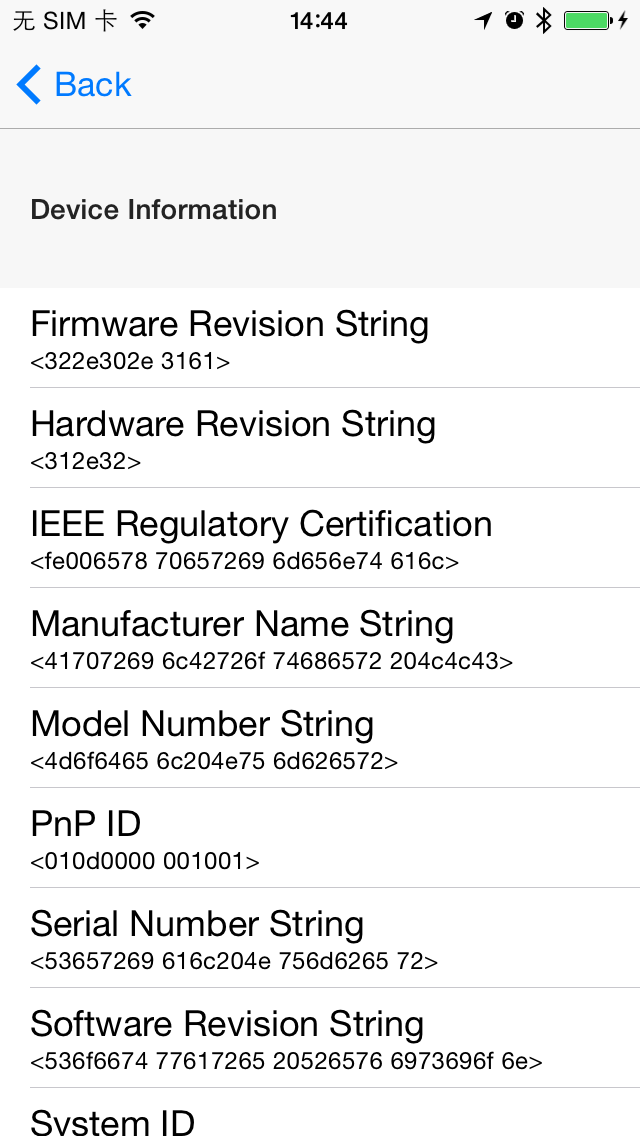
读取每个特性,获取每个特性的值
value。
至此,lightblue基本的仿写思路就清晰列出来了。
1. 扫描设备
先包含头文件1 | #import <CoreBluetooth/CoreBluetooth.h> |
CBCentralManagerDelegate
接着定义2个属性, CBCentralManager用来管理我们的中央设备,NSMutableArray用来保存扫描出来的周边设备。
12 | @property (nonatomic, strong) CBCentralManager *centralMgr; @property (nonatomic, strong) NSMutableArray *arrayBLE; |
CBCentralManager代理,第二个参数设置为nil,因为Peripheral
Manager将Run在主线程中。如果你想用不同的线程做更加复杂的事情,你需要创建一个队列(queue)并将它放在这儿。
12 | self.centralMgr = [[CBCentralManager alloc] initWithDelegate:self queue:nil]; self.arrayBLE = [[NSMutableArray alloc] init]; |
centralManagerDidUpdateState。当Central Manager被初始化,我们要检查它的状态,以检查运行这个App的设备是不是支持BLE。
12 | - (void)centralManagerDidUpdateState:(CBCentralManager *)central
{
switch (central.state)
{
case CBCentralManagerStatePoweredOn:
[self.centralMgr scanForPeripheralsWithServices:nil options:nil];
break;
default:
NSLog(@"Central Manager did change state");
break;
}
} |
-scanForPeripheralsWithServices:options:方法是中央设备开始扫描,可以设置为特定UUID来指,来差找一个指定的服务了。我们需要扫描周边所有设备,第一个参数设置为nil。
当发起扫描之后,我们需要实现
centralManager:didDiscoverPeripheral:advertisementData:RSSI:通过该回调来获取发现设备。
这个回调说明着广播数据和信号质量(RSSI-Received Signal Strength Indicator)的周边设备被发现。通过信号质量,可以用判断周边设备离中央设备的远近。
12 | - (void)centralManager:(CBCentralManager *)central didDiscoverPeripheral:(CBPeripheral *)peripheral advertisementData:(NSDictionary *)advertisementData RSSI:(NSNumber *)RSSI
{
BLEInfo *discoveredBLEInfo = [[BLEInfo alloc] init];
discoveredBLEInfo.discoveredPeripheral = peripheral;
discoveredBLEInfo.rssi = RSSI;
// update tableview
[self saveBLE:discoveredBLEInfo];
} |
12 | @interface BLEInfo : NSObject @property (nonatomic, strong) CBPeripheral *discoveredPeripheral; @property (nonatomic, strong) NSNumber *rssi; @end |
12 | - (BOOL)saveBLE:(BLEInfo *)discoveredBLEInfo
{
for (BLEInfo *info in self.arrayBLE)
{
if ([info.discoveredPeripheral.identifier.UUIDString isEqualToString:discoveredBLEInfo.discoveredPeripheral.identifier.UUIDString])
{
return NO;
}
}
[self.arrayBLE addObject:discoveredBLEInfo];
[self.tableView reloadData];
return YES;
} |

扫描到的周边设备
2. 连接设备
当我们点击其中一个设备,尝试进行连接。lightblue是点击后就立马连接的,然后在下一个UITableView来展示该周边设备的服务与特性。而我是进入下一页UITableView才开始连接,差别不大。但是注意的是,一定要把我们之前的self.centralMgr传递到下一页的UITableView来使用,并且重新设置delegate。
用来展示服务和特性的UITableViewController:
12 | #import <UIKit/UIKit.h> |
12 | - (void)viewDidLoad
{
[super viewDidLoad];
[_centralMgr setDelegate:self];
if (_discoveredPeripheral)
{
[_centralMgr connectPeripheral:_discoveredPeripheral options:nil];
}
_arrayServices = [[NSMutableArray alloc] init];
_characteristicNum = 0;
} |
[centralMgr connectPeripheral:discoveredPeripheral options:nil];
就是中央设备向周边设备发起连接。
我们可以实现下面的函数,如果连接失败,就会得到回调:
12 | - (void)centralManager:(CBCentralManager *)central didFailToConnectPeripheral:(CBPeripheral *)peripheral error:(NSError *)error
{
NSLog(@"didFailToConnectPeripheral : %@", error.localizedDescription);
} |
didConnectPeripheral,只要连接成功,就能回调到该函数,开始获取服务。
12 | - (void)centralManager:(CBCentralManager *)central didConnectPeripheral:(CBPeripheral *)peripheral
{
[self.arrayServices removeAllObjects];
[_discoveredPeripheral setDelegate:self];
[_discoveredPeripheral discoverServices:nil];
} |
discoverServices就是查找该周边设备的服务。
3. 获取服务
当找到了服务之后,就能进入didDiscoverServices的回调。我们把全部服务都保存起来。
12 | - (void)peripheral:(CBPeripheral *)peripheral didDiscoverServices:(NSError *)error
{
if (error)
{
NSLog(@"didDiscoverServices : %@", [error localizedDescription]);
// [self cleanup];
return;
}
for (CBService *s in peripheral.services)
{
NSLog(@"Service found with UUID : %@", s.UUID);
NSMutableDictionary *dic = [[NSMutableDictionary alloc] initWithDictionary:@{SECTION_NAME:s.UUID.description}];
[self.arrayServices addObject:dic];
[s.peripheral discoverCharacteristics:nil forService:s];
}
} |
4. 获取特性
我们通过discoverCharacteristics来获取每个服务下的特性,通过下面的回调来获取。
12 | - (void)peripheral:(CBPeripheral *)peripheral didDiscoverCharacteristicsForService:(CBService *)service error:(NSError *)error
{
if (error)
{
NSLog(@"didDiscoverCharacteristicsForService error : %@", [error localizedDescription]);
return;
}
for (CBCharacteristic *c in service.characteristics)
{
self.characteristicNum++;
[peripheral readValueForCharacteristic:c];
}
} |
5. 获取特性值
readValueForCharacteristic可以读取特性的值。
通过下面的回调,就能得到特性值。
12 | - (void)peripheral:(CBPeripheral *)peripheral didUpdateValueForCharacteristic:(CBCharacteristic *)characteristic error:(NSError *)error
{
self.characteristicNum--;
if (self.characteristicNum == 0)
{
[self.tableView reloadData];
}
if (error)
{
NSLog(@"didUpdateValueForCharacteristic error : %@", error.localizedDescription);
return;
}
NSString *stringFromData = [[NSString alloc] initWithData:characteristic.value encoding:NSUTF8StringEncoding];
if ([stringFromData isEqualToString:@"EOM"])
{
NSLog(@"the characteristic text is END");
// [peripheral setNotifyValue:NO forCharacteristic:characteristic];
// [self.centralMgr cancelPeripheralConnection:peripheral];
}
for (NSMutableDictionary *dic in self.arrayServices)
{
NSString *service = [dic valueForKey:SECTION_NAME];
if ([service isEqual:characteristic.service.UUID.description])
{
NSLog(@"characteristic.description : %@", characteristic.UUID.description);
[dic setValue:characteristic.value forKey:characteristic.UUID.description];
}
}
} |

连接到周边设备获得的蓝牙信息
其它
本来苹果是提供了xcode5.0加ios7的模拟器来实现模拟器开启蓝牙的,本来连文章都给出了:https://developer.apple.com/library/ios/technotes/tn2295/_index.html后来苹果把这文章给删了,还把ios7模拟器支持开启蓝牙给去掉。
那么,可以通过这个文章/article/1576040.html,使用6.0的模拟器来调试。
参考文章
iOS CoreBluetooth 教程藍牙 BLE CoreBluetooth 初探
蓝牙4.0 For IOS
相关文章推荐
- 学习ios蓝牙技术,仿写lightblue
- J2ME蓝牙技术学习
- iOS 学习小菜鸟之蓝牙corebluetooth
- 黑马程序员——-IOS学习五:UITabBarController初步-——黑马 ios 技术博客
- iOS 学习之-蓝牙
- 黑马程序员——IOS学习九:ios开发之数据的持久化存储机制——黑马 ios 技术博客
- 第一天开始学习蓝牙技术
- 黑马程序员——黑马IOS面试学习三:Objective-C 中一些关键字和概念的总汇——黑马 ios 技术博客
- 黑马程序员——IOS学习三:Objective-C的扩展OOP,类别,内存管理等——黑马 ios 技术博客
- 黑马程序员——IOS学习之二:Objective-C基础语法和关键字——黑马 ios 技术博客
- 黑马程序员——ios面试学习一:Mac系统使用教程——黑马 ios 技术博客
- 从今天开始学习iOS开发(iOS 7版)--iOS 技术
- IOS学习之蓝牙4.0
- iOS学习,蓝牙,iOS设备模拟BLE发送数据
- 黑马程序员——IOS学习四:基础控件Label,textfield,button等使用——黑马 ios 技术博客
- 关注iOSDevTip,学习交流ios最新技术
- iOS学习,蓝牙,读取数据方式
- IOS学习之蓝牙4.0
- 黑马程序员——IOS学习七:UINavigationController控件的初步——黑马 ios 技术博客
- 黑马程序员——黑马IOS面试学习二:C语言语法总结——黑马 ios 技术博客
