linux 程序包之编译安装
2014-12-18 17:22
127 查看
编译安装
什么是源码包:
源码包,也就是程序代码是可见的,非加密状态的程序包。程序包开源,则表示提供源码包程序+宽松的许可证书;
程序安装面临问题:
1、不想使用发行版厂商和其他厂商提供的rpm包,而想自己使用未编译的源码包;
2、编译打包时,就决定了程序的功能。实际只需要使用2种功能,发行商打包时添加了更多功能,加大bug出现机率;
3、当我们要深度优化系统的时候,很多程序都需要我们自己去定制安装,需要自己动手编译;
源码包的好处:
1、根据用户的心意随意定制;
2、可以二次开发;
源码包的用处:
软件的开放源码就是类似,开发者在给我们软件的同时,也会告诉我们软件是怎么开发出来的;只要我们的水平足够的高,所有的代码都在那里,我们就可以修改和定制软件,以适合我们的需要;
源码包的存在形式:
源代码一般以file.tar.gz file.tar.bz2或file.src.rpm 打包起来;
编译安装的前提条件:
首先我们在Linux系统中至少得把开发工具安装上,比如 gcc
;perl;python;glibc;gtk;make ;automake
等开发工具或基础包;还要安装一些相应的开发包,一般是文件名包括dev的,比如kernel-devel;还有一些开发库,比如以lib开头的;如果您在编译软件时,有时提示缺少什么东西之类的,大多少的是这些开发工具和开发库等;从光盘中找出安装就是了;有时光盘没有提供,请用google搜索相应的
软件包,有时可能也会用到源码包编译安装所依赖的包;
有时本来系统中已经安装了所依赖的包,但系统提示找不到应该怎么办?这时需要我们设置一下PKG_CONFIG_PATH的环境变量就行了;
#export PKG_CONFIG_PATH=/usr/lib/pkgconfig
或
#export PKG_CONFIG_PATH=/usr/local/lib/pkgconfig
然后我们再来运行编译的./configure ;make ;make install ,尝试着来吧
源码包安装方式:编译安装:
编译安装的大致顺序:
1、获得压缩的源码软件包
2、准备好开发环境
3、./configure (--help,此处指定自定义程序功能和安装目录)
4、make (编译)
5、make install (编译安装)
6、输出:
二进制文件;
头文件;
库文件;
man文档;
头文件、库文件和二进制输出给系统:
由来:当安装了程序之后,某些程序执行时,需要带上本身的头文件和库文件,头文件和库文件在自身的安装目录下面。但是其他用户执行时不会去读取安装目录下的这个头文件和库文件,只能将这个头文件放到系统公共位置才行。 头文件公共位置:/usr/include/下面; 库文件公共位置:/etc/ld.so.conf/下面; 方法: 1、头文件解决方式: 创建链接:将安装目录中的头文件链接到公共头文件目录下; 1、将这个头文件目录下的所有头文件链接走:ln -sv /usr/local/apache/include/* /usr/include/; 2、将头文件目录链接走:ln -sv/usr/local/apache/include /usr/include/httpd;(更合理,便于管理) 2、库文件解决方式:1、新增搜索路径;2、配置文件指定搜索路径下新增文件; 1、新建/etc/ld.so.conf.d/chen.conf文件;一定要在/etc/ld.so.conf.d/目录下去新增,不然配置文件找不到它!! 将“/usr/local/apache/lib”这个路径写到这个新的配置文件中即可(将某个程序的安装目录下的lib库文件写到公共库路径下的自定义的配置文件中。可每行写一个路径); 再执行,ldconfig -v:重建库缓存,让新添加的库配置文件生效。; 2、直接去修改/etc/ld.so.conf,这个配置文件,新增路径即可; vim /etc/ld.so.conf include ld.so.conf.d/*.conf :原来的那条,不动; /usr/local/apache/lib :关键,新增一条搜索路径。如果多个,必须每行一个; 注意:/etc/ld.soZ.cache,存放系统开始时缓存的所有库文件,修改了库配置文件之后,要重新缓存,不然不生效; 使用ldconfig命令去重建缓存,或者重启机器; 3、二进制程序输出: $PATH变量下面存放系统调用的而进程路径,加入我编译安装一个程序后,在执行该程序的命令是更加方便时,怎么办? 1、临时生效: PATH=/usr/local/apache/bin:/usr/local/apache/sbin:$PATH
2、修改环境变量配置文件,系统自动加载到shell里:(有可能造成一般用户也能使用该程序命令) vim /etc/profile.d/chen.sh(新加的) PATH=/usr/local/apache/bin:/usr/local/apache/sbin:$PATH export PATH wq ./etc/profile.d/chen.sh (重读,使新环境变量生效) 增加程序帮助手册到man配置文件:
由来:因为我们编译安装了程序,全部东西都需手动指定,因此,man命令无法找到我安装的程序帮助手册,所以就得自定义; 方法: 1、改变man配置文件: vim/etc/man.config NANPATH=/usr/local/apache/man :将我安装的程序的帮助手册添加到man可搜索的路径范围内即可。写到man路径下; 注意:一般编译安装的程序的帮助手册都放在安装目录下的man目录下面; 2、直接使用man命令打开安装程序的帮助手册: man -M/usr/local/apache/man/httpd 编译安装示例:
编译安装nginx程序包
nginx简单介绍:
Nginx 是一个很强大的高性能Web和反向代理服务器,它具有很多非常优越的特性,在高连接并发的情况下,Nginx是Apache服务器不错的替代品;
安装步骤:
1、首先,我们需要找到一个nginx的源码包,源码包可通过官网下载,或者找一些外网站点去下载。我这里找到一个外网的站点:http://nginx.org/download/ ,这个站点上提供了可供下载的nginx的最新版,使用wget下载非常方便。
[root@localhost ~]# wget http://nginx.org/download/nginx-1.7.8.tar.gz --2014-12-19 06:23:41-- http://nginx.org/download/nginx-1.7.8.tar.gz 47% [=====================> ] 605,122 14.2K/s eta(鑻卞浗涓48% [=====================> ] 610,834 14.5K/s eta(英国中部时49% [======================> ] 627,970 15.4K/s eta(英国中部时49% [======================> ] 630,826 15.4K/s eta(英国中部时50% [======================> ] 640,822 15.1K/s eta(英国中部时50% [======================> ] 642,250 14.4K/s eta(英国中部时50%
98% [=============================================> ] 1,252,006 18.3K/s eta(英国中部时98% [=============================================> ] 1,259,146 18.6K/s eta(英国中部时99% [=============================================> ] 1,262,002 18.6K/s eta(英国中部时99% [=============================================> ] 1,267,714 18.3K/s eta(英国中部时100%[==============================================>] 1,272,511 19.0K/s in 85s
99% [=============================================> ] 819,391 18.6K/s eta(英国中部时100%[==============================================>] 823,122 18.8K/s eta(英国中部时100%[==============================================>] 823,122 18.8K/s in 45s
2014-12-19 06:35:25 (18.0 KB/s) - 已保存 “nginx-1.7.8.tar.gz” [823122/823122])
[root@localhost ~]# ls
anaconda-ks.cfg install.log.syslog 公共的 视频 文档 音乐
install.log nginx-1.7.8.tar.gz 模板 图片 下载 桌面
下载到本地目录,并且是一个zip的压缩包;
2、接下来,我们解药这个压缩包,进入解压后的文件,并查看./configure --help信息
[root@localhost ~]# tar xf nginx-1.7.8.tar.gz
[root@localhost ~]#
[root@localhost ~]# ls
anaconda-ks.cfg install.log.syslog nginx-1.7.8.tar.gz 模板 图片 下载 桌面
install.log nginx-1.7.8 公共的 视频 文档 音乐
[root@localhost ~]#
[root@localhost ~]# cd nginx-1.7.8
[root@localhost nginx-1.7.8]# ls
auto CHANGES CHANGES.ru conf configure contrib html LICENSE man README src
[root@localhost nginx-1.7.8]# pwd
/root/nginx-1.7.8
[root@localhost nginx-1.7.8]#
[root@localhost nginx-1.7.8]# ./configure --help
--help print this message
--prefix=PATH set installation prefix (指定安装路径)
--sbin-path=PATH set nginx binary pathname
--conf-path=PATH set nginx.conf pathname
--error-log-path=PATH set error log pathname
--pid-path=PATH set nginx.pid pathname
--lock-path=PATH set nginx.lock pathname
--user=USER set non-privileged user for
worker processes
--group=GROUP set non-privileged group for
worker processes
3、解压完成之后,接下来开始执行./configure 脚本。
[root@localhost nginx-1.7.8]# ./configure
checking for OS
+ Linux 2.6.32-504.el6.x86_64 x86_64
checking for C compiler ... not found
./configure: error: C compiler cc is not found
[root@localhost nginx-1.7.8]#
出现错误了,提示c或者cc没有发现,什么意思??也就是c编辑器没有找到,说明这个程序在编写时跟c有关联,所以需要c环境。
4、接下来安装编译所需要的环境,如基础包、开发工具、开发包..
[root@localhost nginx-1.7.8]# yum list gcc
[root@localhost nginx-1.7.8]# whereis gcc :没有安装gcc编译环境;
gcc:
安装gcc编译环境:
[root@localhost nginx-1.7.8]# yum -y install gcc
[root@localhost nginx-1.7.8]# yum -y install gcc-c++
安装开发工具和开发包:
[root@localhost nginx-1.7.8]# yum -y install ncurses-devel
[root@localhost nginx-1.7.8]# yum -y install perl
[root@localhost nginx-1.7.8]# yum -y install zlib
[root@localhost nginx-1.7.8]# yum -y install zlib-devel
5、创建nginx的安装目录,并再次执行./configure 脚本
[root@localhost nginx-1.7.8]# ./configure --prefix=/var/nginx/
checking for OS
+ Linux 2.6.32-504.el6.x86_64 x86_64
checking for C compiler ... found
+ using GNU C compiler
+ gcc version: 4.4.7 20120313 (Red Hat 4.4.7-11) (GCC)
checking for gcc -pipe switch ... found
checking for gcc builtin atomic operations ... found
checking for C99 variadic macros ... found
checking for gcc variadic macros ... found
checking for unistd.h ... found
.....
./configure: error: the HTTP rewrite module requires the PCRE library.
You can either disable the module by using --without-http_rewrite_module
option, or install the PCRE library into the system, or build the PCRE library
statically from the source with nginx by using --with-pcre=<path> option.
oh,my god.又报错了,没有安装pcre开发包,类似*-deve的包
安装pcre开发包:
[root@localhost nginx-1.7.8]# yum install pcre-devel
[root@localhost nginx-1.7.8]#
[root@localhost nginx-1.7.8]# ./configure --prefix=/var/nginx/
checking for OS
+ Linux 2.6.32-504.el6.x86_64 x86_64
checking for C compiler ... found
+ using GNU C compiler
+ gcc version: 4.4.7 20120313 (Red Hat 4.4.7-11) (GCC)
checking for gcc -pipe switch ... found
checking for gcc builtin atomic operations ... found
checking for C99 variadic macros ... found
checking for gcc variadic macros ... found
checking for unistd.h ... found
......
Configuration summary
+ using system PCRE library
+ OpenSSL library is not used
+ using builtin md5 code
+ sha1 library is not found
+ using system zlib library
nginx path prefix: "/var/nginx/"
nginx binary file: "/var/nginx//sbin/nginx"
nginx configuration prefix: "/var/nginx//conf"
nginx configuration file: "/var/nginx//conf/nginx.conf"
nginx pid file: "/var/nginx//logs/nginx.pid"
nginx error log file: "/var/nginx//logs/error.log"
nginx http access log file: "/var/nginx//logs/access.log"
nginx http client request body temporary files: "client_body_temp"
nginx http proxy temporary files: "proxy_temp"
nginx http fastcgi temporary files: "fastcgi_temp"
nginx http uwsgi temporary files: "uwsgi_temp"
nginx http scgi temporary files: "scgi_temp"
ok,这次好像成功了!!!!
6、接下来该进行编译和安装了
[root@localhost nginx-1.7.8]#make & make install (编译和安装自动顺序执行)
.......
test -f '/var/nginx//conf/nginx.conf' || cp conf/nginx.conf '/var/nginx//conf/nginx.conf'
cp conf/nginx.conf '/var/nginx//conf/nginx.conf.default'
test -d '/var/nginx//logs' || mkdir -p '/var/nginx//logs'
test -d '/var/nginx//logs' || mkdir -p '/var/nginx//logs'
test -d '/var/nginx//html' || cp -R html '/var/nginx/'
test -d '/var/nginx//logs' || mkdir -p '/var/nginx//logs'
make[1]: Leaving directory `/root/nginx-1.7.8'
[root@localhost nginx-1.7.8]#
[root@localhost nginx]# ls
conf html logs sbin
[root@localhost nginx]#
[root@localhost nginx]# pwd
/var/nginx
[root@localhost nginx]#
安装目录下面生成了文件,成功了!
7、接下来,我们将输出nginx的二进制文件,方便命令的使用
[root@localhost sbin]# pwd
/var/nginx/sbin :命令默认存放在安装目录下的sbin里面;
[root@localhost sbin]# ls
nginx :有个nginx命令;
[root@localhost sbin]#
[root@localhost /]# vim /etc/profile.d/nginx.sh
export PATH
PATH=/var/nginx/sbin:$PATH
export PATH
wq :在$PATH的配置目录下新建一个.sh的文件,让系统默认开机都生效;
[root@localhost /]# ./etc/profile.d/nginx.sh
-bash: ./etc/profile.d/nginx.sh: 权限不够
[root@localhost /]# chmod 755 /etc/profile.d/nginx.sh
[root@localhost /]#
[root@localhost /]# /etc/profile.d/nginx.sh :执行以下nginx.sh
[root@localhost /]#
[root@localhost /]# echo $PATH
/usr/lib64/qt-3.3/bin:/var/nginx/sbin:/usr/local/sbin:/usr/local/bin:/sbin:/bin:/usr/sbin:/usr/bin:/root/bin
执行下新建的配置文件*.sh,让它马上生效;
8、启动nginx服务
[root@localhost /]# netstat -ntl
Active Internet connections (only servers)
Proto Recv-Q Send-Q Local Address Foreign Address State
tcp 0 0 0.0.0.0:22 0.0.0.0:* LISTEN
tcp 0 0 127.0.0.1:631 0.0.0.0:* LISTEN
tcp 0 0 127.0.0.1:25 0.0.0.0:* LISTEN
tcp 0 0 0.0.0.0:53241 0.0.0.0:* LISTEN
tcp 0 0 0.0.0.0:111 0.0.0.0:* LISTEN
tcp 0 0 :::43540 :::* LISTEN
tcp 0 0 :::22 :::* LISTEN
tcp 0 0 ::1:631 :::* LISTEN
tcp 0 0 ::1:25 :::* LISTEN
tcp 0 0 :::111 :::*
当前系统没有开启80端口的服务
[root@localhost ~]#nginx -c /var/nginx/conf/nginx.conf (启动nginx服务)
[root@localhost ~]#
[root@localhost ~]# netstat -ntl
Active Internet connections (only servers)
Proto Recv-Q Send-Q Local Address Foreign Address State
tcp 0 0 0.0.0.0:22 0.0.0.0:* LISTEN
tcp 0 0 127.0.0.1:631 0.0.0.0:* LISTEN
tcp 0 0 127.0.0.1:25 0.0.0.0:* LISTEN
tcp 0 0 0.0.0.0:53241 0.0.0.0:* LISTEN
tcp 0 0 0.0.0.0:111 0.0.0.0:* LISTEN
tcp 0 0 0.0.0.0:80 0.0.0.0:* LISTEN
tcp 0 0 :::43540 :::* LISTEN
tcp 0 0 :::22 :::* LISTEN
tcp 0 0 ::1:631 :::* LISTEN
tcp 0 0 ::1:25 :::* LISTEN
tcp 0 0 :::111 :::* LISTEN
[root@localhost ~]#
[root@localhost ~]# service iptables stop
[root@localhost ~]#
为了验证,关闭防火墙;
9、验证:在浏览器输入http://nginx主机ip即可。
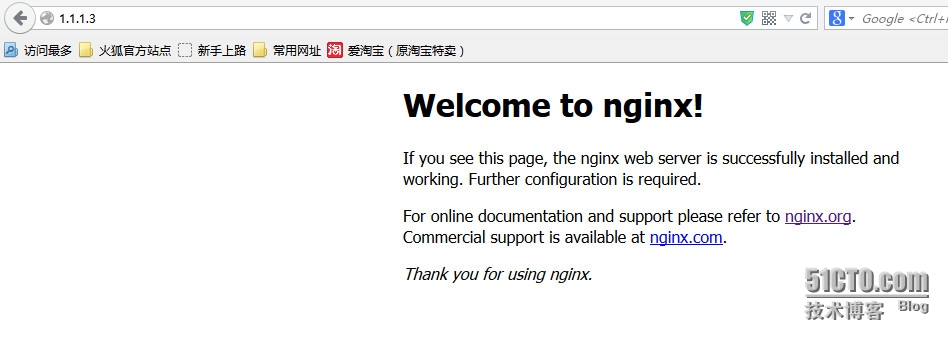
--结束!
本文出自 “linux运维集锦” 博客,请务必保留此出处http://5200linux.blog.51cto.com/6012970/1591480
什么是源码包:
源码包,也就是程序代码是可见的,非加密状态的程序包。程序包开源,则表示提供源码包程序+宽松的许可证书;
程序安装面临问题:
1、不想使用发行版厂商和其他厂商提供的rpm包,而想自己使用未编译的源码包;
2、编译打包时,就决定了程序的功能。实际只需要使用2种功能,发行商打包时添加了更多功能,加大bug出现机率;
3、当我们要深度优化系统的时候,很多程序都需要我们自己去定制安装,需要自己动手编译;
源码包的好处:
1、根据用户的心意随意定制;
2、可以二次开发;
源码包的用处:
软件的开放源码就是类似,开发者在给我们软件的同时,也会告诉我们软件是怎么开发出来的;只要我们的水平足够的高,所有的代码都在那里,我们就可以修改和定制软件,以适合我们的需要;
源码包的存在形式:
源代码一般以file.tar.gz file.tar.bz2或file.src.rpm 打包起来;
编译安装的前提条件:
首先我们在Linux系统中至少得把开发工具安装上,比如 gcc
;perl;python;glibc;gtk;make ;automake
等开发工具或基础包;还要安装一些相应的开发包,一般是文件名包括dev的,比如kernel-devel;还有一些开发库,比如以lib开头的;如果您在编译软件时,有时提示缺少什么东西之类的,大多少的是这些开发工具和开发库等;从光盘中找出安装就是了;有时光盘没有提供,请用google搜索相应的
软件包,有时可能也会用到源码包编译安装所依赖的包;
有时本来系统中已经安装了所依赖的包,但系统提示找不到应该怎么办?这时需要我们设置一下PKG_CONFIG_PATH的环境变量就行了;
#export PKG_CONFIG_PATH=/usr/lib/pkgconfig
或
#export PKG_CONFIG_PATH=/usr/local/lib/pkgconfig
然后我们再来运行编译的./configure ;make ;make install ,尝试着来吧
源码包安装方式:编译安装:
编译安装的大致顺序:
1、获得压缩的源码软件包
2、准备好开发环境
3、./configure (--help,此处指定自定义程序功能和安装目录)
4、make (编译)
5、make install (编译安装)
6、输出:
二进制文件;
头文件;
库文件;
man文档;
头文件、库文件和二进制输出给系统:
由来:当安装了程序之后,某些程序执行时,需要带上本身的头文件和库文件,头文件和库文件在自身的安装目录下面。但是其他用户执行时不会去读取安装目录下的这个头文件和库文件,只能将这个头文件放到系统公共位置才行。 头文件公共位置:/usr/include/下面; 库文件公共位置:/etc/ld.so.conf/下面; 方法: 1、头文件解决方式: 创建链接:将安装目录中的头文件链接到公共头文件目录下; 1、将这个头文件目录下的所有头文件链接走:ln -sv /usr/local/apache/include/* /usr/include/; 2、将头文件目录链接走:ln -sv/usr/local/apache/include /usr/include/httpd;(更合理,便于管理) 2、库文件解决方式:1、新增搜索路径;2、配置文件指定搜索路径下新增文件; 1、新建/etc/ld.so.conf.d/chen.conf文件;一定要在/etc/ld.so.conf.d/目录下去新增,不然配置文件找不到它!! 将“/usr/local/apache/lib”这个路径写到这个新的配置文件中即可(将某个程序的安装目录下的lib库文件写到公共库路径下的自定义的配置文件中。可每行写一个路径); 再执行,ldconfig -v:重建库缓存,让新添加的库配置文件生效。; 2、直接去修改/etc/ld.so.conf,这个配置文件,新增路径即可; vim /etc/ld.so.conf include ld.so.conf.d/*.conf :原来的那条,不动; /usr/local/apache/lib :关键,新增一条搜索路径。如果多个,必须每行一个; 注意:/etc/ld.soZ.cache,存放系统开始时缓存的所有库文件,修改了库配置文件之后,要重新缓存,不然不生效; 使用ldconfig命令去重建缓存,或者重启机器; 3、二进制程序输出: $PATH变量下面存放系统调用的而进程路径,加入我编译安装一个程序后,在执行该程序的命令是更加方便时,怎么办? 1、临时生效: PATH=/usr/local/apache/bin:/usr/local/apache/sbin:$PATH
2、修改环境变量配置文件,系统自动加载到shell里:(有可能造成一般用户也能使用该程序命令) vim /etc/profile.d/chen.sh(新加的) PATH=/usr/local/apache/bin:/usr/local/apache/sbin:$PATH export PATH wq ./etc/profile.d/chen.sh (重读,使新环境变量生效) 增加程序帮助手册到man配置文件:
由来:因为我们编译安装了程序,全部东西都需手动指定,因此,man命令无法找到我安装的程序帮助手册,所以就得自定义; 方法: 1、改变man配置文件: vim/etc/man.config NANPATH=/usr/local/apache/man :将我安装的程序的帮助手册添加到man可搜索的路径范围内即可。写到man路径下; 注意:一般编译安装的程序的帮助手册都放在安装目录下的man目录下面; 2、直接使用man命令打开安装程序的帮助手册: man -M/usr/local/apache/man/httpd 编译安装示例:
编译安装nginx程序包
nginx简单介绍:
Nginx 是一个很强大的高性能Web和反向代理服务器,它具有很多非常优越的特性,在高连接并发的情况下,Nginx是Apache服务器不错的替代品;
安装步骤:
1、首先,我们需要找到一个nginx的源码包,源码包可通过官网下载,或者找一些外网站点去下载。我这里找到一个外网的站点:http://nginx.org/download/ ,这个站点上提供了可供下载的nginx的最新版,使用wget下载非常方便。
[root@localhost ~]# wget http://nginx.org/download/nginx-1.7.8.tar.gz --2014-12-19 06:23:41-- http://nginx.org/download/nginx-1.7.8.tar.gz 47% [=====================> ] 605,122 14.2K/s eta(鑻卞浗涓48% [=====================> ] 610,834 14.5K/s eta(英国中部时49% [======================> ] 627,970 15.4K/s eta(英国中部时49% [======================> ] 630,826 15.4K/s eta(英国中部时50% [======================> ] 640,822 15.1K/s eta(英国中部时50% [======================> ] 642,250 14.4K/s eta(英国中部时50%
98% [=============================================> ] 1,252,006 18.3K/s eta(英国中部时98% [=============================================> ] 1,259,146 18.6K/s eta(英国中部时99% [=============================================> ] 1,262,002 18.6K/s eta(英国中部时99% [=============================================> ] 1,267,714 18.3K/s eta(英国中部时100%[==============================================>] 1,272,511 19.0K/s in 85s
99% [=============================================> ] 819,391 18.6K/s eta(英国中部时100%[==============================================>] 823,122 18.8K/s eta(英国中部时100%[==============================================>] 823,122 18.8K/s in 45s
2014-12-19 06:35:25 (18.0 KB/s) - 已保存 “nginx-1.7.8.tar.gz” [823122/823122])
[root@localhost ~]# ls
anaconda-ks.cfg install.log.syslog 公共的 视频 文档 音乐
install.log nginx-1.7.8.tar.gz 模板 图片 下载 桌面
下载到本地目录,并且是一个zip的压缩包;
2、接下来,我们解药这个压缩包,进入解压后的文件,并查看./configure --help信息
[root@localhost ~]# tar xf nginx-1.7.8.tar.gz
[root@localhost ~]#
[root@localhost ~]# ls
anaconda-ks.cfg install.log.syslog nginx-1.7.8.tar.gz 模板 图片 下载 桌面
install.log nginx-1.7.8 公共的 视频 文档 音乐
[root@localhost ~]#
[root@localhost ~]# cd nginx-1.7.8
[root@localhost nginx-1.7.8]# ls
auto CHANGES CHANGES.ru conf configure contrib html LICENSE man README src
[root@localhost nginx-1.7.8]# pwd
/root/nginx-1.7.8
[root@localhost nginx-1.7.8]#
[root@localhost nginx-1.7.8]# ./configure --help
--help print this message
--prefix=PATH set installation prefix (指定安装路径)
--sbin-path=PATH set nginx binary pathname
--conf-path=PATH set nginx.conf pathname
--error-log-path=PATH set error log pathname
--pid-path=PATH set nginx.pid pathname
--lock-path=PATH set nginx.lock pathname
--user=USER set non-privileged user for
worker processes
--group=GROUP set non-privileged group for
worker processes
3、解压完成之后,接下来开始执行./configure 脚本。
[root@localhost nginx-1.7.8]# ./configure
checking for OS
+ Linux 2.6.32-504.el6.x86_64 x86_64
checking for C compiler ... not found
./configure: error: C compiler cc is not found
[root@localhost nginx-1.7.8]#
出现错误了,提示c或者cc没有发现,什么意思??也就是c编辑器没有找到,说明这个程序在编写时跟c有关联,所以需要c环境。
4、接下来安装编译所需要的环境,如基础包、开发工具、开发包..
[root@localhost nginx-1.7.8]# yum list gcc
[root@localhost nginx-1.7.8]# whereis gcc :没有安装gcc编译环境;
gcc:
安装gcc编译环境:
[root@localhost nginx-1.7.8]# yum -y install gcc
[root@localhost nginx-1.7.8]# yum -y install gcc-c++
安装开发工具和开发包:
[root@localhost nginx-1.7.8]# yum -y install ncurses-devel
[root@localhost nginx-1.7.8]# yum -y install perl
[root@localhost nginx-1.7.8]# yum -y install zlib
[root@localhost nginx-1.7.8]# yum -y install zlib-devel
5、创建nginx的安装目录,并再次执行./configure 脚本
[root@localhost nginx-1.7.8]# ./configure --prefix=/var/nginx/
checking for OS
+ Linux 2.6.32-504.el6.x86_64 x86_64
checking for C compiler ... found
+ using GNU C compiler
+ gcc version: 4.4.7 20120313 (Red Hat 4.4.7-11) (GCC)
checking for gcc -pipe switch ... found
checking for gcc builtin atomic operations ... found
checking for C99 variadic macros ... found
checking for gcc variadic macros ... found
checking for unistd.h ... found
.....
./configure: error: the HTTP rewrite module requires the PCRE library.
You can either disable the module by using --without-http_rewrite_module
option, or install the PCRE library into the system, or build the PCRE library
statically from the source with nginx by using --with-pcre=<path> option.
oh,my god.又报错了,没有安装pcre开发包,类似*-deve的包
安装pcre开发包:
[root@localhost nginx-1.7.8]# yum install pcre-devel
[root@localhost nginx-1.7.8]#
[root@localhost nginx-1.7.8]# ./configure --prefix=/var/nginx/
checking for OS
+ Linux 2.6.32-504.el6.x86_64 x86_64
checking for C compiler ... found
+ using GNU C compiler
+ gcc version: 4.4.7 20120313 (Red Hat 4.4.7-11) (GCC)
checking for gcc -pipe switch ... found
checking for gcc builtin atomic operations ... found
checking for C99 variadic macros ... found
checking for gcc variadic macros ... found
checking for unistd.h ... found
......
Configuration summary
+ using system PCRE library
+ OpenSSL library is not used
+ using builtin md5 code
+ sha1 library is not found
+ using system zlib library
nginx path prefix: "/var/nginx/"
nginx binary file: "/var/nginx//sbin/nginx"
nginx configuration prefix: "/var/nginx//conf"
nginx configuration file: "/var/nginx//conf/nginx.conf"
nginx pid file: "/var/nginx//logs/nginx.pid"
nginx error log file: "/var/nginx//logs/error.log"
nginx http access log file: "/var/nginx//logs/access.log"
nginx http client request body temporary files: "client_body_temp"
nginx http proxy temporary files: "proxy_temp"
nginx http fastcgi temporary files: "fastcgi_temp"
nginx http uwsgi temporary files: "uwsgi_temp"
nginx http scgi temporary files: "scgi_temp"
ok,这次好像成功了!!!!
6、接下来该进行编译和安装了
[root@localhost nginx-1.7.8]#make & make install (编译和安装自动顺序执行)
.......
test -f '/var/nginx//conf/nginx.conf' || cp conf/nginx.conf '/var/nginx//conf/nginx.conf'
cp conf/nginx.conf '/var/nginx//conf/nginx.conf.default'
test -d '/var/nginx//logs' || mkdir -p '/var/nginx//logs'
test -d '/var/nginx//logs' || mkdir -p '/var/nginx//logs'
test -d '/var/nginx//html' || cp -R html '/var/nginx/'
test -d '/var/nginx//logs' || mkdir -p '/var/nginx//logs'
make[1]: Leaving directory `/root/nginx-1.7.8'
[root@localhost nginx-1.7.8]#
[root@localhost nginx]# ls
conf html logs sbin
[root@localhost nginx]#
[root@localhost nginx]# pwd
/var/nginx
[root@localhost nginx]#
安装目录下面生成了文件,成功了!
7、接下来,我们将输出nginx的二进制文件,方便命令的使用
[root@localhost sbin]# pwd
/var/nginx/sbin :命令默认存放在安装目录下的sbin里面;
[root@localhost sbin]# ls
nginx :有个nginx命令;
[root@localhost sbin]#
[root@localhost /]# vim /etc/profile.d/nginx.sh
export PATH
PATH=/var/nginx/sbin:$PATH
export PATH
wq :在$PATH的配置目录下新建一个.sh的文件,让系统默认开机都生效;
[root@localhost /]# ./etc/profile.d/nginx.sh
-bash: ./etc/profile.d/nginx.sh: 权限不够
[root@localhost /]# chmod 755 /etc/profile.d/nginx.sh
[root@localhost /]#
[root@localhost /]# /etc/profile.d/nginx.sh :执行以下nginx.sh
[root@localhost /]#
[root@localhost /]# echo $PATH
/usr/lib64/qt-3.3/bin:/var/nginx/sbin:/usr/local/sbin:/usr/local/bin:/sbin:/bin:/usr/sbin:/usr/bin:/root/bin
执行下新建的配置文件*.sh,让它马上生效;
8、启动nginx服务
[root@localhost /]# netstat -ntl
Active Internet connections (only servers)
Proto Recv-Q Send-Q Local Address Foreign Address State
tcp 0 0 0.0.0.0:22 0.0.0.0:* LISTEN
tcp 0 0 127.0.0.1:631 0.0.0.0:* LISTEN
tcp 0 0 127.0.0.1:25 0.0.0.0:* LISTEN
tcp 0 0 0.0.0.0:53241 0.0.0.0:* LISTEN
tcp 0 0 0.0.0.0:111 0.0.0.0:* LISTEN
tcp 0 0 :::43540 :::* LISTEN
tcp 0 0 :::22 :::* LISTEN
tcp 0 0 ::1:631 :::* LISTEN
tcp 0 0 ::1:25 :::* LISTEN
tcp 0 0 :::111 :::*
当前系统没有开启80端口的服务
[root@localhost ~]#nginx -c /var/nginx/conf/nginx.conf (启动nginx服务)
[root@localhost ~]#
[root@localhost ~]# netstat -ntl
Active Internet connections (only servers)
Proto Recv-Q Send-Q Local Address Foreign Address State
tcp 0 0 0.0.0.0:22 0.0.0.0:* LISTEN
tcp 0 0 127.0.0.1:631 0.0.0.0:* LISTEN
tcp 0 0 127.0.0.1:25 0.0.0.0:* LISTEN
tcp 0 0 0.0.0.0:53241 0.0.0.0:* LISTEN
tcp 0 0 0.0.0.0:111 0.0.0.0:* LISTEN
tcp 0 0 0.0.0.0:80 0.0.0.0:* LISTEN
tcp 0 0 :::43540 :::* LISTEN
tcp 0 0 :::22 :::* LISTEN
tcp 0 0 ::1:631 :::* LISTEN
tcp 0 0 ::1:25 :::* LISTEN
tcp 0 0 :::111 :::* LISTEN
[root@localhost ~]#
[root@localhost ~]# service iptables stop
[root@localhost ~]#
为了验证,关闭防火墙;
9、验证:在浏览器输入http://nginx主机ip即可。
--结束!
本文出自 “linux运维集锦” 博客,请务必保留此出处http://5200linux.blog.51cto.com/6012970/1591480

相关文章推荐
- 第十一天 Linux程序包、RPM 、YUM使用及源代码编译安装
- 谢烟客---------Linux之程序包管理yum使用和编译安装
- Linux下程序包管理rpm、yum及编译安装详解
- linux 程序包管理5 编译安装
- Linux程序包管理之yum仓库、源码编译安装
- Linux程序包管理:rpm、yum、编译安装
- linux程序包管理rpm,yum和编译安装以及冒泡排序练习
- Linux基础之程序包编译安装操作指南
- 【Linux相识相知】yum的配置使用和程序包的编译安装
- Linux程序包编译安装
- Linux程序包管理之编译安装httpd
- Linux操作系统下如何编译安装源码包软件
- linux下安装编译pidgin
- Linux 上完全手动编译安装 Lighttpd
- linux嵌入式编程高手历程系列2-安装debian并建立嵌入式编译环境
- Linux 上完全手动编译安装 Lighttpd
- 深入理解Linux软件包的配置、编译与安装
- 在PS3 FC7 Linux上编译安装RSX支持模块
- Linux直接与编译安装Vsftpd服务器
- linux下安装和使用ccache加快编译