仿腾讯手机管家快捷中心功能的实现方案
2014-12-04 11:05
316 查看
背景
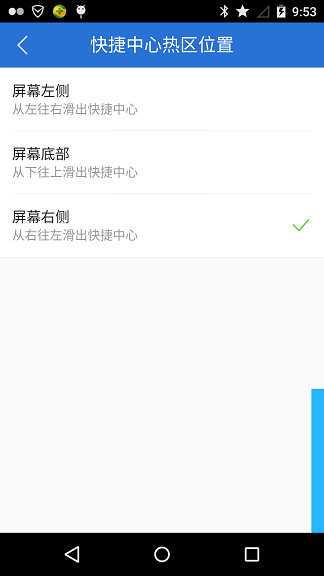
想必用过Android腾讯手机管家或者做过相关研发的童鞋都会发现腾讯做了一个类似于iOS系统下的Panel功能,如下图一。
即从屏幕的底部或者侧部用手势划出快捷中心控制面板,如下图二。

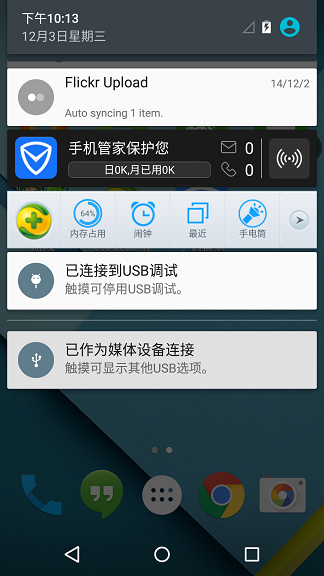
有别于以前的快捷控制方案,以前的快捷控制方案是在下拉的通知栏里去做控制,如下图三的360方案,这个功能算是腾讯的一个微创新,要点赞。

设计原理
看起来很高大上有木有。其实如果掌握了原理是非常简单的,就是运用了Android里的WindowManager技术,这个在很多国内各色各样的手机管家技术里用到的悬浮窗、一键加速是一样一样的(这里就不扩展了,网上一搜一大把),我猜腾讯手机管家用了一个小小的魔术,是什么呢,在图二中看到的选择后出现的蓝色小方块,在退出该界面后是没有的,但是实际上仍然预留了这样一个区域,只是色值设为透明了,通过监听用户在该区域上的手势滑动,从而拖出快捷中心面板。实现方案
实现FloatWindowQuickCenterTouch,用于实现监听手势拖出快捷中心实现FloatWindowQuickCenterShow,用于实现设置界面选择后的蓝色展示区域
实现FloatWindowQuickCenter,用于实现快捷中心具体的界面和逻辑
写一个FloatWindowManager管理类,实现以上几个悬浮窗的实例化和WindowManager实例与addView
在一个Service中运用TimeTask监听悬浮窗的加载状态
代码方案
FloatWindowQuickCenterTouch关键代码FloatWindowQuickCenterTouch主要是用于建立一块在桌面端的透明区域,通过监听手势拖出我们需要的快捷中心面板
/**
* @Function Touch区域实例化
*/
public FloatWindowQuickCenterTouch(Context context, int position) {
// TODO Auto-generated constructor stub
super(context);
this.mContext = context;
this.mPosition = position; //因为涉及到显示位置

if (position != QuickCenterParams.POSITION_RIGHT
&& position != QuickCenterParams.POSITION_BOTTOM)
position = QuickCenterParams.POSITION_RIGHT;

View touchView = new View(context);
LinearLayout.LayoutParams touchParams = new LinearLayout.LayoutParams(
LayoutParams.WRAP_CONTENT, LayoutParams.WRAP_CONTENT);

if (position == QuickCenterParams.POSITION_RIGHT) { //支持右边和底部
touchParams.height = mContext.getResources().getInteger(R.dimen.quick_view_right_height);
touchParams.width = mContext.getResources().getInteger(R.dimen.quick_view_right_width);
} else if (position == QuickCenterParams.POSITION_BOTTOM) {
touchParams.height = mContext.getResources().getInteger(R.dimen.quick_view_bottom_height);
touchParams.width = GlobalApp.screenWidth; //整个屏幕的宽度
}

touchView.setLayoutParams(touchParams);
touchView.setBackgroundColor(getResources().getColor(R.color.transparent)); //注意我用了透明色
this.addView(touchView);
}上面是这个View的实例化,之后再manager类中就是通过调用这个方法来create这个View;之后便是手势的监听,根据手势在该View上的位移来操作快捷中心面板的拖出操作;
/**
* @Function 重写touchevent
* 监听手势的位置位移,来创建快捷中心面板
* 注意要用getRawX/Y方法,与getX/Y的区别请自行百度
*/
@Override
public boolean onTouchEvent(MotionEvent event) {
// TODO Auto-generated method stub
switch (event.getAction()) {
case MotionEvent.ACTION_DOWN:
xInView = event.getX();
yInView = event.getY();
xInScreen = event.getRawX();
yInScreen = event.getRawY() - getStatusBarHeight(); //减去状态栏的高度
break;
case MotionEvent.ACTION_MOVE:
break;
case MotionEvent.ACTION_UP:
xOutScreen = event.getRawX();
yOutScreen = event.getRawY();
if (mContext.getResources().getConfiguration().orientation == Configuration.ORIENTATION_LANDSCAPE) //横屏不执行拖出面板
return super.onTouchEvent(event);
if (mPosition == QuickCenterParams.POSITION_RIGHT) {
if (xInScreen - xOutScreen > GlobalApp.screenWidth / 5) {
FloatWindowManager.createQuickCenterWindow(mContext, mPosition); //这个就是之前提到的Manager类创建快捷中心的方法,之后在介绍
}
} else if (mPosition == QuickCenterParams.POSITION_BOTTOM) {
if (yInScreen - yOutScreen > GlobalApp.screenHeight / 6) {
FloatWindowManager.createQuickCenterWindow(mContext, mPosition);
}
}
break;
default:
break;
}
return super.onTouchEvent(event);
}附送上一个获取状态栏高度的方法/**
* 用于获取状态栏的高度。
* @return 返回状态栏高度的像素值。
*/
public int getStatusBarHeight() {
if (mStatusBarHeight == 0) {
try {
Class<?> c = Class.forName("com.android.internal.R$dimen");
Object o = c.newInstance();
Field field = c.getField("status_bar_height");
int x = (Integer) field.get(o);
mStatusBarHeight = getResources().getDimensionPixelSize(x);
} catch (Exception e) {
e.printStackTrace();
}
}
return mStatusBarHeight;
}FloatWindowQuickCenterShow关键代码
FloatWindowQuickCenterShow主要通过建立一块有色的和Touch相同大小的区域,在设置界面展示给用户
/**
* @Function Show区域实例化
* 与Touch类是一样的,只是改变了颜色,并且不用实现onTouchEvent监听了
*/
public FloatWindowQuickCenterShow(Context context, int position) {
super(context);

if (position != QuickCenterParams.POSITION_RIGHT
&& position != QuickCenterParams.POSITION_BOTTOM)
position = QuickCenterParams.POSITION_RIGHT;

View showView = new View(context);
LinearLayout.LayoutParams showParams = new LinearLayout.LayoutParams(
LayoutParams.WRAP_CONTENT, LayoutParams.WRAP_CONTENT);

if (position == QuickCenterParams.POSITION_RIGHT) {
showParams.height = context.getResources().getInteger(R.dimen.quick_view_right_height);
showParams.width = context.getResources().ge
c573
tInteger(R.dimen.quick_view_right_width);
} else if (position == QuickCenterParams.POSITION_BOTTOM) {
showParams.height = context.getResources().getInteger(R.dimen.quick_view_bottom_height);
showParams.width = GlobalApp.screenWidth;
}

showView.setLayoutParams(showParams);
showView.setBackgroundColor(getResources().getColor(R.color.blue)); //其他都一样,就是这里换成了蓝色
this.addView(showView);
}
FloatWindowQuickCenter关键代码
这个是面板拖出来后的主要逻辑,里面的内容点还挺多也很杂,杂主要是因为Android碎片化严重,调用系统的功能,你能兼顾各个版本吧,兼顾各个厂商吧,之后我再写一篇来讲里面可能涉及到的问题点。就先贴一下创建的代码好了。
/**
* @Function 快捷中心面板
* 继承至LinearLayout,上面的几个view都是继承于它,便于简洁只写了这个,在此一并说明
*/
public class FloatWindowQuickCenter extends LinearLayout {
/**
* @Function 快捷中心实例化
* 这里我没有动态加载view,而是用了xml布局
*/
public FloatWindowQuickCenter(Context context, int position) {
super(context);
mView = LayoutInflater.from(context).inflate(R.layout.view_floatwindow_quickcenter, this);
this.mPosition = position;
this.mContext = context;

//其他功能代码
}

//其他功能代码
}
FloatWindowManager关键代码
这个是自己建立的悬浮窗管理类,里面包含了创建与删除所有悬浮窗的方法,现在为了简洁只取其中一个来展示,其他都可以照猫画虎。里面的方法都采用static,方便直接调用,工具类一般如此写。
/**
* @Function 悬浮窗管理类
* @author rivers
*/
public class FloatWindowManager {
/**
* 用于控制在屏幕上添加或移除悬浮窗
*/
private static WindowManager mWindowManager;

/**
* 如果WindowManager还未创建,则创建一个新的WindowManager返回。否则返回当前已创建的WindowManager。
*
* @param context
*            必须为应用程序的Context.
* @return WindowManager的实例,用于控制在屏幕上添加或移除悬浮窗。
*/
private static WindowManager getWindowManager(Context context) {
if (mWindowManager == null) {
mWindowManager = (WindowManager) context
.getSystemService(Context.WINDOW_SERVICE);
}
return mWindowManager;
}

/**
* 快捷中心实例
*/
private static FloatWindowQuickCenter mFloatWindowQuickCenter;
/**
* 快捷中心参数
*/
private static LayoutParams mQuickCenterParams;

/**
* 快捷中心create方法
*/
public static void createQuickCenterWindow(Context context, int position) {
mWindowManager = getWindowManager(context); //检测windowmanager是否已经创建
if (mFloatWindowQuickCenter == null) {
mFloatWindowQuickCenter = new FloatWindowQuickCenter(context, position);
mQuickCenterParams = new LayoutParams();
mQuickCenterParams.type = LayoutParams.TYPE_SYSTEM_ALERT;
mQuickCenterParams.format = PixelFormat.RGBA_8888;
mQuickCenterParams.flags = LayoutParams.FLAG_NOT_TOUCH_MODAL;
mQuickCenterParams.width = android.view.ViewGroup.LayoutParams.MATCH_PARENT;
mQuickCenterParams.height = android.view.ViewGroup.LayoutParams.MATCH_PARENT;
mQuickCenterParams.x = 0;
mQuickCenterParams.y = 0;
if (position == QuickCenterParams.POSITION_RIGHT) {
mQuickCenterParams.windowAnimations = android.R.style.Animation_Translucent;
} else if (position == QuickCenterParams.POSITION_BOTTOM) {
mQuickCenterParams.windowAnimations = android.R.style.Animation_InputMethod;
}
mWindowManager.addView(mFloatWindowQuickCenter, mQuickCenterParams);
}
}

/**
* 快捷中心remove方法
*/
public static void removeQuickCenterWindow(Context context) {
if (mFloatWindowQuickCenter != null) {
mFloatWindowQuickCenter.clearAnimation();
mFloatWindowQuickCenter.unregisterReceiver();
mWindowManager.removeView(mFloatWindowQuickCenter);
mFloatWindowQuickCenter = null;
}
}

//其他的功能代码
//如show、touch都用类似的方法去执行创建和删除
}需要注意的是LayoutParams这个参数,不是LinearLayout或者RelativeLayout下的LayoutParams,包全称为android.view.WindowManager.LayoutParams,是WindowManager下的专属参数,在create方法中也看到一些参数的定义了,是很重要的,直接影响到利用WindowManager创建的这个悬浮窗的级别和呈现方法、可操作性等。下面简单的介绍一下我用到的参数,更多的可以Google。
首先介绍LayoutParams.type
大概就是设置你的悬浮窗的类型,实际上是一个级别,我用的是TYPE_SYSTEM_ALERT = 2003,查阅API介绍为 Window type: system window,系统级的窗口,这样我们的所需要的窗口就能显示在界面了。
/**
* Start of system-specific window types.  These are not normally
* created by applications.
*/
public static final int FIRST_SYSTEM_WINDOW     = 2000;

/**
* Window type: the status bar.  There can be only one status bar
* window; it is placed at the top of the screen, and all other
* windows are shifted down so they are below it.
* In multiuser systems shows on all users' windows.
*/
public static final int TYPE_STATUS_BAR         = FIRST_SYSTEM_WINDOW;

/**
* Window type: the search bar.  There can be only one search bar
* window; it is placed at the top of the screen.
* In multiuser systems shows on all users' windows.
*/
public static final int TYPE_SEARCH_BAR         = FIRST_SYSTEM_WINDOW+1;

/**
* Window type: phone.  These are non-application windows providing
* user interaction with the phone (in particular incoming calls).
* These windows are normally placed above all applications, but behind
* the status bar.
* In multiuser systems shows on all users' windows.
*/
public static final int TYPE_PHONE              = FIRST_SYSTEM_WINDOW+2;

/**
* Window type: system window, such as low power alert. These windows
* are always on top of application windows.
* In multiuser systems shows only on the owning user's window.
*/
public static final int TYPE_SYSTEM_ALERT       = FIRST_SYSTEM_WINDOW+3;
接下来介绍LayoutParams.flag
常用的有FLAG_NOT_FOCUSABLE,FLAG_NOT_TOUCHABLE,FLAG_NOT_TOUCH_MODAL,按照我理解的意思分别为:
1.如果使用了就touch事件就会被拦截,悬浮窗下面的view事件就不能触发了,如我在设置界面的展示区域就设置了这个flag,不然就不能操作了
2.touch事件不能用,永远接受不到touch event
3.即使这个窗口被聚焦了,允许事件传递到下一层,在我们定义的窗口之外,所以一般会用这个,如dialog
以上为我的理解,不对的地方请指正,下面贴一下官方的注释
/**
* Window type: system window, such as low power alert. These windows
* are always on top of application windows.
* In multiuser systems shows only on the owning user's window.
*/
public static final int TYPE_SYSTEM_ALERT       = FIRST_SYSTEM_WINDOW+3;

/** Window flag: this window won't ever get key input focus, so the
* user can not send key or other button events to it.  Those will
* instead go to whatever focusable window is behind it.  This flag
* will also enable {@link #FLAG_NOT_TOUCH_MODAL} whether or not that
* is explicitly set.
*
* <p>Setting this flag also implies that the window will not need to
* interact with
* a soft input method, so it will be Z-ordered and positioned
* independently of any active input method (typically this means it
* gets Z-ordered on top of the input method, so it can use the full
* screen for its content and cover the input method if needed.  You
* can use {@link #FLAG_ALT_FOCUSABLE_IM} to modify this behavior. */
public static final int FLAG_NOT_FOCUSABLE      = 0x00000008;

/** Window flag: this window can never receive touch events. */
public static final int FLAG_NOT_TOUCHABLE      = 0x00000010;

/** Window flag: even when this window is focusable (its
* {@link #FLAG_NOT_FOCUSABLE} is not set), allow any pointer events
* outside of the window to be sent to the windows behind it.  Otherwise
* it will consume all pointer events itself, regardless of whether they
* are inside of the window. */
public static final int FLAG_NOT_TOUCH_MODAL    = 0x00000020;
再接下来是LayoutParams.windowAnimations,主要是窗口弹出的动画效果,我在项目中根据我的需求,右边我就用android.R.style.Animation_Translucent风格,位移推出快捷中心窗口,如果设置的从下拉出,则用android.R.style.Animation_InputMethod风格,类似于键盘的弹出,还有其他的风格,比如toast,dialog等,TX们可以自行google或者参看。
至于其他的宽高,xy坐标我就不一一介绍了。
Service关键代码
需用Service来创建和监听快捷中心,由于是桌面级的,我们只能用service在后台去控制manager类,并且用一个TimerTask去检测Touch区域的开启和关闭状态。
public class FloatWindowService extends Service {
@Override
public int onStartCommand(Intent intent, int flags, int startId) {
// 开启定时器
mActivityManager = (ActivityManager) getSystemService(Context.ACTIVITY_SERVICE);
if (timer == null) {
timer = new Timer();
RefreshTask freshTask=new RefreshTask();
timer.scheduleAtFixedRate(freshTask, 0, 1400);
}
return super.onStartCommand(intent, flags, startId);
}

class RefreshTask extends TimerTask {

@Override
public void run() {
String pckName = getRunningPck();
if (pckName != null && !TextUtils.isEmpty(pckName)) {
if (currentPkgName == null) {
currentPkgName = pckName;
doRefresh();
} else if (!currentPkgName.equalsIgnoreCase(pckName)) {
currentPkgName = pckName;
doRefresh();
}
}
}

}

public void doRefresh() {
doRefreshFloat();
//其他功能代码
}

public void doRefreshFloat() {
if (SharedUtil.getQuickCenterStatus()) { //检测开启状态
handler.post(new Runnable() {

@Override
public void run() {
// TODO Auto-generated method stub
FloatWindowManager.createQuickCenterTouchArea(getApplicationContext(), SharedUtil.getQuickCenterPosition());
}
});

} else {
FloatWindowManager.removeQuickCenterTouchArea(getApplication());
FloatWindowManager.removeQuickCenterWindow(getApplicationContext());
}
}

//其他功能代码
}
总结
这个一整套下来,一个类似于腾讯手机关键快捷中心的快捷方式就已经算是完成了,由于个人原因大概只能写了一个思路,尽可能的贴出关键代码,如果有需要的TX可以留言交流。调出的原理懂了,至于快捷中心里面的东西就看需求个人发挥了,无非就是写一个布局,点击后实现功能罢了。这个我如果后面有时间会再写一片编码快捷中心面板时遇到的问题 ,由于是调用系统的功能,所以主要是碎片化的问题,包括版本适配(我从2.3适配到了5.0),以及厂商的适配等。
遗憾
腾讯还是很牛的,有一个效果我一直没有实现,即我是通过在Touch区域监听手势滑动然后用动画效果拖出了快捷中心面板。而腾讯手机管家,可以真正做到抽屉(Panel)的效果,即可以在做手势的同时,没有UP的情况下,快捷中心面板就跟着手势滑动出来了,佩服佩服。为什么佩服,做过Panel的童鞋会懂,如果你要拖出一个区域,那必须这个区域已经存在了,这样势必会覆盖住下面的东西,虽然没拖出来之前是显示空白,但是下面还是没法点击的。我百思不得其解,也研究了几天,目前仍未有答案,有相关经验的TX请告之,小弟感激不尽。
相关文章推荐
- 求类似豆瓣网类似功能的图书价格对比实现方案或者demon.谢谢。
- 实现jsp页面得分页显示功能方案
- Android静默安装实现方案,仿360手机助手秒装和智能安装功能
- android客户端消息推送功能实现方案
- Android静默安装实现方案,仿360手机助手秒装和智能安装功能
- 实现jsp页面得分页显示功能方案
- Android静默安装实现方案,秒装(测试没有通过)和智能安装(实现)功能
- 现场升级方案:LPC1778采用U盘方式进行程序IAP升级功能的实现
- 使用flexpaper实现在线预览功能时 ,遇到的flash缓存问题的解放方案
- Android静默安装实现方案,仿360手机助手秒装和智能安装功能
- 基于掌微atlas3/atlas4方案的功能实现分析
- mtk android MT6573方案 power key 长按8s 关机功能实现
- [转]在Java中实现.net中DataTable功能以及操作双数据库的List连接问题解决方案探究
- 猜测功能实现方案 之 IE右键菜单——Add To Evernote
- 小气泡功能在app中的两种实现方案
- javaScript复制功能调用实现方案
- 实现jsp页面得分页显示功能方案
- my35.net:仿兰亭集势产品标签功能方案及技术实现
- Android静默安装实现方案,仿360手机助手秒装和智能安装功能 .
- Android静默安装实现方案,仿360手机助手秒装和智能安装功能
