xcode6制作framework(使用第三方依赖框架)
2014-11-12 09:01
225 查看
这两天由于会用到framework所以研究了一下framework的制作,我用到了xcode6.1、AFNetworing。
转载请注明http://blog.csdn.net/mengxiangyue
废话不多说了,下面是步骤:
1 建立一个single view application工程,然后打开工程中的Main.storyboard,选中里面的唯一一个ViewController,点击菜单栏的Editor->embed in->navigation Controller(嵌入这个navigation controller只是为了测试需要,并不是必须的)。
2 点击工程,在targets项目点击左下角的加号,如下图(下图中的TTTTTTT是我已经添加的Framework):
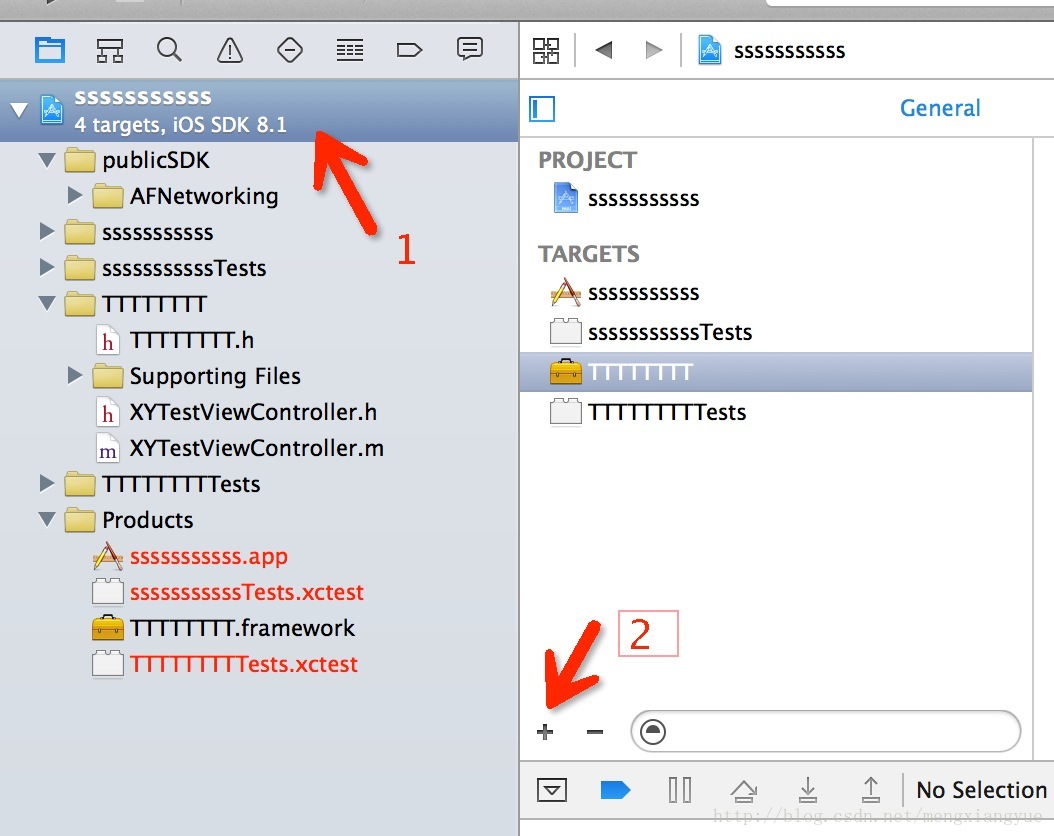
然后会出现如下的图,选择Cocoa Touch Framework
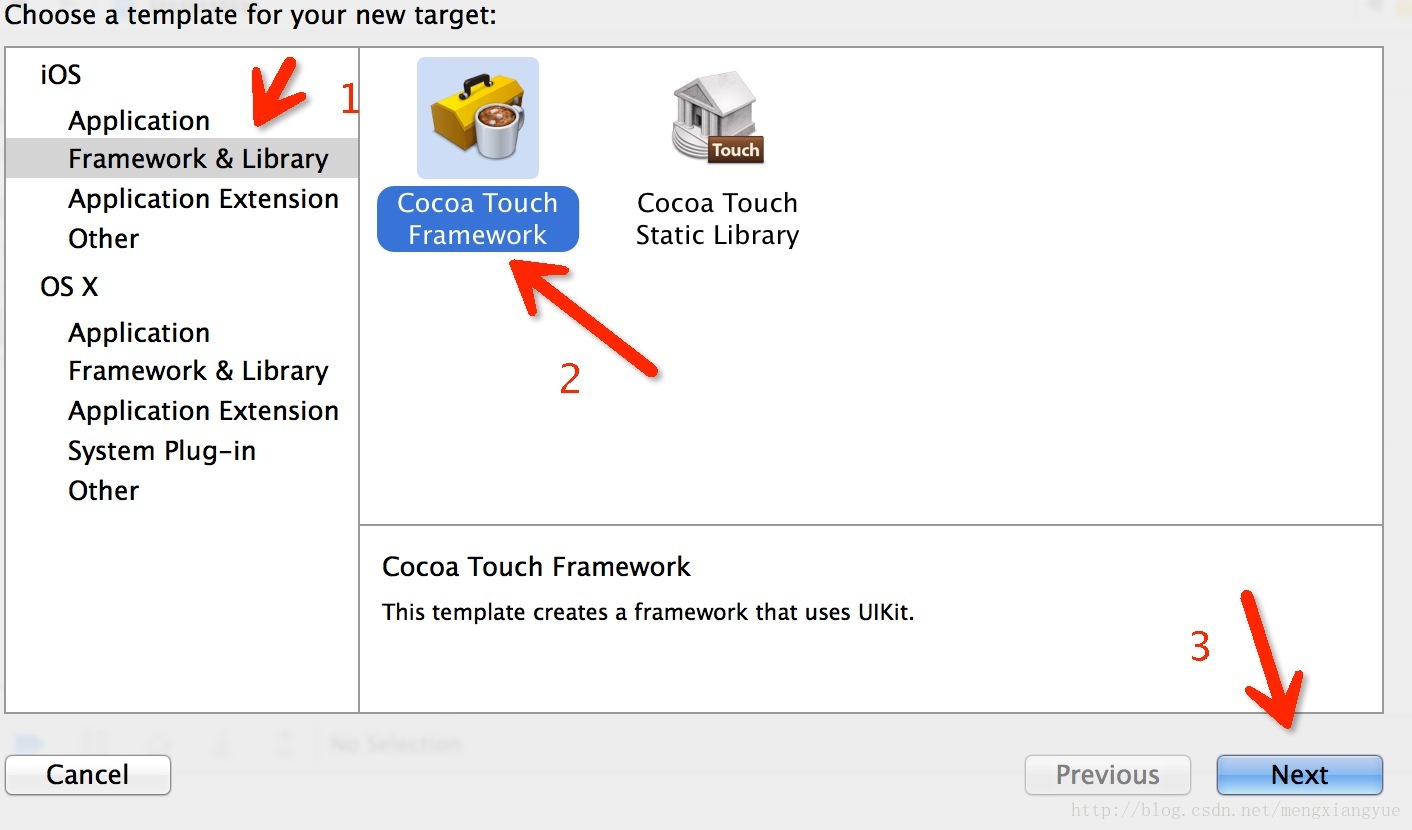
选择next后,输入对应的framework的名字,到这里就创建好了这个framework的工程。
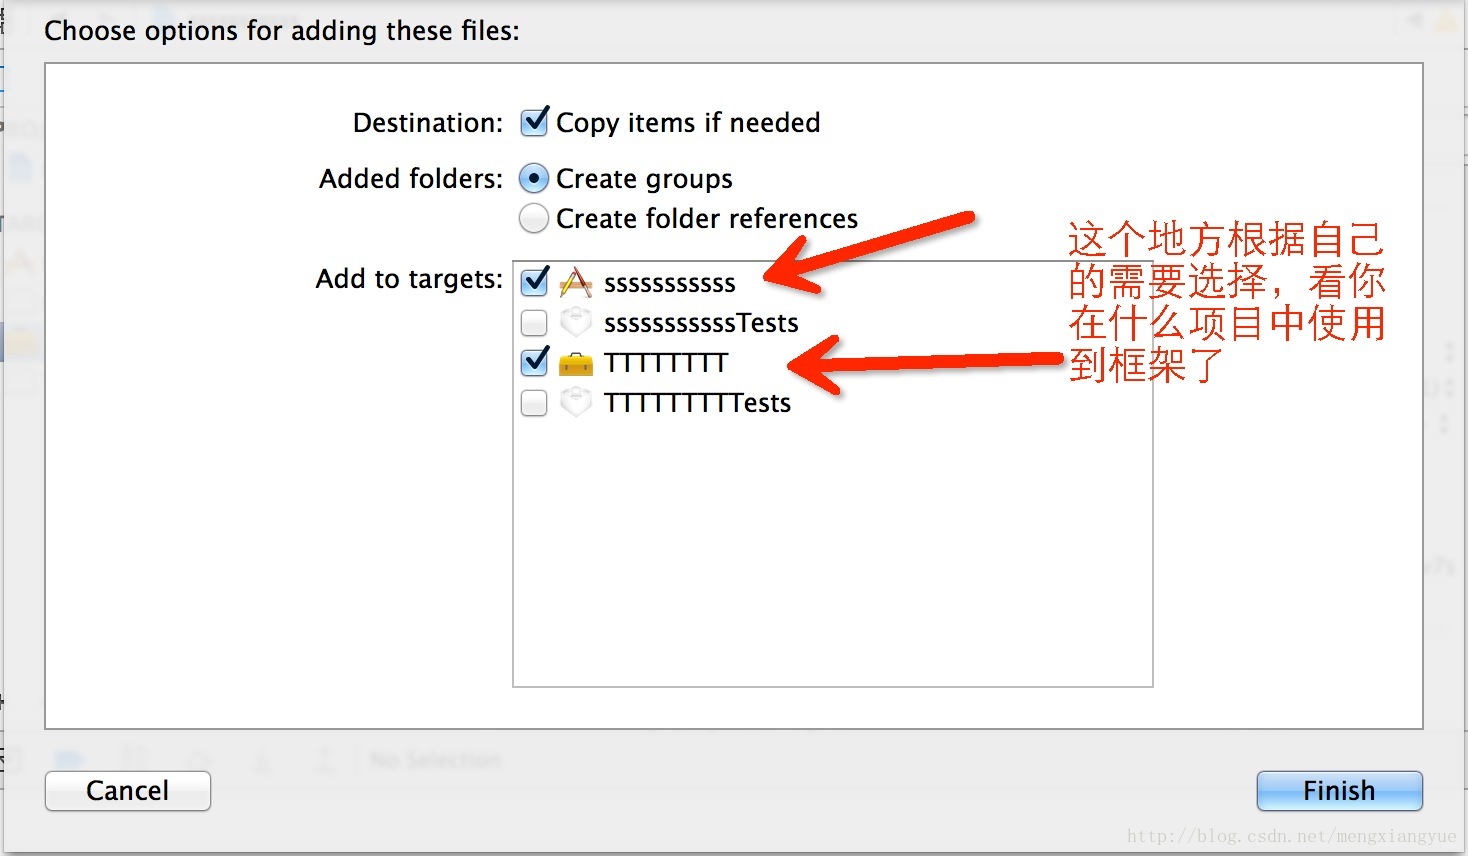
3 引入AFNetWorking,将AFNetWorking拖到项目中,会出现如下的图,选择好Finish导入成功。
4 创建Framework内的类
在创建的Framework上面点击右键,new File-->Coco Touch Class,创建一个Objective-C的类XYTestViewController,类的内容如下:(这个类只是简单的演示,里面引用了AFnetworking)#import <UIKit/UIKit.h>
#import "AFNetworking.h"
@interface XYTestViewController : UIViewController
@end
.m文件
#import "XYTestViewController.h"
@interface XYTestViewController ()
@end
@implementation XYTestViewController
- (void)viewDidLoad {
[super viewDidLoad];
NSLog(@"进入框架内博");
self.view.backgroundColor = [UIColor whiteColor];
UIButton *button = [[UIButton alloc] initWithFrame:CGRectMake(100, 100, 200, 60)];
[button setTitle:@"点击" forState:UIControlStateNormal];
[button setTitleColor:[UIColor blackColor] forState:UIControlStateNormal];
[button addTarget:self action:@selector(click:) forControlEvents:UIControlEventTouchUpInside];
[self.view addSubview:button];
}
- (void)click:(UIButton*)sender {
NSLog(@"点击");
AFHTTPRequestOperationManager *manager = [AFHTTPRequestOperationManager manager];
manager.responseSerializer = [AFHTTPResponseSerializer serializer];
AFHTTPRequestOperation *option1 = [manager GET:@"http://www.baidu.com" parameters:nil success:^(AFHTTPRequestOperation *operation, id responseObject) {
NSLog(@"xxxxxxxxxxxx----%@", responseObject);
} failure:^(AFHTTPRequestOperation *operation, NSError *error) {
}];
}
- (void)didReceiveMemoryWarning {
[super didReceiveMemoryWarning];
// Dispose of any resources that can be recreated.
}
/*
#pragma mark - Navigation
// In a storyboard-based application, you will often want to do a little preparation before navigation
- (void)prepareForSegue:(UIStoryboardSegue *)segue sender:(id)sender {
// Get the new view controller using [segue destinationViewController].
// Pass the selected object to the new view controller.
}
*/
@end
5 测试
修改工程内的ViewController类,修改后的内容如下:
.h文件
#import <UIKit/UIKit.h>
#import "XYTestViewController.h"
@interface ViewController : UIViewController
@end
.m文件
//
// ViewController.m
// sssssssssss
//
// Created by mxy on 14-11-11.
// Copyright (c) 2014年 mxy. All rights reserved.
//
#import "ViewController.h"
@interface ViewController ()
@end
@implementation ViewController
- (void)viewDidLoad {
[super viewDidLoad];
UIButton *button = [[UIButton alloc] initWithFrame:CGRectMake(100, 100, 200, 60)];
[button setTitle:@"进入下一个VC" forState:UIControlStateNormal];
[button setTitleColor:[UIColor blackColor] forState:UIControlStateNormal];
[button addTarget:self action:@selector(click:) forControlEvents:UIControlEventTouchUpInside];
[self.view addSubview:button];
}
- (void)click:(UIButton*)sender {
NSLog(@"进入下一个VC");
XYTestViewController *testVC = [[XYTestViewController alloc] init];
[self.navigationController pushViewController:testVC animated:YES];
}
- (void)didReceiveMemoryWarning {
[super didReceiveMemoryWarning];
// Dispose of any resources that can be recreated.
}
@end
点击运行看看能否正常运行,如果能正常运行就没问题了,然后就能进行下一步了。
6 生成framework
在运行的过程中其实我们已经生成了framework,点击项目中的products,能够看到已经生成的framework,右键show In Finder,能够看到我们生成的framework。在其上级目录会出现四个文件夹:Debug-iphoneos、Debug-iphonesimulator、Release-iphoneos、Release-iphonesimulator,分别对应不同情况下使用的framework。
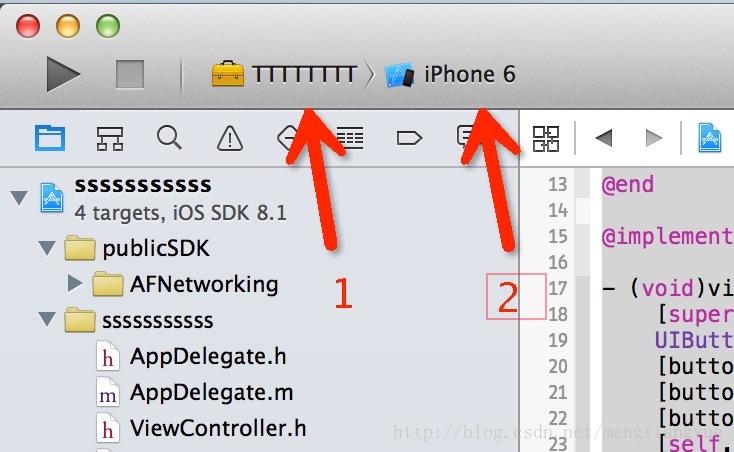
下面图片中的1、2选择不同,然后commond+b编译出来的framework是不同的:
1 framework框架 2 iPhone模拟器 scheme debug 会编译出Debug-iphonesimulator
1 framework框架 2 IOS Device scheme debug 会编译出Debug-iphoneos
1 framework框架 2 iPhone模拟器 scheme Release 会编译出Release-iphonesimulator
1 framework框架 2 IOS Device scheme Release 会编译出Release-iphoneos
设置对外公开的api,如下图:
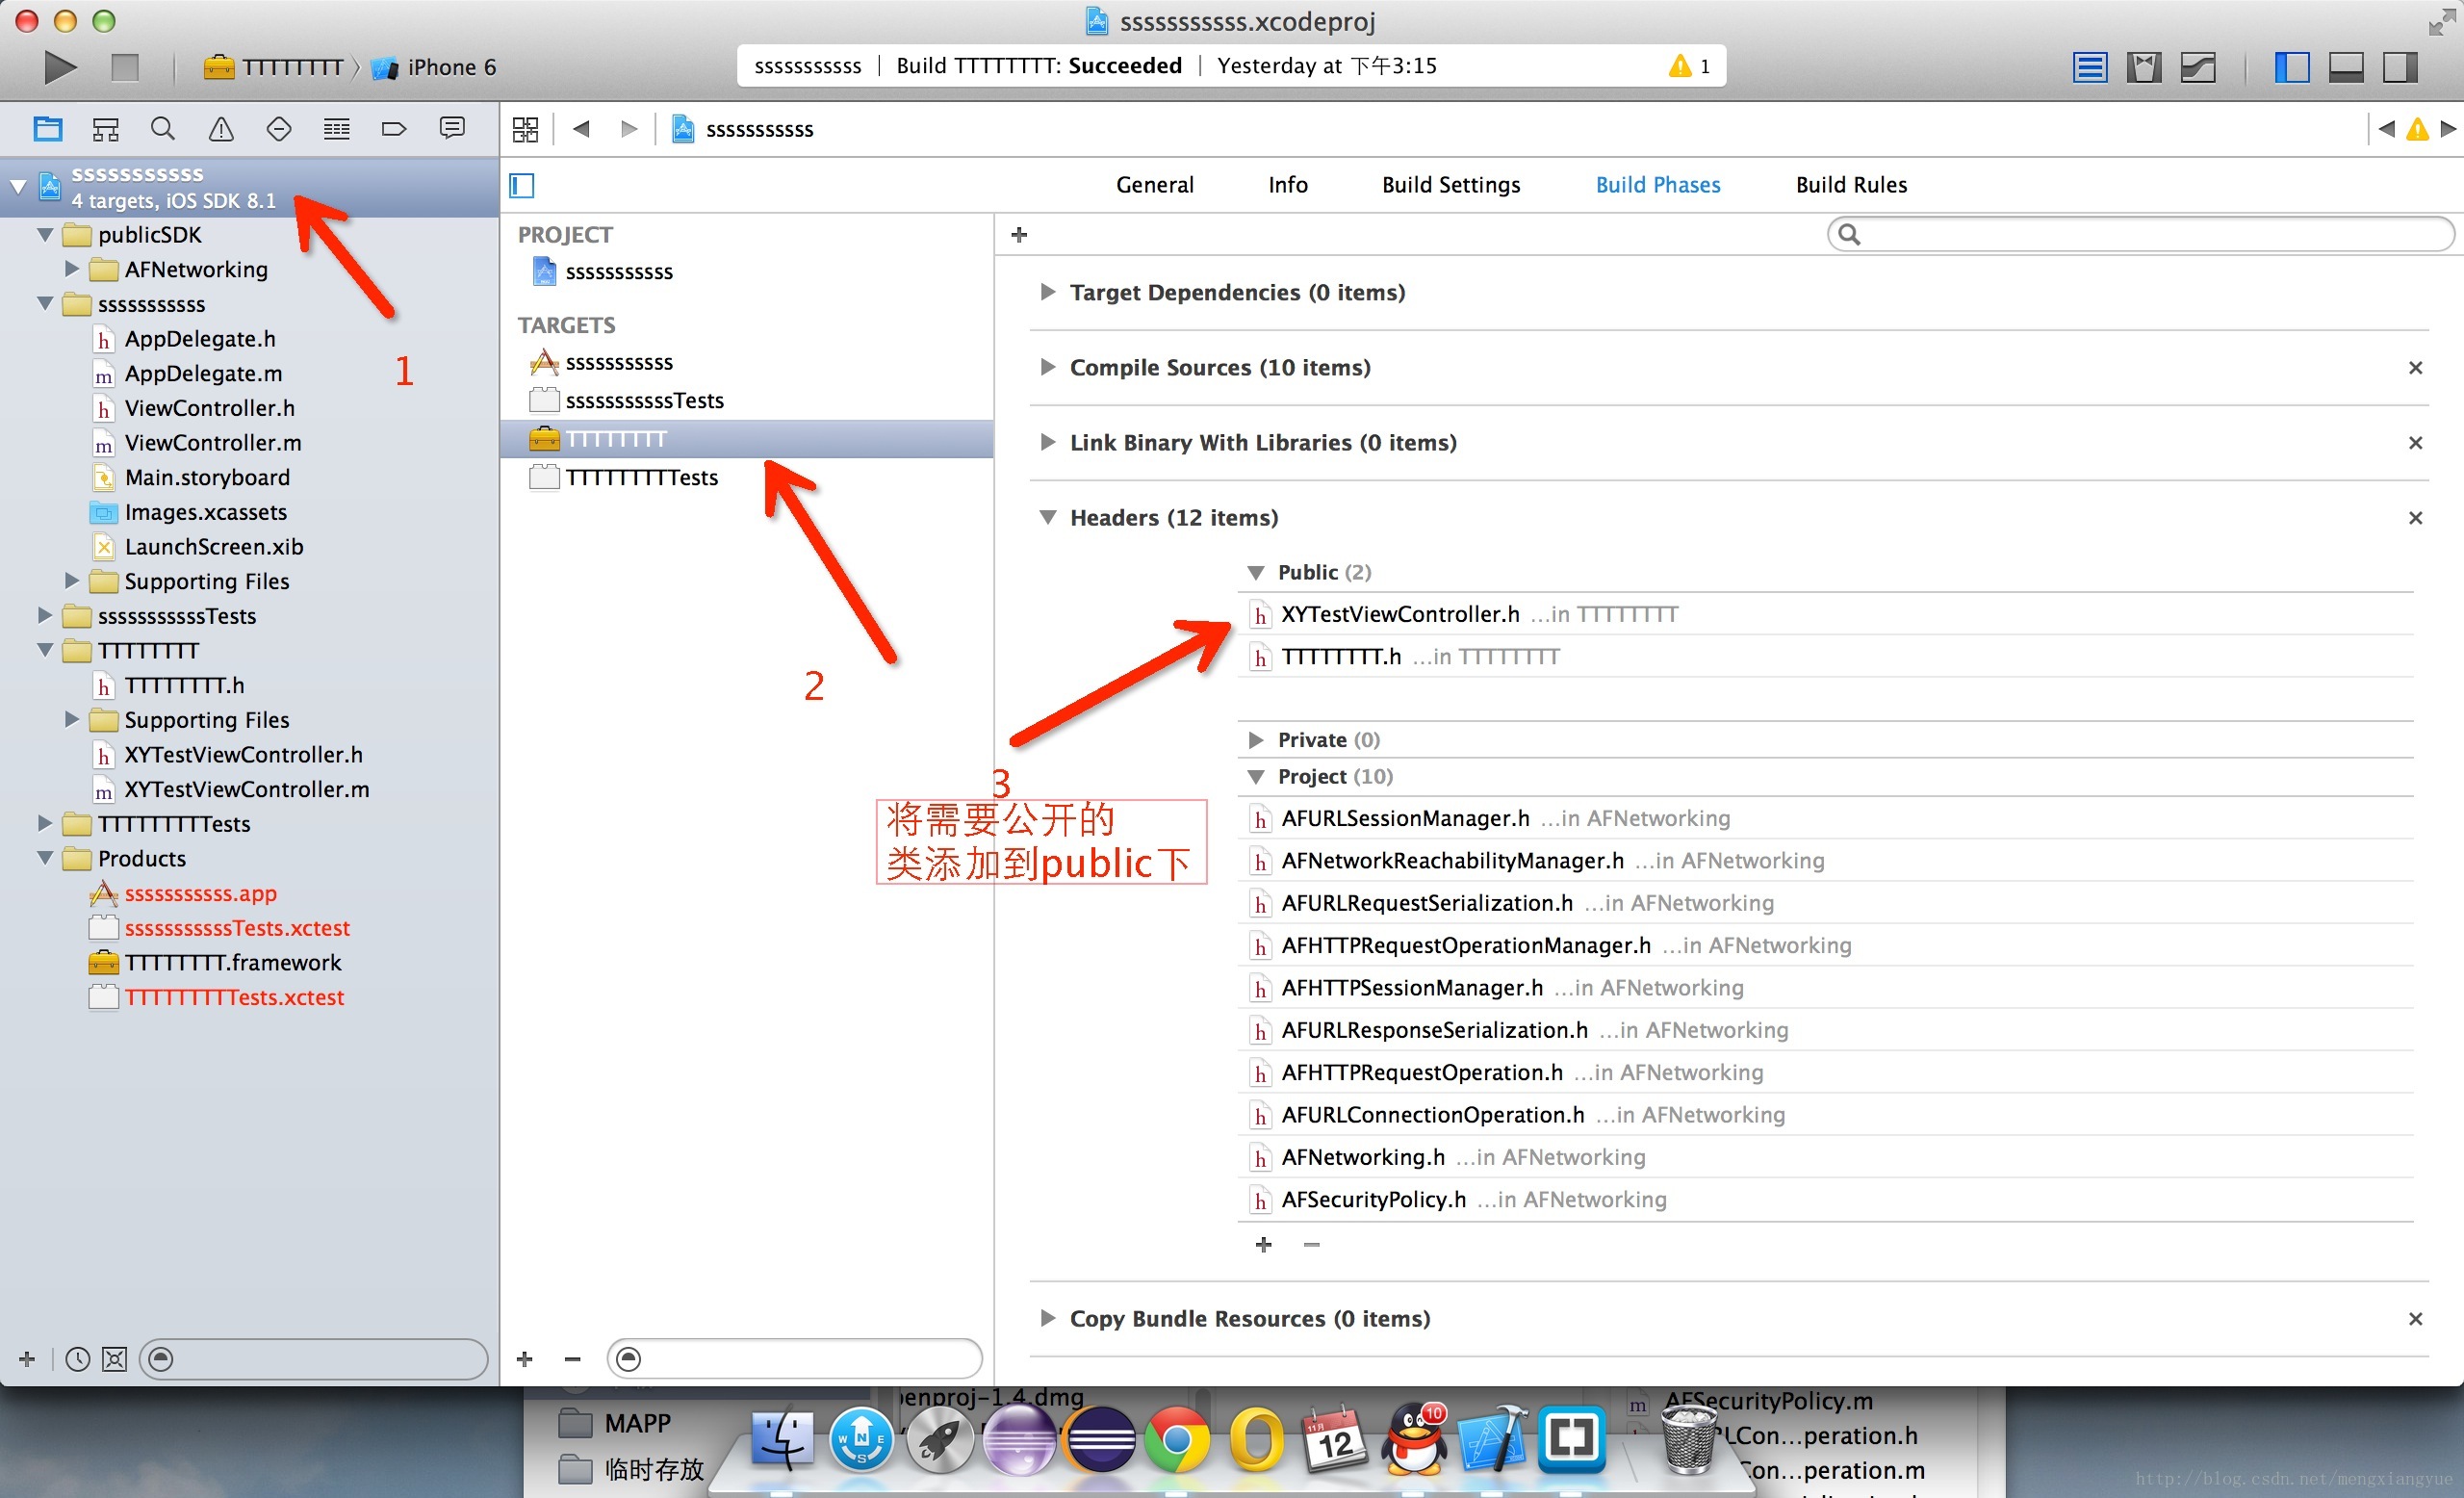
7 使用
另外新建一个工程,将合适的framework导入到工程内,编写代码使用,由于framework中使用到了AFNetworking,但是并没有将其打包到Framework中,所以新建的工程需要自己手动导入一个framework。如果在代码中遇到如下错误:
dyld: Library not loaded: @rpath/TTTTTTTT.framework/TTTTTTTT
Referenced from: /Users/mxy/Library/Developer/CoreSimulator/Devices/72AF601F-3B90-4720-ACB0-E98EE7FD26FE/data/Containers/Bundle/Application/5B492415-EB7E-4188-8342-3C4099502F42/testFFFFFF.app/testFFFFFF
Reason: image not found
上面这个错误我个人理解,是工程编译的过程中没有找到我们自己写的framework。
在工程的buildsetting中搜索runpath search paths,添加$(SRCROOT),然后运行正常。
补充网上看到的一篇文章写得挺好的Xcode 6制作动态及静态Framework。
终于写完了,欢迎拍砖。
转载请注明http://blog.csdn.net/mengxiangyue
废话不多说了,下面是步骤:
1 建立一个single view application工程,然后打开工程中的Main.storyboard,选中里面的唯一一个ViewController,点击菜单栏的Editor->embed in->navigation Controller(嵌入这个navigation controller只是为了测试需要,并不是必须的)。
2 点击工程,在targets项目点击左下角的加号,如下图(下图中的TTTTTTT是我已经添加的Framework):
然后会出现如下的图,选择Cocoa Touch Framework
选择next后,输入对应的framework的名字,到这里就创建好了这个framework的工程。
3 引入AFNetWorking,将AFNetWorking拖到项目中,会出现如下的图,选择好Finish导入成功。
4 创建Framework内的类
在创建的Framework上面点击右键,new File-->Coco Touch Class,创建一个Objective-C的类XYTestViewController,类的内容如下:(这个类只是简单的演示,里面引用了AFnetworking)#import <UIKit/UIKit.h>
#import "AFNetworking.h"
@interface XYTestViewController : UIViewController
@end
.m文件
#import "XYTestViewController.h"
@interface XYTestViewController ()
@end
@implementation XYTestViewController
- (void)viewDidLoad {
[super viewDidLoad];
NSLog(@"进入框架内博");
self.view.backgroundColor = [UIColor whiteColor];
UIButton *button = [[UIButton alloc] initWithFrame:CGRectMake(100, 100, 200, 60)];
[button setTitle:@"点击" forState:UIControlStateNormal];
[button setTitleColor:[UIColor blackColor] forState:UIControlStateNormal];
[button addTarget:self action:@selector(click:) forControlEvents:UIControlEventTouchUpInside];
[self.view addSubview:button];
}
- (void)click:(UIButton*)sender {
NSLog(@"点击");
AFHTTPRequestOperationManager *manager = [AFHTTPRequestOperationManager manager];
manager.responseSerializer = [AFHTTPResponseSerializer serializer];
AFHTTPRequestOperation *option1 = [manager GET:@"http://www.baidu.com" parameters:nil success:^(AFHTTPRequestOperation *operation, id responseObject) {
NSLog(@"xxxxxxxxxxxx----%@", responseObject);
} failure:^(AFHTTPRequestOperation *operation, NSError *error) {
}];
}
- (void)didReceiveMemoryWarning {
[super didReceiveMemoryWarning];
// Dispose of any resources that can be recreated.
}
/*
#pragma mark - Navigation
// In a storyboard-based application, you will often want to do a little preparation before navigation
- (void)prepareForSegue:(UIStoryboardSegue *)segue sender:(id)sender {
// Get the new view controller using [segue destinationViewController].
// Pass the selected object to the new view controller.
}
*/
@end
5 测试
修改工程内的ViewController类,修改后的内容如下:
.h文件
#import <UIKit/UIKit.h>
#import "XYTestViewController.h"
@interface ViewController : UIViewController
@end
.m文件
//
// ViewController.m
// sssssssssss
//
// Created by mxy on 14-11-11.
// Copyright (c) 2014年 mxy. All rights reserved.
//
#import "ViewController.h"
@interface ViewController ()
@end
@implementation ViewController
- (void)viewDidLoad {
[super viewDidLoad];
UIButton *button = [[UIButton alloc] initWithFrame:CGRectMake(100, 100, 200, 60)];
[button setTitle:@"进入下一个VC" forState:UIControlStateNormal];
[button setTitleColor:[UIColor blackColor] forState:UIControlStateNormal];
[button addTarget:self action:@selector(click:) forControlEvents:UIControlEventTouchUpInside];
[self.view addSubview:button];
}
- (void)click:(UIButton*)sender {
NSLog(@"进入下一个VC");
XYTestViewController *testVC = [[XYTestViewController alloc] init];
[self.navigationController pushViewController:testVC animated:YES];
}
- (void)didReceiveMemoryWarning {
[super didReceiveMemoryWarning];
// Dispose of any resources that can be recreated.
}
@end
点击运行看看能否正常运行,如果能正常运行就没问题了,然后就能进行下一步了。
6 生成framework
在运行的过程中其实我们已经生成了framework,点击项目中的products,能够看到已经生成的framework,右键show In Finder,能够看到我们生成的framework。在其上级目录会出现四个文件夹:Debug-iphoneos、Debug-iphonesimulator、Release-iphoneos、Release-iphonesimulator,分别对应不同情况下使用的framework。
下面图片中的1、2选择不同,然后commond+b编译出来的framework是不同的:
1 framework框架 2 iPhone模拟器 scheme debug 会编译出Debug-iphonesimulator
1 framework框架 2 IOS Device scheme debug 会编译出Debug-iphoneos
1 framework框架 2 iPhone模拟器 scheme Release 会编译出Release-iphonesimulator
1 framework框架 2 IOS Device scheme Release 会编译出Release-iphoneos
设置对外公开的api,如下图:
7 使用
另外新建一个工程,将合适的framework导入到工程内,编写代码使用,由于framework中使用到了AFNetworking,但是并没有将其打包到Framework中,所以新建的工程需要自己手动导入一个framework。如果在代码中遇到如下错误:
dyld: Library not loaded: @rpath/TTTTTTTT.framework/TTTTTTTT
Referenced from: /Users/mxy/Library/Developer/CoreSimulator/Devices/72AF601F-3B90-4720-ACB0-E98EE7FD26FE/data/Containers/Bundle/Application/5B492415-EB7E-4188-8342-3C4099502F42/testFFFFFF.app/testFFFFFF
Reason: image not found
上面这个错误我个人理解,是工程编译的过程中没有找到我们自己写的framework。
在工程的buildsetting中搜索runpath search paths,添加$(SRCROOT),然后运行正常。
补充网上看到的一篇文章写得挺好的Xcode 6制作动态及静态Framework。
终于写完了,欢迎拍砖。

相关文章推荐
- xcode6制作framework(使用第三方依赖框架)
- xcode6制作framework(使用第三方依赖框架)
- xcode6制作framework(使用第三方依赖框架)
- Android Studio导入第三方依赖包并且成功编译(开源框架的使用)
- Swift - Framework的制作与使用教程2(引用第三方库
- 怎样使用TabPageIndicator 怎样依赖第三方框架
- 扩展ASP.NET MVC三层框架并使用StructureMap实现依赖注入1-Model层的实现
- 依赖注入框架Autofac的简单使用
- 数据同步框架MS Sync Framework-不同场景使用例子和简要分析
- 依赖注入框架Autofac的简单使用
- 扩展ASP.NET MVC三层框架并使用StructureMap实现依赖注入1
- 不使用任何框架,教你制作网页滑动切换效果
- 可以使用框架但千万不要依赖框架
- ADO.NET Entity Framework如何:使用实体数据模型向导(实体框架)
- ADO.NET Entity Framework (实体模型框架) 一些使用的注意事项
- 扩展ASP.NET MVC三层框架且使用StructureMap实现依赖注入1-Model层
- 依赖注入框架Autofac的简单使用
- ADO.NET Entity Framework 使用数据定义语言(实体框架)
- ASPDotNET使用第三方控件制作BS结构的一卡通管理系统
- Java中不依赖于第三方库使用OpenSSL生成的RSA公私钥进行数据加解密