Amazon Web Services:Putty连接EC2实例
2014-10-05 17:10
330 查看
自用备忘:
Install PuTTY
Download and install PuTTY from the PuTTY download page.
Be sure to install the entire suite.
Get the ID of the instance
You can get the ID of your instance using the Amazon EC2 console (from the Instance ID column). If you prefer, you can use the describe-instances (AWS
CLI) or ec2-describe-instances (Amazon EC2 CLI) command.
Get the public DNS name of the instance
You can get the public DNS for your instance using the Amazon EC2 console (check the Public DNS column; if this column is hidden, click the Show/Hide icon
and select Public DNS). If you prefer, you can use the describe-instances (AWS
CLI) or ec2-describe-instances (Amazon EC2 CLI) command.
Locate the private key
You'll need the fully-qualified path of the
Enable inbound SSH traffic from your IP address to your instance
Ensure that the security group associated with your instance allows incoming SSH traffic from your IP address. For more information, see Authorizing
Network Access to Your Instances.
Important
Your default security group does not allow incoming SSH traffic by default.
PuTTY does not natively support the private key format (.pem) generated by Amazon EC2. PuTTY has a tool named PuTTYgen, which can convert keys to the required PuTTY format (.ppk). You must convert your private key into this format
(.ppk) before attempting to connect to your instance using PuTTY.
To convert your private key
Start PuTTYgen (for example, from the Start menu, click All Programs > PuTTY > PuTTYgen).
Under Type of key to generate, select SSH-2 RSA.

Click Load. By default, PuTTYgen displays only files with the extension
select the option to display files of all types.

Select your
dismiss the confirmation dialog box.
Click Save private key to save the key in the format that PuTTY can use. PuTTYgen displays a warning about saving the key without a passphrase. Click Yes.
Note
A passphrase on a private key is an extra layer of protection, so even if your private key is discovered, it can't be used without the passphrase. The downside to using a passphrase is that it makes automation harder because human intervention is needed to
log on to an instance, or copy files to an instance.
Specify the same name for the key that you used for the key pair (for example,
extension.
Your private key is now in the correct format for use with PuTTY. You can now connect to your instance using PuTTY's SSH client.
To start a PuTTY session
(Optional) You can verify the RSA key fingerprint on your instance by using one of the following commands on your local system (not on the instance). This is useful if you've launched your instance from a public AMI from a third
party. Locate the
of the instance.
get-console-output (AWS CLI)
ec2-get-console-output (Amazon EC2 CLI)
Note
The
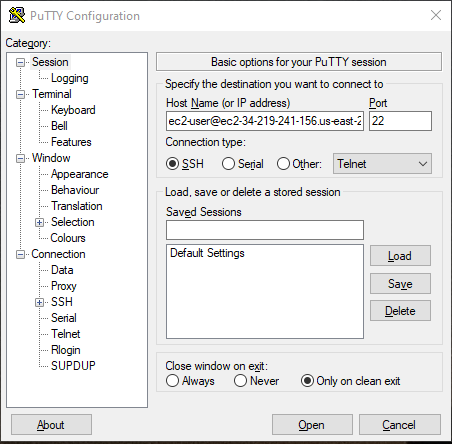
Start PuTTY (from the Start menu, click All Programs > PuTTY > PuTTY).
In the Category pane, select Session and complete the following fields:
In the Host Name box, enter
Be sure to specify the appropriate user name for your AMI. For example:
For an Amazon Linux AMI, the user name is
For a RHEL5 AMI, the user name is either
For an Ubuntu AMI, the user name is
For a Fedora AMI, the user name is either
For SUSE Linux, the user name is
Otherwise, if
with the AMI provider.
Under Connection type, select SSH.
Ensure that Port is 22.
In the Category pane, expand Connection, expand SSH, and then select Auth.
Complete the following:
Click Browse.
Select the
(Optional) If you plan to start this session again later, you can save the session information for future use. Select Session in the Category tree,
enter a name for the session in Saved Sessions, and then click Save.
Click Open to start the PuTTY session.

If this is the first time you have connected to this instance, PuTTY displays a security alert dialog box that asks whether you trust the host you are connecting to.
(Optional) Verify that the fingerprint in the security alert matches the fingerprint that you obtained in step 1. If these fingerprints don't match, someone might be attempting a "man-in-the-middle" attack. If they match, continue
to the next step.
Click Yes. A window opens and you are connected to your instance.
Note
If you specified a passphrase when you converted your private key to PuTTY's format, you must provide that passphrase when you log in to the instance.
Install PuTTY
Download and install PuTTY from the PuTTY download page.
Be sure to install the entire suite.
Get the ID of the instance
You can get the ID of your instance using the Amazon EC2 console (from the Instance ID column). If you prefer, you can use the describe-instances (AWS
CLI) or ec2-describe-instances (Amazon EC2 CLI) command.
Get the public DNS name of the instance
You can get the public DNS for your instance using the Amazon EC2 console (check the Public DNS column; if this column is hidden, click the Show/Hide icon
and select Public DNS). If you prefer, you can use the describe-instances (AWS
CLI) or ec2-describe-instances (Amazon EC2 CLI) command.
Locate the private key
You'll need the fully-qualified path of the
.pemfile for the key pair that you specified when you launched the instance.
Enable inbound SSH traffic from your IP address to your instance
Ensure that the security group associated with your instance allows incoming SSH traffic from your IP address. For more information, see Authorizing
Network Access to Your Instances.
Important
Your default security group does not allow incoming SSH traffic by default.
Converting Your Private Key Using PuTTYgen
PuTTY does not natively support the private key format (.pem) generated by Amazon EC2. PuTTY has a tool named PuTTYgen, which can convert keys to the required PuTTY format (.ppk). You must convert your private key into this format(.ppk) before attempting to connect to your instance using PuTTY.
To convert your private key
Start PuTTYgen (for example, from the Start menu, click All Programs > PuTTY > PuTTYgen).
Under Type of key to generate, select SSH-2 RSA.
Click Load. By default, PuTTYgen displays only files with the extension
.ppk. To locate your
.pemfile,
select the option to display files of all types.
Select your
.pemfile and click Open. Click OK to
dismiss the confirmation dialog box.
Click Save private key to save the key in the format that PuTTY can use. PuTTYgen displays a warning about saving the key without a passphrase. Click Yes.
Note
A passphrase on a private key is an extra layer of protection, so even if your private key is discovered, it can't be used without the passphrase. The downside to using a passphrase is that it makes automation harder because human intervention is needed to
log on to an instance, or copy files to an instance.
Specify the same name for the key that you used for the key pair (for example,
my-key-pair). PuTTY automatically adds the
.ppkfile
extension.
Your private key is now in the correct format for use with PuTTY. You can now connect to your instance using PuTTY's SSH client.
Starting a PuTTY Session
To start a PuTTY session(Optional) You can verify the RSA key fingerprint on your instance by using one of the following commands on your local system (not on the instance). This is useful if you've launched your instance from a public AMI from a third
party. Locate the
SSH HOST KEY FINGERPRINTSsection, and note the RSA fingerprint (for example, 1f:51:ae:28:bf:89:e9:d8:1f:25:5d:37:2d:7d:b8:ca:9f:f5:f1:6f) and compare it to the fingerprint
of the instance.
get-console-output (AWS CLI)
aws ec2 get-console-output --instance-id instance_id[/code]ec2-get-console-output (Amazon EC2 CLI)
ec2-get-console-output instance_id[/code]Note
The
SSH HOST KEY FINGERPRINTSsection is only available after the first boot of the instance.
Start PuTTY (from the Start menu, click All Programs > PuTTY > PuTTY).
In the Category pane, select Session and complete the following fields:
In the Host Name box, enter
user_name@
public_dns_name.
Be sure to specify the appropriate user name for your AMI. For example:
For an Amazon Linux AMI, the user name is
ec2-user.
For a RHEL5 AMI, the user name is either
rootor
ec2-user.
For an Ubuntu AMI, the user name is
ubuntu.
For a Fedora AMI, the user name is either
fedoraor
ec2-user.
For SUSE Linux, the user name is
root.
Otherwise, if
ec2-userand
rootdon't work, check
with the AMI provider.
Under Connection type, select SSH.
Ensure that Port is 22.
In the Category pane, expand Connection, expand SSH, and then select Auth.
Complete the following:
Click Browse.
Select the
.ppkfile that you generated for your key pair, and then click Open.
(Optional) If you plan to start this session again later, you can save the session information for future use. Select Session in the Category tree,
enter a name for the session in Saved Sessions, and then click Save.
Click Open to start the PuTTY session.
If this is the first time you have connected to this instance, PuTTY displays a security alert dialog box that asks whether you trust the host you are connecting to.
(Optional) Verify that the fingerprint in the security alert matches the fingerprint that you obtained in step 1. If these fingerprints don't match, someone might be attempting a "man-in-the-middle" attack. If they match, continue
to the next step.
Click Yes. A window opens and you are connected to your instance.
Note
If you specified a passphrase when you converted your private key to PuTTY's format, you must provide that passphrase when you log in to the instance.

相关文章推荐
- Windows下如何用putty连接Amazon EC2实例图文教程!
- 使用httpclient 连接 restful webservices实例 绝对可用 get的--post
- 尝试Amazon Web Services的EC2
- 使用Putty连接Amazon EC2 Instance
- 用 Amazon Web Services 进行云计算,第 3 部分: 用 EC2 根据需要提供服务器
- Windows下如何用putty连接Amazon EC2
- Windows用putty连接Amazon EC2
- Programming Amazon Web Services: S3, EC2, SQS, FPS, and SimpleDB
- Winscp连接Amazon Ec2实例传送文件
- Amazon Web Services EC2
- 用 Amazon Web Services 进行云计算,第 4 部分: 用 SQS 进行可靠的消息传递
- AWS (Amazon Web services) 免费主机测试使用流程 -- 主机搭建
- Windows下如何用SecureCRT连接Amazon EC2
- AWS (Amazon Web services) 免费主机测试使用流程 – 安装Ubuntu
- AWS (Amazon Web services) 免费主机测试使用流程 – 绑定域名
- Amazon Web Services的一些入门知识
- 用javascript调用.net webservices实例 [转]
- AWS (Amazon Web services) 免费主机测试使用流程 --- 一机绑定多域名