Android Hal层简要分析
2014-09-21 11:36
295 查看
Android Hal层简要分析
Android Hal层(即 Hardware Abstraction Layer)是Google开发的Android系统里上层应用对底层硬件操作屏蔽的一个软件层次,说直白点,就是上层应用不必关心底层硬件具体是如何工作的,只需要调用底层提供的统一接口即可,这种设计思想广泛的存在于当前的软件的架构设计里。个人感觉,以前在Linux系统下学习驱动程序的开发时,当驱动程序完成时,我们会编写相应的用户空间测试程序,感觉这就有点类似此处的硬件抽象层的工作,只不过原来是把测试程序用交叉工具链编译成可执行程序然后下载到开发板上进行验证,而在Android的硬件抽象层中,将测试程序再进行了一次封装,把测试接口封装起来传递给上一层调用,这样就能隐藏硬件的实现细节和参数。
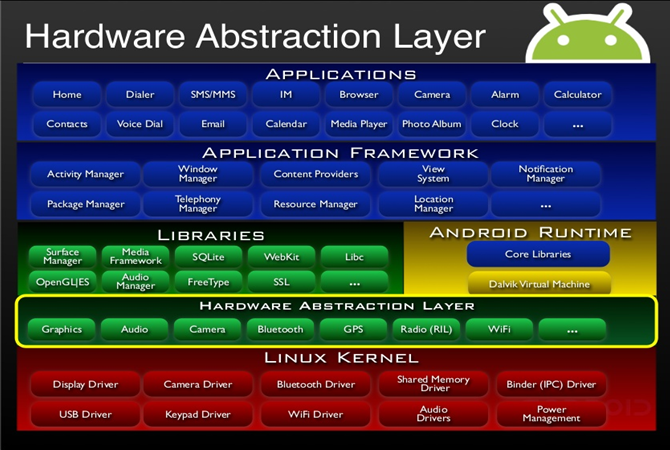
其实Android系统里完全可以没有HAL硬件抽象层,上层应用可以直接通过API调用到底层硬件,但是Android自出现一直打着开源的旗号,而一些硬件设备厂商由于商业因素,不希望把自己的核心代码开源出来,而只是提供二进制的代码。另外,Android系统里使用的一些硬件设备接口可能不是使用的Linux Kernel的统一接口,并且还有GPL版权的原因,所以Google在Android架构里提出了Hal的概念,这个HAL其实就是独立的意思,Android系统不仅依赖于某一个具体的硬件驱动,而是依赖于Hal代码,这样,第三方厂商可以將自己不开源的代码封装在HAL层,仅仅提供二进制代码。在具体分析Android硬件抽象层之前,先从下图了解下其在整个Android系统架构中所处的位置:
Android Hal架构分为两种:
①旧的架构module
②新的架构module stub
下面我们就具体分析下两种架构各自的特点:
一 Module架构
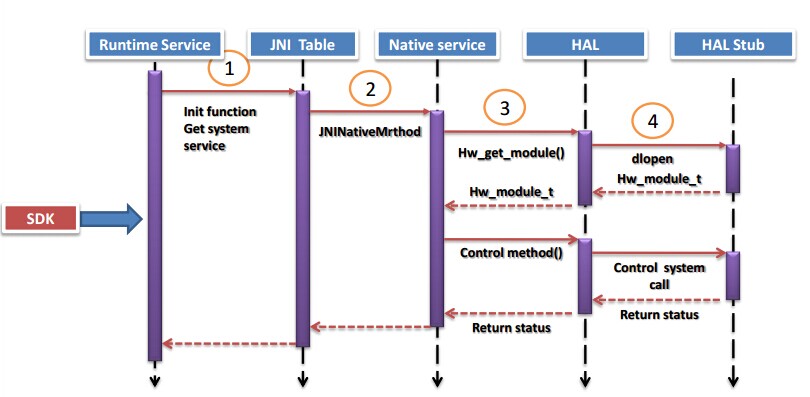
Android用户应用程序或者框架层代码由JAVA实现,Java运行在Dalvik虚拟机中,没有办法直接访问底层硬件,只能通过调用so本地库代码实现,在so本地代码里有对底层硬件操作的代码,如下图所示:
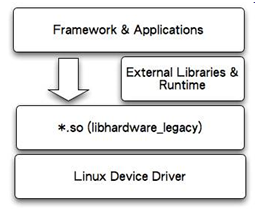
可以这样说,应用层或者框架层Java代码,通过JNI技术调用C或C++写的so库代码,在so库代码中调用底层驱动,从而实现上层应用操作底层硬件的目的。实现硬件操作的so库为module.
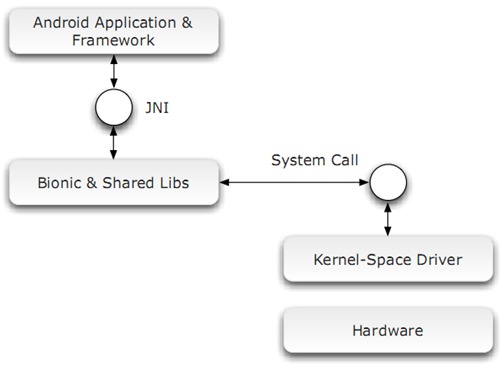
其实现流程如下图所示:
这种设计架构虽然满足了Java应用访问硬件的需要,但是,使得我们的代码上下层次间的耦合太高,用户程序或者框架代码必须要去加载module库,如果底层硬件有变化,module要从新编译,上层也要做相应变化,另外,如果多个应用程序同时访问硬件,都去加载module,同一module被多个进程映射多次,会有代码的重入问题。

二 新的Hal架构:
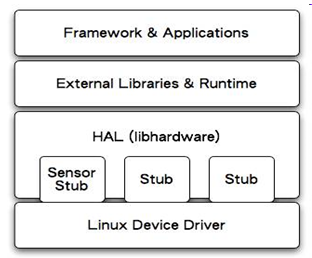
新的代码架构使用的是module stub方式.Stub是存根或者桩的意思,其实说白了,就是指一个对象代表的意思。上层应用层或者框架层代码加载so库代码,so库代码我们称之为module,在Hal层注册了每个硬件对象的存根stub,当上层需要访问硬件的时候,就从当前注册的硬件对象stub里查找,找到之后stub会向上层module提供该硬件对象的operations interface(操作接口),该操作接口就保存在module中,上层应用或框架层再通过这个module操作接口来访问硬件。其架构如下:
以上分别介绍了Module架构和Stub架构,下面做一个对比:
在Module架构中,本地代码由so库实现,上层直接将so库映射到进程空间,会有代码重入及设备多次打开的问题。新的Stub框架虽然也要加载module库,但是这个module已经不包含操作底层硬件驱动的功能了,它里面保存的只是底层stub提供的操作接口,底层stub扮演了“接口提供者”的角色,当stub第一次被使用时加载到内存,后续再使用时仅返回硬件对象操作接口,不会存在设备多次打开的问题,并且由于多进程访问时返回的只是函数指针,代码并没有重入。
三 Hal Stub框架分析
Hal Stub的框架比较简单,三个结构体、两个常量、一个函数,简称321架构,它的定义在:
alps/hardware/libhardware/include/hardware/hardware.h
alps/hardware/libhardware/hardware.c
下面我们先看下三个重要的结构体,其包含在hardware.h中:
接下来在看321架构中的:两个符号常量和一个函数:
用户程序通过硬件的id名来拿到硬件,下面我们以android平台下驱动的开发及测试框架概述(二)一文的例子来分析:
注册一个硬件对象的方法其实只需要声明一个结构体即可,以注册freg_module_t为例:
上面的methods被初始化为freg_module_methods的地址,其结构为hw_methods_t类型的,其声明代码如下:
1:分配硬件设备操作结构体freg_device_t,其描述了硬件操作行为
2:初始化freg_device_t的父结构体hw_device_t成员
3:初始化了freg_device_t中的扩展的操作接口
4:打开设备,将freg_device_t结构体以父结构体类型返回
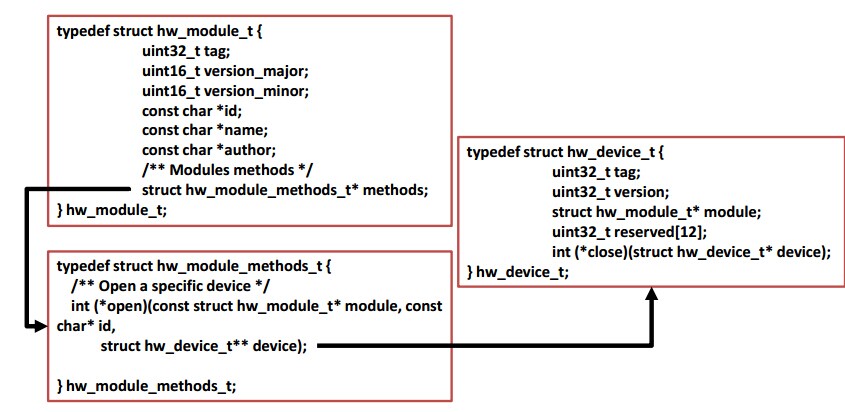
其中freg_device_t和父结构体hw_device_t的关系:
小结一下:
我们有一个硬件id名,通过这个id调用hw_get_module(const char *id, const struct hw_module_t **module)这个函数查找注册到当前系统中与id对应的硬件对象并返回,硬件对象里有个通过hw_module_methods_t结构体封装的open函数指针,回调这个open函数,它返回封装有硬件操作接口的freg_device_t结构体,这样我们就可以通过这个硬件接口去间接访问硬件了。可以用下面的图来描述这个过程:
下面我们再来看hw_get_module这个函数的具体实现,其实现在hardware.c中:
通过上面代码的注释分析可知,硬件对象声明的结构体代码被编译成了so库,由于该结构体声明为const类型,被so库包含在其静态代码段里,要找到硬件对象,首先要找到其对应的so库,再通过dlopen,dlsym这种“杀鸡取卵”的方式找到硬件对象,当然这儿的:“鸡”是指:so库,“卵”即硬件对象led_module_t结构。
在声明结构体freg_module_t时,其名字统一定义为了HMI,而这么做的目的就是为了通过dlsym来查找Freg HAL Stub源码生成的so库里的”HMI”符号。现在很明显了,我们写的HAL Stub代码最终要编译so库文件,并且库文件名为:freg.default.so(当然可以设置四个系统属性之一来指定名字为:freg.属性值.so),并且库的所在目录为:/system/lib/hw/。
Android Hal层简要分析大致都这样了。
参考博文:http://blog.csdn.net/mr_raptor/article/details/8074549
Android Hal层(即 Hardware Abstraction Layer)是Google开发的Android系统里上层应用对底层硬件操作屏蔽的一个软件层次,说直白点,就是上层应用不必关心底层硬件具体是如何工作的,只需要调用底层提供的统一接口即可,这种设计思想广泛的存在于当前的软件的架构设计里。个人感觉,以前在Linux系统下学习驱动程序的开发时,当驱动程序完成时,我们会编写相应的用户空间测试程序,感觉这就有点类似此处的硬件抽象层的工作,只不过原来是把测试程序用交叉工具链编译成可执行程序然后下载到开发板上进行验证,而在Android的硬件抽象层中,将测试程序再进行了一次封装,把测试接口封装起来传递给上一层调用,这样就能隐藏硬件的实现细节和参数。
其实Android系统里完全可以没有HAL硬件抽象层,上层应用可以直接通过API调用到底层硬件,但是Android自出现一直打着开源的旗号,而一些硬件设备厂商由于商业因素,不希望把自己的核心代码开源出来,而只是提供二进制的代码。另外,Android系统里使用的一些硬件设备接口可能不是使用的Linux Kernel的统一接口,并且还有GPL版权的原因,所以Google在Android架构里提出了Hal的概念,这个HAL其实就是独立的意思,Android系统不仅依赖于某一个具体的硬件驱动,而是依赖于Hal代码,这样,第三方厂商可以將自己不开源的代码封装在HAL层,仅仅提供二进制代码。在具体分析Android硬件抽象层之前,先从下图了解下其在整个Android系统架构中所处的位置:
Android Hal架构分为两种:
①旧的架构module
②新的架构module stub
下面我们就具体分析下两种架构各自的特点:
一 Module架构
Android用户应用程序或者框架层代码由JAVA实现,Java运行在Dalvik虚拟机中,没有办法直接访问底层硬件,只能通过调用so本地库代码实现,在so本地代码里有对底层硬件操作的代码,如下图所示:
可以这样说,应用层或者框架层Java代码,通过JNI技术调用C或C++写的so库代码,在so库代码中调用底层驱动,从而实现上层应用操作底层硬件的目的。实现硬件操作的so库为module.
其实现流程如下图所示:
这种设计架构虽然满足了Java应用访问硬件的需要,但是,使得我们的代码上下层次间的耦合太高,用户程序或者框架代码必须要去加载module库,如果底层硬件有变化,module要从新编译,上层也要做相应变化,另外,如果多个应用程序同时访问硬件,都去加载module,同一module被多个进程映射多次,会有代码的重入问题。
二 新的Hal架构:
新的代码架构使用的是module stub方式.Stub是存根或者桩的意思,其实说白了,就是指一个对象代表的意思。上层应用层或者框架层代码加载so库代码,so库代码我们称之为module,在Hal层注册了每个硬件对象的存根stub,当上层需要访问硬件的时候,就从当前注册的硬件对象stub里查找,找到之后stub会向上层module提供该硬件对象的operations interface(操作接口),该操作接口就保存在module中,上层应用或框架层再通过这个module操作接口来访问硬件。其架构如下:
以上分别介绍了Module架构和Stub架构,下面做一个对比:
在Module架构中,本地代码由so库实现,上层直接将so库映射到进程空间,会有代码重入及设备多次打开的问题。新的Stub框架虽然也要加载module库,但是这个module已经不包含操作底层硬件驱动的功能了,它里面保存的只是底层stub提供的操作接口,底层stub扮演了“接口提供者”的角色,当stub第一次被使用时加载到内存,后续再使用时仅返回硬件对象操作接口,不会存在设备多次打开的问题,并且由于多进程访问时返回的只是函数指针,代码并没有重入。
三 Hal Stub框架分析
Hal Stub的框架比较简单,三个结构体、两个常量、一个函数,简称321架构,它的定义在:
alps/hardware/libhardware/include/hardware/hardware.h
alps/hardware/libhardware/hardware.c
下面我们先看下三个重要的结构体,其包含在hardware.h中:
/**
*每一个硬件都通过hw_module_t来描述,我们称之为一个硬件对象。你可以去"继承"这个hw_module_t
*然后扩展自己的属性,硬件对象必须定义为一个固定的名字HMI,即:Hardware Module Information的简写
*每个硬件对象里都封装了一个函数指针open用于打开硬件,我们理解为硬件对象的open方法,open调用后
*返回这个硬件对应的操作接口集合
*/
typedef struct hw_module_t {
/** tag must be initialized to HARDWARE_MODULE_TAG */
uint32_t tag;    //该值必须声明为HARDWARE_MODULE_TAG

/**
* The API version of the implemented module. The module owner is
* responsible for updating the version when a module interface has
* changed.
*
* The derived modules such as gralloc and audio own and manage this field.
* The module user must interpret the version field to decide whether or
* not to inter-operate with the supplied module implementation.
* For example, SurfaceFlinger is responsible for making sure that
* it knows how to manage different versions of the gralloc-module API,
* and AudioFlinger must know how to do the same for audio-module API.
*
* The module API version should include a major and a minor component.
* For example, version 1.0 could be represented as 0x0100. This format
* implies that versions 0x0100-0x01ff are all API-compatible.
*
* In the future, libhardware will expose a hw_get_module_version()
* (or equivalent) function that will take minimum/maximum supported
* versions as arguments and would be able to reject modules with
* versions outside of the supplied range.
*/
uint16_t module_api_version;
#define version_major module_api_version
/**
* version_major/version_minor defines are supplied here for temporary
* source code compatibility. They will be removed in the next version.
* ALL clients must convert to the new version format.
*/

/**
* The API version of the HAL module interface. This is meant to
* version the hw_module_t, hw_module_methods_t, and hw_device_t
* structures and definitions.
*
* The HAL interface owns this field. Module users/implementations
* must NOT rely on this value for version information.
*
* Presently, 0 is the only valid value.
*/
uint16_t hal_api_version;
#define version_minor hal_api_version

/** Identifier of module */
const char *id;     //硬件id名,唯一标识module

/** Name of this module */
const char *name;     //硬件module的名字

/** Author/owner/implementor of the module */
const char *author;     //作者

/** Modules methods */
//指向封装有open函数指针的结构体
struct hw_module_methods_t* methods;

/** module's dso */
void* dso;

/** padding to 128 bytes, reserved for future use */
//128字节补齐
uint32_t reserved[32-7];

} hw_module_t;

//硬件对象的open方法描述结构体,它里面只有一个元素:open函数指针
typedef struct hw_module_methods_t {
/** Open a specific device */
int (*open)(const struct hw_module_t* module, const char* id,
struct hw_device_t** d
d288
evice);

} hw_module_methods_t;

/**
* Every device data structure must begin with hw_device_t
* followed by module specific public methods and attributes.
*/
//硬件对象hw_module_t的open方法返回该硬件的Operation interface,它由hw_device_t结构体来描述
//我们称之为该硬件的操作接口
typedef struct hw_device_t {
/** tag must be initialized to HARDWARE_DEVICE_TAG */
uint32_t tag;    //必须赋值为HARDWARE_DEVICE_TAG

/**
* Version of the module-specific device API. This value is used by
* the derived-module user to manage different device implementations.
*
* The module user is responsible for checking the module_api_version
* and device version fields to ensure that the user is capable of
* communicating with the specific module implementation.
*
* One module can support multiple devices with different versions. This
* can be useful when a device interface changes in an incompatible way
* but it is still necessary to support older implementations at the same
* time. One such example is the Camera 2.0 API.
*
* This field is interpreted by the module user and is ignored by the
* HAL interface itself.
*/
uint32_t version;   //版本号

/** reference to the module this device belongs to */
struct hw_module_t* module;  //该设备属于哪个硬件对象,可以看成硬件操作接口与硬件对象的联系

/** padding reserved for future use */
uint32_t reserved[12];   //字节补齐

/** Close this device */
int (*close)(struct hw_device_t* device); //该设备的关闭函数指针

} hw_device_t; 上述三个结构体之间关系紧密,每个硬件对象都由hw_module_t来描述,只要我们拿到了这个硬件对象,就可以调用它的open方法,返回这个硬件对象的硬件操作接口,然后就可以通过这些硬件操作接口来间接操作硬件。只不过,open方法被hw_module_methods_t结构封装了一次,硬件操作接口被hw_device_t封装了一次而已。下面这张图可以反映出它们三者的关系:接下来在看321架构中的:两个符号常量和一个函数:
//HAL Stub对象固定的名字
#define HAL_MODULE_INFO_SYM         HMI

/**
* Name of the hal_module_info as a string
*/

//字符串形式的名字
#define HAL_MODULE_INFO_SYM_AS_STR  "HMI"

/**
* Get the module info associated with a module by id.
*
* @return: 0 == success, <0 == error and *module == NULL
*/
//通过硬件名来获得硬件HAL Stub对象
int hw_get_module(const char *id, const struct hw_module_t **module);
用户程序通过硬件的id名来拿到硬件,下面我们以android平台下驱动的开发及测试框架概述(二)一文的例子来分析:
注册一个硬件对象的方法其实只需要声明一个结构体即可,以注册freg_module_t为例:
struct freg_module_t HAL_MODULE_INFO_SYM = {
common: {
tag: HARDWARE_MODULE_TAG,
version_major: 1,
version_minor: 0,
id: FREG_HARDWARE_MODULE_ID,
name: MODULE_NAME,
author: MODULE_AUTHOR,
methods: &freg_module_methods,
}
//扩展属性
};我们只需要声明一个结构体freg_module_t,起名为HAL_MODULE_INFO_SYM,也就是固定的名字:HMI,然后将这个结构体填充好就行。而freg_module_t结构是“继承”的hw_module_t类型,创建自己的硬件对象,然后扩展自己的特有属性。
<pre name="code" class="cpp">struct freg_module_t {
struct hw_module_t common;
};上面的methods被初始化为freg_module_methods的地址,其结构为hw_methods_t类型的,其声明代码如下:
static struct hw_module_methods_t freg_module_methods = {
open: freg_device_open
};其仅有的open成员是个函数指针,它被指向freg_device_open函数:static int freg_device_open(const struct hw_module_t* module, const char* id, struct hw_device_t** device) {
if(!strcmp(id, FREG_HARDWARE_DEVICE_ID)) {
struct freg_device_t* dev;
dev = (struct freg_device_t*)malloc(sizeof(struct freg_device_t));
if(!dev) {
LOGE("Failed to alloc space for freg_device_t.");
return -EFAULT;
}
memset(dev, 0, sizeof(struct freg_device_t));
dev->common.tag = HARDWARE_DEVICE_TAG;
dev->common.version = 0;
dev->common.module = (hw_module_t*)module;
dev->common.close = freg_device_close;
dev->set_val = freg_set_val;
dev->get_val = freg_get_val;
if((dev->fd = open(DEVICE_NAME, O_RDWR)) == -1) {
LOGE("Failed to open device file /dev/freg -- %s.", strerror(errno));
free(dev);
return -EFAULT;
}
*device = &(dev->common);
LOGI("Open device file /dev/freg successfully.");
return 0;
}
return -EFAULT;
}这个open函数主要做了以下几件事:1:分配硬件设备操作结构体freg_device_t,其描述了硬件操作行为
2:初始化freg_device_t的父结构体hw_device_t成员
3:初始化了freg_device_t中的扩展的操作接口
4:打开设备,将freg_device_t结构体以父结构体类型返回
其中freg_device_t和父结构体hw_device_t的关系:
struct freg_device_t {
struct hw_device_t common;
int fd;
int (*set_val)(struct freg_device_t* dev, int val);
int (*get_val)(struct freg_device_t* dev, int* val);
};上面所涉及的扩展接口不再做进一步分析,其主要作用是直接和底层驱动打交道。小结一下:
我们有一个硬件id名,通过这个id调用hw_get_module(const char *id, const struct hw_module_t **module)这个函数查找注册到当前系统中与id对应的硬件对象并返回,硬件对象里有个通过hw_module_methods_t结构体封装的open函数指针,回调这个open函数,它返回封装有硬件操作接口的freg_device_t结构体,这样我们就可以通过这个硬件接口去间接访问硬件了。可以用下面的图来描述这个过程:
下面我们再来看hw_get_module这个函数的具体实现,其实现在hardware.c中:
static const char *variant_keys[] = {
“ro.hardware”,
“ro.product.board”,
“ro.board.platform”,
“ro.arch”
};
// 由上面定义的字符串数组可知,HAL_VARIANT_KEYS_COUNT的值为4
struct constint HAL_VARIANT_KEYS_COUNT = (sizeof(variant_keys)/sizeof(variant_keys[0]));

int hw_get_module(const char *id, const struct hw_module_t **module){
// 调用3个参数的hw_get_module_by_class函数
return hw_get_module_by_class(id, NULL, module);
}

int hw_get_module_by_class(const char *class_id, const char *inst,
const struct hw_module_t **module){
int status;
int i;
// 声明一个hw_module_t指针变量hmi
const struct hw_module_t *hmi = NULL;
char prop[PATH_MAX};
char path[PATH_MAX];
char name[PATH_MAX];
// 由前面调用函数可知,inst = NULL,执行else部分,将硬件id名拷贝到name数组里
if(inst)
snprintf(name, PATH_MAX, “%s.%s”, class_id, inst);
else
strlcpy(name, class_id, PATH_MAX);
// i 循环5次
for(i=0; i<HAL_VARIANT_KEYS_COUNT+1; i++){
if(i<HAL_VARIANT_KEYS_COUNT){
// 从系统属性里依次查找前面定义的4个属性的值,找其中一个后,执行后面代码,找不到,进入else部分执行
if(property_get(variant_keys[i], prop, NULL) == 0){
continue;
}
// 找到一个属性值prop后,拼写path的值为:/vendor/lib/hw/硬件id名.prop.so
snprintf(path, sizeof(path), “%s/%s.%s.so”,
HAL_LIBRARY_PATH2, name, prop);
if(access(path, R_OK) ==0) break;   // 如果path指向有效的库文件,退出for循环
// 如果vendor/lib/hw目录下没有库文件,查找/system/lib/hw目录下有没有:硬件id名.prop.so的库文件
snprintf(path, sizeof(path), “%s/%s.%s.so”,
HAL_LIBRARY_PATH1, name, prop);
If(access(path, R_OK) == 0) break;
} else {
// 如果4个系统属性都没有定义,则使用默认的库名:/system/lib/hw/硬件id名.default.so
snprintf(path, sizeof(path), “%s/%s.default.so”,
HAL_LIBRARY_PATH1, name);
If(access(path, R_OK) == 0) break;
}
}
status = -ENOENT;
if(i<HAL_VARIANT_KEYS_COUNT+1){
status = load(class_id, path, module);  // 难道是要加载前面查找到的so库??
}
return status;
}

static int load(const char *id, counst char *path, const struct hw_module_t **pHmi){
void *handle;
struct hw_module_t * hmi;
// 通过dlopen打开so库
handle = dlopen(path, RTLD_NOW);
// sym的值为”HMI”,这个名字还有印象吗?
const char * sym = HAL_MODULE_INFO_SYM_AS_STR;
// 通过dlsym从打开的库里查找”HMI”这个符号,如果在so代码里有定义的函数名或变量名为HMI,dlsym返回其地址hmi,将该地址转化成hw_module_t类型,即,硬件对象,这招够狠,“杀鸡取卵”
hmi = (struct hw_module_t *)dlsym(handle, sym);
// 判断找到的硬件对象的id是否和要查找的id名一致,不一致出错退出
// 取了卵还要验证下是不是自己要的“卵”
if(strcmp(id, hmi->) != 0){
// 出错退出处理
}
// 将库的句柄保存到hmi硬件对象的dso成员里
hmi->dso = handle;
// 将硬件对象地址送给load函数者,最终将硬件对象返回到了hw_get_module的调用者
*pHmi = hmi;
// 成功返回
}
通过上面代码的注释分析可知,硬件对象声明的结构体代码被编译成了so库,由于该结构体声明为const类型,被so库包含在其静态代码段里,要找到硬件对象,首先要找到其对应的so库,再通过dlopen,dlsym这种“杀鸡取卵”的方式找到硬件对象,当然这儿的:“鸡”是指:so库,“卵”即硬件对象led_module_t结构。
在声明结构体freg_module_t时,其名字统一定义为了HMI,而这么做的目的就是为了通过dlsym来查找Freg HAL Stub源码生成的so库里的”HMI”符号。现在很明显了,我们写的HAL Stub代码最终要编译so库文件,并且库文件名为:freg.default.so(当然可以设置四个系统属性之一来指定名字为:freg.属性值.so),并且库的所在目录为:/system/lib/hw/。
Android Hal层简要分析大致都这样了。
参考博文:http://blog.csdn.net/mr_raptor/article/details/8074549

相关文章推荐
- Android Hal层简要分析
- Android Hal层简要分析
- Android Hal层简要分析
- Android Hal层简要分析
- Android Hal层简要分析
- Android Hal层简要分析
- Android Hal层简要分析
- Android Hal层简要分析
- Android Hal层简要分析
- Android Hal层简要分析
- Android Hal层简要分析
- Android Hal层简要分析
- Android HAL层简要分析
- Android Hal层简要分析
- Android Hal层简要分析
- Android Hal层简要分析
- Android Hal层简要分析
- Android Hal层简要分析
- Android Hal层简要分析
- Android Hal层简要分析