基于Vibe算法的运动目标检测
2014-09-12 14:39
357 查看
初学习opencv一段时间了,把自己学的东西在博客上做个总结,也有助于自己的知识的巩固。
这段时间主要是在研究运动目标的检测,目前,关于运动目标检测的方法有很多。比如,平均背景法,帧差法,光流法,ViBe算法等等。那么在对上述方法的学习和了解后,发现ViBe算法相对而言,具有更高的鲁棒性。
首先,介绍ViBe算法。ViBe算法即视觉背景提取算法,是在2009年提出来的用于进行快速背景提取和运动目标检测的算法,具有较高的实时性和鲁棒性。ViBe算法根据图像像素的空间一致性,使用视频序列第一帧来初始化背景模型。采用目标像素的八领域进行背景建模和背景更新。不足之处,对光照和阴影方面处理不足。
这个博客http://blog.csdn.net/brilliantstone/article/details/18085235 对ViBe算法的原理解释的比较清楚。
在理解了算法的基本原理后,下面贴出ViBe的算法。
ViBe.hpp 头文件
ViBe.cpp 实现文件
main函数
运行结果:
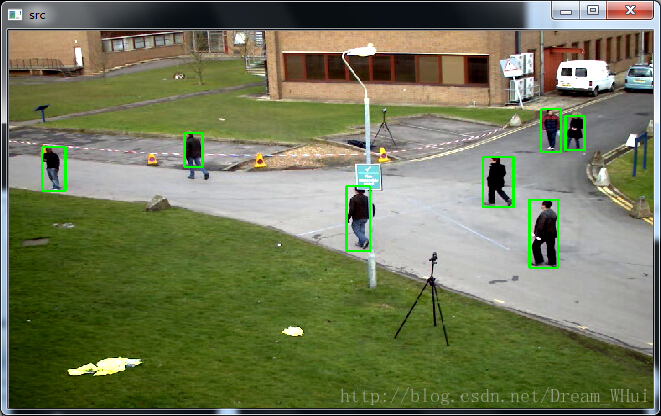
基本实现了对运动目标的检测与跟踪
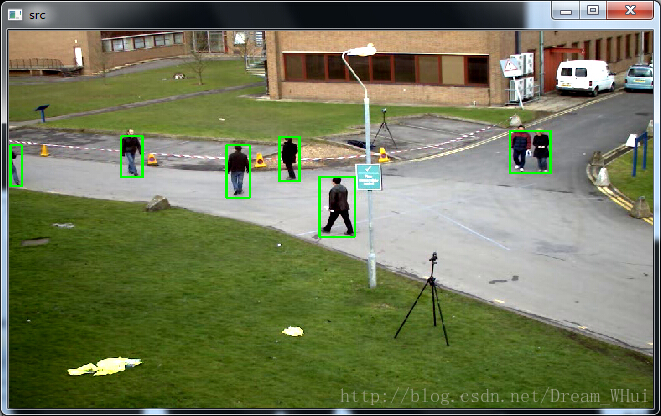
但是,对于运动目标靠的太近,会错误的检测为同一个目标,后期想办法改进~~
这段时间主要是在研究运动目标的检测,目前,关于运动目标检测的方法有很多。比如,平均背景法,帧差法,光流法,ViBe算法等等。那么在对上述方法的学习和了解后,发现ViBe算法相对而言,具有更高的鲁棒性。
首先,介绍ViBe算法。ViBe算法即视觉背景提取算法,是在2009年提出来的用于进行快速背景提取和运动目标检测的算法,具有较高的实时性和鲁棒性。ViBe算法根据图像像素的空间一致性,使用视频序列第一帧来初始化背景模型。采用目标像素的八领域进行背景建模和背景更新。不足之处,对光照和阴影方面处理不足。
这个博客http://blog.csdn.net/brilliantstone/article/details/18085235 对ViBe算法的原理解释的比较清楚。
在理解了算法的基本原理后,下面贴出ViBe的算法。
ViBe.hpp 头文件
#include "stdafx.h"
#include <opencv2/opencv.hpp>
#include <iostream>

using namespace std;
using namespace cv;

#define defaultNbSamples 20     //每个像素点的样本个数
#define defaultReqMatches 2     //#min指数
#define defaultRadius 20        //Sqthere半径
#define defaultSubsamplingFactor 16 //子采样概率
#define background 0        //背景像素
#define foreground 255      //前景像素

void Initialize(CvMat* pFrameMat,RNG rng);//初始化
void update(CvMat* pFrameMat,CvMat* segMat,RNG rng,int nFrmNum);//更新
ViBe.cpp 实现文件
#include "Vibe.h"
#include <opencv2/opencv.hpp>
#include <iostream>

using namespace std;
using namespace cv;

float samples[1024][1024][defaultNbSamples+1];//保存每个像素点的样本值

//初始化
void Initialize(CvMat* pFrameMat,RNG rng){

//记录随机生成的 行(r) 和 列(c)
int rand,r,c;

//对每个像素样本进行初始化
for(int y=0;y<pFrameMat->rows;y++){//Height
for(int x=0;x<pFrameMat->cols;x++){//Width
for(int k=0;k<defaultNbSamples;k++){
//随机获取像素样本值
rand = rng.uniform(-1,1);
r=y+rand;if(r<0) r=0; if(r>=pFrameMat->rows) r=pFrameMat->rows-1;   //行
rand = rng.uniform(-1,1);
c= x+rand; if(c<0) c=0; if(c>=pFrameMat->cols) c=pFrameMat->cols-1; //列

//存储像素样本值
samples[y][x][k]=CV_MAT_ELEM(*pFrameMat,float,r,c);
}
samples[y][x][defaultNbSamples]=0;
}
}
}

//更新函数
void update(CvMat* pFrameMat,CvMat* segMat,RNG rng,int nFrmNum){

for(int y=0;y<pFrameMat->rows;y++){   //Height
for(int x=0;x<pFrameMat->cols;x++){   //Width

//用于判断一个点是否是背景点,index记录已比较的样本个数,count表示匹配的样本个数
int count=0,index=0;float dist=0;
//
while((count<defaultReqMatches) && (index<defaultNbSamples)){
dist=CV_MAT_ELEM(*pFrameMat,float,y,x)-samples[y][x][index];
if(dist<0) dist=-dist;
if(dist<defaultRadius) count++;
index++;
}
if(count>=defaultReqMatches){

//判断为背景像素,只有背景点才能被用来传播和更新存储样本值
samples[y][x][defaultNbSamples]=0;//??????????

*((float *)CV_MAT_ELEM_PTR(*segMat,y,x))=background;

int rand=rng.uniform(0,defaultSubsamplingFactor-1);
if(rand==0){
rand=rng.uniform(0,defaultNbSamples-1);///////////////
samples[y][x][rand]=CV_MAT_ELEM(*pFrameMat,float,y,x);
}
rand=rng.uniform(0,defaultSubsamplingFactor-1);
if(rand==0){
int xN,yN;
rand = rng.uniform(-1,1);yN = y+rand ;if(yN<0) yN=0; if(yN>=pFrameMat->rows) yN=pFrameMat->rows-1;
rand = rng.uniform(-1,1);xN = x+rand ;if(xN<0) xN=0; if(xN>=pFrameMat->cols) xN=pFrameMat->cols-1;
rand=rng.uniform(0,defaultNbSamples-1);
samples[yN][xN][rand]=CV_MAT_ELEM(*pFrameMat,float,y,x);
}
}
else {
//判断为前景像素
*((float *)CV_MAT_ELEM_PTR(*segMat,y,x))=foreground;

samples[y][x][defaultNbSamples]++;
if(samples[y][x][defaultNbSamples]>50){
int rand=rng.uniform(0,defaultNbSamples);
if(rand==0){
rand=rng.uniform(0,defaultNbSamples);
samples[y][x][rand]=CV_MAT_ELEM(*pFrameMat,float,y,x);
}
}
}
}
}
}
main函数
#include "stdafx.h"
#include <opencv2/opencv.hpp>
#include "Vibe.h"
#include <iostream>

using namespace std;
using namespace cv;

int nFrmNum = 0;//记录帧数

//对运动目标用绿色矩形圈出
void find_connected_components(IplImage* pFrame,IplImage* mask,float perimScale)
{
CvMemStorage* mem_storage = NULL;
CvSeq* contours = NULL;

IplImage* mask_temp = cvCreateImage(cvGetSize(mask),8,1);
cvCopy(mask,mask_temp);

mem_storage = cvCreateMemStorage(0);

CvContourScanner scanner = cvStartFindContours(mask_temp,mem_storage,
sizeof(CvContour),CV_RETR_EXTERNAL,CV_CHAIN_APPROX_SIMPLE);

CvSeq* c;
int numCont = 0;
while( ( c = cvFindNextContour(scanner)) != NULL )
{
double len = cvContourPerimeter(c);//计算轮廓的直径
double q = (mask_temp->height + mask_temp->width) / perimScale;

if( len<q )
{
cvSubstituteContour( scanner ,NULL );//去掉小轮廓
}
numCont++;
}

contours = cvEndFindContours( &scanner );

for( c=contours; c!=NULL; c=c->h_next)
{
//cvDrawContours(pFrame, c,  CV_RGB(255,0,0), CV_RGB(255, 0, 0),  2, 1.8, 8, cvPoint(0,0));
CvRect rect = cvBoundingRect(c,0);  //根据序列,返回轮廓外围矩形;

CvPoint pt1,pt2;
pt1.x=rect.x;
pt1.y=rect.y;
pt2.x=rect.x+rect.width;
pt2.y=rect.y+rect.height;

cvDrawContours(pFrame,c,CV_RGB(255,0,0),CV_RGB(255,0,0),0);//画轮廓
cvRectangle(pFrame,pt1,pt2,CV_RGB(0,255,0),2);//画矩形
}

cvReleaseImage(&mask_temp);
cvReleaseMemStorage(&mem_storage);
}

int main(int argc, char* argv[])
{
IplImage* pFrame=NULL;CvMat* pFrameMat = NULL;//pFrame对象
IplImage* pAfter=NULL;CvMat* pAfterMat=NULL;//保存pFrame对应的灰度图像
IplImage* segMap=NULL;CvMat* segMat=NULL;//保存处理后的信息

//要读取的视频文件和保存的视频文件路径
char* openfile="1.avi";

//打开视频文件
CvCapture* pCapture=cvCreateFileCapture(openfile);

if(pCapture==NULL)
{
cout<<"video file open error!"<<endl;
return -1;
}

//获取视频相关信息,帧率和大小
CvSize size=cvSize((int)cvGetCaptureProperty(pCapture,CV_CAP_PROP_FRAME_WIDTH),
(int)cvGetCaptureProperty(pCapture,CV_CAP_PROP_FRAME_HEIGHT));

IplImage* dstImg=cvCreateImage(size,IPL_DEPTH_8U,3); //创建要保存的图像

//创建窗口
cvNamedWindow("out",0);
cvNamedWindow("src",0);

//创建一个随机数生成器
RNG rng(0xFFFFFFFF);

//逐帧读取视频并进行处理
while(pFrame = cvQueryFrame( pCapture ))
{
nFrmNum++;
//如果是第一帧,申请内存并进行初始化
if(nFrmNum==1)
{
segMap = cvCreateImage(cvSize(pFrame->width, pFrame->height),  IPL_DEPTH_8U,1);
segMat = cvCreateMat(pFrame->height, pFrame->width, CV_32FC1);
pAfter=cvCreateImage(cvSize(pFrame->width, pFrame->height), IPL_DEPTH_8U,1);
pAfterMat=cvCreateMat(pFrame->height, pFrame->width, CV_32FC1);

//转化成单通道图像再处理
cvCvtColor(pFrame, pAfter, CV_BGR2GRAY);
cvConvert(pAfter, pAfterMat);
Initialize(pAfterMat,rng);
}
else
{
cvCvtColor(pFrame,pAfter,CV_BGR2GRAY);
cvConvert(pAfter,pAfterMat);
update(pAfterMat,segMat,rng,nFrmNum);//更新背景
cvConvert(segMat,segMap);

cvMorphologyEx(segMap,segMap,0,0,CV_MOP_OPEN,1);
cvMorphologyEx(segMap,segMap,0,0,CV_MOP_CLOSE,1);

//draw(pFrame,segMap);
find_connected_components(pFrame,segMap,20);

cvShowImage("src",pFrame);
cvShowImage("out",segMap);
char c = cvWaitKey(40);
if(c==' ')
cvWaitKey();
}
}
cvReleaseImage(&pFrame);cvReleaseMat(&pFrameMat);
cvReleaseImage(&pAfter);cvReleaseMat(&pAfterMat);
cvReleaseImage(&segMap);cvReleaseMat(&segMat);

cvReleaseImage(&dstImg);
cvDestroyWindow("src");
cvDestroyWindow("out");
return 0;
}
运行结果:
基本实现了对运动目标的检测与跟踪
但是,对于运动目标靠的太近,会错误的检测为同一个目标,后期想办法改进~~

相关文章推荐
- 【图像处理】运动目标检测ViBe算法(附代码)
- OpenCV之基于GMM的运动目标检测
- 运动目标检测ViBe算法
- 基于样本一致性的背景减除运动目标检测算法(SACON)
- 基于Shading Model(对光照变化一定不变性)的运动目标检测算法
- 基于平均背景建模的运动目标检测(二)
- 基于光流分析的运动目标快速检测与跟踪融合算法
- 【计算机视觉】基于局部二值相似性模式(LBSP)的运动目标检测算法
- 每天进步一点点------Sobel算子(3)基于彩色图像边缘差分的运动目标检测算法
- 运动目标检测--基于直方图匹配的鬼影消除
- OpenCV_基于混合高斯模型GMM的运动目标检测
- 运动目标检测--基于YUV颜色空间检测
- 基于最大互信息的运动目标检测
- 运动目标检测中基于HSV空间的阴影去除算法
- 基于BP算法的3维马尔可夫随机场运动目标检测
- OpenCV_基于自适应背景更新的运动目标检测
- 基于平均背景建模的运动目标检测
- 基于同态滤波器(Homomorphic Filtering)的运动目标检测算法
- 基于OpenCV和Android的运动目标检测系统
- 基于样本一致性的背景减除运动目标检测算法(SACON)