10 Tips to Push Your Git Skills to the Next Level
2014-08-20 13:41
676 查看
http://www.sitepoint.com/10-tips-git-next-level/
Recently we published a couple of tutorials to get you familiar with Git basics and using
Git in a team environment. The commands that we discussed were about enough to help a developer survive in the Git world. In this post, we will try to explore how to manage your time effectively and make full use of the features that Git provides.
Note: Some commands in this article include part of the command in square brackets (e.g.
If you run Git commands through the command line, it’s a tiresome task to type in the commands manually every single time. To help with this, you can enable auto completion of Git commands within a few minutes.
To get the script, run the following in a Unix system:
Next, add the following lines to your
Although I have mentioned this earlier, I can not stress it enough: If you want to use the features of Git fully, you should definitely shift to the command line interface!
Are you tired of compiled files (like
fed up that you have added them to Git? Look no further, there is a way through which you can tell Git to ignore certain files and directories altogether. Simply create a file with the name
list the files and directories that you don’t want Git to track. You can make exceptions using the exclamation mark(!).
It’s the natural instinct of human beings to blame others when something goes wrong. If your production server is broke, it’s very easy to find out the culprit — just do a
And in the screenshot below, you can see how this command would look on a bigger repository:
We had a look at the use of
that you should know about.
beside each commit to a reduced commit hash and the commit message, all shown in a single line.
graphical representation of the history on the left hand side of the output. It’s of no use if you are viewing the history for a single branch.
Here’s what a combination of the options looks like:
Let’s say you committed something you didn’t want to and ended up doing a hard reset to come back to your previous state. Later, you realize you lost some other information in the process and want to get it back, or at least view it. This is where
A simple
If I run
However, a
that was lost when I did a hard reset:
It is generally a good practice to make feature-based commits, that is, each commit must represent a feature or a bug fix. Consider what would happen if you fixed two bugs, or added multiple features without committing the changes. In such a situation situation,
you could put the changes in a single commit. But there is a better way: Stage the files individually and commit them separately.
Let’s say you’ve made multiple changes to a single file and want them to appear in separate commits. In that case, we add files by prefixing
our add commands.
Let’s try to demonstrate the same. I have added three new lines to
the first and third lines to appear in my commit. Let’s see what a
And let’s see what happes when we prefix a
It seems that Git assumed that all the changes were a part of the same idea, thereby grouping it into a single hunk. You have the following options:
Enter y to stage that hunk
Enter n to not stage that hunk
Enter e to manually edit the hunk
Enter d to exit or go to the next file.
Enter s to split the hunk.
In our case, we definitely want to split it into smaller parts to selectively add some and ignore the rest.
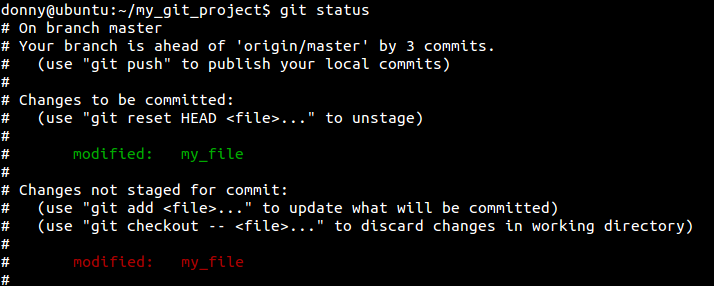
As you can see, we have added the first and third lines and ignored the second. You can then view the status of the repository and make a commit.
When you submit your code for review and create a pull request (which happens often in open source projects), you might be asked to make a change to your code before it’s accepted. You make the change, only to be asked to change it yet again in the next review.
Before you know it, you have a few extra commits. Ideally, you could squash them into one using the
If you want to squash the last two commits, the command that you run is the following.
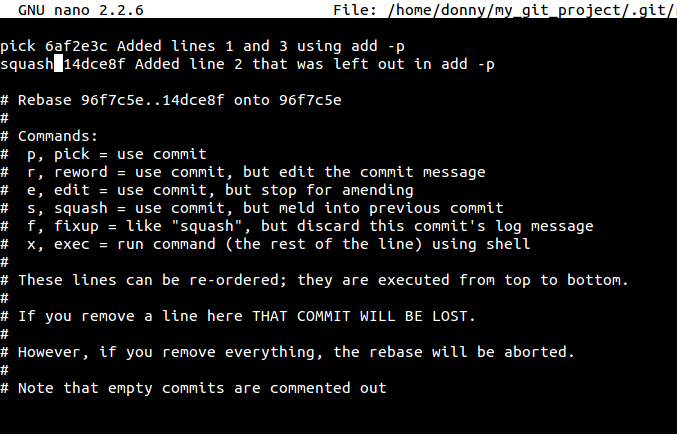
On running this command, you are taken to an interactive interface listing the commits and asking you which ones to squash. Ideally, you
latest commit and
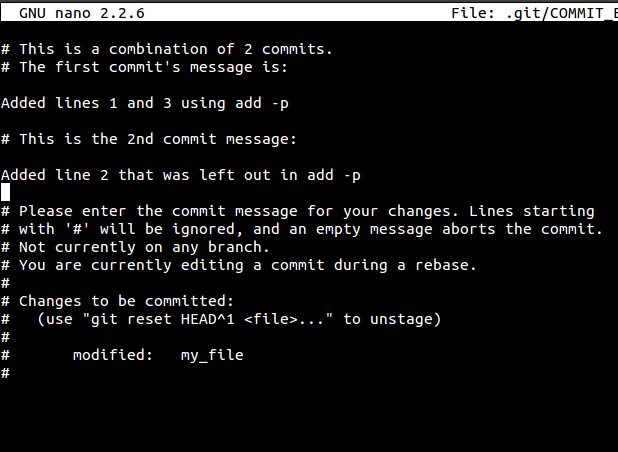
You are then asked to provide a commit message to the new commit. This process essentially re-writes your commit history.
Let’s say you are working on a certain bug or a feature, and you are suddenly asked to demonstrate your work. Your current work is not complete enough to be committed, and you can’t give a demonstration at this stage (without reverting the changes). In such
a situation,
them for further use. To stash your changes, you simply run the following-
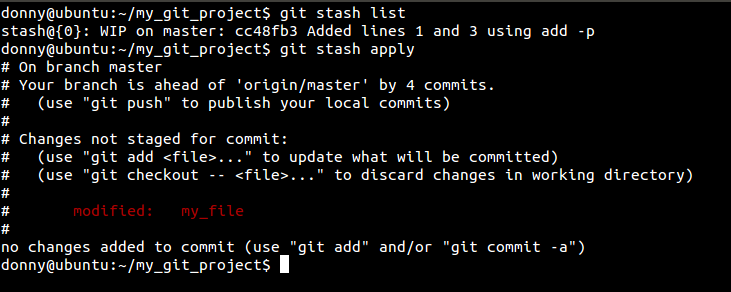
To check the list of stashes, you can run the following:

If you want to un-stash and recover the uncommitted changes, you apply the stash:
In the last screenshot, you can see that each stash has an indentifier, a unique number (although we have only one stash in this case). In case you want to apply only selective stashes, you add the specific identifier to the
Although
That is when the
Here you can see a lost commit. You can check the changes in the commit by running
recover it by running
Let’s say you deleted a remote branch and then cloned the repository. With
for and recover the deleted remote branch.
I have saved the most elegant Git command for the last. The
favorite Git command, because of its literal meaning as well as its utility!
In the simplest of terms,
merging it with your current one. If you are working in a parallel fashion on two or more branches, you might notice a bug that is present in all branches. If you solve it in one, you can cherry pick the commit into
the other branches, without messing with other files or commits.
Let’s consider a scenario where we can apply this. I have two branches and I want to
commit
I switch to the branch into which I want to
Although we had a clean
to conflicts, so use it with care.
With this, we come to the end of our list of tips that I think can help you take your Git skills to a new level. Git is the best out there and it can accomplish anything you can imagine. Therefore, always try to challenge yourself with Git. Chances are, you
will end up learning something new!
Recently we published a couple of tutorials to get you familiar with Git basics and using
Git in a team environment. The commands that we discussed were about enough to help a developer survive in the Git world. In this post, we will try to explore how to manage your time effectively and make full use of the features that Git provides.
Note: Some commands in this article include part of the command in square brackets (e.g.
git
add -p [file_name]
). In those examples, you would insert the necessary number, identifier, etc. without the square brackets.
1. Git Auto Completion
If you run Git commands through the command line, it’s a tiresome task to type in the commands manually every single time. To help with this, you can enable auto completion of Git commands within a few minutes.To get the script, run the following in a Unix system:
~/.bash_profilefile:
2. Ignoring Files in Git
Are you tired of compiled files (like .pyc) appearing in your Git repository? Or are you so
fed up that you have added them to Git? Look no further, there is a way through which you can tell Git to ignore certain files and directories altogether. Simply create a file with the name
.gitignoreand
list the files and directories that you don’t want Git to track. You can make exceptions using the exclamation mark(!).
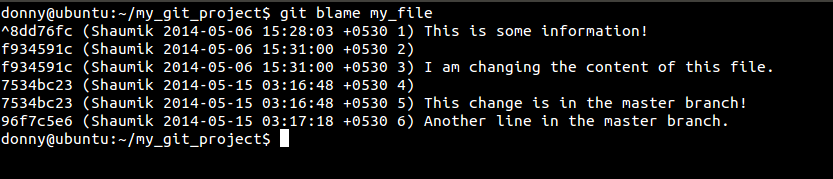
3. Who Messed With My Code?
It’s the natural instinct of human beings to blame others when something goes wrong. If your production server is broke, it’s very easy to find out the culprit — just do a git blame. This command shows you the author of every line in a file, the commit that saw the last change in that line, and the timestamp of the commit.
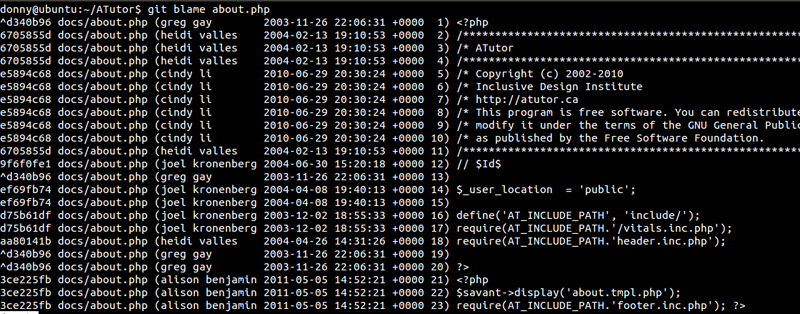
And in the screenshot below, you can see how this command would look on a bigger repository:
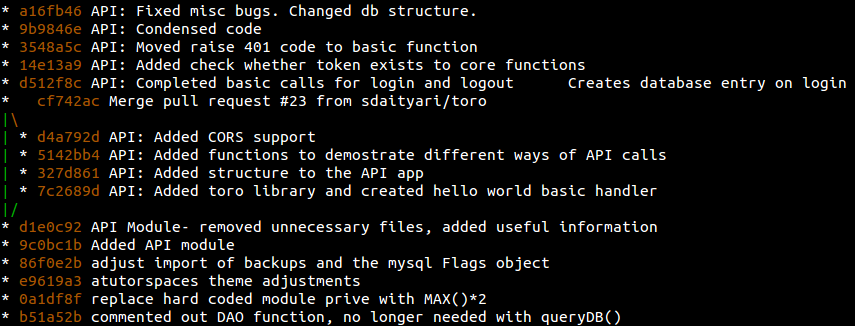
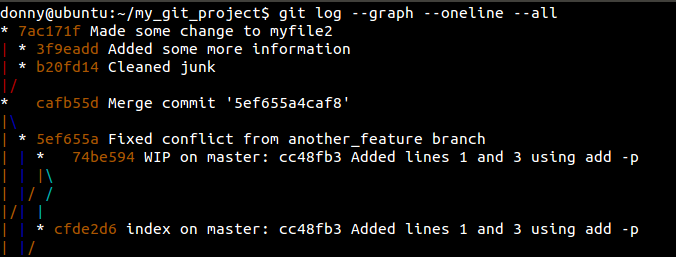
4. Review History of the Repository
We had a look at the use of git login a previous tutorial, however, there are three options
that you should know about.
--oneline– Compresses the information shown
beside each commit to a reduced commit hash and the commit message, all shown in a single line.
--graph– This option draws a text-based
graphical representation of the history on the left hand side of the output. It’s of no use if you are viewing the history for a single branch.
--all– Shows the history of all branches.
Here’s what a combination of the options looks like:
5. Never Lose Track of a Commit
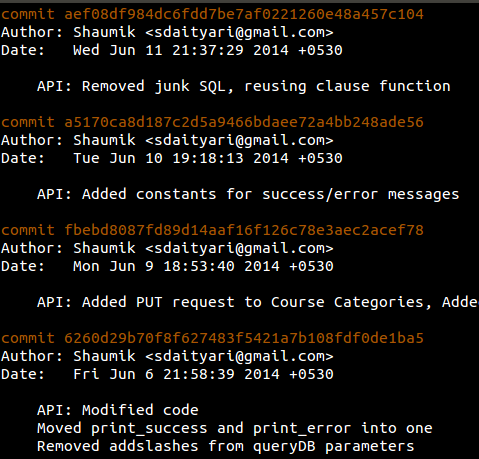
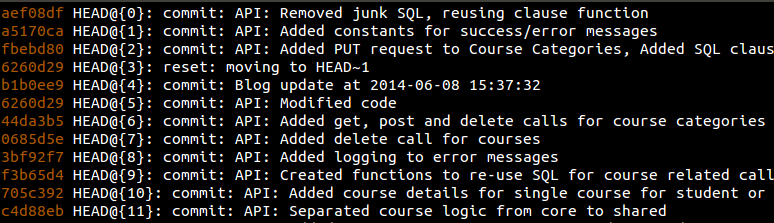
Let’s say you committed something you didn’t want to and ended up doing a hard reset to come back to your previous state. Later, you realize you lost some other information in the process and want to get it back, or at least view it. This is where git reflogcan help.
A simple
git logshows you the latest commit, its parent, its parent’s parent, and so on. However,
git reflogis a list of commits that the head was pointed to. Remember that it’s local to your system; it’s not a part of your repository and not included in pushes or merges.
If I run
git log, I get the commits that are a part of my repository:
However, a
git reflogshows a commit (
b1b0ee9–
HEAD@{4})that was lost when I did a hard reset:
6. Staging Parts of a Changed File for a Commit
It is generally a good practice to make feature-based commits, that is, each commit must represent a feature or a bug fix. Consider what would happen if you fixed two bugs, or added multiple features without committing the changes. In such a situation situation,you could put the changes in a single commit. But there is a better way: Stage the files individually and commit them separately.
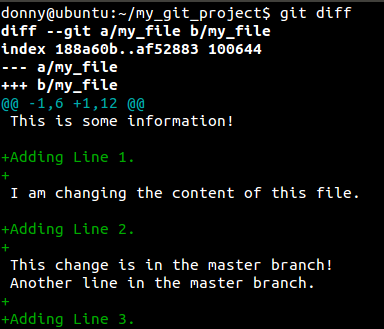
Let’s say you’ve made multiple changes to a single file and want them to appear in separate commits. In that case, we add files by prefixing
-pto
our add commands.
file_nameand I want only
the first and third lines to appear in my commit. Let’s see what a
git diffshows us.
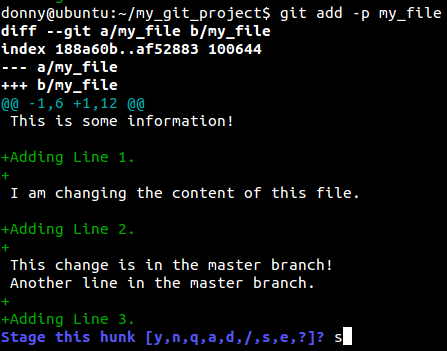
And let’s see what happes when we prefix a
-pto our
addcommand.
It seems that Git assumed that all the changes were a part of the same idea, thereby grouping it into a single hunk. You have the following options:
Enter y to stage that hunk
Enter n to not stage that hunk
Enter e to manually edit the hunk
Enter d to exit or go to the next file.
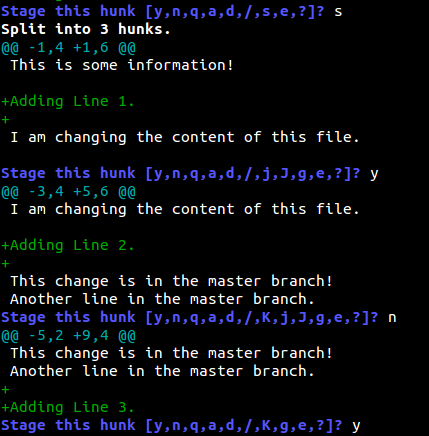
Enter s to split the hunk.
In our case, we definitely want to split it into smaller parts to selectively add some and ignore the rest.
As you can see, we have added the first and third lines and ignored the second. You can then view the status of the repository and make a commit.
7. Squash Multiple Commits
When you submit your code for review and create a pull request (which happens often in open source projects), you might be asked to make a change to your code before it’s accepted. You make the change, only to be asked to change it yet again in the next review.Before you know it, you have a few extra commits. Ideally, you could squash them into one using the
rebasecommand.
pickthe
latest commit and
squashthe old ones.
You are then asked to provide a commit message to the new commit. This process essentially re-writes your commit history.
8. Stash Uncommitted Changes
Let’s say you are working on a certain bug or a feature, and you are suddenly asked to demonstrate your work. Your current work is not complete enough to be committed, and you can’t give a demonstration at this stage (without reverting the changes). In sucha situation,
git stashcomes to the rescue. Stash essentially takes all your changes and stores
them for further use. To stash your changes, you simply run the following-
If you want to un-stash and recover the uncommitted changes, you apply the stash:
applycommand:
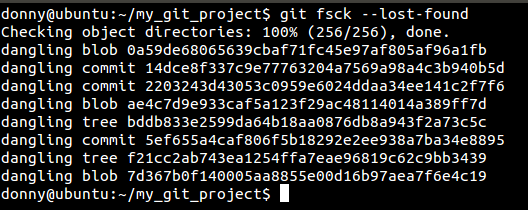
9. Check for Lost Commits
Although reflogis one way of checking for lost commits, it’s not feasible in large repositories.
That is when the
fsck(file system check) command comes into play.
Here you can see a lost commit. You can check the changes in the commit by running
git show [commit_hash]or
recover it by running
git merge [commit_hash].
git fsckhas an advantage over
reflog.
Let’s say you deleted a remote branch and then cloned the repository. With
fsckyou can search
for and recover the deleted remote branch.
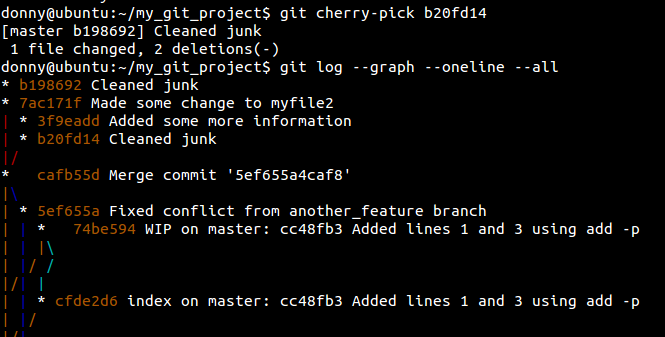
10. Cherry Pick
I have saved the most elegant Git command for the last. The cherry-pickcommand is by far my
favorite Git command, because of its literal meaning as well as its utility!
In the simplest of terms,
cherry-pickis picking a single commit from a different branch and
merging it with your current one. If you are working in a parallel fashion on two or more branches, you might notice a bug that is present in all branches. If you solve it in one, you can cherry pick the commit into
the other branches, without messing with other files or commits.
Let’s consider a scenario where we can apply this. I have two branches and I want to
cherry-pickthe
commit
b20fd14: Cleaned junkinto another one.
I switch to the branch into which I want to
cherry-pickthe commit, and run the following:
Although we had a clean
cherry-pickthis time, you should know that this command can often lead
to conflicts, so use it with care.
Conclusion
With this, we come to the end of our list of tips that I think can help you take your Git skills to a new level. Git is the best out there and it can accomplish anything you can imagine. Therefore, always try to challenge yourself with Git. Chances are, youwill end up learning something new!

相关文章推荐
- 10 Tips to Push Your Git Skills to the Next Level
- CSS and JavaScript tools to take your website to the next level(备用)
- 10 Tips to Improve your LINQ to SQL Application Performance
- 10 Tips for Leading Your Team to Peak Performance(ZT)
- Going to the next level
- git pull 时出现 error: Your local changes to the following files would be overwritten by merge的解决办法
- Pushing the ActionBar to the Next Level
- Knoppix Hacks: Tips and Tools for Using the Linux Live CD to Hack, Repair, and Enjoy Your PC
- 10 Tips to Boost Your Productivity with C# and Visual Studio 2008
- 10 Tips to make Your C Program Effective
- 10 Tips to improve your Software Architecture Design
- How to Spend the First 10 Minutes of Your Day
- 10 Tips for Leading Your Team to Peak Performance(ZT)
- 10 Tips to Boost Your Productivity with C# and Visual Studio 2008
- Xcode4 布置Git环境Your working copy is out of date. Try pulling from the remote to get the latest change
- 10 Tips to Boost Your Productivity with C# and Visual Studio 2008 -- John W Powell
- What is the single most effective thing you did to improve your programming skills
- 10 Tips to Survive and Progress in the Field of Software Testing
- git pull 时出现 error: Your local changes to the following files would be overwritten by merge的解决办法
- git错误error: Your local changes to the following files would be overwritten