用Python和Pygame写游戏-从入门到精通(14)
2014-08-14 14:56
399 查看
用Python和Pygame写游戏-从入门到精通(14)
在继续我们的AI之旅前,分享一个在煎蛋上看到的有趣新闻,能通过读说明书来学习的AI,这个世界真是变得越来越不可琢磨啦!机器人很快就要超越咱了……
因为这一次是接着上面的内容的,所以请不要跳过直接看这里。
哭!!!写完了上传出错,丢失啊,重伤重写~~~~~~~~~~~
蚂蚁实例类
在我们正式建造大脑之前,我们得先做一个蚂蚁类出来,就是下面的这个,从GameEntity继承而来:Python
class Ant(GameEntity):
def __init__(self, world, image):
# 执行基类构造方法
GameEntity.__init__(self, world, "ant", image)
# 创建各种状态
exploring_state = AntStateExploring(self)
seeking_state = AntStateSeeking(self)
delivering_state = AntStateDelivering(self)
hunting_state = AntStateHunting(self)
self.brain.add_state(exploring_state)
self.brain.add_state(seeking_state)
self.brain.add_state(delivering_state)
self.brain.add_state(hunting_state)
self.carry_image = None
def carry(self, image):
self.carry_image = image
def drop(self, surface):
# 放下carry图像
if self.carry_image:
x, y = self.location
w, h = self.carry_image.get_size()
surface.blit(self.carry_image, (x-w, y-h/2))
self.carry_image = None
def render(self, surface):
# 先调用基类的render方法
GameEntity.render(self, surface)
# 额外绘制carry_image
if self.carry_image:
x, y = self.location
w, h = self.carry_image.get_size()
surface.blit(self.carry_image, (x-w, y-h/2))
| 1 2 3 4 5 6 7 8 9 10 11 12 13 14 15 16 17 18 19 20 21 22 23 24 25 26 27 28 29 30 31 | class Ant(GameEntity): def __init__(self, world, image): # 执行基类构造方法 GameEntity.__init__(self, world, "ant", image) # 创建各种状态 exploring_state = AntStateExploring(self) seeking_state = AntStateSeeking(self) delivering_state = AntStateDelivering(self) hunting_state = AntStateHunting(self) self.brain.add_state(exploring_state) self.brain.add_state(seeking_state) self.brain.add_state(delivering_state) self.brain.add_state(hunting_state) self.carry_image = None def carry(self, image): self.carry_image = image def drop(self, surface): # 放下carry图像 if self.carry_image: x, y = self.location w, h = self.carry_image.get_size() surface.blit(self.carry_image, (x-w, y-h/2)) self.carry_image = None def render(self, surface): # 先调用基类的render方法 GameEntity.render(self, surface) # 额外绘制carry_image if self.carry_image: x, y = self.location w, h = self.carry_image.get_size() surface.blit(self.carry_image, (x-w, y-h/2)) |
建造大脑
我们给每一只蚂蚁赋予四个状态,这样才能足够建造我们的蚂蚁的状态机。在建造状态机之前,我们得先把这些状态的详细信息列出来。| 状态 | 动作 |
|---|---|
| 探索(Exploring) | 随机的走向一个点 |
| 搜集(Seeking) | 向一篇树叶前进 |
| 搬运(Dellivering) | 搬运一个什么回去 |
| 狩猎(Hunting) | 攻击一只蜘蛛 |
| 条件 | 转移状态 |
|---|---|
| 发现树叶 | 搜集 |
| 有蜘蛛攻击 | 狩猎 |
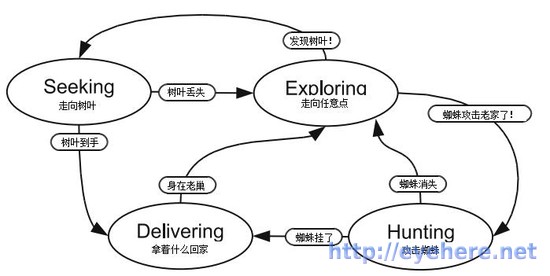
高水平的你也许可以看着上面的图写状态机了,不过为了方便先建立一个State类,来保存一个状态。很简单,只是一个框子,实际上什么都不做:
Python
class State():
def __init__(self, name):
self.name = name
def do_actions(self):
pass
def check_conditions(self):
pass
def entry_actions(self):
pass
def exit_actions(self):
pass
| 1 2 3 4 5 6 7 8 9 10 11 | class State(): def __init__(self, name): self.name = name def do_actions(self): pass def check_conditions(self): pass def entry_actions(self): pass def exit_actions(self): pass |
Python
class StateMachine():
def __init__(self):
self.states = {} # 存储状态
self.active_state = None # 当前有效状态
def add_state(self, state):
# 增加状态
self.states[state.name] = state
def think(self):
if self.active_state is None:
return
# 执行有效状态的动作,并做转移检查
self.active_state.do_actions()
new_state_name = self.active_state.check_conditions()
if new_state_name is not None:
self.set_state(new_state_name)
def set_state(self, new_state_name):
# 更改状态,执行进入/退出动作
if self.active_state is not None:
self.active_state.exit_actions()
self.active_state = self.states[new_state_name]
self.active_state.entry_actions()
| 1 2 3 4 5 6 7 8 9 10 11 12 13 14 15 16 17 18 19 20 21 | class StateMachine(): def __init__(self): self.states = {} # 存储状态 self.active_state = None # 当前有效状态 def add_state(self, state): # 增加状态 self.states[state.name] = state def think(self): if self.active_state is None: return # 执行有效状态的动作,并做转移检查 self.active_state.do_actions() new_state_name = self.active_state.check_conditions() if new_state_name is not None: self.set_state(new_state_name) def set_state(self, new_state_name): # 更改状态,执行进入/退出动作 if self.active_state is not None: self.active_state.exit_actions() self.active_state = self.states[new_state_name] self.active_state.entry_actions() |
我们应该根据上面的四个状态表格建立状态了,有鉴于本次的代码已经很多了,需要好好消化…… 下一次将会一次性给出完整代码,到时候就能看到一个丰富多彩的昆虫世界了!尽请期待~

相关文章推荐
- 用Python和Pygame写游戏-从入门到精通(14)
- 用Python和Pygame写游戏-从入门到精通(14)
- 用Python和Pygame写游戏-从入门到精通(14)
- 用Python和Pygame写游戏-从入门到精通(14)
- 用Python和Pygame写游戏-从入门到精通
- 用Python和Pygame写游戏-从入门到精通(13)
- 用Python和Pygame写游戏-从入门到精通(6)
- 用Python和Pygame写游戏-从入门到精通(2)
- 用Python和Pygame写游戏-从入门到精通
- 用Python和Pygame写游戏-从入门到精通(7)
- 用Python和Pygame写游戏-从入门到精通(9)
- 用Python和Pygame写游戏-从入门到精通(5)
- 用Python和Pygame写游戏-从入门到精通(1)
- 用Python和Pygame写游戏-从入门到精通(目录)
- 用Python和Pygame写游戏-从入门到精通(8)
- 用Python和Pygame写游戏-从入门到精通(3)
- 用Python和Pygame写游戏-从入门到精通(4)
- 用Python和Pygame写游戏-从入门到精通(3)
- 用Python和Pygame写游戏-从入门到精通(1)
- 用Python和Pygame写游戏-从入门到精通(11)