在不修改源码的情况下分析Android应用的操作日志
2014-06-15 16:23
441 查看
在不修改源码的情况下分析Android应用的操作日志
通常启动操作日志记录功能的做法是直接修改源码,添加对Debug.startMethodTracing()的函数调用,这种方法的好处是比较精确。但是也可以在不修改源码的情况下启动操作日志记录功能。以下用一个实例来说明如何在不修改源码的情况下启用一个应用的操作日志,并使用traceview对结果进行分析。
首先新建一个待测试的项目,这里是ProfileDemo应用,该应用实现了如下简单功能:
在界面上有一个按钮,点击后会扫描当前设备上安装的所有非系统应用,并将这些应用的列表绑定到一个ListView上显示出来。
ListView的Item布局如下:
MainActivity布局如下:
MainActivity代码如下:
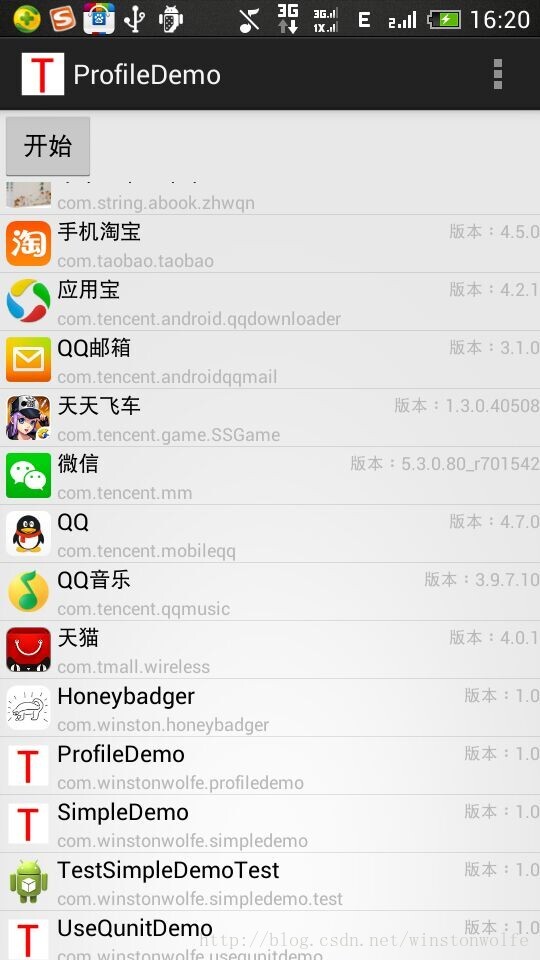
运行效果如下:
在Manifest文件中的application节点下添加可调试信息:android:debuggable="true"。
执行如下命令启动操作日志记录:
adb shell am profilecom.winstonwolfe.profiledemo start /sdcard/test.trace
点击demo上的开始按钮,列表加载完成后执行如下命令结束操作日志记录:
adb shell am profilecom.winstonwolfe.profiledemo stop
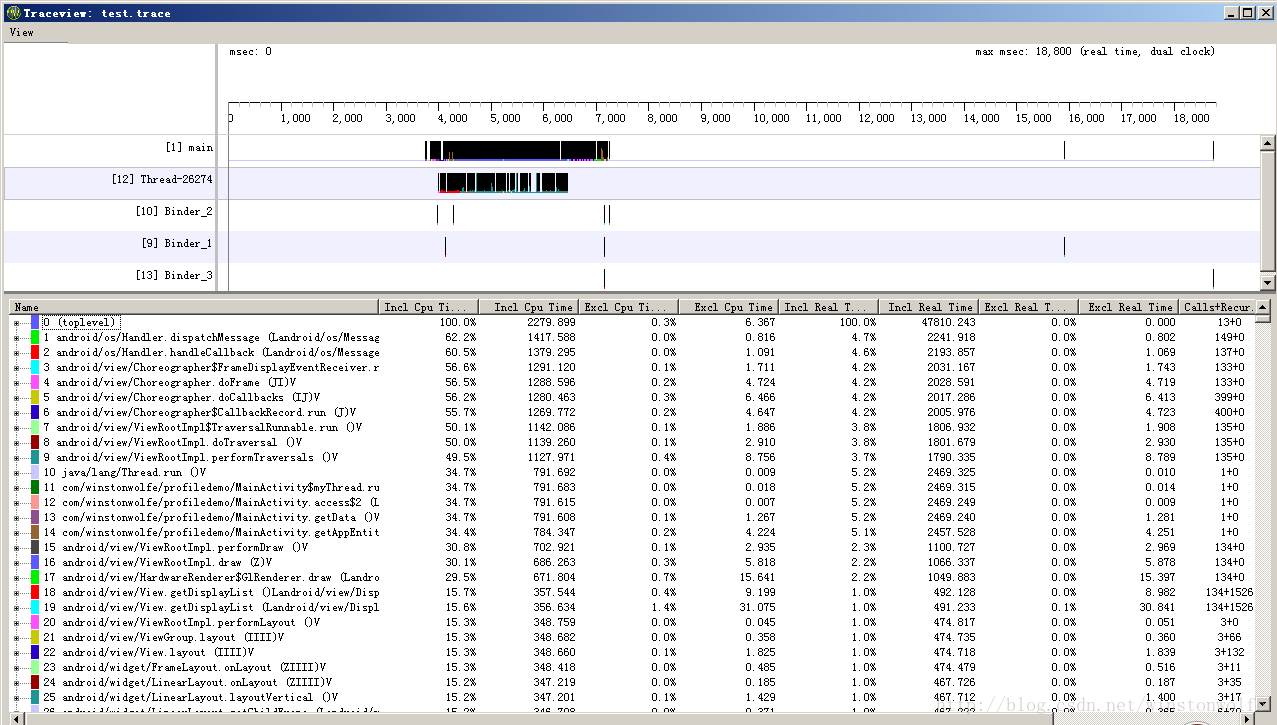
将生成的操作日志记录文件test.trace拷贝出来,通过执行traceview test.trace命令打开traceview工具对操作日志进行分析:
traceview工具的具体使用这里不叙述。
通常启动操作日志记录功能的做法是直接修改源码,添加对Debug.startMethodTracing()的函数调用,这种方法的好处是比较精确。但是也可以在不修改源码的情况下启动操作日志记录功能。以下用一个实例来说明如何在不修改源码的情况下启用一个应用的操作日志,并使用traceview对结果进行分析。
首先新建一个待测试的项目,这里是ProfileDemo应用,该应用实现了如下简单功能:
在界面上有一个按钮,点击后会扫描当前设备上安装的所有非系统应用,并将这些应用的列表绑定到一个ListView上显示出来。
ListView的Item布局如下:
<?xml version="1.0" encoding="UTF-8"?>
<LinearLayout xmlns:android="http://schemas.android.com/apk/res/android"
android:layout_width="fill_parent"
android:layout_height="fill_parent"
android:orientation="horizontal" >
<ImageView android:id="@+id/icon"
android:layout_width="30dp"
android:layout_height="30dp"
android:layout_margin="4dp"/>
<LinearLayout android:orientation="vertical"
android:layout_width="wrap_content"
android:layout_height="wrap_content">
<RelativeLayout
android:layout_width="wrap_content"
android:layout_height="wrap_content">
<TextView android:id="@+id/name"
android:layout_width="wrap_content"
android:layout_height="wrap_content"
android:layout_centerVertical="true"
android:textColor="#000000"
android:textSize="15sp" />
<TextView android:id="@+id/version"
android:layout_width="wrap_content"
android:layout_height="wrap_content"
android:layout_centerVertical="true"
android:layout_alignParentRight="true"
android:textColor="#B8B8B8"
android:textSize="12sp" />
</RelativeLayout>
<TextView android:id="@+id/packagename"
android:layout_width="fill_parent"
android:layout_height="wrap_content"
android:textColor="#B8B8B8"
android:textSize="12sp" />
</LinearLayout>
</LinearLayout>
MainActivity布局如下:
<?xml version="1.0"encoding="utf-8"?>
<LinearLayout xmlns:android="http://schemas.android.com/apk/res/android"
android:layout_width="fill_parent"
android:layout_height="fill_parent"
android:orientation="vertical" >
<RelativeLayout
android:layout_width="fill_parent"
android:layout_height="wrap_content">

<Button
android:id="@+id/btn_start"
android:layout_width="wrap_content"
android:layout_height="wrap_content"
android:layout_centerVertical="true"
android:text="开始" />
</RelativeLayout>
<ListView
android:id="@+id/lv"
android:layout_width="fill_parent"
android:layout_height="fill_parent"
android:scrollbars="vertical"/>
</LinearLayout>
MainActivity代码如下:
package com.winstonwolfe.profiledemo;

import java.util.ArrayList;
import java.util.HashMap;
import java.util.List;
import java.util.Map;
import android.graphics.drawable.Drawable;
import android.os.Bundle;
import android.os.Handler;
import android.app.Activity;
import android.app.ProgressDialog;
import android.content.pm.ApplicationInfo;
import android.content.pm.PackageInfo;
import android.view.Menu;
import android.view.View;
import android.widget.Button;
import android.widget.ImageView;
import android.widget.ListView;
import android.widget.SimpleAdapter;

public class MainActivity extends Activity {
private Button btn;
private ProgressDialog progressDialog = null;
private ListView lv;
List<Map<String, Object>> listData = null;

Handler handler = null;

class myThread implements Runnable {
public void run() {
getData();
handler.post(runnableUi);
}
}

Runnable runnableUi = new Runnable() {
@Override
public void run() {
progressDialog.dismiss();
bindDataToListView();
}
};

@Override
protected void onCreate(Bundle savedInstanceState) {
super.onCreate(savedInstanceState);
setContentView(R.layout.activity_main);

btn = (Button) findViewById(R.id.btn_start);
btn.setOnClickListener(new View.OnClickListener() {
public void onClick(View v) {
progressDialog = ProgressDialog.show(MainActivity.this,
"请稍等...", "正在读取本机上安装的App...", true);

lv = (ListView) findViewById(R.id.lv);
lv.setScrollContainer(true);
handler = new Handler();
new Thread(new myThread()).start();

}
});
}

@Override
public boolean onCreateOptionsMenu(Menu menu) {
// Inflate the menu; thisadds items to the action bar if it is present.
getMenuInflater().inflate(R.menu.main, menu);
return true;
}

private void bindDataToListView() {
SimpleAdapter adapter = new SimpleAdapter(this, listData,
R.layout.item_layout, new String[] { "icon", "name", "version",
"packagename" }, new int[] { R.id.icon, R.id.name,
R.id.version, R.id.packagename });
adapter.setViewBinder(new SimpleAdapter.ViewBinder() { // 显示图标,不能直接绑定Drawable
public boolean setViewValue(View view, Object data,
String textRepresentation) {
if (view instanceof ImageView && data instanceof Drawable) {
ImageView iv = (ImageView) view;
iv.setImageDrawable((Drawable) data);
return true;
} else
return false;
}
});

lv.setAdapter(adapter);
}

private void getData() {
ArrayList<AppEntity> appList = getAppEntityList();
List<Map<String, Object>> list = newArrayList<Map<String, Object>>();
for (int i = 0; i < appList.size(); i++) {
AppEntity app = (AppEntity) appList.get(i);
Map<String, Object> map = new HashMap<String,Object>();
// BitmapDrawablebd = (BitmapDrawable)app.appIcon;
// Bitmap bm =bd.getBitmap();
map.put("icon", app.appIcon);
map.put("name", app.appName);
map.put("version", app.versionName);
map.put("packagename", app.packageName);
list.add(map);
}
listData = list;
}

private ArrayList<AppEntity> getAppEntityList() {
List<PackageInfo> packages = getPackageManager()
.getInstalledPackages(0); // @
ArrayList<AppEntity> appList = newArrayList<AppEntity>(); // 用来存储获取的应用信息数据
AppEntity tmpEntity;
for (int i = 0; i < packages.size(); i++) {
PackageInfo packageInfo = packages.get(i);
if ((packageInfo.applicationInfo.flags & ApplicationInfo.FLAG_SYSTEM) == ApplicationInfo.FLAG_SYSTEM) {// 过滤掉系统程序
continue;
}
tmpEntity = new AppEntity();
tmpEntity.appName = packageInfo.applicationInfo.loadLabel(
getPackageManager()).toString();
tmpEntity.packageName = packageInfo.packageName;
tmpEntity.versionName = "版本:" + packageInfo.versionName;
tmpEntity.versionCode = packageInfo.versionCode;
tmpEntity.appIcon = packageInfo.applicationInfo
.loadIcon(getPackageManager());
appList.add(tmpEntity);
}
return appList;
}

public class AppEntity { //一个代表应用信息的实体类
public String appName = "";
public String packageName = "";
public String versionName = "";
public int versionCode = 0;
public Drawable appIcon = null;

public String dumpString() {
String str = "";
str += appName + ",";
str += packageName + ",";
str += versionName + ",";
str += versionCode;

return str;
}
}

}
运行效果如下:
在Manifest文件中的application节点下添加可调试信息:android:debuggable="true"。
执行如下命令启动操作日志记录:
adb shell am profilecom.winstonwolfe.profiledemo start /sdcard/test.trace
点击demo上的开始按钮,列表加载完成后执行如下命令结束操作日志记录:
adb shell am profilecom.winstonwolfe.profiledemo stop
将生成的操作日志记录文件test.trace拷贝出来,通过执行traceview test.trace命令打开traceview工具对操作日志进行分析:
traceview工具的具体使用这里不叙述。

相关文章推荐
- android_launcher的源码详细分析和壁纸修改
- android java 应用 修改代码 日志
- 【Android 应用开发】 自定义组件 宽高适配方法, 手势监听器操作组件, 回调接口维护策略, 绘制方法分析 -- 基于 WheelView 组件分析自定义组件
- Android应用AsyncTask处理机制详解及源码分析
- 第三方应用检测应用作假(都需要修改android系统源码)
- android_launcher的源码详细分析和壁纸修改 .
- android_launcher的源码详细分析和壁纸修改 .
- 【Android 应用开发】 自定义组件 宽高适配方法, 手势监听器操作组件, 回调接口维护策略, 绘制方法分析 -- 基于 WheelView 组件分析自定义组件
- Android SystemUI源码分析与修改
- Android应用setContentView与LayoutInflater加载解析机制源码分析
- Android源码中添加 修改应用
- [Android]Volley源码分析(肆)应用
- OpenTSDB源码分析之TSDB-UID表操作(修改)
- 【Android 应用开发】 自定义组件 宽高适配方法, 手势监听器操作组件, 回调接口维护策略, 绘制方法分析 -- 基于 WheelView 组件分析自定义组件
- android_launcher的源码详细分析和壁纸修改
- Android菜鸟开发之蓝牙(Bluetooth)---设置应用源码分析
- Android Launcher分析和修改7——AllApp全部应用列表(AppsCustomizeTabHost)
- android修改源码启动指定应用
- Android源码中添加 修改应用
- Android Launcher分析和修改7——AllApp全部应用列表(AppsCustomizeTabHost)