基于cocos2dx3.1引擎C++编写的android平台串口通信接口
2014-06-11 20:09
429 查看
1.serial.h头文件
2. serial.cpp文件
--------------------------------------------
3. 使用:
4. 修改proj.android下的Android.mk
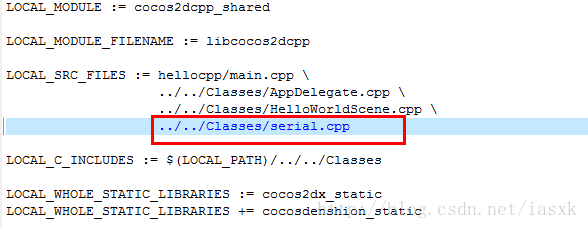
a9db
5. 编译
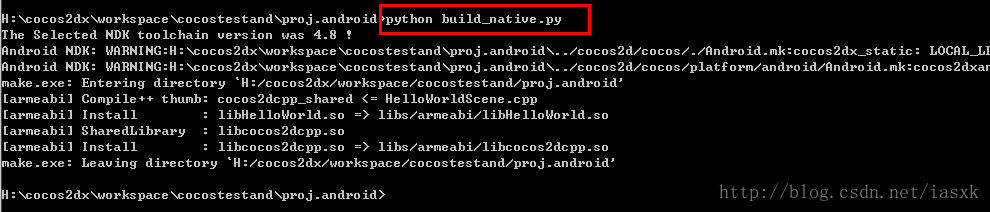
6.导入到eclipse生成APK后,就可以用串口调试工具收发数据了
注:a . VS2012是无法编译的,因为VS2012编译的是win32,而这个串口通信的代码是基于Linux的
只能用NDK编译,python中是有配置NDK的。
b. 注意dev下面串口设备的权限是可读可写的
#ifndef __SERIAL_H__
#define __SERIAL_H__
//包含头文件
#include <stdio.h>
#include <stdlib.h>
#include <unistd.h>
#include <sys/types.h>
#include <sys/stat.h>
#include <fcntl.h>
#include <termios.h>
#include <errno.h>
#include <pthread.h>
//
extern "C" {
int initSerialPort(void);
int open_port(int fd,int comport);
int set_opt(int fd,int nSpeed,int nBits,char nEvent,int nStop);
int closeSerialPort(int fd);
int sendDate(char *pbuf,int size);
int receiverDate(char *pbuf,int size);
}
#endif
/*从头文件中的函数定义不难看出,函数的功能,使用过程如下:
(1) 打开串口设备,调用函数open_port();
(2) 设置串口读写的波特率、停止位、校验位、数据位等.,调用函数set_opt();
(3) 向串口写入数据,调用函数sendDate();
(4) 从串口读出数据,调用函数receiverDate();
(5) 操作完成后,需要调用函数closeSerialPort()来释放申请的串口信息接口; */
2. serial.cpp文件
#include <stdio.h>
#include <sys/ioctl.h>
#include "serial.h"
//打印
#include "android/log.h"
static const char *TAG="HelloWorldScene";
#define LOGI(fmt, args...) __android_log_print(ANDROID_LOG_INFO, TAG, fmt, ##args)
#define LOGD(fmt, args...) __android_log_print(ANDROID_LOG_DEBUG, TAG, fmt, ##args)
#define LOGE(fmt, args...) __android_log_print(ANDROID_LOG_ERROR, TAG, fmt, ##args)
static int fd = 0;
/*****************************
* 功能:初始化设置串口
*****************************/
int initSerialPort(void)
{
fd = open_port(fd,2);
if(fd == 0)
{
LOGE("openSerialPort() error\n");
return 1;
}
set_opt(fd,115200,8,'N',1);
}
/*****************************
* 功能:关闭串口
*****************************/
int closeSerialPort(int fd)
{
// 关闭打开的串口设备
if(fd>0)
{
close(fd);
fd = -1;
LOGE("closeSerialPort");
}
return 0;
}
/*****************************
* 功能:发送数据
*****************************/
int sendDate(char *pbuf,int size)
{
int ret = -1;
ret = write(fd,pbuf,size);
LOGE("sendDate() fd = %d ret=%d",fd,ret);
return ret;
}
/*****************************
* 功能:接收数据
*****************************/
int receiverDate(char *buff,int size)
{
int readSize = 0;
bzero(buff,size);
readSize = read(fd,buff,size);
return readSize;
}
/*****************************
* 功能:打开串口函数
*****************************/
int open_port(int fd,int comport)
{
char *dev[]={"/dev/ttySAC0","/dev/ttySAC1","/dev/ttySAC2","/dev/ttySAC3"};
long vdisable;
fd=open(dev[comport],O_RDWR|O_NOCTTY|O_NDELAY);
if(fd==-1) {
LOGE("Can't Open Serial Port\n");
return -1;
}
LOGE("Open Serial Port %s\n",dev[comport]);
/*恢复串口为阻塞状态*/
if(fcntl(fd,F_SETFL,0)<0) {
LOGE("fcntl failed!\n");
}
else LOGE("fcntl=%d\n",fcntl(fd,F_SETFL,0));

/*测试是否为终端设备*/
if(isatty(STDIN_FILENO)==0) {
LOGE("standard input is not a terminal device\n");
}
else LOGE("isatty success!\n");
LOGE("fd-open=%d\n",fd);
return fd;
}
/*****************************
* 功能:设置串口函数
* 入口:(fd,波特率,数据位,奇偶校验,停止位)
*****************************/
int set_opt(int fd,int nSpeed,int nBits,char nEvent,int nStop)
{
struct termios newtio,oldtio;
/*保存测试现有串口参数设置,在这里如果串口号出错,会有相关的出错信息*/
if(tcgetattr(fd,&oldtio)!=0) {
LOGE("SetupSerial 1");
return -1;
}

bzero(&newtio,sizeof(newtio));

/*步骤一:设置字符大小*/
newtio.c_cflag |= CLOCAL | CREAD;
newtio.c_cflag &= ~CSIZE;

/*设置停止位*/
switch(nBits) {
case 7: newtio.c_cflag |= CS7;
break;
case 8: newtio.c_cflag |= CS8;
break;
}

/*设置奇偶校验位*/
switch(nEvent) {
case 'O': //奇数
newtio.c_cflag |= PARENB;
newtio.c_cflag |= PARODD;
newtio.c_iflag |= (INPCK | ISTRIP);
break;
case 'E': //偶数
newtio.c_iflag |= (INPCK | ISTRIP);
newtio.c_cflag |= PARENB;
newtio.c_cflag &= ~PARODD;

break;
case 'N': //无奇偶校验位
newtio.c_cflag &= ~PARENB;
break;
}

/*设置波特率*/
switch (nSpeed)
{
case 2400:
cfsetispeed(&newtio,B2400);
cfsetospeed(&newtio,B2400);
break;
case 4800:
cfsetispeed(&newtio,B4800);
cfsetospeed(&newtio,B4800);
break;
case 9600:
cfsetispeed(&newtio,B9600);
cfsetospeed(&newtio,B9600);
break;
case 115200:
cfsetispeed(&newtio,B115200);
cfsetospeed(&newtio,B115200);
break;
case 460800:
cfsetispeed(&newtio,B460800);
cfsetospeed(&newtio,B460800);
break;
default :
cfsetispeed(&newtio,B115200);
cfsetospeed(&newtio,B115200);
break;
}

/*设置停止位*/
if(nStop==1) {
newtio.c_cflag &= ~CSTOPB;
}
else if (nStop==2) {
newtio.c_cflag |= CSTOPB;
}

/*设置等待时间和最小接收字符*/
newtio.c_cc[VTIME]=0;
newtio.c_cc[VMIN]=0;

/*处理未接收字符*/
tcflush(fd,TCIFLUSH);
/*激活新配置*/
if((tcsetattr(fd,TCSANOW,&newtio))!=0) {
LOGE("COM set error\n");
return -1;
}
return 0;
}
--------------------------------------------
3. 使用:
....
#include "serial.h"//串口
....
#define BUFSIZE 128

bool HelloWorld::init()
{
...
initSerialPort();
...
}

//测试一下
void HelloWorld::menuCloseCallback(Ref* pSender)
{
char sbuf[]={"Hello,this is a Serial_Port test!\n"};/*待发送的内容,以\n为结束标志*/
int length= strlen(sbuf);/*发送缓冲区数据宽度*/
sendDate(sbuf,length);
int readSize = 0;
int add = 0;
while(add < 1000)
{
char buff[BUFSIZE]={0};
readSize = receiverDate(buff,BUFSIZE);
if(readSize > 0)
{
CCLOGERROR("readSize=%d,%s\n",readSize,buff);
sendDate(buff,readSize);
}
add++;
}
}
4. 修改proj.android下的Android.mk
a9db
5. 编译
6.导入到eclipse生成APK后,就可以用串口调试工具收发数据了
注:a . VS2012是无法编译的,因为VS2012编译的是win32,而这个串口通信的代码是基于Linux的
只能用NDK编译,python中是有配置NDK的。
b. 注意dev下面串口设备的权限是可读可写的

相关文章推荐
- 基于Android平台的串口通信实现
- 基于Android平台的串口通信实现
- 基于Android平台的串口通信实现
- 基于DTMF音调的数据通信(一)——android平台
- 基于Thrift(C++)的hBase通信接口开发文档整理
- Android平台下OpenCV移植与使用---基于C/C++
- 基于paho在android平台上实现MQTT Client间的简单通信
- Android中实现java与PHP服务器(基于新浪云免费云平台)http通信详解
- Android平台下OpenCV移植与使用---基于C/C++
- Android Service和Activity基于串口蓝牙模块的双向通信
- windwos平台下C++实现一个基于UDP的C/S模式通信示例
- 在CB6下基于api函数编写串口通信程序简介
- Linux平台基于C编写的文本通信平台
- 基于api函数编写串口通信
- Android Service和Activity基于串口蓝牙模块的双向通信
- cocos2d-x3.9利用cocos引擎一键打包Android平台APK(C++小白教程)
- OpenCV4Android开发之旅(三)----Windows平台Eclipse、MinGW配置OpenCV2.4.4(C++接口调用) 全过程(附:MinGW编译OpenCV2.4.4)
- 在CB6下基于api函数编写串口通信程序简介
- Horde3D——基于C++编写的3D渲染引擎
- 基于java平台的与无线远程测控终端的串口通信