车牌识别系统开发记录(二) 车牌定位
2014-04-09 18:29
344 查看
这里面我要具体介绍的检测车牌方法的步骤如下:
首先利用Sobel滤波器对灰度图像进行滤波,突出图像中的垂直边缘信息
利用数学形态学方法: Close(先膨胀再腐蚀,填充内部空隙)
利用findContours函数寻找车牌的潜在轮廓
结合车牌的长宽比例的先验知识剔除不符合的轮廓
利用floodfill算法结合车牌的颜色信息提取可能的车牌区域
再次结合车牌的长宽比例的先验知识剔除不符合的轮廓
根据上面初步提取出可能的车牌区域,下一步利用SVM进行判断是否是车牌
好了,下面一步步来分析:
C++: void Sobel(InputArray src,
OutputArray dst, int ddepth, int dx,
int dy, intksize=3, double scale=1,
double delta=0, int borderType=BORDER_DEFAULT )
因为要提取垂直边缘信息,所以令dx=1,dy=0,如下所示:

在凸显完垂直边缘信息后,我们再次利用阈值化处理,将灰度图像变成二值图像,为下面的形态学处理做准备。
Code:
效果:
我们知道,结构元素各向同性的开运算用于消除图像中小于结构元素的细节部分——物体的局部形状保持不变。闭运算用来连接邻近的物体,填补小空洞,填平窄缝隙使得物体边缘变得平滑。
对形态学不熟悉的同学,请击中这个链接(形态学运算)。
在这里我们利用OpenCV中的morphologyEx来进行形态学处理。因为车牌是长方形的,所以我们更希望的是对横向连接,故而我们将结构元素element大小设为(17×3).
Code:
效果:
所谓的(简单的)轮廓提取算法就是:系统性地扫描图像直到遇到连通区域的一个点,以它为起始点,跟踪它的轮廓,标记边界上的像素。当轮廓完整闭合,扫描回到上一个位置,直到再次发现新的成分。
这里面我们利用OpenCV中的findContours函数:
C++: void findContours(InputOutputArray image,
OutputArrayOfArrays contours, int mode, int method,
Point offset=Point())
这个函数输入端是一幅二值图像,而输出的是轮廓的向量(轮廓本身是cv::Points的向量),另外还涉及了两个参数mode和method。其中mode=CV_RETR_EXTERNEL标记了仅返回外部轮廓,即物体的洞将会被忽视。第二个参数method=CV_CHAIN_APPROX_NONE要求给出更复杂的链式轮廓近似,以得到更紧密的表示方式。
More Ref:
[1] 边沿检测与提取,轮廓跟踪
[2] OpenCV文档 findContours
Code:
所谓内定义区域,是指区域内部所有像素具有同一颜色或亮度值,而区域外的所有像素具有另一种颜色或亮度值。Floodfill方法能将该区域中的全部像素都设置为新值,并通过一定的规则确定一组种子点(该种子点为区域内点),然后通过判断种子点的邻域像素是否和种子构成连通域,从而决定是否对其进行填充,直到找到区域内所有像素或达到轮廓线的边界。
Floodfill算法涉及到三个参数:开始种子点、目标颜色判定规则和替换颜色。
常用的实现方法有点点填充递归算法和扫描线填充递归算法。
点点填充可以用广度优先搜索(BFS)或深度优先搜索(DFS)来完成,其主要思想是对种子点的四邻域(或八邻域)逐点进行判断,它的优点是程序简单直观,缺点是没有考虑像素相关性,每个像素都有可能多次入栈出栈,当图像填充面积很大时,需要的栈空间和运行时间急剧增加,容易导致程序爆炸。扫描线填充也是一种递归算法,但是它用线方式代替点方式,充分利用了像素的相关性,考虑到区域在扫描线上的连贯性和相邻扫描线之间的连贯性,进栈时仅选每一条连续未被填充的扫描线与多边形相交区间最左或右边的像素进栈,出栈时填充整个区段,这样栈空间和递归次数都大大减少了。
Pseduo-Code:
本部分我们使用OpenCV中的floodfill函数:
C++: int floodFill(InputOutputArray image,
InputOutputArray mask, Point seedPoint,
Scalar newVal, Rect* rect=0,
Scalar loDiff=Scalar(), Scalar upDiff=Scalar(),
int flags=4 )
image - Input/output image.
mask - Operation mask that should be a single-changel 8-bit image,2 pixels wider and 2 pixels taller.
seedPoint–Starting point.
newVal–New value of the repainted domain pixels.
loDiff–Maximal lower brightness difference between the currently observed pixel and one of its neighbors belonging to the component, or a seed pixel being added to the component.
upDiff–Maximal upper brightness difference between the currently observed pixel and one of its neighbors belonging to the component, or a seed pixel being added to the component.
rect–Optional output parameter set by the function to the minimum bounding rectangle of the repainted domain.
flags–Operation flags. Lower bits contain a connectivity value, 4 (default) or 8, used within the function. Connectivity determines which neighbors of a pixel are considered.
Upper bits can be 0 or a combination of the following flags:
FLOODFILL_FIXED_RANGE If set, the difference between the current pixel and seed pixel is considered. Otherwise, the difference between neighbor pixels is considered (that is, the range is floating).
FLOODFILL_MASK_ONLY If set, the function does not change the image ( newVal is ignored), but fills the mask. The flag can be used for the second variant only.
More Ref:
[1] 冉冉, 杨唐文, 阮秋琦. 基于 Floodfill 种子填充的快速目标物体识别[J].
中国科技论文在线, 2010, 3(18): 1.
[2] Wikipedia: Flood fill
[3]
PPT: Flood-fill
[4] Princeton University: Flood fill
Code:
效果:

支持向量机学习笔记:数学过程及经典Tutorial
支持向量机学习笔记:LIBSVM应用(人脸识别)
libsvm代码阅读
Code:
本文地址:http://blog.csdn.net/linj_m/article/details/23281403
更多图像处理、机器视觉资源请关注 博客:LinJM-机器视觉 微博:林建民-机器视觉
首先利用Sobel滤波器对灰度图像进行滤波,突出图像中的垂直边缘信息
利用数学形态学方法: Close(先膨胀再腐蚀,填充内部空隙)
利用findContours函数寻找车牌的潜在轮廓
结合车牌的长宽比例的先验知识剔除不符合的轮廓
利用floodfill算法结合车牌的颜色信息提取可能的车牌区域
再次结合车牌的长宽比例的先验知识剔除不符合的轮廓
根据上面初步提取出可能的车牌区域,下一步利用SVM进行判断是否是车牌
好了,下面一步步来分析:
提取垂直边缘
先看如何凸显垂直边缘信息。这个主要是利用Sobel算子对图像进行卷积,学过图像处理的同志们对这个肯定不陌生。这里面用的是OpenCV的Sobel函数。C++: void Sobel(InputArray src,
OutputArray dst, int ddepth, int dx,
int dy, intksize=3, double scale=1,
double delta=0, int borderType=BORDER_DEFAULT )
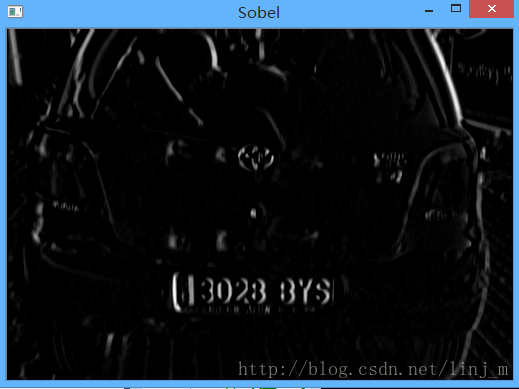
因为要提取垂直边缘信息,所以令dx=1,dy=0,如下所示:
在凸显完垂直边缘信息后,我们再次利用阈值化处理,将灰度图像变成二值图像,为下面的形态学处理做准备。
Code:
Mat img_gray;
cvtColor(input, img_gray, CV_BGR2GRAY);
blur(img_gray, img_gray, Size(5,5));
// 突出垂直边缘
Mat img_sobel;
Sobel(img_gray, img_sobel, CV_8U, 1, 0, 3, 1, 0, BORDER_DEFAULT);
if(showSteps)
imshow("Sobel", img_sobel);
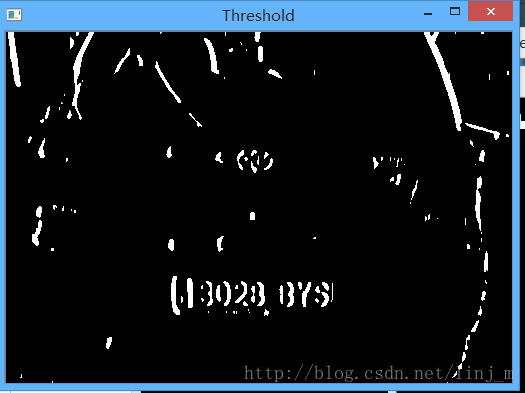
// 阈值化处理
Mat img_threshold;
threshold(img_sobel, img_threshold, 0, 255, CV_THRESH_OTSU+CV_THRESH_BINARY);
if(showSteps)
imshow("Threshold", img_threshold);效果:
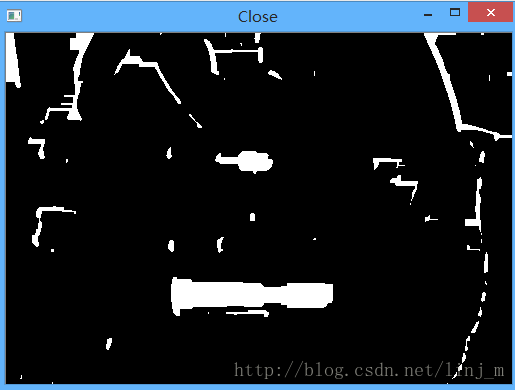
形态学处理:CLOSE
现在利用数学形态学处理中的闭运算(先膨胀再腐蚀),填充上面得到的二值图像的空隙,为下面寻找轮廓做准备。我们知道,结构元素各向同性的开运算用于消除图像中小于结构元素的细节部分——物体的局部形状保持不变。闭运算用来连接邻近的物体,填补小空洞,填平窄缝隙使得物体边缘变得平滑。
对形态学不熟悉的同学,请击中这个链接(形态学运算)。
在这里我们利用OpenCV中的morphologyEx来进行形态学处理。因为车牌是长方形的,所以我们更希望的是对横向连接,故而我们将结构元素element大小设为(17×3).
Code:
// 形态学close处理(先膨胀再腐蚀,填充内部空隙)
Mat element = getStructuringElement(MORPH_RECT, Size(17, 3) );
morphologyEx(img_threshold, img_threshold, CV_MOP_CLOSE, element);
if(showSteps)
imshow("Close", img_threshold);
效果:
提取轮廓
在形态学处理之后,我们对得到的二值图像提取潜在的车牌轮廓。所谓的(简单的)轮廓提取算法就是:系统性地扫描图像直到遇到连通区域的一个点,以它为起始点,跟踪它的轮廓,标记边界上的像素。当轮廓完整闭合,扫描回到上一个位置,直到再次发现新的成分。
这里面我们利用OpenCV中的findContours函数:
C++: void findContours(InputOutputArray image,
OutputArrayOfArrays contours, int mode, int method,
Point offset=Point())
这个函数输入端是一幅二值图像,而输出的是轮廓的向量(轮廓本身是cv::Points的向量),另外还涉及了两个参数mode和method。其中mode=CV_RETR_EXTERNEL标记了仅返回外部轮廓,即物体的洞将会被忽视。第二个参数method=CV_CHAIN_APPROX_NONE要求给出更复杂的链式轮廓近似,以得到更紧密的表示方式。
More Ref:
[1] 边沿检测与提取,轮廓跟踪
[2] OpenCV文档 findContours
Code:
// 利用findContours函数寻找车牌可能的轮廓
vector< vector< Point> > contours;
findContours(img_threshold,
contours,			// 轮廓的数组
CV_RETR_EXTERNAL,	// 获取外轮廓
CV_CHAIN_APPROX_NONE); // 获取每个轮廓的每个像素

// 排除非车牌的可能轮廓
vector<vector<Point> >::iterator itc= contours.begin();
vector<RotatedRect> rects;
while (itc!=contours.end()) {
// minAreaRect函数计算最小包围旋转矩形
RotatedRect mr= minAreaRect(Mat(*itc));
if( !verifySizes(mr)){
itc= contours.erase(itc);
}else{
++itc;
rects.push_back(mr);
}
}

// 画出轮廓
cv::Mat result;
input.copyTo(result);
cv::drawContours(result,contours,
-1, // draw all contours
cv::Scalar(255,0,0), // in blue
1); // with a thickness of 1
Flood Fill 算法
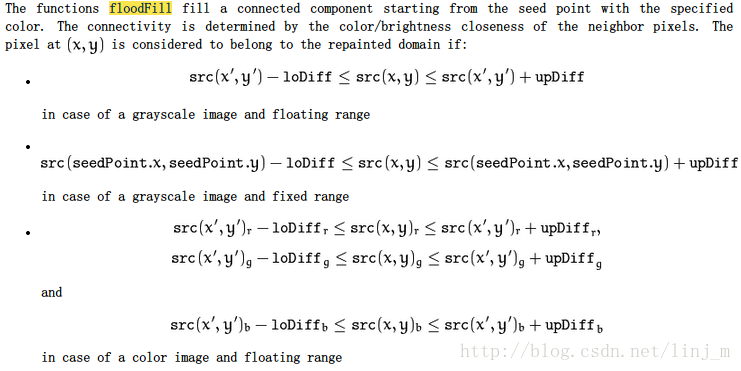
Floodfill算法[1]即漫水填充法,是区域填充法的一种,其实质是种子填充法,这种方法适用于对内定义区域的填充。所谓内定义区域,是指区域内部所有像素具有同一颜色或亮度值,而区域外的所有像素具有另一种颜色或亮度值。Floodfill方法能将该区域中的全部像素都设置为新值,并通过一定的规则确定一组种子点(该种子点为区域内点),然后通过判断种子点的邻域像素是否和种子构成连通域,从而决定是否对其进行填充,直到找到区域内所有像素或达到轮廓线的边界。
Floodfill算法涉及到三个参数:开始种子点、目标颜色判定规则和替换颜色。
常用的实现方法有点点填充递归算法和扫描线填充递归算法。
点点填充可以用广度优先搜索(BFS)或深度优先搜索(DFS)来完成,其主要思想是对种子点的四邻域(或八邻域)逐点进行判断,它的优点是程序简单直观,缺点是没有考虑像素相关性,每个像素都有可能多次入栈出栈,当图像填充面积很大时,需要的栈空间和运行时间急剧增加,容易导致程序爆炸。扫描线填充也是一种递归算法,但是它用线方式代替点方式,充分利用了像素的相关性,考虑到区域在扫描线上的连贯性和相邻扫描线之间的连贯性,进栈时仅选每一条连续未被填充的扫描线与多边形相交区间最左或右边的像素进栈,出栈时填充整个区段,这样栈空间和递归次数都大大减少了。
Pseduo-Code:
Flood-fill (node, target-color, replacement-color):
If the color of node is not equal to target-color, return.
Set the color of node to replacement-color.
Perform Flood-fill (one step to the west of node, target-color, replacement-color).
Perform Flood-fill (one step to the east of node, target-color, replacement-color).
Perform Flood-fill (one step to the north of node, target-color, replacement-color).
Perform Flood-fill (one step to the south of node, target-color, replacement-color).
Return.
本部分我们使用OpenCV中的floodfill函数:
C++: int floodFill(InputOutputArray image,
InputOutputArray mask, Point seedPoint,
Scalar newVal, Rect* rect=0,
Scalar loDiff=Scalar(), Scalar upDiff=Scalar(),
int flags=4 )
image - Input/output image.
mask - Operation mask that should be a single-changel 8-bit image,2 pixels wider and 2 pixels taller.
seedPoint–Starting point.
newVal–New value of the repainted domain pixels.
loDiff–Maximal lower brightness difference between the currently observed pixel and one of its neighbors belonging to the component, or a seed pixel being added to the component.
upDiff–Maximal upper brightness difference between the currently observed pixel and one of its neighbors belonging to the component, or a seed pixel being added to the component.
rect–Optional output parameter set by the function to the minimum bounding rectangle of the repainted domain.
flags–Operation flags. Lower bits contain a connectivity value, 4 (default) or 8, used within the function. Connectivity determines which neighbors of a pixel are considered.
Upper bits can be 0 or a combination of the following flags:
FLOODFILL_FIXED_RANGE If set, the difference between the current pixel and seed pixel is considered. Otherwise, the difference between neighbor pixels is considered (that is, the range is floating).
FLOODFILL_MASK_ONLY If set, the function does not change the image ( newVal is ignored), but fills the mask. The flag can be used for the second variant only.
More Ref:
[1] 冉冉, 杨唐文, 阮秋琦. 基于 Floodfill 种子填充的快速目标物体识别[J].
中国科技论文在线, 2010, 3(18): 1.
[2] Wikipedia: Flood fill
[3]
PPT: Flood-fill
[4] Princeton University: Flood fill
Code:
for(int i = 0; i < rects.size(); i++){

// 现在进一步利用车牌的颜色信息,运用floodfill算法。
// flood fill 算法是从一个区域中提取若干个连通的点与其他相邻区域分开的经典算法。它接收三个参数:起始结点,
// 目标颜色和替换颜色。
circle(result, rects[i].center, 3, Scalar(0,255,0), -1);

//get the min size between width and height
float minSize = (rects[i].size.width < rects[i].size.height)? rects[i].size.width : rects[i].size.height;
minSize=minSize-minSize*0.5;

//initialize rand and get 5 points around center for floodfill algorithm
srand ( time(NULL) );
//Initialize floodfill parameters and variables
Mat mask;
mask.create(input.rows + 2, input.cols + 2, CV_8UC1);
mask= Scalar::all(0);
int loDiff = 30;
int upDiff = 30;
int connectivity = 4;
int newMaskVal = 255;
int NumSeeds = 10;
Rect ccomp;
int flags = connectivity + (newMaskVal << 8 ) + CV_FLOODFILL_FIXED_RANGE + CV_FLOODFILL_MASK_ONLY;

for(int j=0; j<NumSeeds; j++){
Point seed;
seed.x=rects[i].center.x+rand()%(int)minSize-(minSize/2);
seed.y=rects[i].center.y+rand()%(int)minSize-(minSize/2);
circle(result, seed, 1, Scalar(0,255,255), -1);
int area = floodFill(input, mask, seed, Scalar(255,0,0), &ccomp, Scalar(loDiff, loDiff, loDiff), Scalar(upDiff, upDiff, upDiff), flags);
}
if(showSteps)
imshow("MASK", mask);
//cvWaitKey(0);
效果:
利用SVM判断车牌
关于SVM的相关内容,我以前写过几篇文章,大家可以参考:支持向量机学习笔记:数学过程及经典Tutorial
支持向量机学习笔记:LIBSVM应用(人脸识别)
libsvm代码阅读
Code:
////////////////////////////////////////////////////////////////////////
//	以下利用SVM来进一步判断检测到的区域是否是车牌
////////////////////////////////////////////////////////////////////////
FileStorage fs;
fs.open("SVM.xml", FileStorage::READ);
Mat SVM_TrainingData;
Mat SVM_Classes;
fs["TrainingData"] >> SVM_TrainingData;
fs["classes"] >> SVM_Classes;

// 设置SVM参数,其中cvTermCriteria是迭代算法的终止准则
CvSVMParams SVM_params;
SVM_params.svm_type = CvSVM::C_SVC;
SVM_params.kernel_type = CvSVM::LINEAR;
SVM_params.degree = 0;
SVM_params.gamma = 1;
SVM_params.coef0 = 0;
SVM_params.C = 1;
SVM_params.nu = 0;
SVM_params.p = 0;
SVM_params.term_crit = cvTermCriteria(CV_TERMCRIT_ITER,
1000, //最大迭代次数
0.01);//结果的精确性

// SVM的训练构造函数
CvSVM svmClassifier(SVM_TrainingData, SVM_Classes, Mat(), Mat(), SVM_params);

// 对上面detectRegions得到的区域利用svm进行判断
vector<Plate> plates;
for (int i = 0; i < posibles_regions.size(); ++i)
{
Mat img = posibles_regions[i].plateImg;
Mat p = img.reshape(1,1);
p.convertTo(p,CV_32FC1);

int response = (int)svmClassifier.predict(p);
if (response == 1)
{
plates.push_back(posibles_regions[i]);
}
}
cout<<"Number plates detected: "<< plates.size() << "\n";
本文地址:http://blog.csdn.net/linj_m/article/details/23281403
更多图像处理、机器视觉资源请关注 博客:LinJM-机器视觉 微博:林建民-机器视觉

相关文章推荐
- 车牌识别系统开发记录(四) 国内车牌特点
- 车牌识别系统开发记录(一) 系统概述
- 车牌识别系统开发记录(三) 字符识别
- 汽车车牌定位识别系统的设计实现
- 实现-汽车牌照识别系统中车牌定位与校正及字符分割的研究
- Opencv车牌识别之车牌区域定位(一)
- 开发课件资源管理系统项目定位与价值与建设的必要性
- RDIFramework.NET ━ .NET快速信息化系统开发框架 V3.2->新增记录SQL执行过程
- 称重管理系统方案之车牌识别摄像机的应用
- 远控开发记录02_手机定位
- MapXtreme开发森林防火定位系统
- 基于SSH框架-CRM客户资源管理系统-简单小项目开发记录-CRM系统-02
- 人脸识别系统开发(8) -- OpenCV人脸检测
- 基于matlab的蓝色车牌定位与识别---定位
- HyperLPR车牌识别技术算法之车牌粗定位与训练
- 机器学习(二)车牌识别系统
- 部门考勤系统网站开发配置记录
- ios开发之 -- 调用系统定位获取当前经纬度与地理信息
- 在线订购系统(online ordering system)开发记录
- 基于模板匹配的车牌识别系统实例