linux裁剪—定制自己所需要的linux 推荐
2014-03-03 14:07
441 查看
Linux以其开源思想和启动速度快为广大技术人员所喜爱,本文主要讲述通过自己对内核的包装以及对默认程序的设定,来实现自己定制一个自己需要的os系统,并能够实现开机自动加载网卡,并为网卡配置ip地址,本文不涉及内核的编译,内核编译内容将在后续推出,敬请大家期待!
本文是通过宿主机——>目标机的形式来实现。
1、为虚拟机添加一个20G的硬盘,并将磁盘设置为单个文件系统,并命名为smallcentos.vmdk
查看宿主机现在的硬盘信息
2、在sdb创建两个基本100M、512M分区,并将文件系统格式化成ext4格式
此处不再累赘,后面将会附上脚本实现方式
为了防止内核恐慌,需要为bash创建一个软链接sh
8.在目标机的/boot/grub目录中创建grub.conf,已实现开机自检,内容如下
default=0
timeout=10
hiddenmenu
title wangfengLinux
root(hd0,0)
kernel /wangfengvmlinuz ro root=/dev/sda2 selinux=0 init=/sbin/init
initrd /wangfenginitramfs.img
9.为了能够实现开机启动网卡,需要将宿主机上的网卡配置文件复制到目标机上,可以通过lsmod查看当前系统的所有模块,可以通过modinfo 模块名称来查看模块的详细信息
#!/bin/bash
echo -e "Welcome to \033[32m Wangfeng\033[0m Linux"
mount -n -t proc /proc proc
mount -n -t sysfs sysfs /sys
insmod /lib/modules/e1000.ko
ifconfig lo 127.0.0.1/8
ifconfig eth0 192.168.1.200/24
route add -net 0.0.0.0 gw 192.168.1.253
/bin/bash
开启宿主机,可以看到效果
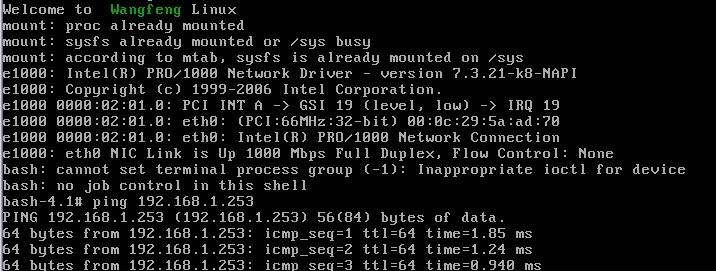
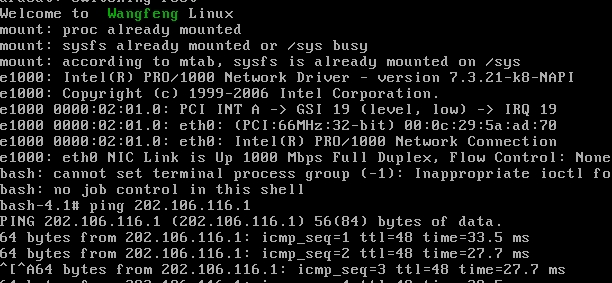
也可以ping通外网
附:拷贝库文件和二进制文件的脚本
#!/bin/bash
options(){
for i in $*;do
dirname=`dirname $i`
[ -d /mnt/sysroot$dirname ] || mkdir -p /mnt/sysroot$dirname
[ -f /mnt/sysroot$i ]||cp $i /mnt/sysroot$dirname/
done
}
while true;do
read -p "Enter a command : " pidname
[[ "$pidname" == "quit" ]] && echo "Quit " && exit 0
bash=`which --skip-alias $pidname`
if [[ -x $bash ]];then
options `/usr/bin/ldd $bash |grep -o "/[^[:space:]]\{1,\}"`
options $bash
else
echo "No such command!"
fi
done
脚本简要说明:
大家都知道一个命令的运行需要依赖于二进制文件和库文件,本实例以cat为例,列举cat的二进制文件所在的路径和文件所在的路径
本文是通过宿主机——>目标机的形式来实现。
1、为虚拟机添加一个20G的硬盘,并将磁盘设置为单个文件系统,并命名为smallcentos.vmdk
查看宿主机现在的硬盘信息
[root@localhost ~]# fdisk -l /dev/sd[a-z]
Disk /dev/sda: 128.8 GB, 128849018880 bytes
255 heads, 63 sectors/track, 15665 cylinders
Units = cylinders of 16065 * 512 = 8225280 bytes
Sector size (logical/physical): 512 bytes / 512 bytes
I/O size (minimum/optimal): 512 bytes / 512 bytes
Disk identifier: 0x0001c38d
Device Boot      Start         End      Blocks   Id  System
/dev/sda1   *           1          26      204800   83  Linux
Partition 1 does not end on cylinder boundary.
/dev/sda2              26        7859    62914560   8e  Linux LVM
Disk /dev/sdb: 21.5 GB, 21474836480 bytes
255 heads, 63 sectors/track, 2610 cylinders
Units = cylinders of 16065 * 512 = 8225280 bytes
Sector size (logical/physical): 512 bytes / 512 bytes
I/O size (minimum/optimal): 512 bytes / 512 bytes
Disk identifier: 0x00000000
新添加的硬盘被识别为sdb,目标主机将通过加载sdb来启动
2、在sdb创建两个基本100M、512M分区,并将文件系统格式化成ext4格式
[root@localhost ~]# echo -e "n\np\n1\n\n+100M\nn\np\n2\n\n+512M\nw" |fdisk /dev/sdb格式化新建的分区
[root@localhost ~]# mke2fs -t ext4 /dev/sdb1
[root@localhost ~]# mke2fs -t ext4 /dev/sdb2
3.将新创建的分区分别挂载至/mnt/boot目录和/mnt/sysroot
[root@localhost mnt]# mount
/dev/sdb1 on /mnt/boot type ext4 (rw)
/dev/sdb2 on /mnt/sysroot type ext4 (rw)
4.安装grub至指定的分区
[root@localhost mnt]# grub-install --root-directory=/mnt /dev/sdb
Probing devices to guess BIOS drives. This may take a long time.
Installation finished. No error reported.
This is the contents of the device map /mnt/boot/grub/device.map.
Check if this is correct or not. If any of the lines is incorrect,
fix it and re-run the script `grub-install'.
(fd0)   /dev/fd0
(hd0)   /dev/sda
(hd1)   /dev/sdb
5.复制/boot目录中的grub和initrd文件至/mnt/boot目录中(将启动文件复制到定制系统中)
[root@localhost grub]# cp /boot/vmlinuz-2.6.32-358.el6.x86_64 /mnt/boot/wangfengvmlinz
[root@localhost grub]# cp /boot/initramfs-2.6.32-358.el6.x86_64.img /mnt/boot/wangfenginitramfs.img
6.创建Linux需要的一些基本文件(在定制系统上需要的)
[root@localhost grub]# mkdir -pv /mnt/sysroot/{etc/rc.d,usr,var,proc,sys,dev,lib,lib64,bin,sbin,boot,src,mnt,media,home,root}7.在宿主机上移植一个可执行的二进制文件和库到目标机的硬盘上,如ls,cat,mkdir,mount,reboot,useradd,passwd,ifconfig,ip,ping等,此处不再累赘,后面将会附上脚本实现方式
为了防止内核恐慌,需要为bash创建一个软链接sh
8.在目标机的/boot/grub目录中创建grub.conf,已实现开机自检,内容如下
default=0
timeout=10
hiddenmenu
title wangfengLinux
root(hd0,0)
kernel /wangfengvmlinuz ro root=/dev/sda2 selinux=0 init=/sbin/init
initrd /wangfenginitramfs.img
9.为了能够实现开机启动网卡,需要将宿主机上的网卡配置文件复制到目标机上,可以通过lsmod查看当前系统的所有模块,可以通过modinfo 模块名称来查看模块的详细信息
[root@localhost ~]# lsmod |grep e1000  -->查看网卡的信息
e1000                 170646  0
[root@localhost ~]# modinfo e1000
filename:       /lib/modules/2.6.32-358.el6.x86_64/kernel/drivers/net/e1000/e1000.ko -->此处为网卡模块的所在位置
version:        7.3.21-k8-NAPI
license:        GPL
description:    Intel(R) PRO/1000 Network Driver
author:         Intel Corporation, <linux.nics@intel.com>
srcversion:     1D4F1E82BB99EA36D320B1B
alias:          pci:v00008086d00002E6Esv*sd*bc*sc*i*
alias:          pci:v00008086d000010B5sv*sd*bc*sc*i*
alias:          pci:v00008086d00001099sv*sd*bc*sc*i*
alias:          pci:v00008086d0000108Asv*sd*bc*sc*i*
alias:          pci:v00008086d0000107Csv*sd*bc*sc*i*
alias:          pci:v00008086d0000107Bsv*sd*bc*sc*i*
alias:          pci:v00008086d0000107Asv*sd*bc*sc*i*
alias:          pci:v00008086d00001079sv*sd*bc*sc*i*
alias:          pci:v00008086d00001078sv*sd*bc*sc*i*
[root@localhost ~]# mkdir -p /mnt/sysroot/lib/modules
[root@localhost ~]# cp /lib/modules/2.6.32-358.el6.x86_64/kernel/drivers/net/e1000/e1000.ko /mnt/sysroot/lib/modules/e1000.ko
10.为了使系统能够开机自动挂载一些文件系统和初始化一些服务,需要在目标机上的/sbin/目录下创建init文件已实现需求,内容如下
#!/bin/bash
echo -e "Welcome to \033[32m Wangfeng\033[0m Linux"
mount -n -t proc /proc proc
mount -n -t sysfs sysfs /sys
insmod /lib/modules/e1000.ko
ifconfig lo 127.0.0.1/8
ifconfig eth0 192.168.1.200/24
route add -net 0.0.0.0 gw 192.168.1.253
/bin/bash
开启宿主机,可以看到效果
也可以ping通外网
附:拷贝库文件和二进制文件的脚本
#!/bin/bash
options(){
for i in $*;do
dirname=`dirname $i`
[ -d /mnt/sysroot$dirname ] || mkdir -p /mnt/sysroot$dirname
[ -f /mnt/sysroot$i ]||cp $i /mnt/sysroot$dirname/
done
}
while true;do
read -p "Enter a command : " pidname
[[ "$pidname" == "quit" ]] && echo "Quit " && exit 0
bash=`which --skip-alias $pidname`
if [[ -x $bash ]];then
options `/usr/bin/ldd $bash |grep -o "/[^[:space:]]\{1,\}"`
options $bash
else
echo "No such command!"
fi
done
脚本简要说明:
大家都知道一个命令的运行需要依赖于二进制文件和库文件,本实例以cat为例,列举cat的二进制文件所在的路径和文件所在的路径
二进制文件所在的位置
[root@localhost ~]# which cat
/bin/cat
依赖的库文件
[root@localhost ~]# ldd `which cat` |grep -o "/[^[:space:]]\{1,\}"
/lib64/libc.so.6
/lib64/ld-linux-x86-64.so.2
由于本人水平有限,请各位大神批评指正,同时为在昆明3.01事件中遇难的同胞默哀,愿逝者安息,伤者平安!!

相关文章推荐
- linux裁剪—定制自己所需要的linux
- linux裁剪—定制自己所需要的linux
- asp.net2.0:扩展ImageButton控件定制自己需要的功能
- asp.net2.0:扩展ImageButton控件定制自己需要的功能
- 定制自己的Linux应用环境
- 自己定制Linux发行版(资料)
- linux 定制自己的开机logo
- Linux_定制自己的vim
- asp.net2.0:扩展ImageButton控件定制自己需要的功能
- Linux系统裁剪之四(自定义内核及busybox完成系统定制)
- 自己定制个人无人机需要的准备工作的内容
- 初接触Linux,裁剪出自己的小linux
- 制作自己的网站第二步***在Linux上装上需要的软件以及部署项目配置**
- linux内核探索:定制自己的initrd.img-转载并修改
- linux/centos安装nginx常见错误及解决办法【make错误,需要yum -y install openssl openssl-devel或者自己下载然后重新./configure】
- 定制自己Linux发行版(ISO):向安装程序添加自定义软件包
- Linux系统内核裁剪定制指南
- 定制自己的Linux时,Ramdisk、Initrd及根系统的制作
- 自己定制软盘上的Linux系统(转载)
- 定制自己的Linux ISO