Nexus 1000v安装与配置
2014-02-27 13:20
399 查看
Nexus 1000v安装与配置2010-10-23 16:21:26标签:Nexus休闲职场一. Nexus 1000v 简介说明注:Nexus 1000V跟传统交换机不同,希望用这个来练交换的可以打住。对于nexus 1000v,我认为是一个分离集中化同时又集中分离化的东西,说他分离集中化是因为整个平台的网络缩减到只需要在两台接入服务器的高密度端口的交换机上划分很少几个VLAN、剩下的都在VSM和vcenter上做就可以了。说他集中分离化则是指以后每台ESX就只相当于是整个交换网络里的一块板卡,与其他 ESX的数据交互可以用传统交换机的板卡间流量交换来理解。二.环境准备ESX 4.0 ESXT.PXL.COM 191.168.72.33VC4.0 VC.PXL.COM 192.168.72.31Cisco Nexus 1000V IP 192.168.72.34三.安装1. 从www.cisco.com下载Nexus 1000V安装包,将安装包解压得到VSM和VEM安装程序。2.从www.vmware.com下载VMware-vSphere-CLI-4.0.0-161974.exe3.在VC上安装VMware-vSphere-CLI-4.0.0-161974.exe程序

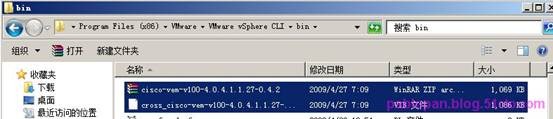
4. 将Nexus1000v-4.0.4.SV1.1\Nexus1000v.4.0.4.SV1.1\VEM\vSphere_4_0_0目录下cisco-vem-v100-4.0.4.1.1.27-0.4.2.zipcross_cisco-vem-v100-4.0.4.1.1.27-0.4.2-release.vib

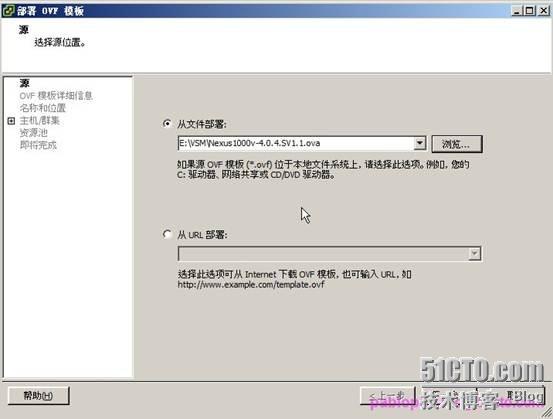
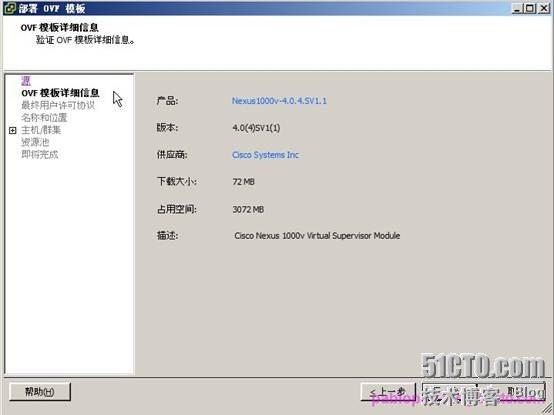
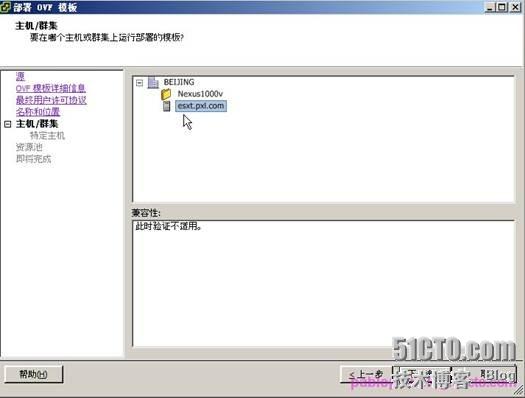
两个文件copy至VC的C:\Program Files\VMware\VMware vSphere CLI\bin目录下 选择开始菜单中的All programs > VMware >VMware vSphere CLI > Command Prompt C:\Program Files\VMware\VMware vSphere CLI>cd binC:\Program Files\VMware>VMware vSphere CLI\bin>vihostupdate.pl -i -b cisco-vem-v100-4.0.4.1.1.27-0.4.2.zip --server 192.168.72.33 //在ESXi服务器上安装并验证VEMC:\Program Files\VMware\VMware vSphere CLI\bin>vihostupdate.pl -b cross_cisco-vem-v100-4.0.4.1.1.27-0.4.2-release.vib --server 192.168.72.335.在vSphere Client中,选择 文件> 部署OVF模板,选中VSM目录中的Nexus1000v-4.0.4.SV1.1.ova,导入VSM虚拟机。

下一步

下一步

下一步

下一步


由于我是在VMware 7.0 下的Virtual Center 4下安装(CPU为I3 530)无法与虚拟机的CPU 兼容

我们只能重新自己新建一台虚拟机来作Nexus 1000V 交换机,首先设置一下ESX 虚拟机支持VT 技术

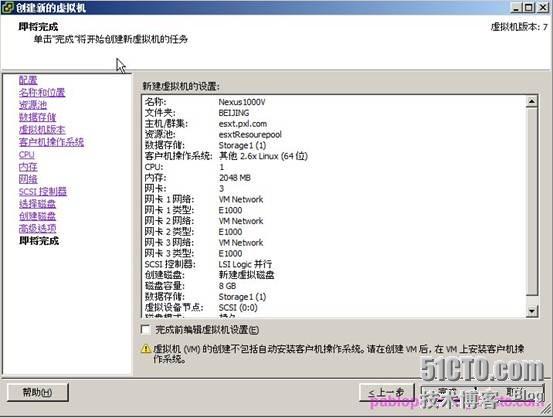
下一步“新建主机à 新建虚拟机”,官方要求说要:you are not using the OVA file, but are creating a new VM, make sure that it meets the following minimum basic requirements:– A 64-bit VM is required and “Other 64bit Linux” is a recommended VM type.– The VM must be equipped as follows:1 Processor2-GB RAM3 NICsMinimum 3-GB SCSI hard disk with LSI Logic Parallel adapter (default)CPU speed of 1.5 GH选择的操作系统为如下

最后显示的结果配置参数如下:

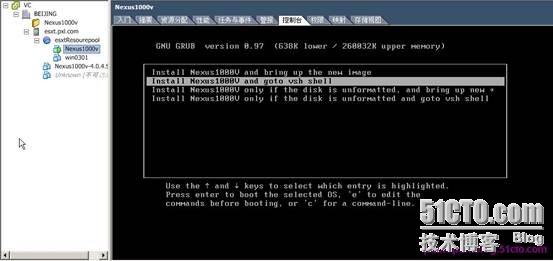
启动虚拟机,从光盘引导如下选择”Install Nexus1000v and brind up the new Image”

最后给admin 配置一个复杂的密码,domain ID

以下便是CISCO 的配置Switch#config t //进入特权模式Switch(config)# hostname Nexus1000v03 //命名为自己定义Nexus1000v03(config)#int mgmt 0 //进入管理口Nexus1000v03(config-if)#ip address 192.168.149.157/24 //设置管理口IP Nexus1000v03(config-if)#no shut //启动管理口Nexus1000v03(config-if)# vrf context management //进入管理口路由表 Nexus1000v03(config-vrf)#ip route 0.0.0.0/0 192.168.149.254 //设置管理口路由 Nexus1000v03(config-vrf)#exit Nexus1000v03(config)#telnet server enable //启动telnet server Nexus1000v03(config)#vlan 149 //创建VLAN 149 Nexus1000v03(config-van)#exit Nexus1000v03(config)#ntp server 192.168.143.254 //配置NTP服务器同步时间 Nexus1000v03(config)#end

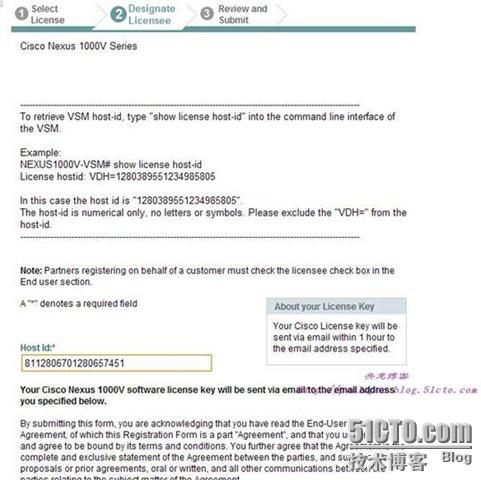
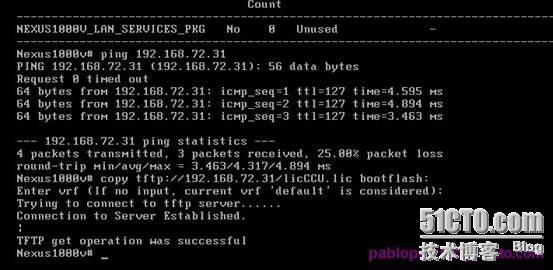
Nesx1000v03# show license host-id //查看host-id License hostid: VDH=2014365328124992567访问http://www.cisco.com/go/1000veval/ 输入host-id(需要CCO帐户) 将下载的License文件放在TFTP服务器,并上传到虚拟机的bootflash中。

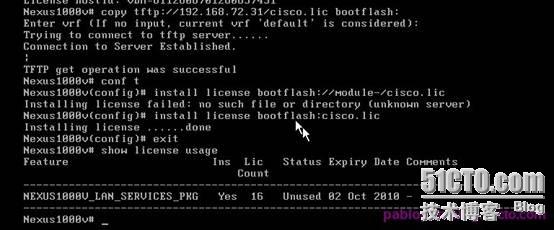
Nesx1000v03(config)# copy tftp://192.168.153.8/cisco.lic bootflash: //从TFTP服务器下载LIC到虚拟交换机Enter vrf (If no input, current vrf 'default' is considered):Trying to connect to tftp server......Connection to Server Established. | TFTP get operation was successful

Nesx1000v03(config)# install license bootflash://module-1/cisco.lic //安装LicenseInstalling license .....done Nesx1000v03##show license usage //查看License

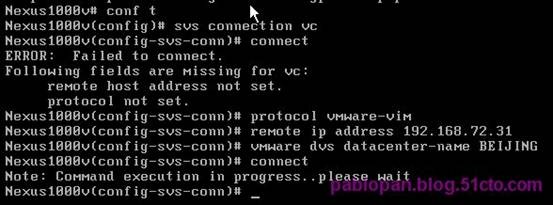
Nesx1000v03##copy run start //保存配置 Nesx1000v03#config t //进入特权模式 Nesx1000v03(config)# port-profile system-uplink //设置port-profile Nesx1000v03(config-port-prof)# capability uplink //设置为上行端口组 Nesx1000v03(config-port-prof)# switchport mode trunk //设置上行端口组模式为Trunk Nesx1000v03(config-port-prof)# switchport trunk allowed vlan all //允许所有VLAN通过,也可以设置特定VLANNesx1000v03(config-port-prof)# system vlan 14Nesx1000v03(config-port-prof)# no shutNesx1000v03(config-port-prof)# state enabledNesx1000v03(config-port-prof)# vmware port-groupNesx1000v03(config-port-prof)# copy run startup-config [########################################] 100%Nesx1000v03(config-port-prof)#exitNesx1000v03(config)# port-profile vlan149 //创建通讯VLANNesx1000v03(config-port-prof)# switchport mode access //设定VLAN模式为access Nesx1000v03(config-port-prof)# switchport access vlan 14//设定VLAN号为14Nesx1000v03(config-port-prof)# vmware port-groupNesx1000v03(config-port-prof)# no shutNesx1000v03(config-port-prof)# state enabledNesx1000v03(config-port-prof)# copy run startup-config [########################################] 100%Nesx1000v03(config-port-prof)#exitNesx1000v03(config)# port-profile vlan15Nesx1000v03(config-port-prof)# switchport mode accessNesx1000v03(config-port-prof)# switchport access vlan 15Nesx1000v03(config-port-prof)# vmware port-groupNesx1000v03(config-port-prof)# no shutNesx1000v03(config-port-prof)# state enabledNesx1000v03(config-port-prof)# copy run startup-config [########################################] 100%Nesx1000v03(config)# svs connection vcNesx1000v03(config-svs-conn)# protocol vmware-vim Nesx1000v03(config-svs-conn)# remote ip address 192.168.72.31 Nesx1000v03(config-svs-conn)# vmware dvs datacenter-name BEIJING Nesx1000v03(config-svs-conn)#

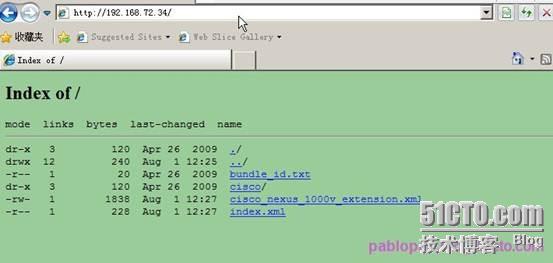
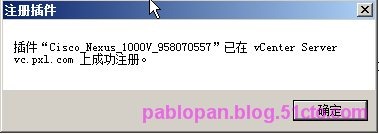
7. 在在vCenter Server上安装Cisco Nexus 1000V Plug-in. 用浏览器打开虚拟机管理地址,如http://192.168.72.34,下载cisco_nexus1000v_extension.xml,在vSphere Client中选择Manage Plug-in,右键点击空白处选择新建Plug-in,选择下载的xml文件并点击注册

选择cisco_nexus_1000v_extension.xml

安装cisco_nexus_1000v_extension.xml


重新登陆VC 执行第8步Nesx1000v03(config)# svs connection vcNesx1000v03(config-svs-conn)# connect

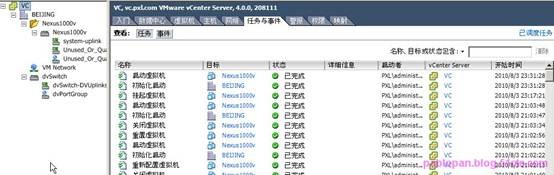
这样分布式交换机就创建成功了


4. 将Nexus1000v-4.0.4.SV1.1\Nexus1000v.4.0.4.SV1.1\VEM\vSphere_4_0_0目录下cisco-vem-v100-4.0.4.1.1.27-0.4.2.zipcross_cisco-vem-v100-4.0.4.1.1.27-0.4.2-release.vib
两个文件copy至VC的C:\Program Files\VMware\VMware vSphere CLI\bin目录下 选择开始菜单中的All programs > VMware >VMware vSphere CLI > Command Prompt C:\Program Files\VMware\VMware vSphere CLI>cd binC:\Program Files\VMware>VMware vSphere CLI\bin>vihostupdate.pl -i -b cisco-vem-v100-4.0.4.1.1.27-0.4.2.zip --server 192.168.72.33 //在ESXi服务器上安装并验证VEMC:\Program Files\VMware\VMware vSphere CLI\bin>vihostupdate.pl -b cross_cisco-vem-v100-4.0.4.1.1.27-0.4.2-release.vib --server 192.168.72.335.在vSphere Client中,选择 文件> 部署OVF模板,选中VSM目录中的Nexus1000v-4.0.4.SV1.1.ova,导入VSM虚拟机。
下一步
下一步

下一步
下一步


由于我是在VMware 7.0 下的Virtual Center 4下安装(CPU为I3 530)无法与虚拟机的CPU 兼容
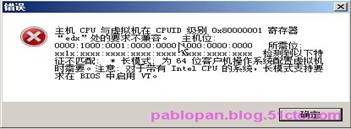
我们只能重新自己新建一台虚拟机来作Nexus 1000V 交换机,首先设置一下ESX 虚拟机支持VT 技术

下一步“新建主机à 新建虚拟机”,官方要求说要:you are not using the OVA file, but are creating a new VM, make sure that it meets the following minimum basic requirements:– A 64-bit VM is required and “Other 64bit Linux” is a recommended VM type.– The VM must be equipped as follows:1 Processor2-GB RAM3 NICsMinimum 3-GB SCSI hard disk with LSI Logic Parallel adapter (default)CPU speed of 1.5 GH选择的操作系统为如下

最后显示的结果配置参数如下:
启动虚拟机,从光盘引导如下选择”Install Nexus1000v and brind up the new Image”
最后给admin 配置一个复杂的密码,domain ID

以下便是CISCO 的配置Switch#config t //进入特权模式Switch(config)# hostname Nexus1000v03 //命名为自己定义Nexus1000v03(config)#int mgmt 0 //进入管理口Nexus1000v03(config-if)#ip address 192.168.149.157/24 //设置管理口IP Nexus1000v03(config-if)#no shut //启动管理口Nexus1000v03(config-if)# vrf context management //进入管理口路由表 Nexus1000v03(config-vrf)#ip route 0.0.0.0/0 192.168.149.254 //设置管理口路由 Nexus1000v03(config-vrf)#exit Nexus1000v03(config)#telnet server enable //启动telnet server Nexus1000v03(config)#vlan 149 //创建VLAN 149 Nexus1000v03(config-van)#exit Nexus1000v03(config)#ntp server 192.168.143.254 //配置NTP服务器同步时间 Nexus1000v03(config)#end

Nesx1000v03# show license host-id //查看host-id License hostid: VDH=2014365328124992567访问http://www.cisco.com/go/1000veval/ 输入host-id(需要CCO帐户) 将下载的License文件放在TFTP服务器,并上传到虚拟机的bootflash中。
Nesx1000v03(config)# copy tftp://192.168.153.8/cisco.lic bootflash: //从TFTP服务器下载LIC到虚拟交换机Enter vrf (If no input, current vrf 'default' is considered):Trying to connect to tftp server......Connection to Server Established. | TFTP get operation was successful
Nesx1000v03(config)# install license bootflash://module-1/cisco.lic //安装LicenseInstalling license .....done Nesx1000v03##show license usage //查看License
Nesx1000v03##copy run start //保存配置 Nesx1000v03#config t //进入特权模式 Nesx1000v03(config)# port-profile system-uplink //设置port-profile Nesx1000v03(config-port-prof)# capability uplink //设置为上行端口组 Nesx1000v03(config-port-prof)# switchport mode trunk //设置上行端口组模式为Trunk Nesx1000v03(config-port-prof)# switchport trunk allowed vlan all //允许所有VLAN通过,也可以设置特定VLANNesx1000v03(config-port-prof)# system vlan 14Nesx1000v03(config-port-prof)# no shutNesx1000v03(config-port-prof)# state enabledNesx1000v03(config-port-prof)# vmware port-groupNesx1000v03(config-port-prof)# copy run startup-config [########################################] 100%Nesx1000v03(config-port-prof)#exitNesx1000v03(config)# port-profile vlan149 //创建通讯VLANNesx1000v03(config-port-prof)# switchport mode access //设定VLAN模式为access Nesx1000v03(config-port-prof)# switchport access vlan 14//设定VLAN号为14Nesx1000v03(config-port-prof)# vmware port-groupNesx1000v03(config-port-prof)# no shutNesx1000v03(config-port-prof)# state enabledNesx1000v03(config-port-prof)# copy run startup-config [########################################] 100%Nesx1000v03(config-port-prof)#exitNesx1000v03(config)# port-profile vlan15Nesx1000v03(config-port-prof)# switchport mode accessNesx1000v03(config-port-prof)# switchport access vlan 15Nesx1000v03(config-port-prof)# vmware port-groupNesx1000v03(config-port-prof)# no shutNesx1000v03(config-port-prof)# state enabledNesx1000v03(config-port-prof)# copy run startup-config [########################################] 100%Nesx1000v03(config)# svs connection vcNesx1000v03(config-svs-conn)# protocol vmware-vim Nesx1000v03(config-svs-conn)# remote ip address 192.168.72.31 Nesx1000v03(config-svs-conn)# vmware dvs datacenter-name BEIJING Nesx1000v03(config-svs-conn)#

7. 在在vCenter Server上安装Cisco Nexus 1000V Plug-in. 用浏览器打开虚拟机管理地址,如http://192.168.72.34,下载cisco_nexus1000v_extension.xml,在vSphere Client中选择Manage Plug-in,右键点击空白处选择新建Plug-in,选择下载的xml文件并点击注册
选择cisco_nexus_1000v_extension.xml

安装cisco_nexus_1000v_extension.xml

重新登陆VC 执行第8步Nesx1000v03(config)# svs connection vcNesx1000v03(config-svs-conn)# connect
这样分布式交换机就创建成功了

相关文章推荐
- Nexus 1000v安装与配置
- Nexus 1000v安装与配置
- windows7下maven的安装及配置 +nexus私服的搭建
- Nexus安装与配置
- nexus-3.3.0-01安装配置(Cent OS7.0环境)
- win7下nexus的安装与配置
- maven系列三 —— nexus仓库安装配置(一)
- Linux安装配置maven以及搭建nexus私服
- CentOS安装Nexus(Maven私有库)详细配置及上传本地jar到私服
- nexus(Maven仓库私服)的安装、配置、使用和仓库迁移
- Maven私有库和本地库的安装与配置 Sonatype Nexus
- nexus(Maven仓库私服)的安装、配置、使用和仓库迁移
- Nexus 安装与配置
- Linux下安装配置Nexus
- Linux安装配置maven3.0以及搭建nexus私服
- Maven 私有库和本地的安装与配置 Sonatype Nexus + Maven
- nexus安装配置 及本地第三方jar部署到私服仓库配置
- CentOS6.5 安装Nexus配置Maven私服
- 【Maven】Nexus的安装和配置
- 本地安装nexus私服步骤以及配置到本地maven插件中