Spring Security 学习之HTTP表单验证
2014-02-11 11:13
141 查看
早已久仰Spring Security大名,一直没机会实践,最近计划对其进行系统学习并通过bolg将心得记录与博友们分享!
准备工作:
1. Spring Security 源码和Samples可以从以下链接下载:
https://github.com/spring-projects/spring-security/tree/master/samples
2. 从Spring官网下载STS
3. 学习时使用的版本 -- Spring : 4.0.0.RELEASE,Spring Security : 3.2.0.RELEASE
历史:
前身为“The Acegi Security System for Spring”,始于2006年,项目得到广大认可和适用后更名为Spring Security纳入Spring的项目之一。
适用场景:
JAVA应用安全管理中的认证和授权,特别是使用Spring框架开发的JAVA应用。
基本原理:
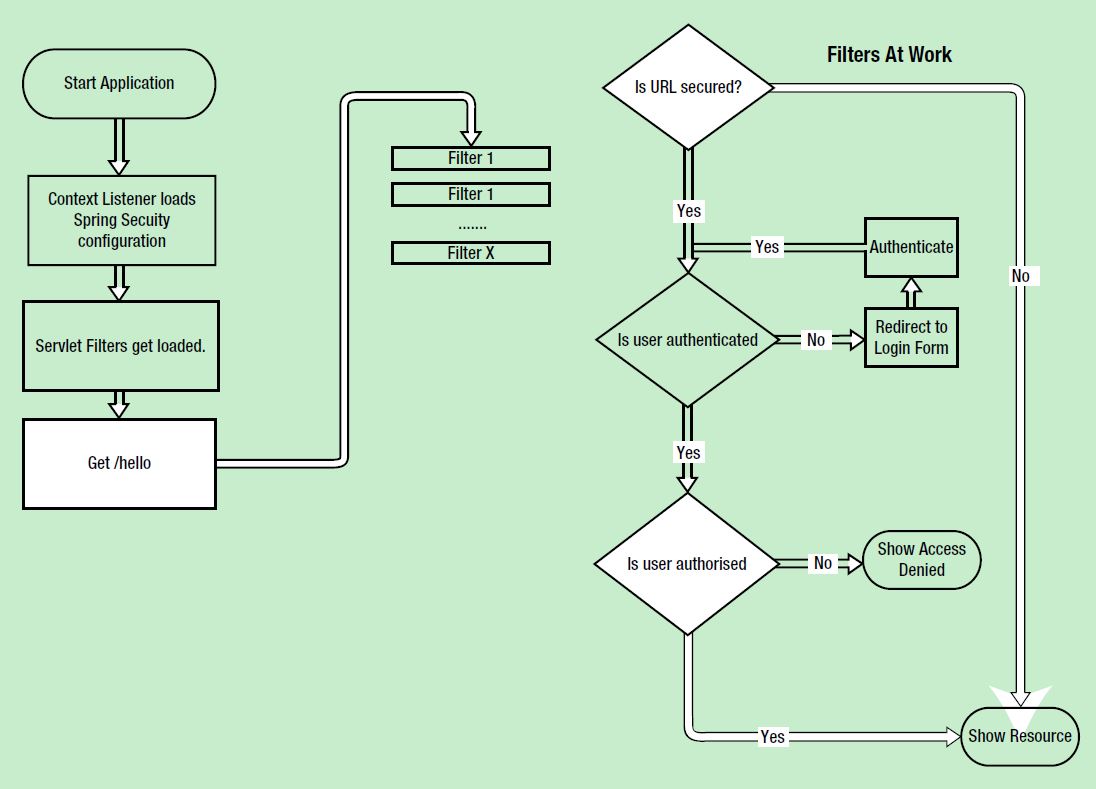
Spring的DI和AOP -- Spring Security大量使用AOP以避免对业务逻辑的干涉,并与Spring核心框架深度集成。
javax.servlet.FilterChain -- 目前Spring Security主要用于web应用,在web应用中通过Filter拦截HTTP请求进行安检。

HTTP表单认证:
Spring Security 内置HTTP表单认证支持,使用Security名字空间可以非常简单让Web应用支持HTTP表单认证,基本使用步骤如下:
1. web.xml配置
首先我们需要在web描述符中配置一个Filter名为springSecurityFilterChain供Spring框架使用,这个名称不能自己随便更改,否则Spring框架会找不到。
Spring Security bean配置分两部分,分别是资源访问权限配置和用户定义,部分标签解说:
http标签 :用于创建FilterChainProxy和它将使用的bean。
auto-config="true" :表示以下配置
pattern :指定被保护的资源,可以使用正则表达式
access :访问权限定义,有多种方式,示例中使用角色,角色必须以ROLE_前缀开始。
user :定义用户名密码和拥有的角色,密码可以使用MD5加密。
实践:
有很多安全相关的专业概念,需要自己慢慢认识,我们先创建一个实例,感性认识一下,步骤如下:
1. New-->Spring Project-->选择"Spring MVC Project"模板--Finish
2. 修改pom.xml,将Spring的版本更改为4.0.0.Release,增加Spring Security的依赖

大功告成!
附件:http://down.51cto.com/data/2364050
准备工作:
1. Spring Security 源码和Samples可以从以下链接下载:
https://github.com/spring-projects/spring-security/tree/master/samples
2. 从Spring官网下载STS
3. 学习时使用的版本 -- Spring : 4.0.0.RELEASE,Spring Security : 3.2.0.RELEASE
历史:
前身为“The Acegi Security System for Spring”,始于2006年,项目得到广大认可和适用后更名为Spring Security纳入Spring的项目之一。
适用场景:
JAVA应用安全管理中的认证和授权,特别是使用Spring框架开发的JAVA应用。
基本原理:
Spring的DI和AOP -- Spring Security大量使用AOP以避免对业务逻辑的干涉,并与Spring核心框架深度集成。
javax.servlet.FilterChain -- 目前Spring Security主要用于web应用,在web应用中通过Filter拦截HTTP请求进行安检。

HTTP表单认证:
Spring Security 内置HTTP表单认证支持,使用Security名字空间可以非常简单让Web应用支持HTTP表单认证,基本使用步骤如下:
1. web.xml配置
首先我们需要在web描述符中配置一个Filter名为springSecurityFilterChain供Spring框架使用,这个名称不能自己随便更改,否则Spring框架会找不到。
<filter>
<filter-name>springSecurityFilterChain</filter-name>
<filter-class>org.springframework.web.filter.DelegatingFilterProxy</filter-class>
</filter>
<filter-mapping>
<filter-name>springSecurityFilterChain</filter-name>
<url-pattern>/*</url-pattern>
</filter-mapping>
2. Spring bean配置
Spring Security bean配置分两部分,分别是资源访问权限配置和用户定义,部分标签解说:
http标签 :用于创建FilterChainProxy和它将使用的bean。
auto-config="true" :表示以下配置
<http>
<form-login />
<http-basic />
<logout />
</http>
intercept-url :定义被保护资源的访问权限
pattern :指定被保护的资源,可以使用正则表达式
access :访问权限定义,有多种方式,示例中使用角色,角色必须以ROLE_前缀开始。
user :定义用户名密码和拥有的角色,密码可以使用MD5加密。
<?xml version="1.0" encoding="UTF-8"?>
<beans xmlns="http://www.springframework.org/schema/beans"
xmlns:xsi="http://www.w3.org/2001/XMLSchema-instance" xmlns:security="http://www.springframework.org/schema/security"
xsi:schemaLocation="http://www.springframework.org/schema/beans http://www.springframework.org/schema/beans/spring-beans-3.1.xsd http://www.springframework.org/schema/security http://www.springframework.org/schema/security/spring-security-3.2.xsd"> <security:http auto-config="true">
<security:intercept-url pattern="/hello"
access="ROLE_ADMIN" />
<security:intercept-url pattern="/**" access="ROLE_USER" />
</security:http>
<security:authentication-manager>
<security:authentication-provider>
<security:user-service>
<security:user authorities="ROLE_USER" name="stevex"
password="stevex" />
<security:user authorities="ROLE_USER, ROLE_ADMIN"
name="admin" password="admin" />
</security:user-service>
</security:authentication-provider>
</security:authentication-manager>
</beans>
实践:
有很多安全相关的专业概念,需要自己慢慢认识,我们先创建一个实例,感性认识一下,步骤如下:
1. New-->Spring Project-->选择"Spring MVC Project"模板--Finish
2. 修改pom.xml,将Spring的版本更改为4.0.0.Release,增加Spring Security的依赖
<dependency>
<groupId>org.springframework.security</groupId>
<artifactId>spring-security-core</artifactId>
<version>3.2.0.RELEASE</version>
</dependency>
<dependency>
<groupId>org.springframework.security</groupId>
<artifactId>spring-security-config</artifactId>
<version>3.2.0.RELEASE</version>
</dependency>
<dependency>
<groupId>org.springframework.security</groupId>
<artifactId>spring-security-web</artifactId>
<version>3.2.0.RELEASE</version>
</dependency>
3. 修改web.xml,增加springSecurityFilterChain
<context-param>
<param-name>contextConfigLocation</param-name>
<param-value>/WEB-INF/spring/root-context.xml /WEB-INF/spring/app-security.xml</param-value>
</context-param>

<!-- Creates the Spring Container shared by all Servlets and Filters -->
<listener>
<listener-class>org.springframework.web.context.ContextLoaderListener</listener-class>
</listener>
<filter>
<filter-name>springSecurityFilterChain</filter-name>
<filter-class>
org.springframework.web.filter.DelegatingFilterProxy
</filter-class>
</filter>
<filter-mapping>
<filter-name>springSecurityFilterChain</filter-name>
<url-pattern>/*</url-pattern>
</filter-mapping>
4. 增加app-security.xml
<?xml version="1.0" encoding="UTF-8"?>
<beans xmlns="http://www.springframework.org/schema/beans"
xmlns:xsi="http://www.w3.org/2001/XMLSchema-instance" xmlns:security="http://www.springframework.org/schema/security"
xsi:schemaLocation="http://www.springframework.org/schema/beans http://www.springframework.org/schema/beans/spring-beans-3.1.xsd http://www.springframework.org/schema/security http://www.springframework.org/schema/security/spring-security-3.2.xsd"> <security:http auto-config="true">
<security:intercept-url pattern="/hello"
access="ROLE_ADMIN" />
<security:intercept-url pattern="/**" access="ROLE_USER" />
</security:http>
<security:authentication-manager>
<security:authentication-provider>
<security:user-service>
<security:user authorities="ROLE_USER" name="stevex"
password="stevex" />
<security:user authorities="ROLE_USER, ROLE_ADMIN"
name="admin" password="admin" />
</security:user-service>
</security:authentication-provider>
</security:authentication-manager>
</beans>
5. 修改HomeController.java,增加hello函数
/**
* Handles requests for the application home page.
*/
@Controller
public class HomeController {

private static final Logger logger = LoggerFactory.getLogger(HomeController.class);

/**
* Simply selects the home view to render by returning its name.
*/
@RequestMapping(value = "/", method = RequestMethod.GET)
public String home(Locale locale, Model model) {
logger.info("Welcome home! The client locale is {}.", locale);

Date date = new Date();
DateFormat dateFormat = DateFormat.getDateTimeInstance(DateFormat.LONG, DateFormat.LONG, locale);

String formattedDate = dateFormat.format(date);

model.addAttribute("serverTime", formattedDate );

return "home";
}

//produces="text/plain" 必须有,否则会有乱码
@RequestMapping(value = "/hello", method = RequestMethod.GET, produces="text/plain")
@ResponseBody
public String hello(){
logger.info("request coming!");
return "Hello Stevex, you are so hard!";
}

}
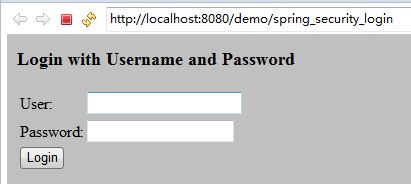
6. 运行应用进行测试
大功告成!
附件:http://down.51cto.com/data/2364050
相关文章推荐
- accp6.0 《使用javascript增强交互效果》学习笔记ch6 表单基本验证技术
- 深入学习jQuery Validate表单验证
- PHP检查表单提交是否来自于本站(验证HTTP_REFERER等)
- Play framework 2.0 -http表单提交和表单验证
- [更新]一份包含: 采用RSA JWT(Json Web Token, RSA加密)的OAUTH2.0,HTTP BASIC,本地数据库验证,Windows域验证,单点登录的Spring Security配置文件
- 从零开始学习jQuery (十一) 实战表单验证与自动完成提示插件
- 从零开始学习jQuery (十一) 实战表单验证与自动完成提示插件
- 【javascript】学习总结——表单验证
- 轻松学习jQuery插件EasyUI EasyUI表单验证
- 20110215 学习记录2:表单中的get和post区别 & 使用 HttpWebRequest 向网站提交数据
- 从零开始学习jQuery (十一) 实战表单验证与自动完成提示插件
- 蜗牛—JavaScript学习之表单验证
- jQuery学习之:Validation表单验证插件
- Laravel 5框架学习之表单验证
- 主题:jQuery学习之:Validation表单验证插件
- 黑马程序员---struts2学习笔记之七(表单验证)
- 学习JQuery后的一个实际应用--页面表单验证(适合大规模应用)
- struts2学习(一)--表单验证的两种方式
- ThinkPHP学习笔记(十)在Model中完成自动验证前台的表单数据
- jQuery框架学习第十一天:实战jQuery表单验证及jQuery自动完成提示插件
