从零开始学习jQuery (十一) 实战表单验证与自动完成提示插件
2010-02-26 11:47
1031 查看
一.摘要
本系列文章将带您进入jQuery的精彩世界, 其中有很多作者具体的使用经验和解决方案,即使你会使用jQuery也能在阅读中发现些许秘籍.
本文是介绍两个最常用的jQuery插件.
分别用于表单验证和自动完成提示(类似google suggest).
二.前言
研究别人的作品真是一件花时间而且痛苦的过程. 当然也和本人英文不好有关. 总觉得控件作者写了很多文档但是都不够系统,
需要深入研究很多的实例后才能了解作者的思路.所以学习和研究一个插件需要很高成本,
如果发现了Bug并修复需要的成本也是未知数(本次我花了较少的时间解决了自动完成提示插件的一个中文bug,
但是如果复杂的bug就不会这么简单了.).
对于简单应用我首先推荐上文中的jQuery UI. 但是jQuery
UI解决的问题有限. 使用jQuery插件是我们最后的一个好办法---还算是好办法, 起码比自己开发要好吧?
很多jQuery的
插件编码异常优美, 看一看艺龙首页现在的城市输入框控件, 除了需要为输入框手工添加很多很多属性(onkeyup, onkeydown等等),
而且还不够通用, 占用服务器资源和网络资源.但是当初也是花费了很久的时间完成的作品.
站在巨人的肩膀上,
让我感觉写脚本和写设计C#程序一样, 都有高度和深度可以挖掘. 除了使用作者开发好的功能, 还可以学习如何开发和封装javascript控件.
看过优秀的jQuery插件作者的代码和设计思想后, 常常自叹设计水平差距居然如此之大, 增加自认为脚本高手,
比较过后就是C#程序员和架构师之间的差距.
希望大家通过本章节介绍的两个插件, 除了学会如何使用,
还能够略微领悟到如何封装和设计javascript控件.
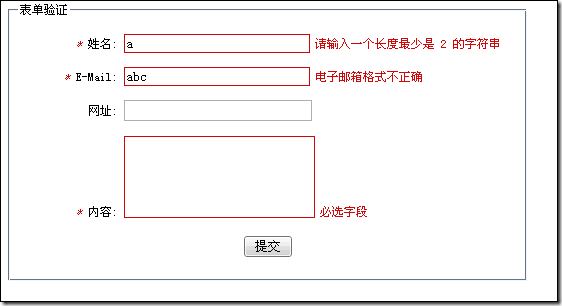
三.表单验证插件 validate
在提交表单前常要对用户输入进行校验.ASP.NET的验证控件就是用于此目的, 可以同时进行客户端和服务器端验证.
但是验证控件并没有被所有项目采用. 而且在MVC项目中经常使用自己的客户端验证框架.
在比较了若干表单验证插件后,
决定采用validate插件. 因为其使用简单并且灵活.
插件首页:
http://bassistance.de/jquery-plugins/jquery-plugin-validation/
插件文档:
http://docs.jquery.com/Plugins/Validation
配置说明:
http://docs.jquery.com/Plugins/Validation/validate#options
1.应用实例
实例效果:
实例代码:
<%@ Page Language="C#" %>

<!
DOCTYPE
html
PUBLIC
"-//W3C//DTD XHTML 1.0 Transitional//EN"
"http://www.w3.org/TR/xhtml1/DTD/xhtml1-transitional.dtd"
>

<
html
xmlns
="http://www.w3.org/1999/xhtml"
>

<
head
id
="Head1"
runat
="server"
>

<
title
>
jQuery PlugIn - 表单验证插件实例 Validate </
title
>

<!--black-tie,blitzer,blitzer,dot-luv,excite-bike,hot-sneaks,humanity,mint-choc,redmond,smoothness,south-street,start,swanky-purse,trontastic,ui-darkness,ui-lightness,vader-->

<
link
rel
="stylesheet"
type
="text/css"
href
="<%=WebConfig.ResourceServer +"
/JsLib
/jquery
/themes
/redmond
/style
.css
"%>"
/>

<
script
type
="text/javascript"
src
="<% =WebConfig.ResourceServer %>/JsLib/jquery/jquery-min-lastest.js"
></
script
>

<script type="text/javascript"
src="<% =WebConfig.ResourceServer %>/JsLib/jquery/ui/jquery-ui-all-min-lastest.js"
></script>

<script type="text/javascript"
src="<% =WebConfig.ResourceServer %>/JsLib/jquery/plugin/jquery.validate/jquery.validate.min.js"
></script>

<script type="text/javascript"
src="<% =WebConfig.ResourceServer %>/JsLib/jquery/plugin/jquery.validate/localization/messages_cn.js"
></script>

<% if
(false
)

{%><script src="~/js/jquery-vsdoc-lastest.js"
type="text/javascript"
></script>

<% }%>

<script type="text/javascript"
>

/*========== 必须放在头部加载的语句块. 尽量避免使用 ==========*/

</
script
>

<style type="text/css"
>

body

{

font-size:12px;

}

/* form中显示文字的label */

.slabel

{

width:100px;

display: -moz-inline-box;

line-height: 1.8;

display: inline-block;

text-align:right;

}

/* 出错样式 */

input.error, textarea.error

{

border: solid 1px #CD0A0A;

}

label.error

{

color:#CD0A0A;

margin-left:5px;

}

/* 深红色文字 */

.textred

{

color:#CD0A0A;

}

</style>

</head>

<body>

<form id="commentForm"
method="get"
action=""
>

<fieldset style="width:500px;"
><legend>表单验证</legend>

<p><label for
="cname"
class
="slabel"
><em class
="textred"
>*</em> 姓名:</label>

<input id="cname"
name="name"
size="25"
class
="required"
minlength="2"
/>

</p>

<p><label for
="cemail"
class
="slabel"
><em class
="textred"
>*</em> E-Mail:</label>

<input id="cemail"
name="email"
size="25"
/>

</p>

<p><label for
="curl"
class
="slabel"
>网址:</label>

<input id="curl"
name="url"
size="25"
class
="url"
value=""
/>

</p>

<p><label for
="ccomment"
class
="slabel"
><em class
="textred"
>*</em> 内容:</label>

<textarea rows="2"
id="ccomment"
name="comment"
cols="20"
class
="required"
style="height:80px;"
></textarea>

</p>

<p style="text-align:center;"
>

<input class
="submit"
type="submit"
value="提交"
/>

</p>

</fieldset>

</form>

<script type="text/javascript"
>

/*==========用户自定义方法==========*/

/*==========事件绑定==========*/

$(function
()

{

});

/*==========加载时执行的语句==========*/

$(function
()

{

$("#commentForm"
).validate(

{

errorClass: "error"
,

submitHandler: function
(form)

{

//如果想提交表单, 需要使用form.submit()而不要使用$(form).submit()

alert("submitted!"
);

},

rules: {

//为name为email的控件添加两个验证方法:required()和email()

email: { required: true
, email: true
}

},

messages: {

//为name为email的控件的required()和email()验证方法设置验证失败的消息内容

email: {required:"需要输入电子邮箱"
, email:"电子邮箱格式不正确"
}

}

});

});

</
script
>

</
body
>

</
html
>
.csharpcode, .csharpcode pre
{
font-size: small;
color: black;
font-family: consolas, "Courier New", courier, monospace;
background-color: #ffffff;
/*white-space: pre;*/
}
.csharpcode pre { margin: 0em; }
.csharpcode .rem { color: #008000; }
.csharpcode .kwrd { color: #0000ff; }
.csharpcode .str { color: #006080; }
.csharpcode .op { color: #0000c0; }
.csharpcode .preproc { color: #cc6633; }
.csharpcode .asp { background-color: #ffff00; }
.csharpcode .html { color: #800000; }
.csharpcode .attr { color: #ff0000; }
.csharpcode .alt
{
background-color: #f4f4f4;
width: 100%;
margin: 0em;
}
.csharpcode .lnum { color: #606060; }
2. 实例讲解
(1) 验证方法
验证方法是验证某一个控件是否满足某些规则的方法, 返回一个boolean值. 比如email()
方法验证内容是否符合email格式, 符合则返回true.
下面是类库中email方法的源代码:
// http://docs.jquery.com/Plugins/Validation/Methods/email
email: function
(value, element) {

// contributed by Scott Gonzalez: http://projects.scottsplayground.com/email_address_validation/
return
this
.optional(element) || /^((([a-z]|/d|[!#/$%&'/*/+/-//=/?/^_`{/|}~]|[/u00A0-/uD7FF/uF900-/uFDCF/uFDF0-/uFFEF])+(/.([a-z]|/d|[!#/$%&'
/*/+/-//=/?/^_`{/|}~]|[/u00A0-/uD7FF/uF900-/uFDCF/uFDF0-/uFFEF])+)*)|((/x22)((((/x20|/x09)*(/x0d/x0a))?(/x20|/x09)+)?(([/x01-/x08/x0b/x0c/x0e-/x1f/x7f]|/x21|[/x23-/x5b]|[/x5d-/x7e]|[/u00A0-/uD7FF/uF900-/uFDCF/uFDF0-/uFFEF])|(//([/x01-/x09/x0b/x0c/x0d-/x7f]|[/u00A0-/uD7FF/uF900-/uFDCF/uFDF0-/uFFEF]))))*(((/x20|/x09)*(/x0d/x0a))?(/x20|/x09)+)?(/x22)))@((([a-z]|/d|[/u00A0-/uD7FF/uF900-/uFDCF/uFDF0-/uFFEF])|(([a-z]|/d|[/u00A0-/uD7FF/uF900-/uFDCF/uFDF0-/uFFEF])([a-z]|/d|-|/.|_|~|[/u00A0-/uD7FF/uF900-/uFDCF/uFDF0-/uFFEF])*([a-z]|/d|[/u00A0-/uD7FF/uF900-/uFDCF/uFDF0-/uFFEF])))/.)+(([a-z]|[/u00A0-/uD7FF/uF900-/uFDCF/uFDF0-/uFFEF])|(([a-z]|[/u00A0-/uD7FF/uF900-/uFDCF/uFDF0-/uFFEF])([a-z]|/d|-|/.|_|~|[/u00A0-/uD7FF/uF900-/uFDCF/uFDF0-/uFFEF])*([a-z]|[/u00A0-/uD7FF/uF900-/uFDCF/uFDF0-/uFFEF])))/.?$/i.test(value);

},
我们在:
http://docs.jquery.com/Plugins/Validation
中的 List of built-in Validation methods
一节中列出了所有内置的验证方法. 同时插件还提供了additional-methods.js 文件, 里面包含了更多的验证方法,
引入后既可启用.
(2) 验证消息
验证消息就是验证方法失败后显示的文字内容. 验证消息一定关联在某一个验证方法上,并且全局的验证消息保存在jQuery.validator.messages 属性中.
默认的validate类库自带英文验证消息:
messages: {

required: "This field is required."
,

//...

});
.csharpcode, .csharpcode pre
{
font-size: small;
color: black;
font-family: consolas, "Courier New", courier, monospace;
background-color: #ffffff;
/*white-space: pre;*/
}
.csharpcode pre { margin: 0em; }
.csharpcode .rem { color: #008000; }
.csharpcode .kwrd { color: #0000ff; }
.csharpcode .str { color: #006080; }
.csharpcode .op { color: #0000c0; }
.csharpcode .preproc { color: #cc6633; }
.csharpcode .asp { background-color: #ffff00; }
.csharpcode .html { color: #800000; }
.csharpcode .attr { color: #ff0000; }
.csharpcode .alt
{
background-color: #f4f4f4;
width: 100%;
margin: 0em;
}
.csharpcode .lnum { color: #606060; }
上面说明当required验证方法验证失败是, 显示"This field is required."这条消息.
在下载文件的localization文件夹中, 包含了各国语言的基本验证消息, 如同本实例一样引入不同的语言文件即可实现语言切换:
<
script
type
="text/javascript"
src
="<% =WebConfig.ResourceServer %>/JsLib/jquery/plugin/jquery.validate/localization/messages_cn.js"
></
script
>
.csharpcode, .csharpcode pre
{
font-size: small;
color: black;
font-family: consolas, "Courier New", courier, monospace;
background-color: #ffffff;
/*white-space: pre;*/
}
.csharpcode pre { margin: 0em; }
.csharpcode .rem { color: #008000; }
.csharpcode .kwrd { color: #0000ff; }
.csharpcode .str { color: #006080; }
.csharpcode .op { color: #0000c0; }
.csharpcode .preproc { color: #cc6633; }
.csharpcode .asp { background-color: #ffff00; }
.csharpcode .html { color: #800000; }
.csharpcode .attr { color: #ff0000; }
.csharpcode .alt
{
background-color: #f4f4f4;
width: 100%;
margin: 0em;
}
.csharpcode .lnum { color: #606060; }
语言文件的内容举例:
jQuery.extend(jQuery.validator.messages, {

required: "必选字段"
,

//...

});.csharpcode, .csharpcode pre
{
font-size: small;
color: black;
font-family: consolas, "Courier New", courier, monospace;
background-color: #ffffff;
/*white-space: pre;*/
}
.csharpcode pre { margin: 0em; }
.csharpcode .rem { color: #008000; }
.csharpcode .kwrd { color: #0000ff; }
.csharpcode .str { color: #006080; }
.csharpcode .op { color: #0000c0; }
.csharpcode .preproc { color: #cc6633; }
.csharpcode .asp { background-color: #ffff00; }
.csharpcode .html { color: #800000; }
.csharpcode .attr { color: #ff0000; }
.csharpcode .alt
{
background-color: #f4f4f4;
width: 100%;
margin: 0em;
}
.csharpcode .lnum { color: #606060; }
现在必填项的问题提示就变成了中文.
除了全局默认的验证消息, 也可以为某一个表单元素设置特有的验证消息, 比如本文实例中, 为email元素设置了特有的验证消息:
messages: {

//为name为email的控件的required()和email()验证方法设置验证失败的消息内容

email: {required:"需要输入电子邮箱"
, email:"电子邮箱格式不正确"
}
options的messages属性可以针对某一个表单元素设置验证消息, 第一个email表示email元素, 值是一个集合,
required就表示required验证函数, 第二个email表示是email验证函数.
(3)验证规则
验证规则就是这样的语意语句: 在元素A上, 使用 验证方法A 和 验证方法B 进行验证.验证规则将元素与验证方法关联起来, 因为验证方法同时也关联了验证消息, 所以元素与消息也关联了起来.
为一个元素添加验证规则有多种方式.
本实例的"姓名"元素使用了CSS样式规则和元素属性规则:
<
input
id
="cname"
name
="name"
size
="25"
class
="required"
minlength
="2"
/>
class元素属性设置元素的CSS样式类, 因为样式类中添加了required类, 所以会和required()验证函数关联.
这种规则叫做CSS样式规则.
minlength
元素属性也会自动和minlength
()
验证函数关联, 这种规则叫做元素属性规则.
另外还可以通过编程的方式进行关联:
rules: {

//为name为email的控件添加两个验证方法:required()和email()

email: { required: true
, email: true
}

},
上面的语句表名为email表单对象添加了required()和email()验证函数.
.csharpcode, .csharpcode pre
{
font-size: small;
color: black;
font-family: consolas, "Courier New", courier, monospace;
background-color: #ffffff;
/*white-space: pre;*/
}
.csharpcode pre { margin: 0em; }
.csharpcode .rem { color: #008000; }
.csharpcode .kwrd { color: #0000ff; }
.csharpcode .str { color: #006080; }
.csharpcode .op { color: #0000c0; }
.csharpcode .preproc { color: #cc6633; }
.csharpcode .asp { background-color: #ffff00; }
.csharpcode .html { color: #800000; }
.csharpcode .attr { color: #ff0000; }
.csharpcode .alt
{
background-color: #f4f4f4;
width: 100%;
margin: 0em;
}
.csharpcode .lnum { color: #606060; }
(4) 表单提交
默认情况下, 当验证函数失败时表单不会提交.但是可以通过添加class="cancel"
的方式让提交按钮跳过验证:
<
input
type
="submit"
class
="cancel"
name
="cancel"
value
="Cancel"
/>
当表单提交时, 会触发options中submitHandler属性设置的函数:
submitHandler: function
(form)

{

//如果想提交表单, 需要使用form.submit()而不要使用$(form).submit()

alert("submitted!"
);

},
.csharpcode, .csharpcode pre
{
font-size: small;
color: black;
font-family: consolas, "Courier New", courier, monospace;
background-color: #ffffff;
/*white-space: pre;*/
}
.csharpcode pre { margin: 0em; }
.csharpcode .rem { color: #008000; }
.csharpcode .kwrd { color: #0000ff; }
.csharpcode .str { color: #006080; }
.csharpcode .op { color: #0000c0; }
.csharpcode .preproc { color: #cc6633; }
.csharpcode .asp { background-color: #ffff00; }
.csharpcode .html { color: #800000; }
.csharpcode .attr { color: #ff0000; }
.csharpcode .alt
{
background-color: #f4f4f4;
width: 100%;
margin: 0em;
}
.csharpcode .lnum { color: #606060; }此函数的签名同上. 我们可以在这个函数中,
编写在表单提交前需要处理的业务逻辑.
需要注意当最后以编程的方式提交表单时, 一定不要使用jQuery对象的submit()方法,
因为此方法会触发表单验证,并且再次调用submitHandler设置的函数, 会导致递归调用.
此函数的参数form就是表单对象, 用途就是不进行验证提交表单:form.submit()
(5) DEBUG模式
在开发阶段我们通常不希望表单被真正提交, 虽然可以通过本实例中重写submitHandler函数来实现, 但是还有更好的方式,我们可以在submitHandler函数完成正式提交的逻辑, 然后通过设置options的debug属性,
来达到即使验证通过也不会提交表单的目的:
$(".selector"
).validate({

debug: true

})
.csharpcode, .csharpcode pre
{
font-size: small;
color: black;
font-family: consolas, "Courier New", courier, monospace;
background-color: #ffffff;
/*white-space: pre;*/
}
.csharpcode pre { margin: 0em; }
.csharpcode .rem { color: #008000; }
.csharpcode .kwrd { color: #0000ff; }
.csharpcode .str { color: #006080; }
.csharpcode .op { color: #0000c0; }
.csharpcode .preproc { color: #cc6633; }
.csharpcode .asp { background-color: #ffff00; }
.csharpcode .html { color: #800000; }
.csharpcode .attr { color: #ff0000; }
.csharpcode .alt
{
background-color: #f4f4f4;
width: 100%;
margin: 0em;
}
.csharpcode .lnum { color: #606060; }
(6) 多表单验证
有时会在一个页面上出现多个Form, 因为validate控件是针对form对象进行包装的, 所以我们可以控制哪些form对象需要验证.同时为了方便一次设置页面上所有的应用了validate控件的form对象, 提供了 jQuery.validator.setDefaults
函数让我们可以一次设置所有的默认值:
jQuery.validator.setDefaults({

debug: true

});
.csharpcode, .csharpcode pre
{
font-size: small;
color: black;
font-family: consolas, "Courier New", courier, monospace;
background-color: #ffffff;
/*white-space: pre;*/
}
.csharpcode pre { margin: 0em; }
.csharpcode .rem { color: #008000; }
.csharpcode .kwrd { color: #0000ff; }
.csharpcode .str { color: #006080; }
.csharpcode .op { color: #0000c0; }
.csharpcode .preproc { color: #cc6633; }
.csharpcode .asp { background-color: #ffff00; }
.csharpcode .html { color: #800000; }
.csharpcode .attr { color: #ff0000; }
.csharpcode .alt
{
background-color: #f4f4f4;
width: 100%;
margin: 0em;
}
.csharpcode .lnum { color: #606060; }
四.自动完成插件 autocomplete
autocomplete插件能帮助我们实现类似于Google Suggest的效果:
插件首页:
http://bassistance.de/jquery-plugins/jquery-plugin-autocomplete/
插件文档:
http://docs.jquery.com/Plugins/Autocomplete
配置说明:
http://docs.jquery.com/Plugins/Autocomplete/autocomplete#toptions
1.应用实例
本实例演示的是使用autocomplete完成对输入城市的自动提示效果,如图: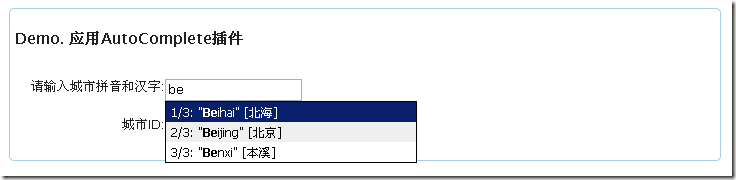
实例代码:
<%@ Page Language="C#" %>

<!
DOCTYPE
html
PUBLIC
"-//W3C//DTD XHTML 1.0 Transitional//EN"
"http://www.w3.org/TR/xhtml1/DTD/xhtml1-transitional.dtd"
>

<
html
xmlns
="http://www.w3.org/1999/xhtml"
>

<
head
id
="Head1"
runat
="server"
>

<
title
>
jQuery PlugIn - 自动完成插件实例 AutoComplete </
title
>

<!--black-tie,blitzer,blitzer,dot-luv,excite-bike,hot-sneaks,humanity,mint-choc,redmond,smoothness,south-street,start,swanky-purse,trontastic,ui-darkness,ui-lightness,vader-->

<
link
rel
="stylesheet"
type
="text/css"
href
="<%=WebConfig.ResourceServer +"
/JsLib
/jquery
/themes
/redmond
/style
.css
"%>"
/>

<
link
rel
="stylesheet"
type
="text/css"
href
="<%=WebConfig.ResourceServer +"
/JsLib
/jquery
/plugin
/jquery
.autocomplete
/jquery
.autocomplete
.css
"%>"
/>

<
script
type
="text/javascript"
src
="<% =WebConfig.ResourceServer %>/JsLib/jquery/jquery-min-lastest.js"
></
script
>

<script type="text/javascript"
src="<% =WebConfig.ResourceServer %>/JsLib/jquery/ui/jquery-ui-all-min-lastest.js"
></script>

<script type="text/javascript"
src="<% =WebConfig.ResourceServer %>/JsLib/jquery/plugin/jquery.autocomplete/jquery.autocomplete.min.js"
></script>

<% if
(false
)

{%><script src="~/js/jquery-vsdoc-lastest.js"
type="text/javascript"
></script>

<% }%>

<script type="text/javascript"
>

/*========== 必须放在头部加载的语句块. 尽量避免使用 ==========*/

</
script
>

<style type="text/css"
>

body

{

font-size: 12px;

}

.formLabel{float
: left; width: 150px; text-align:right;}

.formInput{float
: left;}

</style>

</head>

<body>

<!-- Demo. 应用AutoComplete插件 -->

<div class
="ui-widget ui-widget-content ui-corner-all"
style="width: 700px; padding: 5px;"
>

<h3>

Demo. 应用AutoComplete插件 </h3>

<br style="clear: both"
/>

<div class
="formLabel"
>

<label for
="inputCityName"
>请输入城市拼音和汉字:</label>

</div>

<div class
="formInput"
>

<input id="inputCityName"
name="inputCityName"
type="text"
/>

</div>

<br style="clear:both"
/>

<br style="clear: both"
/>

<div class
="formLabel"
>

<label for
="inputCityName"
>城市ID:</label></div>

<div class
="formInput"
>

<input id="inputCityId"
name="inputCityId"
type="text"
/></div>

<br style="clear: both"
/>

<br style="clear: both"
/>

</div>

<script type="text/javascript"
>

/*==========用户自定义方法==========*/

//城市数据

var
cityList;

//autocomplete选项

var
options = {

minChars: 1,

max: 500,

width: 250,

matchContains: true
,

formatItem: function
(row, i, max)

{

return
i + "/"
+ max + ": /""
+ row.CityNameEn + "/" ["
+ row.CityName + "]"
;

},

formatMatch: function
(row, i, max)

{

return
row.CityNameEn + " "
+ row.CityName;

},

formatResult: function
(row)

{

return
row.CityName;

}

};

//autocomplete初始化函数

function
initAutoComplete(data)

{

cityList = data;

$("#inputCityName"
).autocomplete(cityList, options);

$("#inputCityName"
).result(function
(event
, data, formatted)

{

$("#inputCityId"
).val(data.ElongCityId);

});

}

/*==========事件绑定==========*/

$(function
()

{

});

/*==========加载时执行的语句==========*/

$(function
()

{

//加载城市数据, 并在回调函数中用返回的数据初始化autocomplete

$.getJSON("cityinfo.htm"
, null
, initAutoComplete)

});

</
script
>

</
body
>

</
html
>
.csharpcode, .csharpcode pre
{
font-size: small;
color: black;
font-family: consolas, "Courier New", courier, monospace;
background-color: #ffffff;
/*white-space: pre;*/
}
.csharpcode pre { margin: 0em; }
.csharpcode .rem { color: #008000; }
.csharpcode .kwrd { color: #0000ff; }
.csharpcode .str { color: #006080; }
.csharpcode .op { color: #0000c0; }
.csharpcode .preproc { color: #cc6633; }
.csharpcode .asp { background-color: #ffff00; }
.csharpcode .html { color: #800000; }
.csharpcode .attr { color: #ff0000; }
.csharpcode .alt
{
background-color: #f4f4f4;
width: 100%;
margin: 0em;
}
.csharpcode .lnum { color: #606060; }
2. 实例讲解
(1)准备数据源
首先要准备实现自动建议的数据源. 本实例是通过发送Ajax请求获取JSON对象. autocomplete()方法支持两个参数,第一个是data, 第二个是options.
其中data参数可以使本实例中的一个数据变量, 也可以是一个url. 如果是url则会每次都调用Ajax请求获取数据.
为了效率我倾向于在数据量允许的情况下, 在页面加载后使用Ajax获取全部的数据, 然后使用传递数据变量给autocomplete组件.
如实例中所示. 除非数据特别巨大无法再客户端加载, 则只能每次都使用发送Ajax请求从服务器端获取部分数据. 但是这会对服务器造成负担.
(2) 设置关键函数
虽然options是可选项, 但是对于我们的数据源cityList是一个多属性对象, 所以必须设置下面几个关键的配置项后才能够使用:formatItem
对匹配的每一行数据使用此函数格式化, 返回值是显示给用户的数据内容.函数签名:
function(row, rowNum, rowCount, searchItem)
参数说明:
row: 当前行. the results row,
rowNum: 当前行号,从1开始.(注意不是索引,索引从0开始) the position of the row in the list
of results (starting at 1),
rowCount: 总的行号 the number of items in the list of results
searchItem: 查询使用的数据, 即formatMatch函数返回的数据格式的内容.
我们在formatMatch函数中会设置程序内部搜索时使用的数据格式,这个格式和给用户展示的数据是不同的.
formatMatch
对每一行数据使用此函数格式化需要查询的数据格式. 返回值是给内部搜索算法使用的.实例中用户看到的匹配结果是formatItem中设置的格式, 但是程序内部其实只搜索城市的英文和中文名称,
搜索数据在formatMatch中定义:
return
row.CityNameEn + " "
+ row.CityName;
函数签名:
function(row, rowNum, rowCount,)
参数说明同上
formatResult
此函数是用户选中后返回的数据格式. 比如实例中只返回城市名给input控件:return row.CityName;
.csharpcode, .csharpcode pre
{
font-size: small;
color: black;
font-family: consolas, "Courier New", courier, monospace;
background-color: #ffffff;
/*white-space: pre;*/
}
.csharpcode pre { margin: 0em; }
.csharpcode .rem { color: #008000; }
.csharpcode .kwrd { color: #0000ff; }
.csharpcode .str { color: #006080; }
.csharpcode .op { color: #0000c0; }
.csharpcode .preproc { color: #cc6633; }
.csharpcode .asp { background-color: #ffff00; }
.csharpcode .html { color: #800000; }
.csharpcode .attr { color: #ff0000; }
.csharpcode .alt
{
background-color: #f4f4f4;
width: 100%;
margin: 0em;
}
.csharpcode .lnum { color: #606060; }
函数签名:
function(row, rowNum, rowCount,)
参数说明同上
(3) 为控件添加Result事件函数
上面3个函数无法实现这类要求: 虽然只返回城市名称, 但是查询时使用城市ID, 选中一个城市后需要将城市ID存储在一个隐藏域中.所以autocomplete控件提供了result事件函数, 此事件会在用户选中某一项后触发:
$("#inputCityName"
).result(function
(event
, data, formatted)

{

$("#inputCityId"
).val(data.ElongCityId);

});
函数签名:
function
(event
,
data, formatted)
.csharpcode, .csharpcode pre
{
font-size: small;
color: black;
font-family: consolas, "Courier New", courier, monospace;
background-color: #ffffff;
/*white-space: pre;*/
}
.csharpcode pre { margin: 0em; }
.csharpcode .rem { color: #008000; }
.csharpcode .kwrd { color: #0000ff; }
.csharpcode .str { color: #006080; }
.csharpcode .op { color: #0000c0; }
.csharpcode .preproc { color: #cc6633; }
.csharpcode .asp { background-color: #ffff00; }
.csharpcode .html { color: #800000; }
.csharpcode .attr { color: #ff0000; }
.csharpcode .alt
{
background-color: #f4f4f4;
width: 100%;
margin: 0em;
}
.csharpcode .lnum { color: #606060; }
参数列表:
Result事件会为绑定的事件处理函数传递三个参数:
event: 事件对象. event.type为result.
data: 选中的数据行.
formatted: 虽然官方的解释应该是formatResult函数返回的值, 但是实验结果是formatMatch返回的值.
在本实例为: "Beijing 北京".
(4) 匹配中文
当前版本的autocomplete控件对中文搜索存在Bug, 原因是其搜索事件绑定在keydown事件上,当使用中文输入法输入"北"字时没有任何提示. 我对原库做了修改, 将keydown事件修改为keyup事件, 即可完成对中文的智能提示搜索.
另外主要需要将"matchContains"配置项设置为"true", 因为我们的搜索格式是"Beijing 北京", 默认只匹配开头的字符.
(5) 更多配置项
关于更多的配置项, 请参考官方文档:http://docs.jquery.com/Plugins/Autocomplete/autocomplete#toptions
(6) 更多事件
除了上面介绍的autocomplete()和result()函数, 还有如下函数:search(
)
:
激活search事件
flushCache(
)
:
清空缓存
setOptions(
options )
:
设置配置项
五.总结
本文详细介绍了表单验证插件和自动完成插件, 目前大家可以搜索到很多的插件应用, 或者上千的插件列表, 但是却找不到详细的使用文档.插件用起来简单但是真正的灵活应用却不容易, 除了要翻越英文文档学习基本的使用, 还要花很长时间了解各个参数的作用, 如何配合使用等.
并且在上面做二次开发的难度相对较大, 插件的核心代码多没有注释并且复杂, 要在其中寻找逻辑关系要花费很多时间和精力.
本文介绍的两个插件更多的细节请参考官方文档, 地址都在一开始为大家提供了.
后续文章我决定先进行jQuery技巧和javascript必备知识的讲解, 我们很少开发自定义插件所以将开发插件篇放在最后.
作者:张子秋
出处:http://www.cnblogs.com/zhangziqiu/
本文版权归作者和博客园共有,欢迎转载,但未经作者同意必须保留此段声明,且在文章页面明显位置给出原文连接,否则保留追究法律责任的权利。

相关文章推荐
- 从零开始学习jQuery (十一) 实战表单验证与自动完成提示插件
- 从零开始学习jQuery (十一) 实战表单验证与自动完成提示插件
- 从零开始学习jQuery (十一) 实战表单验证与自动完成提示插件
- 从零开始学习jQuery (十一) 实战表单验证与自动完成提示插件
- 从零开始学习jQuery (十一) 实战表单验证与自动完成提示插件
- 从零开始学习jQuery (十一) 实战表单验证与自动完成提示插件
- 从零开始学习jQuery (十一) 实战表单验证与自动完成提示插件
- [乐意黎转载]从零开始学习jQuery (十一) 实战表单验证与自动完成提示插件
- 从零开始学习jQuery (十一) 实战表单验证与自动完成提示插件(2010-5-7)
- 从零开始学习jQuery (十一) 实战表单验证与自动完成提示插件
- 从零开始学习jQuery (十一) 实战表单验证与自动完成提示插件
- 从零开始学习jQuery (十一) 实战表单验证与自动完成提示插件
- 从零开始学习jQuery (十一) 实战表单验证与自动完成提示插件
- 从零开始学习jQuery (十一) 实战表单验证与自动完成提示插件 【转】
- 从零开始学习jQuery (十一) 实战表单验证与自动完成提示插件
- 从零开始学习jQuery (十一) 实战表单验证与自动完成提示插件
- jQuery框架学习第十一天:实战jQuery表单验证及jQuery自动完成提示插件
- Jquery(十一)实战表单验证与自动完成提示插件
- jQuery 教程 (十一) 实战表单验证与自动完成提示插件 .NET
- jQuery框架学习第十一天:实战jQuery表单验证及jQuery自动完成提示插件