自定义 Android 对话框 (AlertDialog) 的样式
2014-01-07 21:05
483 查看
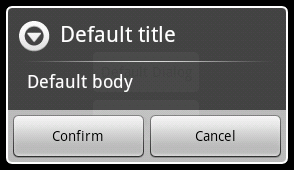
Android 提供了 AlertDialog 类可通过其内部类 Builder 轻松创建对话框窗口,但是没法对这个对话框窗口进行定制,为了修改
AlertDialog 窗口显示的外观,解决的办法就是创建一个指定的 AlertDialog 和 AlertDialog.Builder 类。
我们希望将上面默认的对话框外观修改为如下图所示的新对话框风格:
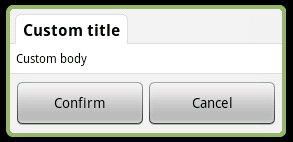
该对话框将支持下面特性:
可从资源或者字符串直接指定对话框标题
可从资源、字符串和自定义布局来设置对话框内容
可设置按钮和相应的事件处理
该对话框使用一个定制的布局来输出内容,布局定义的id将用于访问标题 TextView,下面是定义文件:
根节点 LinearLayout 的宽度设置为 fill_parent 而最小的宽度是 280dip ,因此对话框的宽度将始终为屏幕宽度的 87.5%
自定义的主题用于声明对话框是浮动的,而且使用自定义的背景和标题视图:
接下来我们需要定义对话框的标题和消息的显示:
最好我们要提供跟 AletDialog.Builder 类一样的方法:
使用方法很简单:
完整的代码下载: SampleCustomDialog
Enjoy !
http://blog.androgames.net/10/custom-android-dialog/
AlertDialog 窗口显示的外观,解决的办法就是创建一个指定的 AlertDialog 和 AlertDialog.Builder 类。
定义外观
我们希望将上面默认的对话框外观修改为如下图所示的新对话框风格:该对话框将支持下面特性:
可从资源或者字符串直接指定对话框标题
可从资源、字符串和自定义布局来设置对话框内容
可设置按钮和相应的事件处理
编写布局、样式和主题
该对话框使用一个定制的布局来输出内容,布局定义的id将用于访问标题 TextView,下面是定义文件:<?xml version="1.0" encoding="utf-8"?> <LinearLayout xmlns:android="http://schemas.android.com/apk/res/android" android:orientation="vertical" android:layout_width="fill_parent" android:minWidth="280dip" android:layout_height="wrap_content"> <LinearLayout android:orientation="vertical" android:background="@drawable/header" android:layout_width="fill_parent" android:layout_height="wrap_content"> <TextView style="@style/DialogText.Title" android:id="@+id/title" android:paddingRight="8dip" android:paddingLeft="8dip" android:background="@drawable/title" android:layout_width="wrap_content" android:layout_height="wrap_content"/> </LinearLayout> <LinearLayout android:id="@+id/content" android:orientation="vertical" android:background="@drawable/center" android:layout_width="fill_parent" android:layout_height="wrap_content"> <TextView style="@style/DialogText" android:id="@+id/message" android:padding="5dip" android:layout_width="fill_parent" android:layout_height="wrap_content"/> </LinearLayout> <LinearLayout android:orientation="horizontal" android:background="@drawable/footer" android:layout_width="fill_parent" android:layout_height="wrap_content"> <Button android:id="@+id/positiveButton" android:layout_marginTop="3dip" android:layout_width="0dip" android:layout_weight="1" android:layout_height="wrap_content" android:singleLine="true"/> <Button android:id="@+id/negativeButton" android:layout_marginTop="3dip" android:layout_width="0dip" android:layout_weight="1" android:layout_height="wrap_content" android:singleLine="true"/> </LinearLayout> </LinearLayout>
根节点 LinearLayout 的宽度设置为 fill_parent 而最小的宽度是 280dip ,因此对话框的宽度将始终为屏幕宽度的 87.5%
自定义的主题用于声明对话框是浮动的,而且使用自定义的背景和标题视图:
<?xml version="1.0" encoding="utf-8"?>
<resources>

<style name="Dialog" parent="android:style/Theme.Dialog">
<item name="android:windowBackground">@null</item>
<item name="android:windowNoTitle">true</item>
<item name="android:windowIsFloating">true</item>
</style>

</resources>
接下来我们需要定义对话框的标题和消息的显示:
<?xml version="1.0" encoding="utf-8"?>
<resources>

<style name="DialogText">
<item name="android:textColor">#FF000000</item>
<item name="android:textSize">12sp</item>
</style>

<style name="DialogText.Title">
<item name="android:textSize">16sp</item>
<item name="android:textStyle">bold</item>
</style>

</resources>
编写对话框和 Builder 类
最好我们要提供跟 AletDialog.Builder 类一样的方法:package net.androgames.blog.sample.customdialog.dialog; import net.androgames.blog.sample.customdialog.R; import android.app.Dialog; import android.content.Context; import android.content.DialogInterface; import android.view.LayoutInflater; import android.view.View; import android.view.ViewGroup.LayoutParams; import android.widget.Button; import android.widget.LinearLayout; import android.widget.TextView; /** * * Create custom Dialog windows for your application * Custom dialogs rely on custom layouts wich allow you to * create and use your own look & feel. * * Under GPL v3 : http://www.gnu.org/licenses/gpl-3.0.html * * <a href="http://my.oschina.net/arthor" target="_blank" rel="nofollow">@author</a> antoine vianey * */ public class CustomDialog extends Dialog { public CustomDialog(Context context, int theme) { super(context, theme); } public CustomDialog(Context context) { super(context); } /** * Helper class for creating a custom dialog */ public static class Builder { private Context context; private String title; private String message; private String positiveButtonText; private String negativeButtonText; private View contentView; private DialogInterface.OnClickListener positiveButtonClickListener, negativeButtonClickListener; public Builder(Context context) { this.context = context; } /** * Set the Dialog message from String * @param title * @return */ public Builder setMessage(String message) { this.message = message; return this; } /** * Set the Dialog message from resource * @param title * @return */ public Builder setMessage(int message) { this.message = (String) context.getText(message); return this; } /** * Set the Dialog title from resource * @param title * @return */ public Builder setTitle(int title) { this.title = (String) context.getText(title); return this; } /** * Set the Dialog title from String * @param title * @return */ public Builder setTitle(String title) { this.title = title; return this; } /** * Set a custom content view for the Dialog. * If a message is set, the contentView is not * added to the Dialog... * @param v * @return */ public Builder setContentView(View v) { this.contentView = v; return this; } /** * Set the positive button resource and it's listener * @param positiveButtonText * @param listener * @return */ public Builder setPositiveButton(int positiveButtonText, DialogInterface.OnClickListener listener) { this.positiveButtonText = (String) context .getText(positiveButtonText); this.positiveButtonClickListener = listener; return this; } /** * Set the positive button text and it's listener * @param positiveButtonText * @param listener * @return */ public Builder setPositiveButton(String positiveButtonText, DialogInterface.OnClickListener listener) { this.positiveButtonText = positiveButtonText; this.positiveButtonClickListener = listener; return this; } /** * Set the negative button resource and it's listener * @param negativeButtonText * @param listener * @return */ public Builder setNegativeButton(int negativeButtonText, DialogInterface.OnClickListener listener) { this.negativeButtonText = (String) context .getText(negativeButtonText); this.negativeButtonClickListener = listener; return this; } /** * Set the negative button text and it's listener * @param negativeButtonText * @param listener * @return */ public Builder setNegativeButton(String negativeButtonText, DialogInterface.OnClickListener listener) { this.negativeButtonText = negativeButtonText; this.negativeButtonClickListener = listener; return this; } /** * Create the custom dialog */ public CustomDialog create() { LayoutInflater inflater = (LayoutInflater) context .getSystemService(Context.LAYOUT_INFLATER_SERVICE); // instantiate the dialog with the custom Theme final CustomDialog dialog = new CustomDialog(context, R.style.Dialog); View layout = inflater.inflate(R.layout.dialog, null); dialog.addContentView(layout, new LayoutParams( LayoutParams.FILL_PARENT, LayoutParams.WRAP_CONTENT)); // set the dialog title ((TextView) layout.findViewById(R.id.title)).setText(title); // set the confirm button if (positiveButtonText != null) { ((Button) layout.findViewById(R.id.positiveButton)) .setText(positiveButtonText); if (positiveButtonClickListener != null) { ((Button) layout.findViewById(R.id.positiveButton)) .setOnClickListener(new View.OnClickListener() { public void onClick(View v) { positiveButtonClickListener.onClick( dialog, DialogInterface.BUTTON_POSITIVE); } }); } } else { // if no confirm button just set the visibility to GONE layout.findViewById(R.id.positiveButton).setVisibility( View.GONE); } // set the cancel button if (negativeButtonText != null) { ((Button) layout.findViewById(R.id.negativeButton)) .setText(negativeButtonText); if (negativeButtonClickListener != null) { ((Button) layout.findViewById(R.id.negativeButton)) .setOnClickListener(new View.OnClickListener() { public void onClick(View v) { positiveButtonClickListener.onClick( dialog, DialogInterface.BUTTON_NEGATIVE); } }); } } else { // if no confirm button just set the visibility to GONE layout.findViewById(R.id.negativeButton).setVisibility( View.GONE); } // set the content message if (message != null) { ((TextView) layout.findViewById( R.id.message)).setText(message); } else if (contentView != null) { // if no message set // add the contentView to the dialog body ((LinearLayout) layout.findViewById(R.id.content)) .removeAllViews(); ((LinearLayout) layout.findViewById(R.id.content)) .addView(contentView, new LayoutParams( LayoutParams.WRAP_CONTENT, LayoutParams.WRAP_CONTENT)); } dialog.setContentView(layout); return dialog; } } }
使用自定义的 Builder
使用方法很简单:/**
* Build the desired Dialog
* CUSTOM or DEFAULT
*/
@Override
public Dialog onCreateDialog(int dialogId) {
Dialog dialog = null;
switch (dialogId) {
case CUSTOM_DIALOG :
CustomDialog.Builder customBuilder = new
CustomDialog.Builder(CustomDialogActivity.this);
customBuilder.setTitle("Custom title")
.setMessage("Custom body")
.setNegativeButton("Cancel",
new DialogInterface.OnClickListener() {
public void onClick(DialogInterface dialog, int which) {
CustomDialogActivity.this
.dismissDialog(CUSTOM_DIALOG);
}
})
.setPositiveButton("Confirm",
new DialogInterface.OnClickListener() {
public void onClick(DialogInterface dialog, int which) {
dialog.dismiss();
}
});
dialog = customBuilder.create();
break;
case DEFAULT_DIALOG :
AlertDialog.Builder alertBuilder = new
AlertDialog.Builder(CustomDialogActivity.this);
alertBuilder.setTitle("Default title")
.setMessage("Default body")
.setNegativeButton("Cancel",
new DialogInterface.OnClickListener() {
public void onClick(DialogInterface dialog, int which) {
dialog.dismiss();
}
})
.setPositiveButton("Confirm",
new DialogInterface.OnClickListener() {
public void onClick(DialogInterface dialog, int which) {
CustomDialogActivity.this
.dismissDialog(DEFAULT_DIALOG);
}
});
dialog = alertBuilder.create();
break;
}
return dialog;
}完整的代码下载: SampleCustomDialog
Enjoy !
http://blog.androgames.net/10/custom-android-dialog/

相关文章推荐
- 自定义 Android 对话框 (AlertDialog) 的样式
- 自定义 Android 对话框 (AlertDialog) 的样式
- 自定义 Android 对话框 (AlertDialog) 的样式
- 自定义 Android 对话框 (AlertDialog) 的样式
- 自定义 Android 对话框 (AlertDialog) 的样式
- 自定义 Android 对话框 (AlertDialog) 的样式
- 自定义 Android 对话框 (AlertDialog) 的样式
- 自定义 Android 对话框 (AlertDialog) 的样式
- 自定义 Android 对话框 (AlertDialog) 的样式
- 自定义 Android 对话框 (AlertDialog) 的样式
- Android 自定义AlertDialog对话框样式
- 自定义 Android 对话框 (AlertDialog) 的样式(转载)
- Android自定义样式的对话框
- Android中AlertDialog以及自定义对话框的使用
- Android自定义AlertDialog对话框并回传Activity参数
- Android自定义样式的对话框
- Android自定义样式的对话框
- Android--自定义对话框--AlertDialog
- Android常用的AlertDialog对话框及自定义对话框
- Android 自定义对话框样式