Windows下Tomcat+nginx配置证书实现登录页https访问
2014-01-06 23:34
1056 查看
最近公司出于安全考虑,需要将登录页做成https访问,其他页面仍采用http访问,环境是Linux平台,web服务器采用Tomcat + Nginx。之前没接触过nginx,这两天网上查资料,试了好多,终于有点小成果,特此做一下记录。目前还存在一些问题,希望各位多多指教。下面说一下我的具体做法:
1.将nginx解压到C盘根目录,重命名文件夹为Nginx(版本:1.3.5)。
2.生成自签名证书(采用OpenSSL生成),生成工具下载:绿色版OpenSSL工具.rar、自签名测试证书工具.rar。
3.将生成的证书文件server.cer和server.key分别都拷贝到Tomcat和Nginx的conf目录下,双击生成的root.cer根证书,然后安装证书,将其安装到受信任的根证书颁发机构(如不安装,访问时浏览器会提示证书错误)。
4.配置Tomcat的server.xml文件和web工程的web.xml文件:
https配置:
虚拟目录配置:
web.xml文件中加入如下配置:
5.配置Nginx的nginx.conf文件:
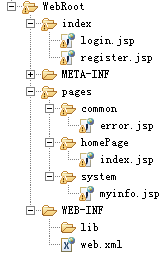
6.web工程的截图:
LoginServlet的代码:
目前存在的问题(希望各位多多指教):
1.在本机访问https正常,其他机器访问浏览器提示证书错误。
2.location规则的配置,由于本人水平有限,对location规则的配置不是很了解,所以location目前不太会配置(配置要求:index目录下的页面采用https访问,其他页面全部采用http访问)。
参考资料:
证书生成与配置:http://www.ert7.com/install/sslinstall/1244.html
1.将nginx解压到C盘根目录,重命名文件夹为Nginx(版本:1.3.5)。
2.生成自签名证书(采用OpenSSL生成),生成工具下载:绿色版OpenSSL工具.rar、自签名测试证书工具.rar。
3.将生成的证书文件server.cer和server.key分别都拷贝到Tomcat和Nginx的conf目录下,双击生成的root.cer根证书,然后安装证书,将其安装到受信任的根证书颁发机构(如不安装,访问时浏览器会提示证书错误)。
4.配置Tomcat的server.xml文件和web工程的web.xml文件:
https配置:
1 | < Connector port = "8443" protocol = "org.apache.coyote.http11.Http11AprProtocol" |
2 | SSLEnabled = "true" maxThreads = "150" |
3 | scheme = "https" secure = "true" disableUploadTimeout = "true" |
4 | enableLookups = "false" acceptCount = "100" clientAuth = "false" |
5 | SSLCertificateFile = "C:/Program Files/Tomcat 6.0/conf/server.cer" |
6 | SSLCertificateKeyFile = "C:/Program Files/Tomcat 6.0/conf/server.key" |
7 | SSLVerifyClient = "none" sslProtocol = "TLS" /> |
1 | < Host name = "localhost" appBase = "C:\nginx\html" |
2 | unpackWARs = "true" autoDeploy = "true" |
3 | xmlValidation = "false" xmlNamespaceAware = "false" > |
01 | <!-- 登录页采用https访问 --> |
02 | < security-constraint > |
03 | < web-resource-collection > |
04 | < web-resource-name >SSL</ web-resource-name > |
05 | < url-pattern >/index/*</ url-pattern > |
06 | </ web-resource-collection > |
07 | < user-data-constraint > |
08 | < transport-guarantee >CONFIDENTIAL</ transport-guarantee > |
09 | </ user-data-constraint > |
10 | </ security-constraint > |
01 | server { |
02 | listen 80; |
03 | server_name localhost; #域名,可以多个 |
04 |
05 | #charset koi8-r; |
06 |
07 | #access_log logs/host.access.log main; |
08 |
09 | #配置规则 |
10 | location / { |
11 | if (!-f $request_filename){ |
12 | rewrite ^/pages/common/(.*)$ /error.jsp; |
13 | } |
14 | root yddweb; |
15 | #index index.jsp; |
16 | proxy_pass http://localhost:8080;[/code] |
17 | proxy_set_header Host $host:80; |
18 | proxy_set_header X-Real-IP $remote_addr; |
19 | proxy_set_header X-Forwarded-For $proxy_add_x_forwarded_for; |
20 | proxy_set_header Via "nginx" ; |
21 | } |
22 |
23 | location ^~ /pages/$ { |
24 | root yddweb; |
25 | #index index.jsp; |
26 | proxy_pass http://localhost:8080;[/code] |
27 | proxy_set_header Host $host:80; |
28 | proxy_set_header X-Real-IP $remote_addr; |
29 | proxy_set_header X-Forwarded-For $proxy_add_x_forwarded_for; |
30 | proxy_set_header Via "nginx" ; |
31 | } |
32 |
33 | #location ~ \.(gif|jpg|png|js|css)$ { |
34 | #规则 |
35 | #} |
36 | } |
37 |
38 | # HTTPS server |
39 | # |
40 | server { |
41 | listen 443; |
42 | server_name localhost:443; |
43 |
44 | ssl on; |
45 | ssl_certificate server.cer; # |
46 | ssl_certificate_key server.key; |
47 |
48 | ssl_session_timeout 5m; |
49 |
50 | #ssl_protocols SSLv2 SSLv3 TLSv1; |
51 | #ssl_ciphers HIGH:!aNULL:!MD5; |
52 | #ssl_prefer_server_ciphers on; |
53 |
54 | #配置规则 |
55 | location ^~ /index/.jsp$ { |
56 | root yddweb; |
57 | index login.jsp; |
58 | proxy_pass https://localhost:8443;[/code] |
59 | proxy_set_header Host $host:443; |
60 | proxy_set_header X-Real-IP $remote_addr; |
61 | proxy_set_header X-Forwarded-For $proxy_add_x_forwarded_for; |
62 | proxy_set_header Via "nginx" ; |
63 | } |
64 | location ~ ^/(WEB-INF)/ { |
65 | deny all; |
66 | } |
67 | } |
68 | } |
LoginServlet的代码:
1 | HttpSession session = request.getSession( true ); |
2 | String name = request.getParameter( "name" ).trim(); |
3 | session.setAttribute( "curuser" , name); |
4 | String url = "http://" +request.getServerName()+request.getContextPath()+ "/pages/system/myinfo.jsp" ;response.sendRedirect(url); |
1.在本机访问https正常,其他机器访问浏览器提示证书错误。
2.location规则的配置,由于本人水平有限,对location规则的配置不是很了解,所以location目前不太会配置(配置要求:index目录下的页面采用https访问,其他页面全部采用http访问)。
参考资料:
证书生成与配置:http://www.ert7.com/install/sslinstall/1244.html

相关文章推荐
- Windows下Tomcat+nginx配置证书实现登录页https访问
- Windows下Nginx配置SSL实现Https访问(包含证书生成) Windows下Nginx配置SSL实现Https访问(包含证书生成) 首先要说明为什么要实现https? HTT
- Windows下Nginx配置SSL实现Https访问(包含证书生成)
- Windows下Nginx配置SSL实现Https访问(包含证书生成) Windows下Nginx配置SSL实现Https访问(包含证书生成) 首先要说明为什么要实现https? HTTP
- Windows下Nginx配置SSL实现Https访问(包含证书生成)
- Windows下Nginx配置SSL实现Https访问(包含证书生成)
- windows下创建配置nginx,tomcat自签证书SSL,实现https
- Windows下Nginx配置SSL实现Https访问(包含证书生成)
- Windows下Nginx配置SSL实现Https访问(包含证书生成)
- Windows下Nginx配置SSL实现Https访问(包含证书生成)
- 阿里云申请的免费证书,配置到Tomcat,实现https访问
- certbot在Centos7上配置合法签名证书,实现nginx的https访问
- certbot在Centos7上配置合法签名证书,实现nginx的https访问
- certbot在Centos7上配置合法签名证书,实现nginx的https访问
- Nginx+tomcat 配置https访问
- 普元 EOS Platform 7.6 如何配置tomcat证书,使用https访问应用
- nginx系列-06-nginx配置https并转发请求至后端tomcat-商用https证书
- Nginx配置SSL实现Https访问
- HTTPS证书生成,Nginx + Tomcat 配置HTTPS
- Windows下Nginx配置SSL实现Https访问(包含证书生成)