表视图
2013-12-15 14:55
363 查看
在IOS中,一般情况下,我们都会以表的形式来展示数据。在表视图中,分节、分组和索引功能使我们展示的数据看起来更规整。
一、概述
1、表视图组成
在IOS中,表视图是最重要的视图。与表视图相关的一些概念如下:
(1)表头视图。表视图最上边的视图,用于展示表视图的信息,如表视图刷新信息等。
(2)表脚视图。表视图最下边的视图,用于展示表视图的信息,如表视图分页时显示“更多”等信息。
(3)单元格(cell)。单元格是组成表视图每一行的单位视图。
(4)节(section)。它由多个单元格组成,有节头和节脚。
2、表视图相关类
表视图继承自UIScrollView,UITableViewCell是单元格类,UITableViewController类是UITableView的控制器,UITableViewHeaderFooterView类用于节头和节脚提供视图(IOS6之后才有的新类)。下图是相关类的构成。

3、表视图分类
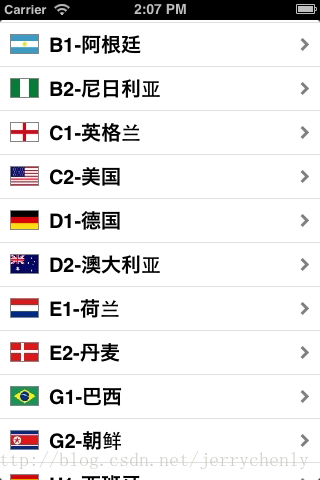
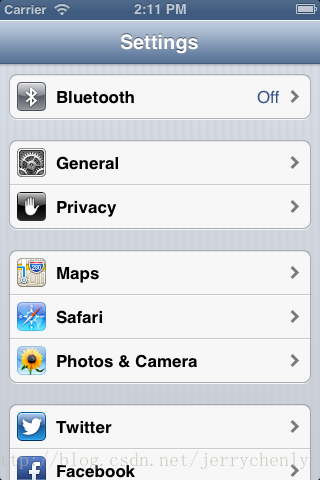
表视图主要分为普通视图(下左图)和分组视图(下右图)。
(1)普通视图。主要用于动态表,而动态表一般在单元格数目未知的情况下使用。
(2)分组视图。一般用于静态表,组将表分成很多部分(由一些类似的单元格组成)。静态表一般用于控件的界面布局,它是在IOS 5之后由storyboard提供的。
除此之外,在表视图中还可以带有索引、选择列和搜索栏等。
4、单元格的组成和样式
单元格由图标、标题和扩展视图等组成。
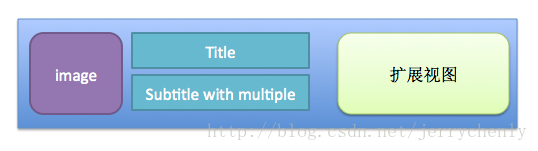
单元格可以有很多样式,也可以自定义。图标、标题和副标题可以有选择地设置,扩展视图可以有内置或者自定义,其中内置的扩展视图是在枚举UITableViewCellAccessoryType中定义的。UITableViewCellAccessoryType中定义的常量有:
(1)UITableViewCellAccessoryNone,没有扩展视图。
(2)UITableViewCellAccessoryDisclosureIndicator,扩展指示器。触摸该图标将切换到下一级表视图。
(3)UITableViewCellAccessoryDetailDisclosureButton,细节展示按钮。触摸该单元格的适合,表视图会以视图的方式显示当前单元格的更多详细信息。
(4)UITableViewCellAccessoryCheckmark,选中标志。表示该行被选中。
在实际的开发过程中,我们首先考虑apple提供的一些固有单元格样式。IOS API提供的单元格样式是在枚举UITableViewCellStyle中定义的。UITableViewCellStyle中定义的常量有:
(1)UITableViewCellStyleDefault。默认样式,只有图标和主表土。
(2)UITableViewCellStyleSubtitle。带有副标题的样式,有图标、主标题和副标题。
(3)UITableViewCellStyleValue1。无图标带副标题样式1,有主标题和子标题。
(4)UITableViewCellStyleValue2。无图标带副标题样式2,有主标题和子标题。
如果以上单元格样式都不满足需求,我们可以考虑自定义。
二、简单实现
这里我们实现一个简单的表视图,其中单元格采用默认样式,有图标和主标题。
有两个地方需要注意:
1、Scene列表中选择TableView,打开表视图的属性检查器。可以看到Content下有两个选项(Dynamic Prototypes和Static Cells),这两个选项只有在storyboard中才有。Dynamic Prototype用于构建“动态表”,而Static Cells用于构建“静态表”。
2、如果通过代码实现单元格的创建,则TableView的属性检查器中的Prototype Cells项要设为0;如果用视图文件创建单元格,则这里设为1。
这里我们在代码中创建单元格,具体代码如下:
如果利用storyboard中创建单元格,打开Table View Cell的属性检查器。Style选项中有很多可用属性,这些都与表视图描述的单元格的样式一致,Identifier是指可重用单元格的标识符。这样做之后,我们就不需要在代码中实例化单元格了。我们可以直接通过Identifier取得单元格的实例。下面是获取单元格的代码:
三、带搜索栏
IOS提供了搜索栏控件,方便我们查询数据。这里我们在上面代码的基础上再实现搜索功能。
1、IOS的搜索栏有很多样式:
(1)基本搜索栏。
(2)带清除按钮的搜索栏。
(3)带查询结果按钮的搜索栏。

显示最近搜索结果,事件响应由UISearchBarDelegate对象中的searchBarResultsListButtonClicked:方法管理。
(4)带书签按钮的搜索栏。

显示用户收藏的书签列表,事件响应由UISearchBarDelegate对象中的searchBarBookmarkButtonClicked:方法管理。
(5)带取消按钮的搜索栏。

事件响应由UISearchBarDelegate对象中的searchBarCancelButtonClicked:方法管理。
(6)带Scope的搜索栏。
事件响应由UISearchBarDelegate或UISearchDisplayDelegate对象管理。
这里有一点需要注意,默认情况下,Scope Bar初始是显示的。这在iphone上用户体验比较差,我们需要让它初始隐藏,当SearchBar获取 焦点时再显示。为此,我们需要在初始化时调用SearchBar的两个方法:
[searchBar setShowsScopeBar:NO];
[searchBar sizeToFit];
2、相对来说SearchBar是一个比较复杂的控件,它涉及到一些其它类:
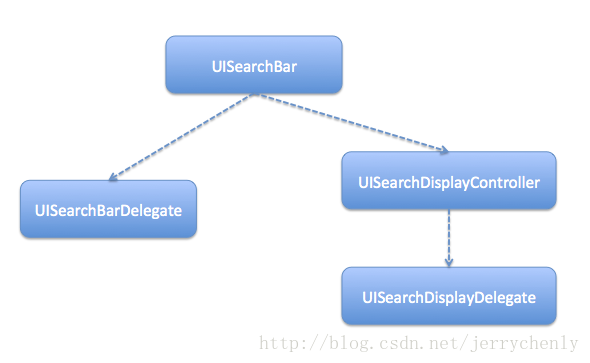
UISearchBarDelegate是UISearchBar的委托协议;UISearchDisplayController用于管理SearchBar并显示搜索结果视图,其事件处理由UISearchDisplayDelegate协议的委托对象来管理。
3、我们用storyboard来设计我们的视图,这里有个小技巧:
我们从对象库中拖拽的是Search Bar and Search Display Controller到界面,而不是Search Bar控件。前者的好处在于它可以把UISearchDisplayController也添加到搜索栏,并且将委托和数据源连线完毕。
下面是我们的实现:
在搜索栏中输入查询条件,会触发UISearchBarDelegate委托对象的searchBar:textDidChange:方法和UISearchDisplayDelegate委托对象的searchDisplayController:shouldReloadTableForSearchString:方法,我们只要实现这两者之一即可。这里我们选择实现后者,因为后者的优势在于可以控制表视图数据源是否重新加载。如果实现searchBar:textDidChange:方法,则我们还需要自己调用[tableView
reloadData]方法重新加载表视图数据。
ScopeBar进行切换时,会触发UISearchBarDelegate委托对象的searchBar:selectedScopeButtonIndexDidChange:方法和UISearchDisplayDelegate委托对象的searchDisplayController:shouldReloadTableForSearchScope:方法,我们也只要实现两者之一即可。这里我们同样选择实现后者,因为后者能控制表视图数据源是否重新加载。
四、分节和索引
当表中的数据需要归类时,我们会用到节;当表中数据量比较大时,我们还可以建立索引。下面是一个简单的实现。
1、数据组织
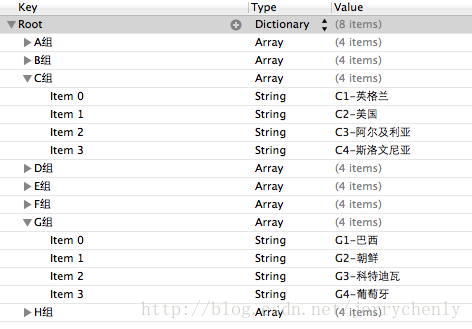
这里我们在Dictionary中存放Array,每个Array为一个节。
具体实现:
五、编辑表视图
TableView的编辑包括:insert、delete和move。
setEditing:animated:方法是UIViewController生命周期方法,用于响应视图编辑状态的变化。在我们这里,当点击NavigationItem上的Edit(这个编辑按钮是视图控制器中预定义的按钮,点击后按钮会转换到Done)时便会触发setEditing:animated:方法。在这个方法里,我们触发TableView的编辑方法。
tableView:commitEditingStyle:forRowAtIndexPath:方法是TableView的编辑提交方法,我们编辑完成后,点击NavigationItem上的Done便会触发该方法。
在处理键盘遮挡输入框时,有一点需要注意,

这里textField的父亲的父亲才是UITableViewCell。textField的父亲是单元格内容视图,并不是UITableViewCell。
tableView:canMoveRowAtIndexPath:控制cell是否可移动,我们这里除了最后一条(最后一条是添加item选项),都能移动。cell移动时,我们需要在tableView:moveRowAtIndexPath:toIndexPath:方法中做相应的处理。
下面是运行截图:

六、自定义UITableViewCell
iOS提供了几种cell的样式,实际应用中经常需要根据需求自定义cell。自定义的方式有多种,这里介绍两种方式。第一种,新建一个cell类(不带xib),并继承UITableViewCell,然后在类中用代码添加view,这种方式会稍微麻烦一点。第二种,新建一个cell类,附带xib(xib中的根view不是UIView,而是TableViewCell),指定cell的复用id,类继承UITableViewCell,然后在xib中添加view。
上面提到两种自定义TableViewCell的方式,接下来还有一个复用的问题。第一种方式自定义的TableViewCell在使用的时候与使用系统的cell一样,先调用tableview的dequeueReusableCellWithIdentifier方法获取复用,如果为nil,直接调用alloc创建并初始化一个复用id;第二种方式自定义的TableViewCell在使用的时候稍微有点不一样,首先在viewDidLoad方法中注册Nib:
注册之后,在
一、概述
1、表视图组成
在IOS中,表视图是最重要的视图。与表视图相关的一些概念如下:
(1)表头视图。表视图最上边的视图,用于展示表视图的信息,如表视图刷新信息等。
(2)表脚视图。表视图最下边的视图,用于展示表视图的信息,如表视图分页时显示“更多”等信息。
(3)单元格(cell)。单元格是组成表视图每一行的单位视图。
(4)节(section)。它由多个单元格组成,有节头和节脚。
2、表视图相关类
表视图继承自UIScrollView,UITableViewCell是单元格类,UITableViewController类是UITableView的控制器,UITableViewHeaderFooterView类用于节头和节脚提供视图(IOS6之后才有的新类)。下图是相关类的构成。
3、表视图分类
表视图主要分为普通视图(下左图)和分组视图(下右图)。
(1)普通视图。主要用于动态表,而动态表一般在单元格数目未知的情况下使用。
(2)分组视图。一般用于静态表,组将表分成很多部分(由一些类似的单元格组成)。静态表一般用于控件的界面布局,它是在IOS 5之后由storyboard提供的。
除此之外,在表视图中还可以带有索引、选择列和搜索栏等。
4、单元格的组成和样式
单元格由图标、标题和扩展视图等组成。
单元格可以有很多样式,也可以自定义。图标、标题和副标题可以有选择地设置,扩展视图可以有内置或者自定义,其中内置的扩展视图是在枚举UITableViewCellAccessoryType中定义的。UITableViewCellAccessoryType中定义的常量有:
(1)UITableViewCellAccessoryNone,没有扩展视图。
(2)UITableViewCellAccessoryDisclosureIndicator,扩展指示器。触摸该图标将切换到下一级表视图。
(3)UITableViewCellAccessoryDetailDisclosureButton,细节展示按钮。触摸该单元格的适合,表视图会以视图的方式显示当前单元格的更多详细信息。
(4)UITableViewCellAccessoryCheckmark,选中标志。表示该行被选中。
在实际的开发过程中,我们首先考虑apple提供的一些固有单元格样式。IOS API提供的单元格样式是在枚举UITableViewCellStyle中定义的。UITableViewCellStyle中定义的常量有:
(1)UITableViewCellStyleDefault。默认样式,只有图标和主表土。
(2)UITableViewCellStyleSubtitle。带有副标题的样式,有图标、主标题和副标题。
(3)UITableViewCellStyleValue1。无图标带副标题样式1,有主标题和子标题。
(4)UITableViewCellStyleValue2。无图标带副标题样式2,有主标题和子标题。
如果以上单元格样式都不满足需求,我们可以考虑自定义。
二、简单实现
这里我们实现一个简单的表视图,其中单元格采用默认样式,有图标和主标题。
有两个地方需要注意:
1、Scene列表中选择TableView,打开表视图的属性检查器。可以看到Content下有两个选项(Dynamic Prototypes和Static Cells),这两个选项只有在storyboard中才有。Dynamic Prototype用于构建“动态表”,而Static Cells用于构建“静态表”。
2、如果通过代码实现单元格的创建,则TableView的属性检查器中的Prototype Cells项要设为0;如果用视图文件创建单元格,则这里设为1。
这里我们在代码中创建单元格,具体代码如下:
//  ViewController.h

#import <UIKit/UIKit.h>

@interface ViewController : UITableViewController

@property (strong,nonatomic) NSArray *data;
@end
//  ViewController.m

#import "ViewController.h"

@interface ViewController ()

@end

@implementation ViewController

- (void)viewDidLoad
{
[super viewDidLoad];

NSString *path=[[NSBundle mainBundle] pathForResource:@"team" ofType:@"plist"];
self.data=[NSArray arrayWithContentsOfFile:path];
}

-(NSInteger)tableView:(UITableView *)tableView numberOfRowsInSection:(NSInteger)section
{
return [self.data count];
}

-(UITableViewCell *)tableView:(UITableView *)tableView cellForRowAtIndexPath:(NSIndexPath *)indexPath
{
static NSString *cellIdentifier=@"Cell";
UITableViewCell *tableViewCell=[tableView dequeueReusableCellWithIdentifier:cellIdentifier];
if(!tableViewCell){
tableViewCell=[[UITableViewCell alloc] initWithStyle:UITableViewCellStyleDefault reuseIdentifier:cellIdentifier];
}

//根据indexPath获取相应的数据
NSUInteger row=[indexPath row];
NSDictionary  *dict=[self.data objectAtIndex:row];

//设置cell的显示数据
tableViewCell.textLabel.text=[dict objectForKey:@"name"];
NSString *imgPath=[dict objectForKey:@"image"];
imgPath=[imgPath stringByAppendingString:@".png"];
UIImage *image=[UIImage imageNamed:imgPath];
tableViewCell.imageView.image=image;

//设置cell的扩展视图的样式
tableViewCell.accessoryType=UITableViewCellAccessoryDisclosureIndicator;

return tableViewCell;
}

@end
如果利用storyboard中创建单元格,打开Table View Cell的属性检查器。Style选项中有很多可用属性,这些都与表视图描述的单元格的样式一致,Identifier是指可重用单元格的标识符。这样做之后,我们就不需要在代码中实例化单元格了。我们可以直接通过Identifier取得单元格的实例。下面是获取单元格的代码:
static NSString *cellIdentifier=@"Cell";
UITableViewCell *tableViewCell=[tableView dequeueReusableCellWithIdentifier:cellIdentifier];
//    if(!tableViewCell){
//        tableViewCell=[[UITableViewCell alloc] initWithStyle:UITableViewCellStyleDefault reuseIdentifier:cellIdentifier];
//    }
三、带搜索栏
IOS提供了搜索栏控件,方便我们查询数据。这里我们在上面代码的基础上再实现搜索功能。
1、IOS的搜索栏有很多样式:
(1)基本搜索栏。
(2)带清除按钮的搜索栏。
(3)带查询结果按钮的搜索栏。
显示最近搜索结果,事件响应由UISearchBarDelegate对象中的searchBarResultsListButtonClicked:方法管理。
(4)带书签按钮的搜索栏。
显示用户收藏的书签列表,事件响应由UISearchBarDelegate对象中的searchBarBookmarkButtonClicked:方法管理。
(5)带取消按钮的搜索栏。
事件响应由UISearchBarDelegate对象中的searchBarCancelButtonClicked:方法管理。
(6)带Scope的搜索栏。
事件响应由UISearchBarDelegate或UISearchDisplayDelegate对象管理。
这里有一点需要注意,默认情况下,Scope Bar初始是显示的。这在iphone上用户体验比较差,我们需要让它初始隐藏,当SearchBar获取 焦点时再显示。为此,我们需要在初始化时调用SearchBar的两个方法:
[searchBar setShowsScopeBar:NO];
[searchBar sizeToFit];
2、相对来说SearchBar是一个比较复杂的控件,它涉及到一些其它类:
UISearchBarDelegate是UISearchBar的委托协议;UISearchDisplayController用于管理SearchBar并显示搜索结果视图,其事件处理由UISearchDisplayDelegate协议的委托对象来管理。
3、我们用storyboard来设计我们的视图,这里有个小技巧:
我们从对象库中拖拽的是Search Bar and Search Display Controller到界面,而不是Search Bar控件。前者的好处在于它可以把UISearchDisplayController也添加到搜索栏,并且将委托和数据源连线完毕。
下面是我们的实现:
//  ViewController.h

#import <UIKit/UIKit.h>

@interface ViewController : UITableViewController<UISearchBarDelegate,UISearchDisplayDelegate>
@property (strong,nonatomic) NSArray *data;
@property (strong,nonatomic) NSMutableArray *filterData;
@property (weak, nonatomic) IBOutlet UISearchBar *searchBar;

//根据text和选中的scope过滤数据
-(void)filterDataWithText:(NSString*)text scope:(NSUInteger) scopeIndex;
@end
//  ViewController.m

#import "ViewController.h"

@interface ViewController ()

@end

@implementation ViewController

- (void)viewDidLoad
{
[super viewDidLoad];
//设置搜索栏的ScopeBar初始隐藏
[self.searchBar setShowsScopeBar:NO];
[self.searchBar sizeToFit];

NSString *path=[[NSBundle mainBundle] pathForResource:@"team" ofType:@"plist"];
self.data=[NSArray arrayWithContentsOfFile:path];
//加载所有数据
[self filterDataWithText:@"" scope:-1];
}

-(void)filterDataWithText:(NSString *)text scope:(NSUInteger)scopeIndex
{
if([text length]==0){
self.filterData=[NSMutableArray arrayWithArray:self.data];
return;
}
NSPredicate *predicate;
switch (scopeIndex) {
case 0:
//按中文查询
predicate=[NSPredicate predicateWithFormat:@"SELF.name contains[c] %@",text];
self.filterData=[NSMutableArray arrayWithArray:[self.data filteredArrayUsingPredicate:predicate]];
break;
case 1:
//按英文查询
predicate=[NSPredicate predicateWithFormat:@"SELF.image contains[c] %@",text];
self.filterData=[NSMutableArray arrayWithArray:[self.data filteredArrayUsingPredicate:predicate]];
break;

default:
//默认查询所有
self.filterData=[NSMutableArray arrayWithArray:self.data];
break;
}
}

-(NSInteger)tableView:(UITableView *)tableView numberOfRowsInSection:(NSInteger)section
{
return [self.filterData count];
}

-(UITableViewCell *)tableView:(UITableView *)tableView cellForRowAtIndexPath:(NSIndexPath *)indexPath
{
static NSString *cellIdentifier=@"Cell";
UITableViewCell *tableViewCell=[tableView dequeueReusableCellWithIdentifier:cellIdentifier];
if(!tableViewCell){
tableViewCell=[[UITableViewCell alloc] initWithStyle:UITableViewCellStyleSubtitle reuseIdentifier:cellIdentifier];
}

//根据indexPath获取相应的数据
NSUInteger row=[indexPath row];
NSDictionary  *dict=[self.filterData objectAtIndex:row];

//设置cell的显示数据
tableViewCell.textLabel.text=[dict objectForKey:@"name"];
NSString *imgPath=[dict objectForKey:@"image"];
tableViewCell.detailTextLabel.text=imgPath;
imgPath=[imgPath stringByAppendingString:@".png"];
UIImage *image=[UIImage imageNamed:imgPath];
tableViewCell.imageView.image=image;

//设置cell的扩展视图的样式
tableViewCell.accessoryType=UITableViewCellAccessoryDisclosureIndicator;
return tableViewCell;
}

-(BOOL)searchDisplayController:(UISearchDisplayController *)controller shouldReloadTableForSearchString:(NSString *)searchString
{
[self filterDataWithText:searchString scope:self.searchBar.selectedScopeButtonIndex];
return YES;
}

-(BOOL)searchDisplayController:(UISearchDisplayController *)controller shouldReloadTableForSearchScope:(NSInteger)searchOption
{
[self filterDataWithText:self.searchBar.text scope:searchOption];
return YES;
}

-(void)searchBarCancelButtonClicked:(UISearchBar *)searchBar
{
[self filterDataWithText:@"" scope:-1];
}

@end
在搜索栏中输入查询条件,会触发UISearchBarDelegate委托对象的searchBar:textDidChange:方法和UISearchDisplayDelegate委托对象的searchDisplayController:shouldReloadTableForSearchString:方法,我们只要实现这两者之一即可。这里我们选择实现后者,因为后者的优势在于可以控制表视图数据源是否重新加载。如果实现searchBar:textDidChange:方法,则我们还需要自己调用[tableView
reloadData]方法重新加载表视图数据。
ScopeBar进行切换时,会触发UISearchBarDelegate委托对象的searchBar:selectedScopeButtonIndexDidChange:方法和UISearchDisplayDelegate委托对象的searchDisplayController:shouldReloadTableForSearchScope:方法,我们也只要实现两者之一即可。这里我们同样选择实现后者,因为后者能控制表视图数据源是否重新加载。
四、分节和索引
当表中的数据需要归类时,我们会用到节;当表中数据量比较大时,我们还可以建立索引。下面是一个简单的实现。
1、数据组织
这里我们在Dictionary中存放Array,每个Array为一个节。
具体实现:
//  ViewController.h

#import <UIKit/UIKit.h>

@interface ViewController : UITableViewController

@property (nonatomic,strong) NSDictionary *data;
@property (nonatomic,strong) NSArray *groupName;

@end
//  ViewController.m

#import "ViewController.h"

@interface ViewController ()

@end

@implementation ViewController

- (void)viewDidLoad
{
[super viewDidLoad];

//获取所有数据
self.data=[NSDictionary dictionaryWithContentsOfFile:[[NSBundle mainBundle] pathForResource:@"team_dictionary" ofType:@"plist"]];
//获取组名
NSArray *temp=[self.data allKeys];
//从哈希表中获取的数据是无序的,所以需要排序
self.groupName=[temp sortedArrayUsingSelector:@selector(compare:)];

}

//定义表中的节数
-(NSInteger)numberOfSectionsInTableView:(UITableView *)tableView
{
return [self.groupName count];
}

//定义节头显示字符串
-(NSString *)tableView:(UITableView *)tableView titleForHeaderInSection:(NSInteger)section
{
return [self.groupName objectAtIndex:section];
}

//定义节索引
-(NSArray *)sectionIndexTitlesForTableView:(UITableView *)tableView
{
NSMutableArray *sectionIndexArray=[[NSMutableArray alloc] initWithCapacity:[self.groupName count]];
for(NSString *temp in self.groupName){
NSString *indexTitle=[temp substringToIndex:1];
[sectionIndexArray addObject:indexTitle];
}
return sectionIndexArray;
}

//定义节中的行数
-(NSInteger)tableView:(UITableView *)tableView numberOfRowsInSection:(NSInteger)section
{
NSString *group=[self.groupName objectAtIndex:section];
NSArray *temp=[self.data objectForKey:group];
return [temp count];
}

//定义单元格
-(UITableViewCell *)tableView:(UITableView *)tableView cellForRowAtIndexPath:(NSIndexPath *)indexPath
{
static NSString *cellIdentifier=@"cell";
UITableViewCell *cell=[tableView dequeueReusableCellWithIdentifier:cellIdentifier];
if(!cell){
cell=[[UITableViewCell alloc] initWithStyle:UITableViewCellStyleSubtitle reuseIdentifier:cellIdentifier];
}

//获取节
NSUInteger section=[indexPath section];
NSUInteger row=[indexPath row];
//获取组名
NSString *group=[self.groupName objectAtIndex:section];
//获取组中的数据
NSArray *temp=[self.data objectForKey:group];

cell.textLabel.text=[temp objectAtIndex:row];

return cell;
}

@end
五、编辑表视图
TableView的编辑包括:insert、delete和move。
//  ViewController.m

#import "ViewController.h"

@interface ViewController ()

@end

@implementation ViewController

- (void)viewDidLoad
{
[super viewDidLoad];

self.tableView.delegate=self;
self.tableView.dataSource=self;
self.textField.delegate=self;
//设置NavigationItem的右按钮以及title
self.navigationItem.rightBarButtonItem=self.editButtonItem;
self.navigationItem.title=@"TableView Editing";
//初始隐藏TextField
self.textField.hidden=YES;

self.data=[[NSMutableArray alloc] initWithObjects:@"Houston",@"New York",@"Los Angeles",@"Boston",@"Miami",@"Washington", nil];
}

/*
Sets whether the view controller shows an editable view.
Subclasses that use an edit-done button must override this method to change their view to an editable state if editing is YES and a non-editable state if it is NO. This method should invoke super’s implementation before updating its view.
*/
-(void)setEditing:(BOOL)editing animated:(BOOL)animated
{
[super setEditing:editing animated:YES];

[self.tableView setEditing:editing animated:YES];
if(editing){
self.textField.hidden=NO;
}else{
self.textField.hidden=YES;
}
}

//Asks the delegate for the editing style of a row at a particular location in a table view.
-(UITableViewCellEditingStyle)tableView:(UITableView *)tableView editingStyleForRowAtIndexPath:(NSIndexPath *)indexPath
{
if(indexPath.row==[self.data count]){
return UITableViewCellEditingStyleInsert;
}else{
return UITableViewCellEditingStyleDelete;
}
}

//Asks the data source to commit the insertion or deletion of a specified row in the receiver.
-(void)tableView:(UITableView *)tableView commitEditingStyle:(UITableViewCellEditingStyle)editingStyle forRowAtIndexPath:(NSIndexPath *)indexPath
{
if(editingStyle==UITableViewCellEditingStyleDelete){//delete
[self.data removeObjectAtIndex:indexPath.row];
[tableView deleteRowsAtIndexPaths:[NSArray arrayWithObject:indexPath] withRowAnimation:UITableViewRowAnimationFade];
}else if(editingStyle==UITableViewCellEditingStyleInsert){//insert
[self.data insertObject:self.textField.text atIndex:[self.data count]];
[tableView insertRowsAtIndexPaths:[NSArray arrayWithObject:indexPath] withRowAnimation:UITableViewRowAnimationFade];
}
[tableView reloadData];
}

//Asks the data source whether a given row can be moved to another location in the table view.
-(BOOL)tableView:(UITableView *)tableView canMoveRowAtIndexPath:(NSIndexPath *)indexPath
{
if(indexPath.row==[self.data count]){
return NO;
}
return YES;
}

//Tells the data source to move a row at a specific location in the table view to another location.
-(void)tableView:(UITableView *)tableView moveRowAtIndexPath:(NSIndexPath *)sourceIndexPath toIndexPath:(NSIndexPath *)destinationIndexPath
{
NSString *str=[self.data objectAtIndex:sourceIndexPath.row];
[self.data removeObjectAtIndex:sourceIndexPath.row];
[self.data insertObject:str atIndex:destinationIndexPath.row];
}

-(BOOL)tableView:(UITableView *)tableView shouldHighlightRowAtIndexPath:(NSIndexPath *)indexPath
{
if(indexPath.row==[self.data count]){
return NO;
}
return YES;
}

//Asks the delegate if the text field should process the pressing of the return button.
-(BOOL)textFieldShouldReturn:(UITextField *)textField
{
[textField resignFirstResponder];
return YES;
}

//Tells the delegate that editing began for the specified text field.
//设置tableview内容的offset,以免文本框被键盘挡住
-(void)textFieldDidBeginEditing:(UITextField *)textField
{
UITableViewCell *cell=(UITableViewCell*)[[textField superview] superview];
[self.tableView setContentOffset:CGPointMake(0.0, cell.frame.origin.y) animated:YES];
}

-(NSInteger)tableView:(UITableView *)tableView numberOfRowsInSection:(NSInteger)section
{
return [self.data count]+1;
}

-(UITableViewCell *)tableView:(UITableView *)tableView cellForRowAtIndexPath:(NSIndexPath *)indexPath
{
static NSString *cellIdentifier=@"cell";
UITableViewCell *cell=[tableView dequeueReusableCellWithIdentifier:cellIdentifier];
if(!cell){
cell=[[UITableViewCell alloc] initWithStyle:UITableViewCellStyleDefault reuseIdentifier:cellIdentifier];
}
if([indexPath row]==[self.data count]){
self.textField.frame=cell.contentView.frame;
self.textField.text=@"";
[cell.contentView addSubview:self.textField];
}else{
cell.textLabel.text=[self.data objectAtIndex:[indexPath row]];
cell.accessoryType=UITableViewCellAccessoryDisclosureIndicator;
}
return cell;
}

@end
setEditing:animated:方法是UIViewController生命周期方法,用于响应视图编辑状态的变化。在我们这里,当点击NavigationItem上的Edit(这个编辑按钮是视图控制器中预定义的按钮,点击后按钮会转换到Done)时便会触发setEditing:animated:方法。在这个方法里,我们触发TableView的编辑方法。
tableView:commitEditingStyle:forRowAtIndexPath:方法是TableView的编辑提交方法,我们编辑完成后,点击NavigationItem上的Done便会触发该方法。
在处理键盘遮挡输入框时,有一点需要注意,
这里textField的父亲的父亲才是UITableViewCell。textField的父亲是单元格内容视图,并不是UITableViewCell。
tableView:canMoveRowAtIndexPath:控制cell是否可移动,我们这里除了最后一条(最后一条是添加item选项),都能移动。cell移动时,我们需要在tableView:moveRowAtIndexPath:toIndexPath:方法中做相应的处理。
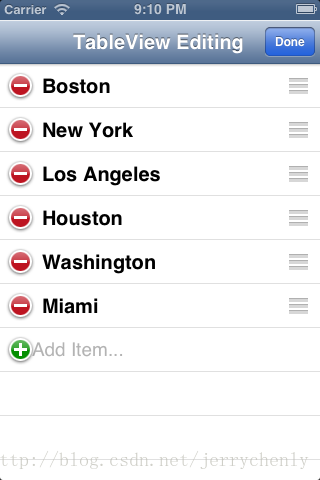
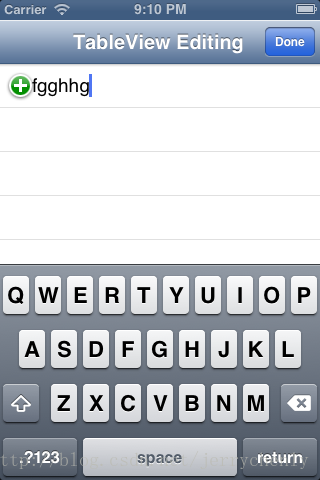
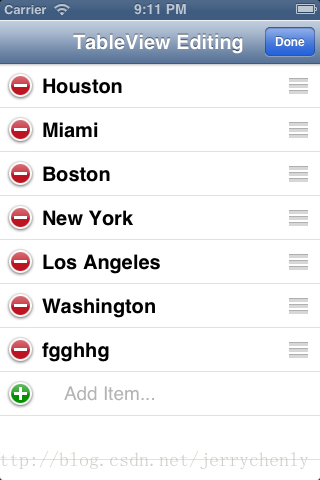
下面是运行截图:
六、自定义UITableViewCell
iOS提供了几种cell的样式,实际应用中经常需要根据需求自定义cell。自定义的方式有多种,这里介绍两种方式。第一种,新建一个cell类(不带xib),并继承UITableViewCell,然后在类中用代码添加view,这种方式会稍微麻烦一点。第二种,新建一个cell类,附带xib(xib中的根view不是UIView,而是TableViewCell),指定cell的复用id,类继承UITableViewCell,然后在xib中添加view。
上面提到两种自定义TableViewCell的方式,接下来还有一个复用的问题。第一种方式自定义的TableViewCell在使用的时候与使用系统的cell一样,先调用tableview的dequeueReusableCellWithIdentifier方法获取复用,如果为nil,直接调用alloc创建并初始化一个复用id;第二种方式自定义的TableViewCell在使用的时候稍微有点不一样,首先在viewDidLoad方法中注册Nib:
UINib *nib = [UINib nibWithNibName:@"MusicPickerViewCell" bundle:nil];
[self.tableView registerNib:nib forCellReuseIdentifier:cellIdentifier];
注册之后,在
-(UITableViewCell *)tableView:(UITableView *)tableView cellForRowAtIndexPath:(NSIndexPath *)indexPath方法中直接获取复用cell即可(不需要判断nil):
MusicPickerViewCell *cell = [tableView dequeueReusableCellWithIdentifier:cellIdentifier];

相关文章推荐
- ORACLE物化视图--物化视图日志如何避免系统时间变化带来的影响
- Asp.Net MVC4入门指南(3):添加一个视图
- ASP.NET视图状态解析(本博客仅是自己留着作为存储学习)---选自MSDN
- iOS开发UI高级—17Modal模态视图简单介绍
- Android自定义视图四:定制onMeasure强制显示为方形
- OpenGL:光照、模型视图投影变换
- symbian应用程序中视图切换问题
- 内连接,外连接、临时表、表变量、视图
- mysql 视图
- 玩转iOS开发 - 视图控制器生命周期
- Oracle 11g笔记——视图、同义词
- iOS模仿color多彩手杖实现,视图旋转,缩放,画刷
- Asp.Net MVC 视图(View)实现 1
- sql中视图
- IOS 表视图(UITableVIew)的使用方法(2)名单的分段显示
- UITableView 表视图
- iOS开发之基础视图——UITextView
- Android动画之View Animation(视图动画)
- MYSQL人事工资管理系统--设计视图(四)
- spring视图解析类ResourceBundleViewResolver的用法