How to Compile Linux Kernel from Source to Build Custom Kernel
2013-12-11 09:10
696 查看
原文: http://www.thegeekstuff.com/2013/06/compile-linux-kernel/
Linux kernel is the life force of all Linux family of operating systems including Ubuntu, CentOS, and Fedora.
For most part, you don’t need to compile the kernel, as it is installed by default when you install the OS. Also, when there is a critical update done to the kernel, you can use yum, or apt-get to update the kernel on your Linux system.
However you might encounter certain situation, where you may have to compile kernel from source. The following are few situation where you may have to compile Kernel on your Linux system.
To enable experimental features that are not part of the default kernel.
To enable support for a new hardware that is not currently supported by the default kernel.
To debug the kernel
Or, just to learn how kernel works, you might want to explore the kernel source code, and compile it on your own.
In this tutorial, we’ll explain how to compile Linux kernel from source.
Also, please note that if you just want to compile a driver, you don’t need to compile the kernel. You need only the linux-headers package of the kernel.
kernel.org.
Linux kernel is the life force of all Linux family of operating systems including Ubuntu, CentOS, and Fedora.
For most part, you don’t need to compile the kernel, as it is installed by default when you install the OS. Also, when there is a critical update done to the kernel, you can use yum, or apt-get to update the kernel on your Linux system.
However you might encounter certain situation, where you may have to compile kernel from source. The following are few situation where you may have to compile Kernel on your Linux system.
To enable experimental features that are not part of the default kernel.
To enable support for a new hardware that is not currently supported by the default kernel.
To debug the kernel
Or, just to learn how kernel works, you might want to explore the kernel source code, and compile it on your own.
In this tutorial, we’ll explain how to compile Linux kernel from source.
Also, please note that if you just want to compile a driver, you don’t need to compile the kernel. You need only the linux-headers package of the kernel.
1. Download the Latest Stable Kernel
The first step is to download the latest stable kernel fromkernel.org.
# cd /usr/src/ # wget https://www.kernel.org/pub/linux/kernel/v3.x/linux-3.9.3.tar.xz[/code]2. Untar the Kernel Source
The second step is to
untar the kernel source file for compilation.# tar -xvJf linux-3.9.3.tar.xz3. Configure the Kernel
The kernel contains nearly 3000 configuration options. To make the kernel used by most people on most hardware, the Linux distro like Ubuntu, Fedora, Debian, RedHat, CentOS, etc, will generally include support for most common hardware. You can take any one
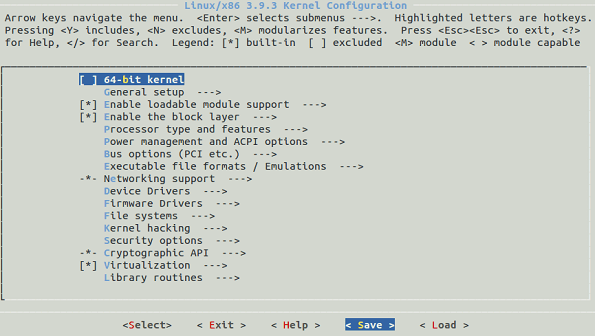
of configuration from the distro, and on top of that you can add your own configuration, or you can configure the kernel from scratch, or you can use the default config provided by the kernel# cd linux-3.9.3 # make menuconfig
The make menuconfig, will launch a text-based user interface with default configuration options as shown in the figure. You should have installed “libncurses and libncurses-devel” packages for this command to work.
We will use the default config provided by the kernel. So select “Save” and save the config in the file name “.config”.
The following is a sample of the “.config” file:CONFIG_MMU=y CONFIG_NEED_DMA_MAP_STATE=y CONFIG_NEED_SG_DMA_LENGTH=y CONFIG_GENERIC_ISA_DMA=y CONFIG_GENERIC_BUG=y CONFIG_GENERIC_HWEIGHT=y4. Compile the Linux Kernel
Compile the main kernel:# make
Compile the kernel modules:# make modules
Install the kernel modules:# make modules_install
At this point, you should see a directory named /lib/modules/3.9.3/ in your system.5. Install the New Kernel
Install the new kernel on the system:# make install
The make install command will create the following files in the /boot directory.
vmlinuz-3.9.3 – The actual kernel
System.map-3.9.3 – The symbols exported by the kernel
initrd.img-3.9.3 –
initrd image is temporary root file system used during boot process
config-3.9.3 – The kernel configuration file
The command “make install” will also update the grub.cfg by default. So we don’t need to manually edit the grub.cfg file.6. Boot Linux to the new Kernel
To use the new kernel that you just compiled, reboot the system.# reboot
Since, in grub.cfg, the new kernel is added as default boot, the system will boot from the new kernel. Just in case if you have problems with the new kernel, you can select the old kernel from the grub menu during boot and you can use your system as usual.
Once the system is up, use
uname command to verify that the new version of Linux kernel is installed.$ uname -r 3.9.3

相关文章推荐
- How to Compile Qt from Source Code on Linux
- How to build a Linux kernel and flash it to the phone
- HOWTO compile kernel modules for the kernel 2.6: (编译linux2.6版本内核)
- How To Compile Httpd From Source
- HowTo use the CDT to navigate Linux kernel source
- How to build and run ARM Linux on QEMU from scratch
- How to build NCL and NCAR Graphics from source code
- example how to build RPM package from source package
- linux compile source to ko(kernel object) successfully!
- How to build NCL and NCAR Graphics from source code
- How to Build OpenSource Coin on Ububtu Linux
- How to build the Robotics Library from source code on Windows
- How to compile Linux kernel in fedora 6
- How to compile your own boblight binarys directly from source
- how to build and install vim from source code
- how to compile and install linux kernel
- How to: Compile Linux kernel 2.6
- HowTo use the CDT to navigate Linux kernel source
- 【转】How to build and install PHP 5.6.9 from source on Ubuntu 14.04 VPS
- How to get Linux Kernel Source Code of Android?