nagios 监控linux 主机
2013-11-21 11:28
232 查看
1.解决时间同步问题
当然前提是你的服务器已经安装了ntp的程序,如果没有安装可以: yum -y install ntp /usr/sbin/ntpdate pool.ntp.org uptime
2.安装Nagios所需要的基础包
yum -y install gcc glibc glibc-common yum -y install gd gd-devdel yum -y install openssl-devel
3.创建nagios 用户
useradd nagios
4.下载安装最新nagios插件
wget https://www.nagios-plugins.org/download/nagios-plugins-1.5.tar.gz
tar zxvf nagios-plugins-1.5.tar.gz
cd nagios-plugins-1.5
./configure --with-nagios-user=nagios --with-nagios-group=nagios
make && make install
5.更改目录权限:
chown nagios.nagios /usr/local/nagios chown -R nagios.nagios /usr/local/nagios/libexec6.安装nrpe插件wget http://sourceforge.net/projects/nagios/files/nrpe-2.x/nrpe-2.15/nrpe-2.15.tar.gz/downloadtar zxvf nrpe-2.15.tar.gzcd nrpe-2.15./configure
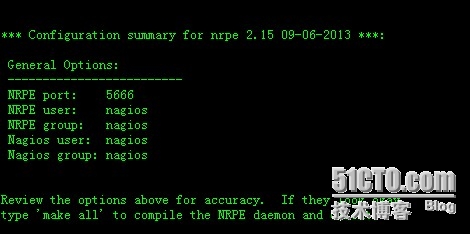
make allmake install-pluginmake install-daemonmake install-daemon-config
7.将NRPE deamon作为xinetd 下的一个服务运行 yum -y install xinetd make install-xinetd显示如下

可以看到创建了这个文件/etc/xinetd.d/nrpe,编辑这个脚本: vim /etc/xinetd.d/nrpe
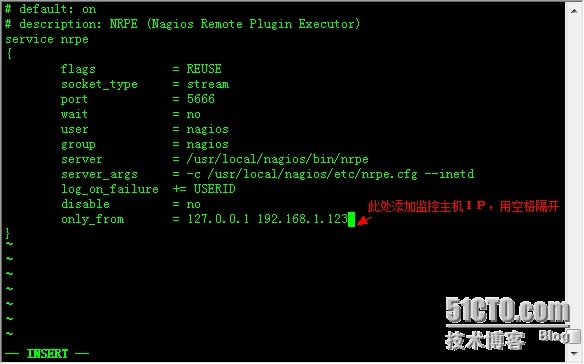
8.编辑/etc/services这个文件,添加nrpe服务 vim /etc/services在最后添加如下:#Local services
nrpe 5666/tcp #nrpe
重启xinetd的服务:
service xinetd restart
查看nrpe是否已经启动:
[root@wordpress nrpe-2.15]# netstat -at |grep nrpe
tcp 0 0 *:nrpe *:* LISTEN
[root@wordpress nrpe-2.15]# netstat -an |grep 5666
tcp 0 0 :::5666 :::* LIST
查看nrpe 是否正常工作 /usr/local/nagios/libexec/check_nrpe -H localhost
8.查看nrpe的监控命令:
vim /usr/local/nagios/etc/nrpe.cfg

上面这5行定义的命令分别是检测登陆用户数,cpu负载,sda1的容量,僵尸进程,总进程数
9.配置监控端:
先安装openssl-devel
yum -y install openssl-devel
安装nrpe
tar -zxvf nrpe-2.8.1.tar.gz
cd nrpe-2.8.1
./configure --enable-ssl --with-ssl-lib=/usr/lib/
make all
make install-plugin
只运行之一步就行了,因为只需要check_nrpe这个插件
测试与被监控机的通信:
/usr/local/nagios/libexec/check_nrpe -H 192.168.1.243
返回nrpe的版本说明通信正常
10.在command.cfg里添加外部构件nrpe vi /usr/local/nagios/etc/objects/commands.cfg
添加
#check nrpe
define command{
command_name check_nrpe
command_line $USER1$/check_nrpe -H $HOSTADDRESS$ -c $ARG1$
} 配置被监控主机:
vim /usr/local/nagios/etc/nagios.cfg
添加:
cfg_file=/usr/local/nagios/etc/objects/mylinux.cfg
11.配置mylinux.cfg
cd /usr/local/nagios/etc/objects/
touch mylinux.cfg
chown nagios.nagios mylinux.cfg
vim mylinux.cfg
写入如下:
define host{
use linux-server
host_name mylinux
alias mylinux
address 192.168.1.243
}
define service{
use generic-service
host_name mylinux
service_description HTTP
check_command check_http
}
define service{
use generic-service
host_name mylinux
service_description SSH
check_command check_ssh
}
define service{
use generic-service
host_name mylinux
service_description check-swap
check_command check_nrpe!check_swap
}
define service{
use generic-service
host_name mylinux
service_description check-load
check_command check_nrpe!check_load
}
define service{
use generic-service
host_name mylinux
service_description check-disk
check_command check_nrpe!check_disk
}
define service{
use generic-service
host_name mylinux
service_description check-users
check_command check_nrpe!check_users
}
define service{
use generic-service
host_name mylinux
service_description otal_procs
check_command check_nrpe!check_total_procs
}
检查配置文件是否错误:
/usr/local/nagios/bin/nagios -v /usr/local/nagios/etc/nagios.cfg

12.重启nagios: service nagios restart
13.查看web

完成!
本文出自 “Linux_life” 博客,请务必保留此出处http://snbolinux.blog.51cto.com/3069187/1329456
当然前提是你的服务器已经安装了ntp的程序,如果没有安装可以: yum -y install ntp /usr/sbin/ntpdate pool.ntp.org uptime
2.安装Nagios所需要的基础包
yum -y install gcc glibc glibc-common yum -y install gd gd-devdel yum -y install openssl-devel
3.创建nagios 用户
useradd nagios
4.下载安装最新nagios插件
wget https://www.nagios-plugins.org/download/nagios-plugins-1.5.tar.gz
tar zxvf nagios-plugins-1.5.tar.gz
cd nagios-plugins-1.5
./configure --with-nagios-user=nagios --with-nagios-group=nagios
make && make install
5.更改目录权限:
chown nagios.nagios /usr/local/nagios chown -R nagios.nagios /usr/local/nagios/libexec6.安装nrpe插件wget http://sourceforge.net/projects/nagios/files/nrpe-2.x/nrpe-2.15/nrpe-2.15.tar.gz/downloadtar zxvf nrpe-2.15.tar.gzcd nrpe-2.15./configure
make allmake install-pluginmake install-daemonmake install-daemon-config
7.将NRPE deamon作为xinetd 下的一个服务运行 yum -y install xinetd make install-xinetd显示如下
可以看到创建了这个文件/etc/xinetd.d/nrpe,编辑这个脚本: vim /etc/xinetd.d/nrpe
8.编辑/etc/services这个文件,添加nrpe服务 vim /etc/services在最后添加如下:#Local services
nrpe 5666/tcp #nrpe
重启xinetd的服务:
service xinetd restart
查看nrpe是否已经启动:
[root@wordpress nrpe-2.15]# netstat -at |grep nrpe
tcp 0 0 *:nrpe *:* LISTEN
[root@wordpress nrpe-2.15]# netstat -an |grep 5666
tcp 0 0 :::5666 :::* LIST
查看nrpe 是否正常工作 /usr/local/nagios/libexec/check_nrpe -H localhost
8.查看nrpe的监控命令:
vim /usr/local/nagios/etc/nrpe.cfg
上面这5行定义的命令分别是检测登陆用户数,cpu负载,sda1的容量,僵尸进程,总进程数
9.配置监控端:
先安装openssl-devel
yum -y install openssl-devel
安装nrpe
tar -zxvf nrpe-2.8.1.tar.gz
cd nrpe-2.8.1
./configure --enable-ssl --with-ssl-lib=/usr/lib/
make all
make install-plugin
只运行之一步就行了,因为只需要check_nrpe这个插件
测试与被监控机的通信:
/usr/local/nagios/libexec/check_nrpe -H 192.168.1.243
返回nrpe的版本说明通信正常
10.在command.cfg里添加外部构件nrpe vi /usr/local/nagios/etc/objects/commands.cfg
添加
#check nrpe
define command{
command_name check_nrpe
command_line $USER1$/check_nrpe -H $HOSTADDRESS$ -c $ARG1$
} 配置被监控主机:
vim /usr/local/nagios/etc/nagios.cfg
添加:
cfg_file=/usr/local/nagios/etc/objects/mylinux.cfg
11.配置mylinux.cfg
cd /usr/local/nagios/etc/objects/
touch mylinux.cfg
chown nagios.nagios mylinux.cfg
vim mylinux.cfg
写入如下:
define host{
use linux-server
host_name mylinux
alias mylinux
address 192.168.1.243
}
define service{
use generic-service
host_name mylinux
service_description HTTP
check_command check_http
}
define service{
use generic-service
host_name mylinux
service_description SSH
check_command check_ssh
}
define service{
use generic-service
host_name mylinux
service_description check-swap
check_command check_nrpe!check_swap
}
define service{
use generic-service
host_name mylinux
service_description check-load
check_command check_nrpe!check_load
}
define service{
use generic-service
host_name mylinux
service_description check-disk
check_command check_nrpe!check_disk
}
define service{
use generic-service
host_name mylinux
service_description check-users
check_command check_nrpe!check_users
}
define service{
use generic-service
host_name mylinux
service_description otal_procs
check_command check_nrpe!check_total_procs
}
检查配置文件是否错误:
/usr/local/nagios/bin/nagios -v /usr/local/nagios/etc/nagios.cfg
12.重启nagios: service nagios restart
13.查看web
完成!
本文出自 “Linux_life” 博客,请务必保留此出处http://snbolinux.blog.51cto.com/3069187/1329456

相关文章推荐
- Nagios 监控 Linux 主机 (2009-11-10 09:31)
- nagios配置――添加linux主机监控
- centos6.4 x64 Nagios监控平台:监控linux主机的CPU温度
- Nagios之linux监控windows主机
- Nagios监控平台之二:nrpe监控远程Linux主机
- nagios监控linux主机、web等各种服务,并实现飞信自动报警
- LINUX开源监控平台Nagios(主机监控配置)
- nagios4.1.1 服务端及监控端部署(三)之nrpe监控远程linux主机
- Nagios之NRPE监控Linux/UNIX主机
- nagios监控linux主机及服务信息
- 安装Nagios来监控远程Windows主机和Linux主机 推荐
- LINUX开源监控平台Nagios(主机监控配置)
- centos6.2 使用nagios nrpe监控本地与远程Linux主机
- 网络监控软件Nagios, Nagios是一款开源的免费网络监视工具,能有效监控Windows、Linux和Unix的主机状态,交换机路由器等网络设备,打印机等。在系统或服务状态异常时发出邮件或短信报
- nagios用NRPE监控Linux主机 服务端和客户端的安装配置 推荐
- Nagios之NRPE监控Linux/UNIX主机
- 一步步实现Nagios监控linux主机及飞信报警
- nagios监控Linux和windows主机常见的报警错误及修复方法
- nagios 监控 linux主机的信息
- nagios监控linux主机