HTML5, jQuery Mobile 和 ASP.NET MVC 4——在模型和控制器之间使用ViewModel
2013-11-14 09:24
316 查看
在企业应用开发场景,我们也许需要聚集一些模型/数据来源并将其呈现为一个整体控制器。简单起见,我们拿个需要输入新学生姓名、年级、州(如图一)的例子来说。
年级为A、B和C,但如果我们能够让这些年级显示为第一类、第二类、第三类,而非ABC,那或许会颇有意义。因此在UI中,我们需要显示第一二三类,但当保存数据是,我们需要在DB中保存相应的值,这同样适用于“州”。当用户点击“州”下拉选择图标时,州列表豁然出现并展示所有州。当选中一个州时,它被显示于UI中,但当保存到DB时,代码名称是诸如“Ca”代表“加利福尼亚”这样保存的,如图二所示。
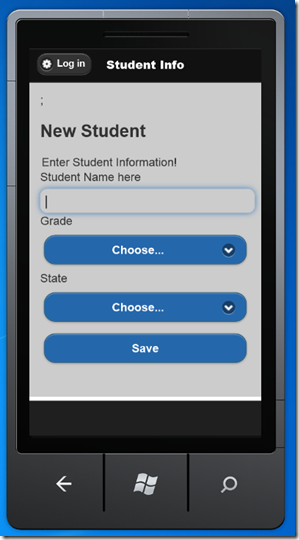
图一:用来输入新生信息的表单。

图二:当点击州下来菜单时,如图菜单出现。
ViewModel(视图模型)的魔力:ViewModel允许你从一个或更多的数据模型/来源塑造多个实体到单个对象,优化了消耗和渲染。
图三就表明了ViewModel的理念:
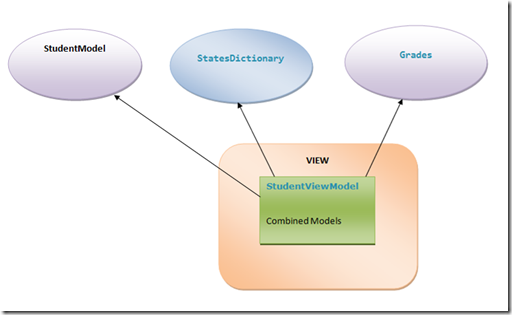
图三:StudentViewModel集合了不同的模型和数据来源,提供信息给视图作为单个实体。
ViewModel的目的是将渲染单个对象的视图,缓解对UI逻辑代码的需求(原本是必需)。这意味着视图唯一的责任就是渲染该单个ViewModel对象,在一个更干净的关注点分离予以帮助。关注点是应用程序独特的一方面,它们有着特别的目的,而保持这些方面分离意味着你的应用程序更为有组织,代码更为聚焦。将数据操作代码置于其本身的位置,远离视图和控制器,增强关注点分离。在MVC中使用ViewModel将把你带向更加简单的可维护、可测试代码。
现在我们来我们创建数据来源。第一个是年级,代码如下。年级类是一个简单的Dictionary对象包含两类参数。类还包括Dictionary中所有成员的定义(如年级数据)。年级类唯一的属性就是显示列为清单的年级。GradeSelectList属性中的Dictionary<string, string>类相应地映射着年级缩写及年级名称。
同样的login用于“州”。StatesDictionary的代码如下:
数据在小清单内并很少更改,如Grades,StatesDictionary类,存在于应用程序的所有类型中。
创建模型
现在我们需要一个模型来采集学生姓名、年级以及他/她来自哪个州(如图一所示)。StudentModels类定义捕捉这些特征于简单的数据结构中。我们现在创建一个如下的StudentModels。在Models文件夹下创建一个文件StudentModels.cs并添加如下代码:
创建ViewModel
因为数据来自需要被展示在视图中的不同来源,如果你使用ViewModel,代码和维护将会很简单,ViewModels只是一个类。马上开始,创建一个新的文件夹命名为ViewModels并在其中添加一个新的代码文件StudentViewModel.cs。要创建StudentViewModel,添加StudentModels、Grades和StatesDictionary作为来自StudentViewModel的属性。在如下源代码中,StudentViewModel类包含新定义的属性。
创建控制器
在创建ViewModel之后,下一步就是在控制器中例示并将其返回到视图。我们是在这个新的MVC4上做R&D(研发)因此你将看到一些乱码。
如下代码创建一个控制器传送ViewModel到视图,而我们关注的代码是公共的ActionResult StudentInfo(),这在应用程序激活时被执行。
在ASP.NET MVC 4视图中创建HTML5 Mobile Form
在Visual Studio 2010中,点击项目并新增Item命令以创建StudentInfo.cshtml。在视图内,各种ASP.NET MVC 4 HTML Helpers通过渲染它们映射于ViewModel的数据类型的最适合的HTML元素来呈现StudentViewModel组件。比如,
年级渲染为一个HTML下拉菜单由此用户可以轻易选中一个项目,而非手动进入之。
StudentInfo.cshtml代码如下:
下载源代码请点击这里在Global.asax文件做如下改变:
年级为A、B和C,但如果我们能够让这些年级显示为第一类、第二类、第三类,而非ABC,那或许会颇有意义。因此在UI中,我们需要显示第一二三类,但当保存数据是,我们需要在DB中保存相应的值,这同样适用于“州”。当用户点击“州”下拉选择图标时,州列表豁然出现并展示所有州。当选中一个州时,它被显示于UI中,但当保存到DB时,代码名称是诸如“Ca”代表“加利福尼亚”这样保存的,如图二所示。
图一:用来输入新生信息的表单。
图二:当点击州下来菜单时,如图菜单出现。
ViewModel(视图模型)的魔力:ViewModel允许你从一个或更多的数据模型/来源塑造多个实体到单个对象,优化了消耗和渲染。
图三就表明了ViewModel的理念:
图三:StudentViewModel集合了不同的模型和数据来源,提供信息给视图作为单个实体。
ViewModel的目的是将渲染单个对象的视图,缓解对UI逻辑代码的需求(原本是必需)。这意味着视图唯一的责任就是渲染该单个ViewModel对象,在一个更干净的关注点分离予以帮助。关注点是应用程序独特的一方面,它们有着特别的目的,而保持这些方面分离意味着你的应用程序更为有组织,代码更为聚焦。将数据操作代码置于其本身的位置,远离视图和控制器,增强关注点分离。在MVC中使用ViewModel将把你带向更加简单的可维护、可测试代码。
现在我们来我们创建数据来源。第一个是年级,代码如下。年级类是一个简单的Dictionary对象包含两类参数。类还包括Dictionary中所有成员的定义(如年级数据)。年级类唯一的属性就是显示列为清单的年级。GradeSelectList属性中的Dictionary<string, string>类相应地映射着年级缩写及年级名称。
public class Grades
{
public static SelectList GradeSelectList
{
get
{
return new SelectList(GradeDictionary, "Value", "Key");
}

}
public static readonly IDictionary<string, string>
GradeDictionary = new Dictionary<string, string>
{
{"Choose…",""}
, { "First Class", "A" }
, { "Second Class", "B" }
, { "Third Class", "c" }
};
}
同样的login用于“州”。StatesDictionary的代码如下:
public class StatesDictionary
{
public static SelectList StateSelectList
{
get { return new SelectList(StateDictionary, "Value", "Key"); }
}

public static readonly IDictionary<string, string>
StateDictionary = new Dictionary<string, string> {
{"Choose…",""}
, { "Alabama", "AL" }
, { "Alaska", "AK" }
, { "Arizona", "AZ" }
, { "Arkansas", "AR" }
, { "California", "CA" }
, { "Colorado", "CO" }
, { "Connecticut", "CT" }
, { "Delaware", "DE" }
, { "District of Columbia", "DC" }
, { "Florida", "FL" }
, { "Georgia", "GA" }
, { "Hawaii", "HI" }
, { "Idaho", "ID" }
, { "Illinois", "IL" }
, { "Indiana", "IN" }
, { "Iowa", "IA" }
, { "Kansas", "KS" }
, { "Kentucky", "KY" }
, { "Louisiana", "LA" }
, { "Maine", "ME" }
, { "Maryland", "MD" }
, { "Massachusetts", "MA" }
, { "Michigan", "MI" }
, { "Minnesota", "MN" }
, { "Mississippi", "MS" }
, { "Missouri", "MO" }
, { "Montana", "MT" }
, { "Nebraska", "NE" }
, { "Nevada", "NV" }
, { "New Hampshire", "NH" }
, { "New Jersey", "NJ" }
, { "New Mexico", "NM" }
, { "New York", "NY" }
, { "North Carolina", "NC" }
, { "North Dakota", "ND" }
, { "Ohio", "OH" }
, { "Oklahoma", "OK" }
, { "Oregon", "OR" }
, { "Pennsylvania", "PA" }
, { "Rhode Island", "RI" }
, { "South Carolina", "SC" }
, { "South Dakota", "SD" }
, { "Tennessee", "TN" }
, { "Texas", "TX" }
, { "Utah", "UT" }
, { "Vermont", "VT" }
, { "Virginia", "VA" }
, { "Washington", "WA" }
, { "West Virginia", "WV" }
, { "Wisconsin", "WI" }
, { "Wyoming", "WY" }
// more states
};
}
数据在小清单内并很少更改,如Grades,StatesDictionary类,存在于应用程序的所有类型中。
创建模型
现在我们需要一个模型来采集学生姓名、年级以及他/她来自哪个州(如图一所示)。StudentModels类定义捕捉这些特征于简单的数据结构中。我们现在创建一个如下的StudentModels。在Models文件夹下创建一个文件StudentModels.cs并添加如下代码:
using System;
using System.Collections.Generic;
using System.Linq;
using System.Web;
using System.ComponentModel.DataAnnotations;

namespace TagStatus.Models
{
public class StudentModels
{
[Display(Name = "Student Name here")]
[Required()]
public string StudentName { get; set; }
public string Grade { get; set; }
public string State { get; set; }
}
}
创建ViewModel
因为数据来自需要被展示在视图中的不同来源,如果你使用ViewModel,代码和维护将会很简单,ViewModels只是一个类。马上开始,创建一个新的文件夹命名为ViewModels并在其中添加一个新的代码文件StudentViewModel.cs。要创建StudentViewModel,添加StudentModels、Grades和StatesDictionary作为来自StudentViewModel的属性。在如下源代码中,StudentViewModel类包含新定义的属性。
using System;
using System.Collections.Generic;
using System.Linq;
using System.Web;

using TagStatus.Models;
namespace TagStatus.ViewModels
{
public class StudentViewModel
{
public StudentModels Student { get; set; }
public Grades Grades { get; set; }
public StatesDictionary States { get; set; }
public StudentViewModel(StudentModels student)
{
Student = student;
Grades = new Grades();
States = new StatesDictionary();
}
public StudentViewModel()
{
Student = new StudentModels(); ;
Grades = new Grades();
States = new StatesDictionary();
}
}
}
创建控制器
在创建ViewModel之后,下一步就是在控制器中例示并将其返回到视图。我们是在这个新的MVC4上做R&D(研发)因此你将看到一些乱码。
如下代码创建一个控制器传送ViewModel到视图,而我们关注的代码是公共的ActionResult StudentInfo(),这在应用程序激活时被执行。
using System;
using System.Collections.Generic;
using System.Linq;
using System.Web;
using System.Web.Mvc;

using TagStatus.Models;
using TagStatus.ViewModels;
namespace TagStatus.Controllers
{
public class StudentController : Controller
{
//public string StudentName { get; set; }
//public int Grade { get; set; }
//
// GET: /Student/
public ActionResult Index()
{
StudentModels stdm = new StudentModels();
StudentViewModel stdvm = new StudentViewModel(stdm);
return View(stdvm);
}
//[AllowAnonymous]
//public ActionResult StudentInfo()
//{
//    return View();
//}
[AllowAnonymous]
[HttpPost]
public ActionResult StudentInfo(StudentModels model)
{
if (ModelState.IsValid)
{
model.StudentName = model.State;
}
return View(model);
}
[AllowAnonymous]
public ActionResult StudentInfo()
{
StudentViewModel model = new StudentViewModel();
//model.StudentName = model.State;
return View(model);
}
}
}
在ASP.NET MVC 4视图中创建HTML5 Mobile Form
在Visual Studio 2010中,点击项目并新增Item命令以创建StudentInfo.cshtml。在视图内,各种ASP.NET MVC 4 HTML Helpers通过渲染它们映射于ViewModel的数据类型的最适合的HTML元素来呈现StudentViewModel组件。比如,
年级渲染为一个HTML下拉菜单由此用户可以轻易选中一个项目,而非手动进入之。
StudentInfo.cshtml代码如下:
@model TagStatus.ViewModels.StudentViewModel
@{
ViewBag.Title = "Student Info";
}

<h2> New Student </h2>
@using (Html.BeginForm("Results","Home"))
{
@Html.ValidationSummary(true)
<fieldset>
<legend>Enter Student Information!</legend>
<div class="editor-label">
@Html.LabelFor(model => model.Student.StudentName)
</div>
<div class="editor-field">
@Html.TextBoxFor(Model => Model.Student.StudentName)
@Html.ValidationMessageFor(Model => Model.Student.StudentName)
</div>
<div class="editor-label">
@Html.LabelFor(model => model.Student.Grade)
</div>
<div class="editor-field">
@Html.DropDownListFor(Model => Model.Student.Grade, Grades.GradeSelectList)
</div>
<div class="editor-label">
@Html.LabelFor(model => model.Student.State)
</div>
<div class="editor-field">
@Html.DropDownListFor(Model => Model.Student.State, StatesDictionary.StateSelectList)
</div>
<p>
<input type="submit" value="Save" />
</p>
</fieldset>
}下载源代码请点击这里在Global.asax文件做如下改变:
routes.MapRoute(

name: "Default",

url: "{controller}/{action}/{id}",

//defaults: new { controller = "Tag", action = "Lookup", id = UrlParameter.Optional }

defaults: new { controller = "Student", action = "StudentInfo", id = UrlParameter.Optional }

//defaults: new { controller = "Home", action = "Index", id = UrlParameter.Optional }

);

相关文章推荐
- ASP.NET MVC中使用View Model分离领域模型
- 在ASP.NET MVC中使用Knockout实践02,组合View Model成员、Select绑定、通过构造器创建View Model,扩展View Model方法
- ASP.net MVC 同一view或页面使用多个Model或数据集的方法
- ASP.NET MVC在布局页上使用模型(model)
- asp.net mvc 使用ajax请求 控制器 (PartialViewResult)分部的action,得到一个分部视图(PartialView)的HTML,进行渲染
- ASP.NET MVC使用ajax向控制器post Model 研究
- HTML5, jQuery Mobile and ASP.NET MVC 4 – Using the ViewModel between the model and controller
- Asp.Net MVC中Controller与View之间传递的Model
- 在ASP.NET MVC中使用Knockout实践04,控制View Model的json格式内容
- 使用dynamic在ASP.NET MVC中应用匿名ViewModel
- ASP.NET MVC(模型(Model),视图(View)和控制Controller)实践:实现身份验证权限管理
- 在模型和控制器之间使用ViewModel
- 敏捷开发中asp.net MVC的开发次序感受(先开发View?先开发Model?先开发Controller!)
- ASP.NET MVC: 使用自定义 ModelBinder 过滤敏感信息
- asp.net MVC前台View页面向后台Controller控制器传递数据的几种方式
- Intro to ASP.NET MVC 4 with Visual Studio [译六:从控制器中访问模型的数据]
- 【译】使用自定义ViewHelper来简化Asp.net MVC view的开发------part4
- MVC(Model View Controller)模型-视图-控制器
- ASP.NET MVC 在View中获取Model以外的关系属性
- [Asp.net MVC]Asp.net MVC5系列——从控制器访问模型中的数据