openfire 绑定第三方账号 设置密码编码格式
2013-10-27 15:06
267 查看
最近公司用到android的即时通讯功能。折腾了一天,和同事决定用xmpp协议openfire来作为IM服务器。
安装,此处省略若干字。由于安装比较简单,网上有很多的安装资料,找到一篇文章就可以正确的安装。这里不多费口舌了。
安装完成之后,发现需要在openfire里面注册新的账号才行。直接瞪眼!这不苦逼了,原来的用户非得要再重新注册一个账号才行?这么做肯定不行。想想,既然这个工具已经如此受到欢迎,不可能有这么打一个却低啊。于是就在网上找了一下,还真有呢!!!再次灰常感谢那些编写openfire的工程师门。
好了,废话不多说,直接些方法。
绑定第三方账号:
扩展绑定第三方的账号主要有两种方法,网上有很多介绍的。再次做一个备份。虽然是两种方法,但是感觉都差不过的,都是通过修改一个openfire系统表里的一个叫做ofProperty的表来实现功能的。(再次小编批注一下,我用的是将openfire的系统安装到mysql一个第三方的数据库中,没有使用openfire自带的数据库。这样的话,即时由于修改错了参数的话,直接在数据中,将数据的参数update修改回来,也很方便。 要不然,找不到openfire自带的数据库,万一修改错了参数,就进不去配置界面。那时候,就叫天天不应,叫地地不灵了。
估计也有能够找到openfire自带数据在哪里的,不过小编太懒了,没去关注这方面的资料。如果有知道的朋友们,可以直接给我留言,分享进步嘛~ 我得意滴笑!)
方法一: 通过配置界面,进入到控制前台。 小编是将openfire服务安装到自己的机器上,所以地址是: http://localhsot:9090 如果安装到其他的地方,将localhost换成IP就好了进入到如下界面:

不用说,你懂得,用户密码全都放上,没啥也,进入到管理界面。
进去之后, 左上角那去找 服务器->服务器管理器->系统属性 进入到系统属性编辑界面。如下图:
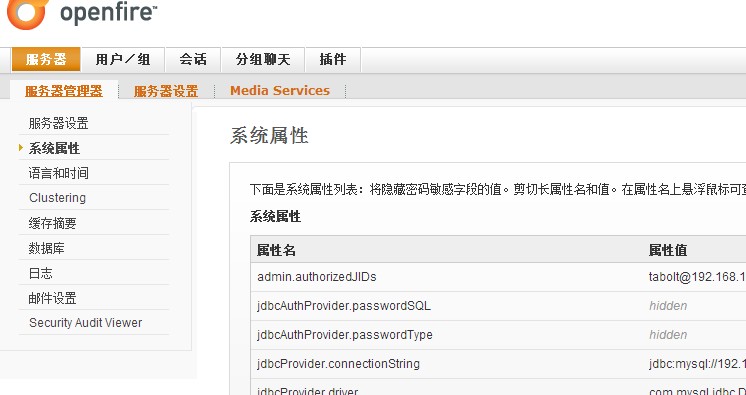
然后,拖到最下面,去找添加属性的配置
属性名称: jdbcProvider.driver 值:com.mysql.jdbc.Driver
属性名称: jdbcProvider.connectionString 值:jdbc:mysql://localhost/同步的数据库名?user=数据库用户名&password=数据库密码
属性名称: admin.authorizedJIDs 值:admin@amy-tang //admin是openfire的管理员账号,@amy-tang是安装openfire时填写的域名,也可以写成@192.168.0.1即openfire安装服务器电脑的IP地址
属性名称: jdbcAuthProvider.passwordSQL 值:SELECT Password FROM Profiles WHERE NickName=? //Profiles是用户表,NickName用户名,Password登录码。
属性名称: jdbcAuthProvider.passwordType 值:md5 //选择的加密方式,可以选择MD5,plain(明文)或者其他只要和现有用户表加密方式一样就行
属性名称: jdbcUserProvider.loadUserSQL 值:SELECT NickName,Email FROM Profiles WHERE NickName=?
属性名称: jdbcUserProvider.userCountSQL 值:SELECT COUNT(*) FROM Profiles
属性名称: jdbcUserProvider.allUsersSQL 值:SELECT NickName FROM Profiles
属性名称: jdbcUserProvider.usernameField 值:NickName
属性名称: jdbcUserProvider.nameField 值:NickName
属性名称: jdbcUserProvider.emailField 值:Email
然后再更新两个
属性名称:provider.user.className 值:org.jivesoftware.openfire.user.JDBCUserProvider
属性名称:provider.auth.className 值:org.jivesoftware.openfire.auth.JDBCAuthProvider
这样就好了, 第二种方法就是直接取后台修改sql语句将上面的数据用sql写入到数据库中去。 insert 语句在这里就省去了~ 自己写就好了。直接用工具, 复制+粘贴也能搞定,没必要非得写sql语句的。
如果你的数据库中的密码用的是标准md5加密,那么 jdbcAuthProvider.passwordType 设置为md5就好了,如果明文(情况很少,并不是没有)那就是plain了。
(此处感谢 寻梦 在她的空间博客里面找到的这些资料,对我有很大的帮助。 http://blog.sina.com.cn/u/1785328994)
好了,修改完了,重启一下openfire重新进入openfire的管理界面。
下面是见证奇迹的时刻:
到登录态,输入用户名,密码 进入。此时,会有两个情况:
情况一: 能进去,嘛事没有! 此人必有老天帮助。这个时候你可以 出门鞭炮眼花一起放,敲锣打鼓庆祝吧,因为你成功了。
情况二: 苦逼小编我就是这样的情况,进不去,就是说我用户名密码不对。(登录后台的用户名密码 是 你在上面设置属性的时候的 属性名称: admin.authorizedJIDs 值:admin@amy-tang 的账号,其他的,就是错的了,哪怕你是密码正确呢,因为你没有这个权利啊。)我用的是md5 编码啊,怎么会不对呢。好吧,被鄙视了,确定问题,寻找解决办法。
我用的方法就是,在后台,将用户名密码全都贴出来, 然后修改秘密编码格式为明文。我将机密后的密码当做密码登陆。 修改完了之后,重启openfire,激动人心的时刻到了,用户名密码,能进去了!!!! 我去, 真的被鄙视了,丫的!!!!!
修改密码编码格式:
好了,被鄙视之后,就找到问题所在了。找到问题,解决问题。
在网上找一下,嘿,果然有相关资料。 但是内容总结出来就是一句话:修改源文件(万能得开源啊)
好吧,去官网下载源文件:
下载下来之后,去找org.jivesoftware.openfire.auth这个包里可以找到JDBCAuthProvider这个类,验证密码的函数就是authenticate。一进去,代码还不少嘞。
好吧,好多,但是代码看起来很是很不错的,能看懂。下面就修改了, 都说在源代码上修改时屠夫的做法,太暴力了,咱也君子一下,新添加一个类,继承 AuthProvider 这个类 写一个新的类就好了。
小编我比较懒,就在三个地方,添加了点代码。
在 authenticate方法中,在
这些代码的基础上,添加了一个自己定义的边编码格式,添加完成之后如下,就是最后多了一个判断:
然后,自己写一个 demoPassword的密码编码格式就好了。最后,还要再 public enum PasswordType {……} 枚举里面添加你自己写的那个demo就好了。(果真懒到家了) 完成之后,生成class,(应该有两个,一个是这个编码class 还有一个是type枚举的),然后,将class放到安装目录下的Openfire\lib\openfire.jar包中对应的位置就好了。添加的时候,也费率一点劲,想偷懒,结果消耗时间了。用要压软件死活就是添加不进去,没办法,安装了一个WinRAR来添加的,再次被鄙视,囧啊~!!!!
将写的java生成jar包,然后放到openfire.jar里面,记录一下路径。然后,在后天数据库中,修改一下 ‘provider.auth.className’ 属性对应的值。 我上面的类名为 ZYJDBCAuthProvider 路径为 org.zysecondedeveloper.openfire.plugin 所以,我就将值修改为 org.zysecondedeveloper.openfire.plugin.ZYJDBCAuthProvider
然后,替换点安装路径下的openfire 重启openfire就好了
安装完了之后,重启。 输入用户名密码, 恩,不错,这回能进去了。 小得意一下。
再发布的时候遇到的问题一:
有的时候,自己弄的class文件放到openfire.jar包中去。当替换掉安装目录下的时候,一启动,就报错,说是不支持,粗无内容如下:
Unsupported major.minor version 51.0 纠结了一小段时间,发现时javajdk版本不匹配。 可以用eclipse 修改一下java的jdk 的编码格式,解决方法参考:http://www.111cn.net/jsp/Jsp-Servlet/45158.htm 然后重新打成jar包,将class放到openfire.jar里面就好了。
修改密码这部分,感谢 hustpzb 的文章http://blog.csdn.net/hustpzb/article/details/7647801
和 hetylei的文章http://hetylei.iteye.com/blog/290519 对我的帮助。
希望这边文章对大家有帮助。 QQ: 2281879713 有问题可以留言或者qq
安装,此处省略若干字。由于安装比较简单,网上有很多的安装资料,找到一篇文章就可以正确的安装。这里不多费口舌了。
安装完成之后,发现需要在openfire里面注册新的账号才行。直接瞪眼!这不苦逼了,原来的用户非得要再重新注册一个账号才行?这么做肯定不行。想想,既然这个工具已经如此受到欢迎,不可能有这么打一个却低啊。于是就在网上找了一下,还真有呢!!!再次灰常感谢那些编写openfire的工程师门。
好了,废话不多说,直接些方法。
绑定第三方账号:
扩展绑定第三方的账号主要有两种方法,网上有很多介绍的。再次做一个备份。虽然是两种方法,但是感觉都差不过的,都是通过修改一个openfire系统表里的一个叫做ofProperty的表来实现功能的。(再次小编批注一下,我用的是将openfire的系统安装到mysql一个第三方的数据库中,没有使用openfire自带的数据库。这样的话,即时由于修改错了参数的话,直接在数据中,将数据的参数update修改回来,也很方便。 要不然,找不到openfire自带的数据库,万一修改错了参数,就进不去配置界面。那时候,就叫天天不应,叫地地不灵了。
估计也有能够找到openfire自带数据在哪里的,不过小编太懒了,没去关注这方面的资料。如果有知道的朋友们,可以直接给我留言,分享进步嘛~ 我得意滴笑!)
方法一: 通过配置界面,进入到控制前台。 小编是将openfire服务安装到自己的机器上,所以地址是: http://localhsot:9090 如果安装到其他的地方,将localhost换成IP就好了进入到如下界面:
不用说,你懂得,用户密码全都放上,没啥也,进入到管理界面。
进去之后, 左上角那去找 服务器->服务器管理器->系统属性 进入到系统属性编辑界面。如下图:
然后,拖到最下面,去找添加属性的配置
属性名称: jdbcProvider.driver 值:com.mysql.jdbc.Driver
属性名称: jdbcProvider.connectionString 值:jdbc:mysql://localhost/同步的数据库名?user=数据库用户名&password=数据库密码
属性名称: admin.authorizedJIDs 值:admin@amy-tang //admin是openfire的管理员账号,@amy-tang是安装openfire时填写的域名,也可以写成@192.168.0.1即openfire安装服务器电脑的IP地址
属性名称: jdbcAuthProvider.passwordSQL 值:SELECT Password FROM Profiles WHERE NickName=? //Profiles是用户表,NickName用户名,Password登录码。
属性名称: jdbcAuthProvider.passwordType 值:md5 //选择的加密方式,可以选择MD5,plain(明文)或者其他只要和现有用户表加密方式一样就行
属性名称: jdbcUserProvider.loadUserSQL 值:SELECT NickName,Email FROM Profiles WHERE NickName=?
属性名称: jdbcUserProvider.userCountSQL 值:SELECT COUNT(*) FROM Profiles
属性名称: jdbcUserProvider.allUsersSQL 值:SELECT NickName FROM Profiles
属性名称: jdbcUserProvider.usernameField 值:NickName
属性名称: jdbcUserProvider.nameField 值:NickName
属性名称: jdbcUserProvider.emailField 值:Email
然后再更新两个
属性名称:provider.user.className 值:org.jivesoftware.openfire.user.JDBCUserProvider
属性名称:provider.auth.className 值:org.jivesoftware.openfire.auth.JDBCAuthProvider
这样就好了, 第二种方法就是直接取后台修改sql语句将上面的数据用sql写入到数据库中去。 insert 语句在这里就省去了~ 自己写就好了。直接用工具, 复制+粘贴也能搞定,没必要非得写sql语句的。
如果你的数据库中的密码用的是标准md5加密,那么 jdbcAuthProvider.passwordType 设置为md5就好了,如果明文(情况很少,并不是没有)那就是plain了。
(此处感谢 寻梦 在她的空间博客里面找到的这些资料,对我有很大的帮助。 http://blog.sina.com.cn/u/1785328994)
好了,修改完了,重启一下openfire重新进入openfire的管理界面。
下面是见证奇迹的时刻:
到登录态,输入用户名,密码 进入。此时,会有两个情况:
情况一: 能进去,嘛事没有! 此人必有老天帮助。这个时候你可以 出门鞭炮眼花一起放,敲锣打鼓庆祝吧,因为你成功了。
情况二: 苦逼小编我就是这样的情况,进不去,就是说我用户名密码不对。(登录后台的用户名密码 是 你在上面设置属性的时候的 属性名称: admin.authorizedJIDs 值:admin@amy-tang 的账号,其他的,就是错的了,哪怕你是密码正确呢,因为你没有这个权利啊。)我用的是md5 编码啊,怎么会不对呢。好吧,被鄙视了,确定问题,寻找解决办法。
我用的方法就是,在后台,将用户名密码全都贴出来, 然后修改秘密编码格式为明文。我将机密后的密码当做密码登陆。 修改完了之后,重启openfire,激动人心的时刻到了,用户名密码,能进去了!!!! 我去, 真的被鄙视了,丫的!!!!!
修改密码编码格式:
好了,被鄙视之后,就找到问题所在了。找到问题,解决问题。
在网上找一下,嘿,果然有相关资料。 但是内容总结出来就是一句话:修改源文件(万能得开源啊)
好吧,去官网下载源文件:
下载下来之后,去找org.jivesoftware.openfire.auth这个包里可以找到JDBCAuthProvider这个类,验证密码的函数就是authenticate。一进去,代码还不少嘞。
/**
* $Revision: 1116 $
* $Date: 2005-03-10 20:18:08 -0300 (Thu, 10 Mar 2005) $
*
* Copyright (C) 2005-2008 Jive Software. All rights reserved.
*
* Licensed under the Apache License, Version 2.0 (the "License");
* you may not use this file except in compliance with the License.
* You may obtain a copy of the License at
*
*     http://www.apache.org/licenses/LICENSE-2.0 *
* Unless required by applicable law or agreed to in writing, software
* distributed under the License is distributed on an "AS IS" BASIS,
* WITHOUT WARRANTIES OR CONDITIONS OF ANY KIND, either express or implied.
* See the License for the specific language governing permissions and
* limitations under the License.
*/

package org.jivesoftware.openfire.auth;

import java.sql.Connection;
import java.sql.DriverManager;
import java.sql.PreparedStatement;
import java.sql.ResultSet;
import java.sql.SQLException;

import org.jivesoftware.database.DbConnectionManager;
import org.jivesoftware.openfire.XMPPServer;
import org.jivesoftware.openfire.user.UserAlreadyExistsException;
import org.jivesoftware.openfire.user.UserManager;
import org.jivesoftware.openfire.user.UserNotFoundException;
import org.jivesoftware.util.JiveGlobals;
import org.jivesoftware.util.StringUtils;
import org.slf4j.Logger;
import org.slf4j.LoggerFactory;

/**
* The JDBC auth provider allows you to authenticate users against any database
* that you can connect to with JDBC. It can be used along with the
* {@link HybridAuthProvider hybrid} auth provider, so that you can also have
* XMPP-only users that won't pollute your external data.<p>
*
* To enable this provider, set the following in the system properties:
* <ul>
* <li><tt>provider.auth.className = org.jivesoftware.openfire.auth.JDBCAuthProvider</tt></li>
* </ul>
*
* You'll also need to set your JDBC driver, connection string, and SQL statements:
*
* <ul>
* <li><tt>jdbcProvider.driver = com.mysql.jdbc.Driver</tt></li>
* <li><tt>jdbcProvider.connectionString = jdbc:mysql://localhost/dbname?user=username&password=secret</tt></li>
* <li><tt>jdbcAuthProvider.passwordSQL = SELECT password FROM user_account WHERE username=?</tt></li>
* <li><tt>jdbcAuthProvider.passwordType = plain</tt></li>
* <li><tt>jdbcAuthProvider.allowUpdate = true</tt></li>
* <li><tt>jdbcAuthProvider.setPasswordSQL = UPDATE user_account SET password=? WHERE username=?</tt></li>
* </ul>
*
* In order to use the configured JDBC connection provider do not use a JDBC
* connection string, set the following property
*
* <ul>
* <li><tt>jdbcAuthProvider.useConnectionProvider = true</tt></li>
* </ul>
*
* The passwordType setting tells Openfire how the password is stored. Setting the value
* is optional (when not set, it defaults to "plain"). The valid values are:<ul>
*      <li>{@link PasswordType#plain plain}
*      <li>{@link PasswordType#md5 md5}
*      <li>{@link PasswordType#sha1 sha1}
*      <li>{@link PasswordType#sha256 sha256}
*      <li>{@link PasswordType#sha512 sha512}
*  </ul>
*
* @author David Snopek
*/
public class JDBCAuthProvider implements AuthProvider {

private static final Logger Log = LoggerFactory.getLogger(JDBCAuthProvider.class);

private String connectionString;

private String passwordSQL;
private String setPasswordSQL;
private PasswordType passwordType;
private boolean allowUpdate;
private boolean useConnectionProvider;

/**
* Constructs a new JDBC authentication provider.
*/
public JDBCAuthProvider() {
// Convert XML based provider setup to Database based
JiveGlobals.migrateProperty("jdbcProvider.driver");
JiveGlobals.migrateProperty("jdbcProvider.connectionString");
JiveGlobals.migrateProperty("jdbcAuthProvider.passwordSQL");
JiveGlobals.migrateProperty("jdbcAuthProvider.passwordType");
JiveGlobals.migrateProperty("jdbcAuthProvider.setPasswordSQL");
JiveGlobals.migrateProperty("jdbcAuthProvider.allowUpdate");

useConnectionProvider = JiveGlobals.getBooleanProperty("jdbcAuthProvider.useConnectionProvider");

if (!useConnectionProvider) {
// Load the JDBC driver and connection string.
String jdbcDriver = JiveGlobals.getProperty("jdbcProvider.driver");
try {
Class.forName(jdbcDriver).newInstance();
}
catch (Exception e) {
Log.error("Unable to load JDBC driver: " + jdbcDriver, e);
return;
}
connectionString = JiveGlobals.getProperty("jdbcProvider.connectionString");
}

// Load SQL statements.
passwordSQL = JiveGlobals.getProperty("jdbcAuthProvider.passwordSQL");
setPasswordSQL = JiveGlobals.getProperty("jdbcAuthProvider.setPasswordSQL");

allowUpdate = JiveGlobals.getBooleanProperty("jdbcAuthProvider.allowUpdate",false);

passwordType = PasswordType.plain;
try {
passwordType = PasswordType.valueOf(
JiveGlobals.getProperty("jdbcAuthProvider.passwordType", "plain"));
}
catch (IllegalArgumentException iae) {
Log.error(iae.getMessage(), iae);
}
}

public void authenticate(String username, String password) throws UnauthorizedException {
if (username == null || password == null) {
throw new UnauthorizedException();
}
username = username.trim().toLowerCase();
if (username.contains("@")) {
// Check that the specified domain matches the server's domain
int index = username.indexOf("@");
String domain = username.substring(index + 1);
if (domain.equals(XMPPServer.getInstance().getServerInfo().getXMPPDomain())) {
username = username.substring(0, index);
} else {
// Unknown domain. Return authentication failed.
throw new UnauthorizedException();
}
}
String userPassword;
try {
userPassword = getPasswordValue(username);
}
catch (UserNotFoundException unfe) {
throw new UnauthorizedException();
}
// If the user's password doesn't match the password passed in, authentication
// should fail.
if (passwordType == PasswordType.md5) {
password = StringUtils.hash(password, "MD5");
}
else if (passwordType == PasswordType.sha1) {
password = StringUtils.hash(password, "SHA-1");
}
else if (passwordType == PasswordType.sha256) {
password = StringUtils.hash(password, "SHA-256");
}
else if (passwordType == PasswordType.sha512) {
password = StringUtils.hash(password, "SHA-512");
}
if (!password.equals(userPassword)) {
throw new UnauthorizedException();
}

// Got this far, so the user must be authorized.
createUser(username);
}

public void authenticate(String username, String token, String digest)
throws UnauthorizedException
{
if (passwordType != PasswordType.plain) {
throw new UnsupportedOperationException("Digest authentication not supported for "
+ "password type " + passwordType);
}
if (username == null || token == null || digest == null) {
throw new UnauthorizedException();
}
username = username.trim().toLowerCase();
if (username.contains("@")) {
// Check that the specified domain matches the server's domain
int index = username.indexOf("@");
String domain = username.substring(index + 1);
if (domain.equals(XMPPServer.getInstance().getServerInfo().getXMPPDomain())) {
username = username.substring(0, index);
} else {
// Unknown domain. Return authentication failed.
throw new UnauthorizedException();
}
}
String password;
try {
password = getPasswordValue(username);
}
catch (UserNotFoundException unfe) {
throw new UnauthorizedException();
}
String anticipatedDigest = AuthFactory.createDigest(token, password);
if (!digest.equalsIgnoreCase(anticipatedDigest)) {
throw new UnauthorizedException();
}

// Got this far, so the user must be authorized.
createUser(username);
}

public boolean isPlainSupported() {
// If the auth SQL is defined, plain text authentication is supported.
return (passwordSQL != null);
}

public boolean isDigestSupported() {
// The auth SQL must be defined and the password type is supported.
return (passwordSQL != null && passwordType == PasswordType.plain);
}

public String getPassword(String username) throws UserNotFoundException,
UnsupportedOperationException
{

if (!supportsPasswordRetrieval()) {
throw new UnsupportedOperationException();
}
if (username.contains("@")) {
// Check that the specified domain matches the server's domain
int index = username.indexOf("@");
String domain = username.substring(index + 1);
if (domain.equals(XMPPServer.getInstance().getServerInfo().getXMPPDomain())) {
username = username.substring(0, index);
} else {
// Unknown domain.
throw new UserNotFoundException();
}
}
return getPasswordValue(username);
}

public void setPassword(String username, String password)
throws UserNotFoundException, UnsupportedOperationException
{
if (allowUpdate && setPasswordSQL != null) {
setPasswordValue(username, password);
} else {
throw new UnsupportedOperationException();
}
}

public boolean supportsPasswordRetrieval() {
return (passwordSQL != null && passwordType == PasswordType.plain);
}

private Connection getConnection() throws SQLException {
if (useConnectionProvider)
return DbConnectionManager.getConnection();
return DriverManager.getConnection(connectionString);
}

/**
* Returns the value of the password field. It will be in plain text or hashed
* format, depending on the password type.
*
* @param username user to retrieve the password field for
* @return the password value.
* @throws UserNotFoundException if the given user could not be loaded.
*/
private String getPasswordValue(String username) throws UserNotFoundException {
String password = null;
Connection con = null;
PreparedStatement pstmt = null;
ResultSet rs = null;
if (username.contains("@")) {
// Check that the specified domain matches the server's domain
int index = username.indexOf("@");
String domain = username.substring(index + 1);
if (domain.equals(XMPPServer.getInstance().getServerInfo().getXMPPDomain())) {
username = username.substring(0, index);
} else {
// Unknown domain.
throw new UserNotFoundException();
}
}
try {
con = getConnection();
pstmt = con.prepareStatement(passwordSQL);
pstmt.setString(1, username);

rs = pstmt.executeQuery();

// If the query had no results, the username and password
// did not match a user record. Therefore, throw an exception.
if (!rs.next()) {
throw new UserNotFoundException();
}
password = rs.getString(1);
}
catch (SQLException e) {
Log.error("Exception in JDBCAuthProvider", e);
throw new UserNotFoundException();
}
finally {
DbConnectionManager.closeConnection(rs, pstmt, con);
}
return password;
}

private void setPasswordValue(String username, String password) throws UserNotFoundException {
Connection con = null;
PreparedStatement pstmt = null;
if (username.contains("@")) {
// Check that the specified domain matches the server's domain
int index = username.indexOf("@");
String domain = username.substring(index + 1);
if (domain.equals(XMPPServer.getInstance().getServerInfo().getXMPPDomain())) {
username = username.substring(0, index);
} else {
// Unknown domain.
throw new UserNotFoundException();
}
}
try {
con = getConnection();
pstmt = con.prepareStatement(setPasswordSQL);
pstmt.setString(2, username);
if (passwordType == PasswordType.md5) {
password = StringUtils.hash(password, "MD5");
}
else if (passwordType == PasswordType.sha1) {
password = StringUtils.hash(password, "SHA-1");
}
else if (passwordType == PasswordType.sha256) {
password = StringUtils.hash(password, "SHA-256");
}
else if (passwordType == PasswordType.sha512) {
password = StringUtils.hash(password, "SHA-512");
}
pstmt.setString(1, password);
pstmt.executeQuery();
}
catch (SQLException e) {
Log.error("Exception in JDBCAuthProvider", e);
throw new UserNotFoundException();
}
finally {
DbConnectionManager.closeConnection(pstmt, con);
}

}

/**
* Indicates how the password is stored.
*/
@SuppressWarnings({"UnnecessarySemicolon"})  // Support for QDox Parser
public enum PasswordType {

/**
* The password is stored as plain text.
*/
plain,

/**
* The password is stored as a hex-encoded MD5 hash.
*/
md5,

/**
* The password is stored as a hex-encoded SHA-1 hash.
*/
sha1,

/**
* The password is stored as a hex-encoded SHA-256 hash.
*/
sha256,

/**
* The password is stored as a hex-encoded SHA-512 hash.
*/
sha512;
}

/**
* Checks to see if the user exists; if not, a new user is created.
*
* @param username the username.
*/
private static void createUser(String username) {
// See if the user exists in the database. If not, automatically create them.
UserManager userManager = UserManager.getInstance();
try {
userManager.getUser(username);
}
catch (UserNotFoundException unfe) {
try {
Log.debug("JDBCAuthProvider: Automatically creating new user account for " + username);
UserManager.getUserProvider().createUser(username, StringUtils.randomString(8),
null, null);
}
catch (UserAlreadyExistsException uaee) {
// Ignore.
}
}
}
}
好吧,好多,但是代码看起来很是很不错的,能看懂。下面就修改了, 都说在源代码上修改时屠夫的做法,太暴力了,咱也君子一下,新添加一个类,继承 AuthProvider 这个类 写一个新的类就好了。
小编我比较懒,就在三个地方,添加了点代码。
在 authenticate方法中,在
if (passwordType == PasswordType.md5) {
password = StringUtils.hash(password, "MD5");
}
else if (passwordType == PasswordType.sha1) {
password = StringUtils.hash(password, "SHA-1");
}
else if (passwordType == PasswordType.sha256) {
password = StringUtils.hash(password, "SHA-256");
}
else if (passwordType == PasswordType.sha512) {
password = StringUtils.hash(password, "SHA-512");
这些代码的基础上,添加了一个自己定义的边编码格式,添加完成之后如下,就是最后多了一个判断:
if (passwordType == PasswordType.md5) {
password = StringUtils.hash(password, "MD5");
}
else if (passwordType == PasswordType.sha1) {
password = StringUtils.hash(password, "SHA-1");
}
else if (passwordType == PasswordType.sha256) {
password = StringUtils.hash(password, "SHA-256");
}
else if (passwordType == PasswordType.sha512) {
password = StringUtils.hash(password, "SHA-512");
}else if(passwordType == PasswordType.demo){
password = demoPassword(password);
}
然后,自己写一个 demoPassword的密码编码格式就好了。最后,还要再 public enum PasswordType {……} 枚举里面添加你自己写的那个demo就好了。(果真懒到家了) 完成之后,生成class,(应该有两个,一个是这个编码class 还有一个是type枚举的),然后,将class放到安装目录下的Openfire\lib\openfire.jar包中对应的位置就好了。添加的时候,也费率一点劲,想偷懒,结果消耗时间了。用要压软件死活就是添加不进去,没办法,安装了一个WinRAR来添加的,再次被鄙视,囧啊~!!!!
将写的java生成jar包,然后放到openfire.jar里面,记录一下路径。然后,在后天数据库中,修改一下 ‘provider.auth.className’ 属性对应的值。 我上面的类名为 ZYJDBCAuthProvider 路径为 org.zysecondedeveloper.openfire.plugin 所以,我就将值修改为 org.zysecondedeveloper.openfire.plugin.ZYJDBCAuthProvider
然后,替换点安装路径下的openfire 重启openfire就好了
安装完了之后,重启。 输入用户名密码, 恩,不错,这回能进去了。 小得意一下。
再发布的时候遇到的问题一:
有的时候,自己弄的class文件放到openfire.jar包中去。当替换掉安装目录下的时候,一启动,就报错,说是不支持,粗无内容如下:
Unsupported major.minor version 51.0 纠结了一小段时间,发现时javajdk版本不匹配。 可以用eclipse 修改一下java的jdk 的编码格式,解决方法参考:http://www.111cn.net/jsp/Jsp-Servlet/45158.htm 然后重新打成jar包,将class放到openfire.jar里面就好了。
修改密码这部分,感谢 hustpzb 的文章http://blog.csdn.net/hustpzb/article/details/7647801
和 hetylei的文章http://hetylei.iteye.com/blog/290519 对我的帮助。
希望这边文章对大家有帮助。 QQ: 2281879713 有问题可以留言或者qq

相关文章推荐
- Mysql re-set password, mysql set encode utf8 mysql重置密码,mysql设置存储编码格式
- GridView数据绑定控件的模版列时设置显示的格式
- Eclipse中设置编码格式为UTF-8
- IO流-设置输出字符编码格式
- gridview绑定格式设置(一)
- 利用域控设置启动脚本统一更改客户端administrator密码和添加客户端本地管理员账号
- eclipse 设置默认的工程编码格式
- 关于webstorm(phpstorm)设置了编码格式之后还是乱码的问题
- "Spring"中设置编码格式的方法
- jsp-property-group 设置 解决jsp编码格式
- 用过滤器filter设置编码格式
- DreamweaverCS6基础 设置新建文档的默认编码格式
- Source Insight 4.0 文件类型、编码格式、tab转空格、tab键自动补全设置。。。
- Qt Creator 设置默认编码格式为 UTF-8
- 连接数据库时设置编码格式
- php+mysql设置编码格式
- mysql设置默认编码格式utf-8
- 用过滤器filter设置编码格式
- Oracle 用户账号解锁、密码重置、设置密码永不过期
- pl/sql developer编码格式设置