Using CUDA and Thrust with Visual Studio 2010
2013-10-13 00:13
2655 查看
Using CUDA and Thrust with Visual Studio 2010
Sunday, March 6, 2011 – 11:16 am Using CUDA 4.0 RC2? Read the update post here.I was working on setting up some new CUDA projects as I’m doing some spiking (prototyping for the not so agile crowd) work to figure out how best to use CUDA 4.0. I’ve turned it in to a quick tutorial on how to write a simple application that allows you to use both CUDA and the latest C++0x features in Visual Studio 2010.Because the current CUDA SDK requires projects to compile using the v90 toolset (Visual Studio 2008) the solution requires two projects. One DLL project containing the CUDA and targeting v90 and a second application project targeting v100 (VS 2010) containing the C++ code.
Click on the images to see full size versions.
Installing dependencies
Make sure you have the following installed.Visual Studio 2010 and 2008 SP1 (required by CUDA).
Parallel NSight 1.51
CUDA 4.0 RC or 3.2 and Thrust
If you don’t have 4.0. I built this walkthrough using the 4.0 RC but it should work with 3.2.
Setting up the solution
Create a solution containing two projects. Two projects are required because one targets the V100 (VS 2010) compiler to allow access to the latest C++0x language features and one targets the V90 (VS 2008) compiler because this is required by CUDA.1) Create a Win32 console application called HelloWorld. Select the defaults for the remaining pages in the wizard. This project will contain the main entry point to your application and any Windows specific code, like the Parallel Patterns Library (PPL) code used for managing threads.

2) Create a second Win32 project called HelloWorldCuda. This is the DLL that will contain your CUDA code. In the application settings screen select DLL for the application type and check the empty project box.


Configure the CUDA project
There’s a number of settings that need to be configured on the HelloWorldCuda project.3) Configure the HelloWorldCuda project.
3.1) Select the Project | Build Customizations… menu item. In the dialog select the CUDA 4.0 item. This adds support for CUDA C/C++ files but there needs to be a .CU file in the project before the build settings appear in the project properties. If you don’t have CUDA 4.0 then use the 3.2 rules.

3.2) Add two new items to the project; a C++ file (.cpp) and header file (.h) called Hello.cpp and Hello.h, rename the .cpp file to Hello.cu. Your solution should look like this:

3.3) Select the Hello.cu file and open it’s properties pages. In the general tab change the Item Type to “CUDA C/C++”.

3.4) Select the project and open the properties (ALT-Enter). In the general tab set the Platform Toolset field to v90 (if you are not able to do this then you probably don’t have VS 2008 installed, this is required by CUDA).

3.5) Open the Linker | General properties page and add “$(CUDA_PATH_V4_0)\lib\$(Platform);” to the Additional Libraries Directories field.

Note that the CUDA/C++ properties tab is now visible.
3.6) Open the Linker | Input properties page and add “cudart.lib;” to the Additional Dependencies field.

3.7) Make sure that your projects will always build in the correct order. Right click on the HelloWorld project and select Project Dependencies. Check the box next to HelloWorldCuda. This will force the HellowWorldCuda project to build before HelloWorld.
5) Build the solution. At this point the solution should build without any warnings or errors. It doesn’t do anything yet but all the pieces are in place.
Adding some CUDA/Thrust code
Now it’s time to add some code. We need to write some CUDA code in HelloWorldCuda DLL and export it so that the HelloWorld application can execute it.5) Configure the HelloWorld project. It needs to link the HelloWorldCuda and also have access to the appropriate header files.
5.1) Open the Linker | General properties page and add “..\$(Configuration);$(CUDA_PATH_V4_0)\lib\$(Platform);” to the Additional Libraries Directories field.

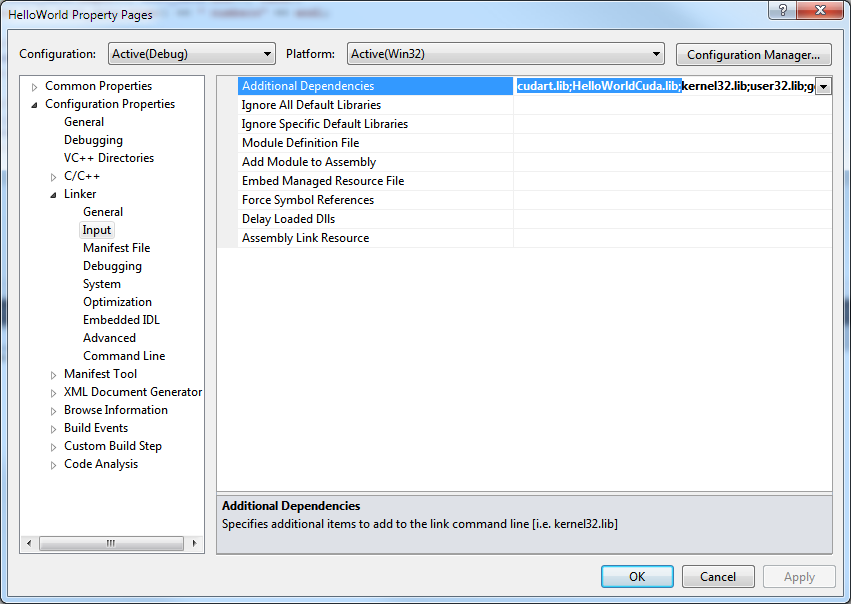
5.2) Open the Linker | Input properties page and add “cudart.lib;HelloWorldCuda.lib;” to the Additional Dependencies field.
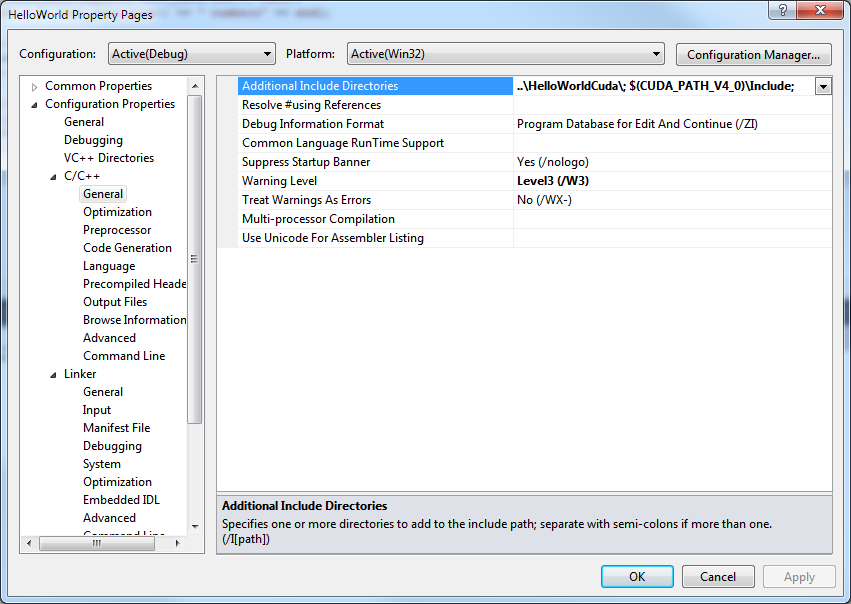
5.3) Open the C/C++ | general properties page and add “..\HelloWorldCuda\; $(CUDA_PATH_V4_0)\Include;” to the Additional Include Directories field.
5.4) Open the Project | Project Dependencies menu item and check the HelloWorldCuda box to make the CUDA project a dependency of the main Win32 application project.

6) Now it’s time to write some code. CUDA 4.0 now comes with Thrust so we’re going to use Thrust in our example. If you’re not using 4.0 then you need to download the latest Thrust library (link below) and copy it into a Thrust folder inside the CUDA SDK include folder %CUDA_PATH%\include\thrust.
This is a Hello World application so the code is very simple. It’s a variation of the first example on the Thrust project homepage.
Add the following class declaration to Hello.h. Most of the code is to fix up compilation warnings. Really all this does is declares a class that is constructed with a host_vector<unsigned long> and then has some methods that execute CUDA code and return results.
1: #pragma once
2: #pragma warning(push)
3: #pragma warning(disable: 4996) // Thrust's use of strerror
4: #pragma warning(disable: 4251) // STL class exports
5: #include "thrust/host_vector.h"
6: #include "thrust/device_vector.h"
7: #pragma warning(pop)
8:
9: // See: http://support.microsoft.com/default.aspx?scid=KB;EN-US;168958
10: // http://msdn.microsoft.com/en-us/library/esew7y1w.aspx
11:// http://www.unknownroad.com/rtfm/VisualStudio/warningC4251.html
12:
13: #if defined(__CUDACC__)
14: # define DECLSPECIFIER __declspec(dllexport)
15: # define EXPIMP_TEMPLATE
16: #else
17: # define DECLSPECIFIER __declspec(dllimport)
18: # define EXPIMP_TEMPLATE extern
19: #endif
20:
21: #pragma once
22: #pragma warning(push)
23: #pragma warning(disable: 4231)
24: EXPIMP_TEMPLATE template class
25: DECLSPECIFIER thrust::device_vector<unsigned long>;
26: EXPIMP_TEMPLATE template class
27: DECLSPECIFIER thrust::detail::vector_base<unsigned long,
28: thrust::device_malloc_allocator<unsigned long>>;
29: #pragma warning(pop)
30:
31: class DECLSPECIFIER Hello
32: {33: private:
34: thrust::device_vector<unsigned long> m_device_data;
35:
36: public:
37: Hello(const thrust::host_vector<unsigned long>& data);
38: unsigned long Sum();
39: unsigned long Max();
40: };Hello.cu declares the constructor and Sum and Max methods. The constructor copies the data onto the device, while the Sum and Max methods call Thrust algorithms to carry out calculations on the GPU.
1: #include "Hello.h"
2:
3: Hello::Hello(const thrust::host_vector<unsigned long>& data)
4: {5: m_device_data = data;
6: }
7:
8:unsigned long Hello::Sum()
9: {10: return thrust::reduce(m_device_data.cbegin(), m_device_data.cend(),
11: 0, thrust::plus<unsigned long>());
12: }
13:
14: unsigned long Hello::Max()
15: {16: return *thrust::max_element(m_device_data.cbegin(), m_device_data.cend(),
17: thrust::less<unsigned long>());
18: }Finally HelloWorld.cpp contains the application’s entry point and executes the CUDA/Thrust code. It also calculates the answers on the host’s CPU so that you can check for correctness.
1: #include "stdafx.h"
2:#include <iostream>
3: #include <algorithm>
4: #include <vector>
5: #include "Hello.h"
6:
7:using namespace ::std;
8:
9: int _tmain(int argc, _TCHAR* argv[])
10: {11: cout << "Generating data..." << endl;
12: thrust::host_vector<unsigned long> host_data(100000);
13: thrust::generate(host_data.begin(), host_data.end(), rand);
14: cout << "generated " << host_data.size() << " numbers" << endl;
15:
16: cout << endl << "Running host code..." << endl;
17: unsigned long host_result = thrust::reduce(host_data.cbegin(), host_data.cend(),
18: 0, thrust::plus<unsigned long>());
19: cout << "The sum is: " << host_result << endl;
20: host_result = *thrust::max_element(host_data.cbegin(), host_data.cend(),
21: thrust::less<unsigned long>());
22:
23: cout << "The max is: " << host_result << endl;
24:
25: cout << endl << "Copying data to device..." << endl;
26: Hello hello(host_data);
27:
28: cout << endl << "Running CUDA device code..." << endl;
29: unsigned long device_result = hello.Sum();
30: cout << "The sum is: " << device_result << endl;
31:
32: cout << endl << "Running CUDA device code..." << endl;
33: device_result = hello.Max();
34: cout << "The max is: " << device_result << endl;
35:
36: return 0;
37: }Run the application and you should see the following output:

You may see lots of warnings Resolving Thrust/CUDA warnings “Cannot tell what pointer points to…”. This appears to be a know issue. They only appear when the NVCC compiler’s –G0 flag is set and/or the project is compiling against arch sm_10.
Making use of the Parallel Patterns Library and C++ lambdas
So now we have a Win32 application that runs CUDA code using the Thrust template library. We could have done this with a single project that targeted the v90 toolset. Update the HelloWorld.cpp file to use the parallel_invoke algorithm to run the host and device code in parallel.1: #include "stdafx.h"
2:#include <iostream>
3: #include <algorithm>
4: #include <vector>
5: #include "ppl.h"
6:
7:#include "Hello.h"
8:
9: using namespace ::std;
10: using namespace ::Concurrency;
11:
12: int _tmain(int argc, _TCHAR* argv[])
13:{14: cout << "Generating data..." << endl;
15: thrust::host_vector<unsigned long> host_data(100000);
16: thrust::generate(host_data.begin(), host_data.end(), rand);
17: cout << "generated " << host_data.size() << " numbers" << endl;
18:
19: parallel_invoke(
20: [host_data]()
21: {22: cout << endl << "Running host code..." << endl;
23: unsigned long host_result = thrust::reduce(host_data.cbegin(),
24: host_data.cend(), 0, thrust::plus<unsigned long>());
25: cout << "The sum is: " << host_result << endl;
26: host_result = *thrust::max_element(host_data.cbegin(),
27: host_data.cend(), thrust::less<unsigned long>());
28: cout << "The max is: " << host_result << endl;
29: },
30: [host_data]()
31: {32: cout << endl << "Copying data to device..." << endl;
33: Hello hello(host_data);
34:
35: cout << endl << "Running CUDA device code..." << endl;
36: unsigned long device_result = hello.Sum();
37: cout << "The sum is: " << device_result << endl;
38:
39: cout << endl << "Running CUDA device code..." << endl;
40: device_result = hello.Max();
41: cout << "The max is: " << device_result << endl;
42: }
43: );
44: return 0;
45: }Notice how the output ordering has changed. The call to parallel_invoke takes to lambda expressions containing code that is now run in parallel.

The complete code for this sample is available on here.
Other resources
How to create/upgrade a CUDA project in VS2008 and VS2010 to work with Nsight 1.5 and CUDA 3.2 (NVIDIA forum post)Thrust (Project homepage on Google Code)
The Parallel Patterns Library
Lambda expressions in C++ Visual Studio 2010
come from: http://www.ademiller.com/blogs/tech/2011/03/using-cuda-and-thrust-with-visual-studio-2010/

相关文章推荐
- 项目管理实践【五】自动编译和发布网站【Using Visual Studio with Source Control System to build and publish website autom
- 项目管理实践【五】自动编译和发布网站【Using Visual Studio with Source Control System to build and publish website automatically】
- Customize vs 2010 build settings using visual studio's macros and customized macros
- Using UTF-8 as the internal representation for strings in C and C++ with Visual Studio
- Using Code Analysis with Visual Studio 2010 to Improve Code Quality
- Visual Studio Tools for Office: Using C# with Excel, Word, Outlook, and InfoPath
- GSL 1.15 and 1.16 building with Visual Studio 2010 --FROM 4fire
- 项目管理实践【五】自动编译和发布【Using Visual Studio with Source Control System to build and publish website automatically】
- Coding Faster-Getting More Productive with Microsoft Visual Studio: Covers Microsoft Visual Studio 2005, 2008, and 2010
- 项目管理实践【五】自动编译和发布网站【Using Visual Studio with Source Control System to build and publish website automatically】
- 项目管理实践【五】自动编译和发布网站【Using Visual Studio with Source Control System to build and publish website autom
- Using Weka and Libsvm with C# in Visual Studio
- 项目管理实践【五】自动编译和发布网站【Using Visual Studio with Source Control System to build and publish website automatically】
- 项目管理实践【四】自动编译和发布网站【Using Visual Studio with Source Control System to build and publish website automatically】
- 项目管理实践【五】自动编译和发布网站【Using Visual Studio with Source Control System to build and publish website automatically】
- 项目管理实践【五】自动编译和发布网站【Using Visual Studio with Source Control System to build and publish website automatically】
- 项目管理实践【五】自动编译和发布网站【Using Visual Studio with Source Control System to build and publish website autom
- GSL 1.15 and 1.16 building with Visual Studio 2010 --FROM 4fire
- Create custom Task List and Forms in SharePoint 2010 with Visual Studio 2012
- How to create a DLL with SWIG from Visual Studio 2010