【Android基础入门〖3〗】四大组件之Activity
2013-09-24 22:37
666 查看
1 简介
Activity (活动) 即应用程序 显示的 界面。可以通过两种方式 设置显示的内容 1:纯代码方式2:xml 布局方式无论哪一种方式,都是通过 setContentView 来设置显示的内容。
使用步骤
基本上四大组件创建步骤都一样
1:自定义 组件(Activity)
2:注册
3:使用
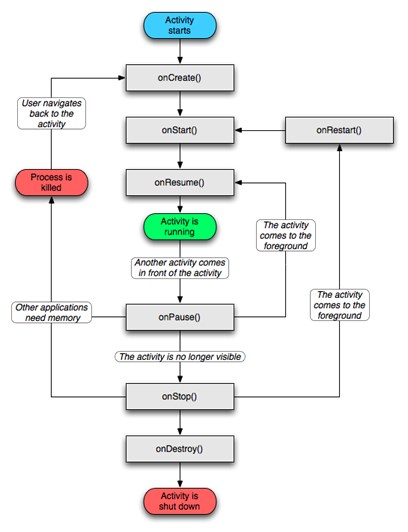
2 生命周期图
3 新建一个自定义的Activity
index.javapackage com.demo;
import android.app.Activity;
import android.content.Intent;
import android.os.Bundle;
import android.widget.TextView;
public class index extends Activity{
@Override
protected void onCreate(Bundle savedInstanceState) {
// TODO 自动生成的方法存根
super.onCreate(savedInstanceState);
Intent intent=this.getIntent();
TextView text=new TextView(this);
text.setText(intent.getStringExtra("str"));
setContentView(text);//设置显示的内容,这里是代码生成的 TextView 对象
}
@Override
public void onBackPressed() {
// 拦截返回按钮
Intent intent=new Intent();创建 intent 绑定要传送的数据
Bundle bundle=new Bundle();
bundle.putString("s1", "恭喜你跳成功了");
bundle.putString("s2", "然后赶紧回家睡觉吧");
intent.putExtra("bundle", bundle);
setResult(0, intent);//通过 intent 返回数据
this.finish();
}
}4 注册Activity
AndroidManifest.xml<?xml version="1.0" encoding="utf-8"?> <manifest xmlns:android="http://schemas.android.com/apk/res/android" package="com.myprovider" android:versionCode="1" android:versionName="1.0" > <uses-sdk android:minSdkVersion="11" android:targetSdkVersion="18" /> <application android:allowBackup="true" android:icon="@drawable/ic_launcher" android:label="@string/app_name" android:theme="@style/AppTheme" > <activity android:name="com.myprovider.MainActivity" android:label="@string/app_name" > <intent-filter> <action android:name="android.intent.action.MAIN" /> <category android:name="android.intent.category.LAUNCHER" /> </intent-filter> </activity> <provider android:name="com.myprovider.MyProvider" android:authorities="com.michael" android:exported="true"/> </application> </manifest>
5 MainActivity (主 Activity)
MainActivity.javapackage com.demo;
import android.app.Activity;
import android.content.Intent;
import android.os.Bundle;
import android.util.Log;
import android.view.View;
import android.view.View.OnClickListener;
import android.widget.Button;
import android.widget.EditText;
public class MainActivity extends Activity {
EditText edit1;
String str;
@Override
protected void onCreate(Bundle savedInstanceState) {
super.onCreate(savedInstanceState);
setContentView(R.layout.activity_main);
edit1=(EditText)findViewById(R.id.edit1);
edit1.setText(str);
Button btn=(Button)findViewById(R.id.btn1);
btn.setOnClickListener(new OnClickListener() {
@Override
public void onClick(View v) {
// TODO 自动生成的方法存根
Intent intent=new Intent();
intent.putExtra("str", "我跳跃成功!哈哈");
intent.setClass(MainActivity.this, index.class);
//startActivity(intent);
startActivityForResult(intent, 0);
}
});
}
@Override
protected void onActivityResult(int requestCode, int resultCode, Intent data) {
// TODO 自动生成的方法存根
super.onActivityResult(requestCode, resultCode, data);
Bundle bundle=data.getBundleExtra("bundle");
edit1.setText(bundle.getString("s1")+bundle.getString("s2"));
}
@Override
protected void onStart() {
// TODO 自动生成的方法存根
super.onStart();
Log.i("demo", "onStart");
}
@Override
protected void onRestart() {
// TODO 自动生成的方法存根
super.onRestart();
Log.i("demo", "onRestart");
}
@Override
protected void onResume() {
// TODO 自动生成的方法存根
super.onResume();
Log.i("demo", "onResume");
}
@Override
protected void onPause() {
// TODO 自动生成的方法存根
super.onPause();
Log.i("demo", "onPause");
}
@Override
protected void onStop() {
// TODO 自动生成的方法存根
super.onStop();
Log.i("demo", "onStop");
}
@Override
protected void onDestroy() {
// TODO 自动生成的方法存根
super.onDestroy();
Log.i("demo", "onDestroy");
str=edit1.getText().toString();
}
}注:转载请注明出处 :) 毕竟代码是一个一个敲出来的啊,O(∩_∩)O~

相关文章推荐
- 解決Linux下Android开发真机调试设备不被识别问题
- [Android]在代码里运行另一个程序的方法
- [软件咨询]WPS2012正式版已发布 金山Office移动版4.0发布
- Android笔记-Linux Kernel Ftrace (Function Trace)解析
- android USB如何修改VID具体实现
- 深入Android Browser配置管理的详解
- Android Mms之:深入理解对话列表管理
- android 多线程技术应用
- Android之采用execSQL与rawQuery方法完成数据的添删改查操作详解
- Android数据类型之间相互转换系统介绍
- 通过Android trace文件分析死锁ANR实例过程
- Android实现左右滑动效果的方法详解
- Android 各国语言缩写及简称详细介绍
- Android 自动判断是电话,网址,EMAIL方法之Linkify的使用
- android IPC之binder通信机制
- Android应用开发中模拟按下HOME键的效果(实现代码)
- Android 读写文件方法汇总
- Android如何禁止横屏竖屏的变换
- Android中设置只有程序第一次运行才显示的界面实现思路
- android textview 显示html方法解析