iphone Dev 开发实例9:Create Grid Layout Using UICollectionView in iOS 6
2013-09-16 16:02
597 查看
In this tutorial, we will build a simple app to display a collection of recipe photos in grid layout. Here are what you’re going to learn:
Introduction to UICollectionView
How to Use UICollectionView to build a simple Grid-based layout
Customizing the Collection Cell Background
Note: Please make sure you use Xcode 4.5 or up to create the project.

RecipePhoto – New Xcode Project

Add a Collection View Controller
In the “Size Inspector” of the Collection View, you can change various size-related attributes. Let’s alter the size of the cell and change it to 100 by 100 pixels.

Change the size of Collection View Cell
Next, select the Collection View Cell and set the identifier as “Cell” in the Attribute Inspector.

Cell Reuse Identifier
Then, add an Image View to the cell. Xcode automatically resizes the image view and make it fit into the cell. In the “Attribute Inspector”, set the tag value to 100 for later reference.

Add Image View to Cell

Create RecipeCollectionViewController
Go back to Storyboard and assign it as the custom class of the Collection View Controller.

Assign RecipeCollectionViewController as the custom class
As said, the UICollectionView operates in a very similar way to UITableView. To populate data in UITableView, we have to implement two methods defined in the UITableViewDataSource protocol. Much like the UITableView, the UICollectionViewDataSource protocol defines data source methods for providing the data of the collection view. At least, you have to implement the collectionView:numberOfItemsInSection: and collectionView:cellForItemAtIndexPath: methods.
Let’s move on to code the RecipeCollectionViewController class. First, download this image pack, unzip it and add all the images into the Xcode project.
In RecipeCollectionViewController.m, declare an array for the image files:
And initialize it in viewDidLoad method:
Next, implement the two mandatory methods of UICollectionViewDataSource protocol:
The collectionView:numberOfItemsInSection: method returns the number of recipe images. The cellForItemAtIndexPath: method provides the data for the collection view cells. We first define a cell identifier and then request the collectionView to dequeue a reusable cell using that reuse identifier. In iOS 6, you no longer need to create the cell manually. The dequeueReusableCellWithReuseIdentifier: method will automatically create a cell or return you with a cell from re-use queue. At last, we get the image view by using the tag value and assign it with a recipe image.
Now compile and run the app. You should have a grid-based photo app.

RecipePhoto App with Grid-based Layout
Background View – background view of the cell
Selected Background View – the background view when the cell is selected. When user selects the cell, this selected background view will be layered above the background view.
Content View – obviously, it’s the cell content.
We have already used the content view to display the recipe photo. We’ll make use of the background view to show the picture frame. In the image pack you downloaded earlier, it includes a file named “pic_frame.png”, which is the picture frame. The size of the frame is 100 by 100 pixel. In order to frame the recipe photo, we’ll first resize the image view of cell and re-arrange its position.
Go to Storyboard and select the image view. Set X to 5 and Y to 8. The width and height should be changed to 90 and 72 pixels respectively.

Resize image view to fit into the photo frame
In the cellForItemAtIndexPath: method of RecipeCollectionViewController.m, add the following line of code:
We first load the photo frame image and set it as the cell background. Now compile and run the app again. Your app should look like this:

Introduction to UICollectionView
How to Use UICollectionView to build a simple Grid-based layout
Customizing the Collection Cell Background
Create Simple App with Grid Layout
To better understand how UICollectionView work, let’s get some hand-on experience and build a simple app. Open Xcode and create a new project using the “Single View application” template. Name the project as “RecipePhoto” with “Use Storyboard” and “Use Automatic Reference Count” enabled.Note: Please make sure you use Xcode 4.5 or up to create the project.
RecipePhoto – New Xcode Project
Designing the Collection View
Go to Storyboard and delete the default view controller. Instead, add a Collection View Controller from object library.Add a Collection View Controller
In the “Size Inspector” of the Collection View, you can change various size-related attributes. Let’s alter the size of the cell and change it to 100 by 100 pixels.
Change the size of Collection View Cell
Next, select the Collection View Cell and set the identifier as “Cell” in the Attribute Inspector.
Cell Reuse Identifier
Then, add an Image View to the cell. Xcode automatically resizes the image view and make it fit into the cell. In the “Attribute Inspector”, set the tag value to 100 for later reference.
Add Image View to Cell
Coding the Collection View
In Project Navigator, right-click and select “New File”. Create a new class that is a subclass of UICollectionViewController and name it as RecipeCollectionViewController.Create RecipeCollectionViewController
Go back to Storyboard and assign it as the custom class of the Collection View Controller.
Assign RecipeCollectionViewController as the custom class
As said, the UICollectionView operates in a very similar way to UITableView. To populate data in UITableView, we have to implement two methods defined in the UITableViewDataSource protocol. Much like the UITableView, the UICollectionViewDataSource protocol defines data source methods for providing the data of the collection view. At least, you have to implement the collectionView:numberOfItemsInSection: and collectionView:cellForItemAtIndexPath: methods.
Let’s move on to code the RecipeCollectionViewController class. First, download this image pack, unzip it and add all the images into the Xcode project.
In RecipeCollectionViewController.m, declare an array for the image files:
| 1 2 3 | @interface RecipeCollectionViewController () { NSArray *recipePhotos; } |
| 1 2 3 4 5 6 7 8 | - (void)viewDidLoad { [super viewDidLoad]; // Initialize recipe image array recipeImages = [NSArray arrayWithObjects:@"angry_birds_cake.jpg", @"creme_brelee.jpg", @"egg_benedict.jpg", @"full_breakfast.jpg", @"green_tea.jpg", @"ham_and_cheese_panini.jpg", @"ham_and_egg_sandwich.jpg", @"hamburger.jpg", @"instant_noodle_with_egg.jpg", @"japanese_noodle_with_pork.jpg", @"mushroom_risotto.jpg", @"noodle_with_bbq_pork.jpg", @"starbucks_coffee.jpg", @"thai_shrimp_cake.jpg", @"vegetable_curry.jpg", @"white_chocolate_donut.jpg", nil]; } |
| 1 2 3 4 5 6 7 8 9 10 11 12 13 14 15 | - (NSInteger)collectionView:(UICollectionView *)collectionView numberOfItemsInSection:(NSInteger)section { return recipeImages.count; } - (UICollectionViewCell *)collectionView:(UICollectionView *)collectionView cellForItemAtIndexPath:(NSIndexPath *)indexPath{ static NSString *identifier = @"Cell"; UICollectionViewCell *cell = [collectionView dequeueReusableCellWithReuseIdentifier:identifier forIndexPath:indexPath]; UIImageView *recipeImageView = (UIImageView *)[cell viewWithTag:100]; recipeImageView.image = [UIImage imageNamed:[recipeImages objectAtIndex:indexPath.row]]; return cell; } |
Now compile and run the app. You should have a grid-based photo app.
RecipePhoto App with Grid-based Layout
Customizing the Collection Cell Background
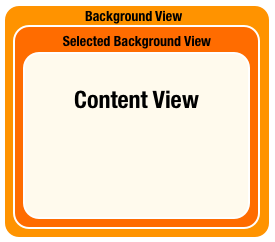
Isn’t UICollectionView great? With a few lines of code, you can create a grid-based photo app. But what if you want to add a picture frame to the photos? Like other UI elements, the design of the collection view cell lets developers customize the background easily. The UICollectionViewCell is actually comprised of three different views including background, selected background and content view. It’s best to illustrate the cell views using a picture:Background View – background view of the cell
Selected Background View – the background view when the cell is selected. When user selects the cell, this selected background view will be layered above the background view.
Content View – obviously, it’s the cell content.
We have already used the content view to display the recipe photo. We’ll make use of the background view to show the picture frame. In the image pack you downloaded earlier, it includes a file named “pic_frame.png”, which is the picture frame. The size of the frame is 100 by 100 pixel. In order to frame the recipe photo, we’ll first resize the image view of cell and re-arrange its position.
Go to Storyboard and select the image view. Set X to 5 and Y to 8. The width and height should be changed to 90 and 72 pixels respectively.
Resize image view to fit into the photo frame
In the cellForItemAtIndexPath: method of RecipeCollectionViewController.m, add the following line of code:
| 1 | cell.backgroundView = [[UIImageView alloc] initWithImage:[UIImage imageNamed:@"photo-frame.png"]]; |

相关文章推荐
- iphone Dev 开发实例10:How To Add a Slide-out Sidebar Menu in Your Apps
- 【无限互联】iOS开发之瀑布流布局实现(UICollectionView拓展Layout)
- iOS 开发UICollectionView及其常用方法+实例
- Using UIScrollView with Auto Layout in iOS
- Using UIScrollView with Auto Layout in iOS
- iphone dev 入门实例7:How to Add Splash Screen in Your iOS App
- iphone dev 入门实例2:Pass Data Between View Controllers using segue
- iOS开发笔记15:地图坐标转换那些事、block引用循环/weak–strong dance、UICollectionviewLayout及瀑布流、图层混合
- iOS开发 自定义UICollectionViewLayout实现Masonry Layout
- iOS开发 - UICollectionViewLayout 自定义布局
- iOS开发进阶 - 自定义UICollectionViewLayout实现瀑布流布局
- iphone Dev 开发实例8: Parsing an RSS Feed Using NSXMLParser
- iOS开发进阶 - 自定义UICollectionViewLayout实现瀑布流布局
- iOS开发之UICollectionViewController
- iOS开发tips-UIScrollView的Autlayout布局
- iOS开发上下滑动UIScrollview隐藏或者显示导航栏的实例
- [IOS开发]新控件,新特性 UICollectionView(2)
- IOS 开发中 Whose view is not in the window hierarchy 错误的解决办法
- iOS开发之窥探UICollectionViewController(四) --一款功能强大的自定义瀑布流
- iOS开发——高级篇——流水布局UICollectionViewFlowLayout的基本使用