kvm虚拟化学习笔记(十二)之kvm linux虚拟机在线扩展磁盘
2013-09-12 22:55
351 查看
KVM虚拟化学习笔记系列文章列表
----------------------------------------
kvm虚拟化学习笔记(一)之kvm虚拟化环境安装
/article/4403901.html
kvm虚拟化学习笔记(二)之linux kvm虚拟机安装
/article/4403812.html
kvm虚拟化学习笔记(三)之windows kvm虚拟机安装
/article/4403813.html
kvm虚拟化学习笔记(四)之kvm虚拟机日常管理与配置
/article/4403814.html
kvm虚拟化学习笔记(五)之windows虚拟机性能调整
/article/4403815.html
kvm虚拟化学习笔记(六)之kvm虚拟机控制台登录配置
/article/4403816.html
kvm虚拟化学习笔记(七)之kvm虚拟机克隆
/article/4403817.html
kvm虚拟化学习笔记(八)之kvm虚拟机vnc配置
/article/4403818.html
kvm虚拟化学习笔记(九)之kvm虚拟机时间配置
/article/4403819.html
kvm虚拟化学习笔记(十)之kvm虚拟机快照备份
/article/4403820.html
kvm虚拟化学习笔记(十一)之kvm虚拟机扩展磁盘空间
/article/4403821.html
kvm虚拟化学习笔记(十二)之kvm linux虚拟机在线扩展磁盘
/article/4403822.html
kvm虚拟化学习笔记(十三)之kvm虚拟机磁盘文件读取小结
/article/4403823.html
kvm虚拟化学习笔记(十四)之kvm虚拟机静态迁移
/article/4403824.html
kvm虚拟化学习笔记(十五)之kvm虚拟机动态迁移
/article/4403825.html
kvm虚拟化学习笔记(十六)之kvm虚拟化存储池配置
/article/4403830.html
kvm虚拟化学习笔记(十七)之KVM到KVM之v2v迁移
/article/4403831.html
kvm虚拟化学习笔记(十八)之ESXi到KVM之v2v迁移
/article/4403832.html
kvm虚拟化学习笔记(十九)之convirt集中管理平台搭建
/article/4403836.html
kvm虚拟化学习笔记(二十)之convirt安装linux系统
/article/4403837.html
说明:
1) vmware ESXi虚拟化平台也支持这台在线扩展磁盘功能。
2) kvm虚拟机也支持在线扩展磁盘功能,在线扩展有特定的使用环境,主要用于不能随便停用的生产环境中。
3) 经过测试KVM在线扩展磁盘功能只适用于RHEL/CentOS/OEL6.x环境,5.x不支持在线的扩展磁盘,其它ubuntu等其它Linux我没有测试,不做评论。
本文出自:http://koumm.blog.51cto.com
本文为了测试,专门安装了OEL6.3虚拟机。
# qemu-img create -f qcow2 /data/test02.qcow2 7G
# virt-install --name=oeltest02 --os-variant=RHEL6.3 --ram 512 --vcpus=1 --disk path=/data/test01.qcow2,format=qcow2,size=7,bus=virtio --accelerate --cdrom /data/iso/oel63x64.iso --vnc --vncport=5911 --vnclisten=0.0.0.0 --network bridge=br0,model=virtio --noautoconsole
目的是使用实验环境磁盘改为virtio驱动下的vda磁盘,这种scsi磁盘可以热插拨,可以动态添加。
整个安装过程略,虚拟机各种配置略,可以参考系列文章前面的内容。
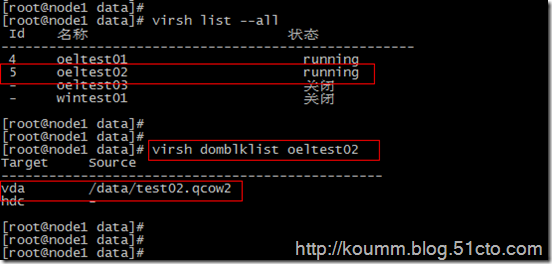
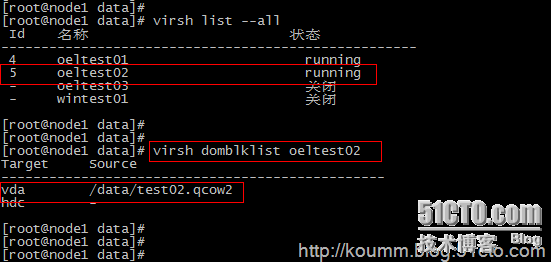
[root@node1 data]# virsh domblklist oeltest02
(2) 创建一块qcow2虚拟磁盘
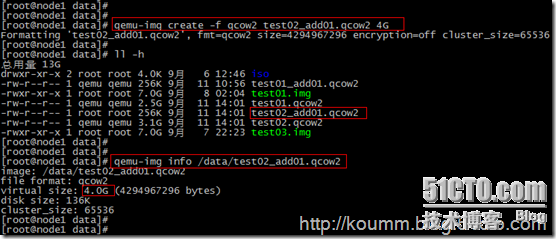
[root@node1 data]# qemu-img create -f qcow2 test02_add01.qcow2 4G
(3) 在线添加这台qcow2虚拟磁盘
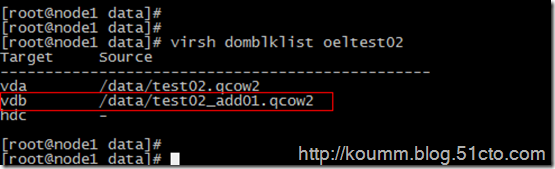
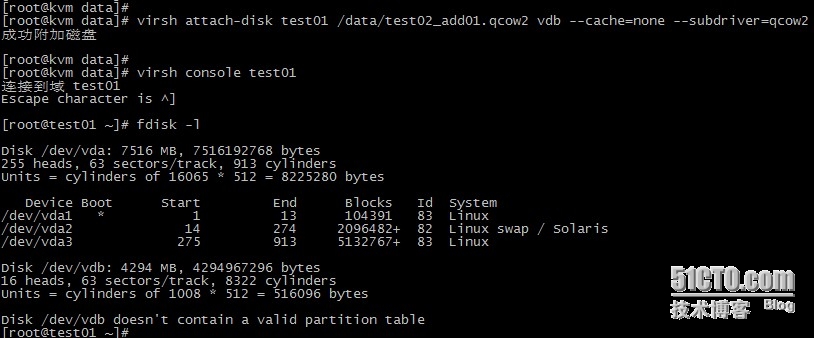
# virsh attach-disk oeltest02 /data/test02_add01.qcow2 vdb --cache=none --subdriver=qcow2

(4) 进入oeltest02虚拟机查看添加磁盘情况
[root@node1 data]#
[root@node1 data]# virsh console oeltest02
连接到域 oeltest02
Escape character is ^]
Oracle Linux Server release 6.3
Kernel 2.6.32-279.el6.x86_64 on an x86_64
test02 login: root
Password:
Last login: Thu Sep 12 00:46:27 on ttyS0
[root@test02 ~]#
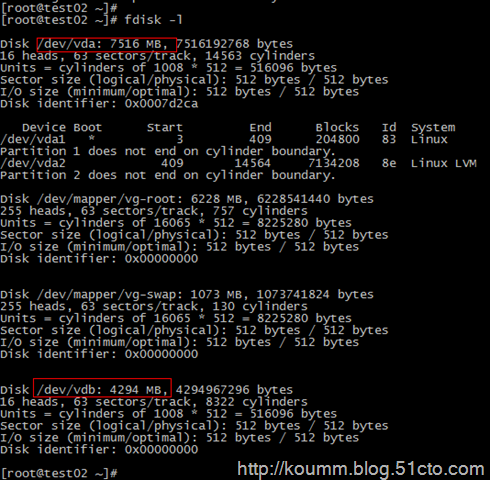
[root@test02 ~]# fdisk –l
即可看到刚才添加的磁盘已经被虚拟机适别到了。
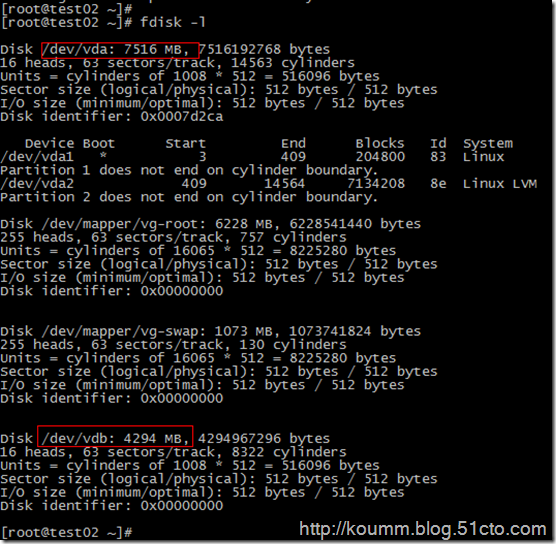
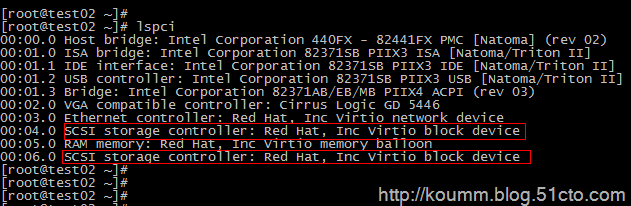
可以看到有两个scsi存储设备。

注:再次说明只有RHEL/CentOS/OEL6.x版本在线添加磁盘,虚拟机直接可以在线识别。
(5) 修改虚拟机配置文件添加新增磁盘配置
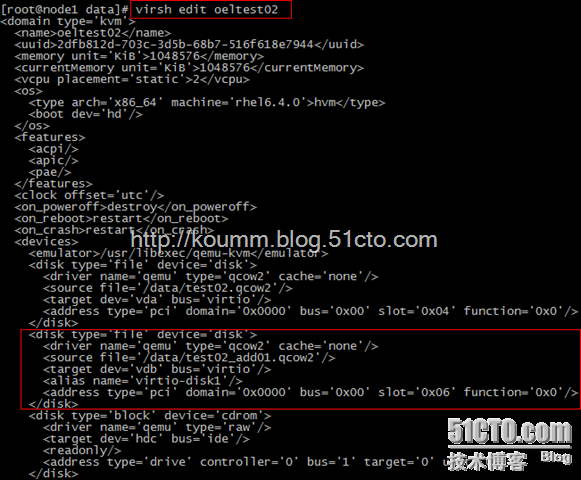
1) 查看当前虚拟机配置文件
这里查看到的虚拟机配置文件是内存中存放的配置,重启后会消失,需要将新添的磁盘配置保存到配置文件中。
[root@node1 data]# virsh dumpxml oeltest02
<domain type='kvm' id='5'>
<name>oeltest02</name>
<uuid>2dfb812d-703c-3d5b-68b7-516f618e7944</uuid>
<memory unit='KiB'>1048576</memory>
<currentMemory unit='KiB'>1048576</currentMemory>
<vcpu placement='static'>2</vcpu>
<os>
<type arch='x86_64' machine='rhel6.4.0'>hvm</type>
<boot dev='hd'/>
</os>
<features>
<acpi/>
<apic/>
<pae/>
</features>
<clock offset='utc'/>
<on_poweroff>destroy</on_poweroff>
<on_reboot>restart</on_reboot>
<on_crash>restart</on_crash>
<devices>
<emulator>/usr/libexec/qemu-kvm</emulator>
<disk type='file' device='disk'>
<driver name='qemu' type='qcow2' cache='none'/>
<source file='/data/test02.qcow2'/>
<target dev='vda' bus='virtio'/>
<alias name='virtio-disk0'/>
<address type='pci' domain='0x0000' bus='0x00' slot='0x04' function='0x0'/>
</disk>
<disk type='file' device='disk'>
<driver name='qemu' type='qcow2' cache='none'/>
<source file='/data/test02_add01.qcow2'/>
<target dev='vdb' bus='virtio'/>
<alias name='virtio-disk1'/>
<address type='pci' domain='0x0000' bus='0x00' slot='0x06' function='0x0'/>
</disk>
<disk type='block' device='cdrom'>
<driver name='qemu' type='raw'/>
<target dev='hdc' bus='ide'/>
<readonly/>
<alias name='ide0-1-0'/>
<address type='drive' controller='0' bus='1' target='0' unit='0'/>
</disk>
<controller type='usb' index='0'>
<alias name='usb0'/>
<address type='pci' domain='0x0000' bus='0x00' slot='0x01' function='0x2'/>
</controller>
<controller type='ide' index='0'>
<alias name='ide0'/>
<address type='pci' domain='0x0000' bus='0x00' slot='0x01' function='0x1'/>
</controller>
<interface type='bridge'>
<mac address='52:54:00:ff:2f:70'/>
<source bridge='br0'/>
<target dev='vnet1'/>
<model type='virtio'/>
<alias name='net0'/>
<address type='pci' domain='0x0000' bus='0x00' slot='0x03' function='0x0'/>
</interface>
<serial type='pty'>
<source path='/dev/pts/3'/>
<target port='0'/>
<alias name='serial0'/>
</serial>
<console type='pty' tty='/dev/pts/3'>
<source path='/dev/pts/3'/>
<target type='serial' port='0'/>
<alias name='serial0'/>
</console>
<input type='mouse' bus='ps2'/>
<graphics type='vnc' port='5911' autoport='no' listen='0.0.0.0'>
<listen type='address' address='0.0.0.0'/>
</graphics>
<video>
<model type='cirrus' vram='9216' heads='1'/>
<alias name='video0'/>
<address type='pci' domain='0x0000' bus='0x00' slot='0x02' function='0x0'/>
</video>
<memballoon model='virtio'>
<alias name='balloon0'/>
<address type='pci' domain='0x0000' bus='0x00' slot='0x05' function='0x0'/>
</memballoon>
</devices>
<seclabel type='none'/>
</domain>
[root@node1 data]#
2) 保存新增磁盘配置
[root@node1 data]# virsh edit oeltest02
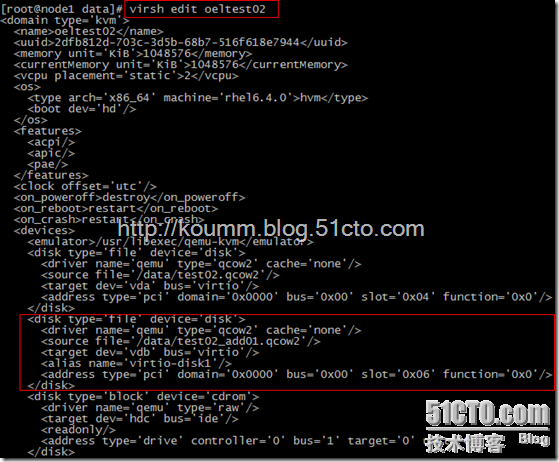
说明:对RHEL/CentOS/OEL5.x版本虚拟机在线添加磁盘按照第4小节处理。
[root@test02 ~]# fdisk /dev/vdb
[root@test02 ~]# partprobe
(2) 创建逻辑卷过程如下
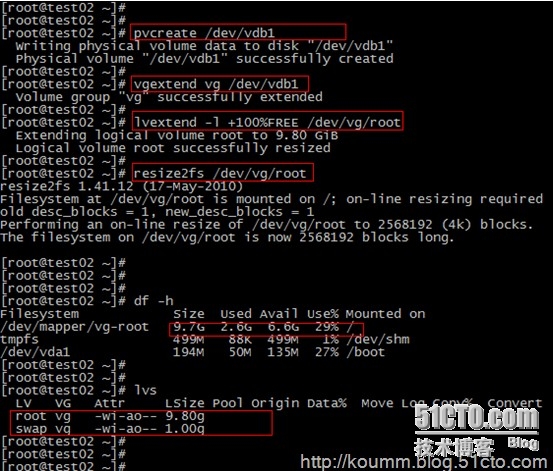
到此oeltest02虚拟机在线添加磁盘并在线扩展磁盘成功。
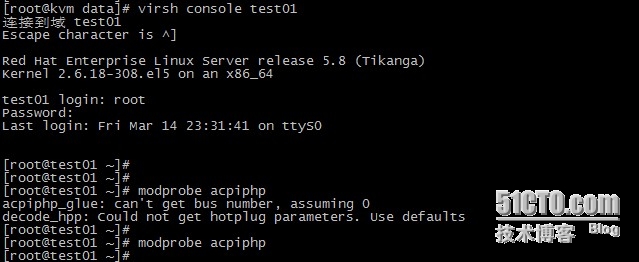
2014-03-14日修改, 感谢xiaoli110提供如下解决办法。
(1) 先登录进虚拟机执行两次如下命令
modprobe acpiphp
modprobe acpiphp
(2) 虚拟主机上创建磁盘并添加磁盘
以上方式要感谢xiaoli110网友指教。
本文出自 “koumm的linux技术博客” 博客,请务必保留此出处/article/4403822.html
----------------------------------------
kvm虚拟化学习笔记(一)之kvm虚拟化环境安装
/article/4403901.html
kvm虚拟化学习笔记(二)之linux kvm虚拟机安装
/article/4403812.html
kvm虚拟化学习笔记(三)之windows kvm虚拟机安装
/article/4403813.html
kvm虚拟化学习笔记(四)之kvm虚拟机日常管理与配置
/article/4403814.html
kvm虚拟化学习笔记(五)之windows虚拟机性能调整
/article/4403815.html
kvm虚拟化学习笔记(六)之kvm虚拟机控制台登录配置
/article/4403816.html
kvm虚拟化学习笔记(七)之kvm虚拟机克隆
/article/4403817.html
kvm虚拟化学习笔记(八)之kvm虚拟机vnc配置
/article/4403818.html
kvm虚拟化学习笔记(九)之kvm虚拟机时间配置
/article/4403819.html
kvm虚拟化学习笔记(十)之kvm虚拟机快照备份
/article/4403820.html
kvm虚拟化学习笔记(十一)之kvm虚拟机扩展磁盘空间
/article/4403821.html
kvm虚拟化学习笔记(十二)之kvm linux虚拟机在线扩展磁盘
/article/4403822.html
kvm虚拟化学习笔记(十三)之kvm虚拟机磁盘文件读取小结
/article/4403823.html
kvm虚拟化学习笔记(十四)之kvm虚拟机静态迁移
/article/4403824.html
kvm虚拟化学习笔记(十五)之kvm虚拟机动态迁移
/article/4403825.html
kvm虚拟化学习笔记(十六)之kvm虚拟化存储池配置
/article/4403830.html
kvm虚拟化学习笔记(十七)之KVM到KVM之v2v迁移
/article/4403831.html
kvm虚拟化学习笔记(十八)之ESXi到KVM之v2v迁移
/article/4403832.html
kvm虚拟化学习笔记(十九)之convirt集中管理平台搭建
/article/4403836.html
kvm虚拟化学习笔记(二十)之convirt安装linux系统
/article/4403837.html
说明:
1) vmware ESXi虚拟化平台也支持这台在线扩展磁盘功能。
2) kvm虚拟机也支持在线扩展磁盘功能,在线扩展有特定的使用环境,主要用于不能随便停用的生产环境中。
3) 经过测试KVM在线扩展磁盘功能只适用于RHEL/CentOS/OEL6.x环境,5.x不支持在线的扩展磁盘,其它ubuntu等其它Linux我没有测试,不做评论。
本文出自:http://koumm.blog.51cto.com
本文为了测试,专门安装了OEL6.3虚拟机。
1. 安装oel6.3虚拟机
安装oeltest02虚拟机# qemu-img create -f qcow2 /data/test02.qcow2 7G
# virt-install --name=oeltest02 --os-variant=RHEL6.3 --ram 512 --vcpus=1 --disk path=/data/test01.qcow2,format=qcow2,size=7,bus=virtio --accelerate --cdrom /data/iso/oel63x64.iso --vnc --vncport=5911 --vnclisten=0.0.0.0 --network bridge=br0,model=virtio --noautoconsole
目的是使用实验环境磁盘改为virtio驱动下的vda磁盘,这种scsi磁盘可以热插拨,可以动态添加。
整个安装过程略,虚拟机各种配置略,可以参考系列文章前面的内容。
2. 给oeltest02虚拟机在线添加磁盘
(1) 查看现有磁盘[root@node1 data]# virsh domblklist oeltest02
(2) 创建一块qcow2虚拟磁盘
[root@node1 data]# qemu-img create -f qcow2 test02_add01.qcow2 4G

(3) 在线添加这台qcow2虚拟磁盘
# virsh attach-disk oeltest02 /data/test02_add01.qcow2 vdb --cache=none --subdriver=qcow2


(4) 进入oeltest02虚拟机查看添加磁盘情况
[root@node1 data]#
[root@node1 data]# virsh console oeltest02
连接到域 oeltest02
Escape character is ^]
Oracle Linux Server release 6.3
Kernel 2.6.32-279.el6.x86_64 on an x86_64
test02 login: root
Password:
Last login: Thu Sep 12 00:46:27 on ttyS0
[root@test02 ~]#
[root@test02 ~]# fdisk –l
即可看到刚才添加的磁盘已经被虚拟机适别到了。
可以看到有两个scsi存储设备。
注:再次说明只有RHEL/CentOS/OEL6.x版本在线添加磁盘,虚拟机直接可以在线识别。
(5) 修改虚拟机配置文件添加新增磁盘配置
1) 查看当前虚拟机配置文件
这里查看到的虚拟机配置文件是内存中存放的配置,重启后会消失,需要将新添的磁盘配置保存到配置文件中。
[root@node1 data]# virsh dumpxml oeltest02
<domain type='kvm' id='5'>
<name>oeltest02</name>
<uuid>2dfb812d-703c-3d5b-68b7-516f618e7944</uuid>
<memory unit='KiB'>1048576</memory>
<currentMemory unit='KiB'>1048576</currentMemory>
<vcpu placement='static'>2</vcpu>
<os>
<type arch='x86_64' machine='rhel6.4.0'>hvm</type>
<boot dev='hd'/>
</os>
<features>
<acpi/>
<apic/>
<pae/>
</features>
<clock offset='utc'/>
<on_poweroff>destroy</on_poweroff>
<on_reboot>restart</on_reboot>
<on_crash>restart</on_crash>
<devices>
<emulator>/usr/libexec/qemu-kvm</emulator>
<disk type='file' device='disk'>
<driver name='qemu' type='qcow2' cache='none'/>
<source file='/data/test02.qcow2'/>
<target dev='vda' bus='virtio'/>
<alias name='virtio-disk0'/>
<address type='pci' domain='0x0000' bus='0x00' slot='0x04' function='0x0'/>
</disk>
<disk type='file' device='disk'>
<driver name='qemu' type='qcow2' cache='none'/>
<source file='/data/test02_add01.qcow2'/>
<target dev='vdb' bus='virtio'/>
<alias name='virtio-disk1'/>
<address type='pci' domain='0x0000' bus='0x00' slot='0x06' function='0x0'/>
</disk>
<disk type='block' device='cdrom'>
<driver name='qemu' type='raw'/>
<target dev='hdc' bus='ide'/>
<readonly/>
<alias name='ide0-1-0'/>
<address type='drive' controller='0' bus='1' target='0' unit='0'/>
</disk>
<controller type='usb' index='0'>
<alias name='usb0'/>
<address type='pci' domain='0x0000' bus='0x00' slot='0x01' function='0x2'/>
</controller>
<controller type='ide' index='0'>
<alias name='ide0'/>
<address type='pci' domain='0x0000' bus='0x00' slot='0x01' function='0x1'/>
</controller>
<interface type='bridge'>
<mac address='52:54:00:ff:2f:70'/>
<source bridge='br0'/>
<target dev='vnet1'/>
<model type='virtio'/>
<alias name='net0'/>
<address type='pci' domain='0x0000' bus='0x00' slot='0x03' function='0x0'/>
</interface>
<serial type='pty'>
<source path='/dev/pts/3'/>
<target port='0'/>
<alias name='serial0'/>
</serial>
<console type='pty' tty='/dev/pts/3'>
<source path='/dev/pts/3'/>
<target type='serial' port='0'/>
<alias name='serial0'/>
</console>
<input type='mouse' bus='ps2'/>
<graphics type='vnc' port='5911' autoport='no' listen='0.0.0.0'>
<listen type='address' address='0.0.0.0'/>
</graphics>
<video>
<model type='cirrus' vram='9216' heads='1'/>
<alias name='video0'/>
<address type='pci' domain='0x0000' bus='0x00' slot='0x02' function='0x0'/>
</video>
<memballoon model='virtio'>
<alias name='balloon0'/>
<address type='pci' domain='0x0000' bus='0x00' slot='0x05' function='0x0'/>
</memballoon>
</devices>
<seclabel type='none'/>
</domain>
[root@node1 data]#
2) 保存新增磁盘配置
[root@node1 data]# virsh edit oeltest02
说明:对RHEL/CentOS/OEL5.x版本虚拟机在线添加磁盘按照第4小节处理。
3. 将新增磁盘并入虚拟机逻辑卷中
(1) 分区过程如下[root@test02 ~]# fdisk /dev/vdb
[root@test02 ~]# partprobe
(2) 创建逻辑卷过程如下
到此oeltest02虚拟机在线添加磁盘并在线扩展磁盘成功。
2014-03-14日修改, 感谢xiaoli110提供如下解决办法。
4. OEL/RHEL/CentOS5.x虚拟机在线添加磁盘过程
说明:OEL/RHEL/CentOS5.x虚拟机按照上面的过程在线添加磁盘,磁盘识别不出来,需要在添加磁盘后,修改配置文件后重启,不能在线识别到磁盘。需要采用如下方式处理,即可以实现在线添加磁盘的功能。(1) 先登录进虚拟机执行两次如下命令
modprobe acpiphp
modprobe acpiphp
(2) 虚拟主机上创建磁盘并添加磁盘
以上方式要感谢xiaoli110网友指教。
本文出自 “koumm的linux技术博客” 博客,请务必保留此出处/article/4403822.html

相关文章推荐
- kvm虚拟化学习笔记(十二)之kvm linux虚拟机在线扩展磁盘
- kvm虚拟化学习笔记(十一)之kvm虚拟机扩展磁盘空间
- KVM虚拟化笔记(十一)------kvm之Linux虚拟机在线扩展磁盘
- kvm虚拟化学习笔记(六)之kvm虚拟机控制台登录配置
- CentOS下KVM虚拟化学习笔记
- kvm虚拟化学习笔记(二十一)之KVM性能优化学习笔记
- kvm虚拟化学习笔记(六)之kvm虚拟机控制台登录配置
- kvm虚拟化学习笔记(十七)之KVM到KVM之v2v迁移
- 老广: KVM虚拟化学习笔记
- kvm虚拟化学习笔记(十八)之ESXi到KVM之v2v迁移
- kvm虚拟化学习笔记(二)之linux kvm虚拟机安装
- kvm虚拟化学习笔记(十三)之kvm虚拟机磁盘文件读取小结
- kvm在线磁盘扩展
- kvm虚拟化学习笔记(一)之kvm虚拟化环境安装
- kvm虚拟化学习笔记(三)之windows kvm虚拟机安装
- KVM虚拟化笔记(十)------kvm虚拟机扩充磁盘空间
- 转载:KVM虚拟化学习笔记
- 虚拟化学习笔记-KVM 虚拟机在物理主机之间迁移的实现(p2p)
- kvm虚拟化学习笔记(十七)之KVM到KVM之v2v迁移
- kvm虚拟化学习笔记(二)之linux kvm虚拟机安装