Redhat关闭防火墙和SELinux方法
2013-08-29 11:02
369 查看
[b][b][b]【实验拓扑】[/b][/b][/b][b][b][b]
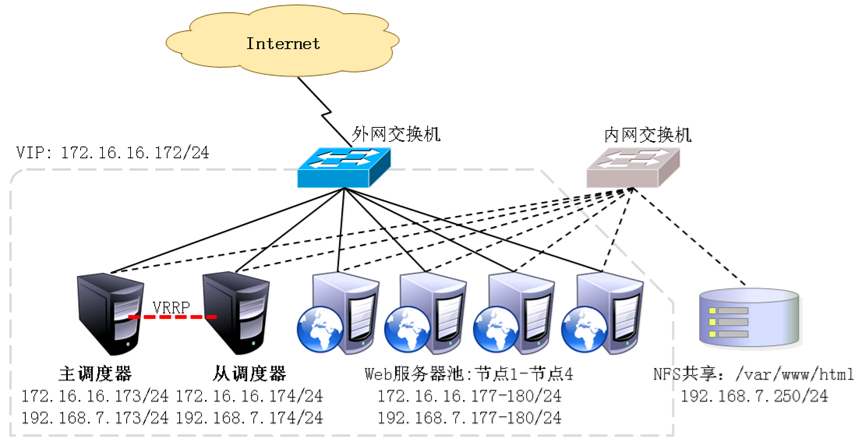
[/b][/b][/b][b][/b][b][b][b][b][b]【实验任务】[/b][/b][/b][/b][/b][b][b][b][/b][/b][/b]主调度器负责分配客户机请求,若出现故障则由从调度器自动接替服务启用邮件通知功能,以便及时了解各web节点服务器的健康状况
[b]【实验步骤】[/b]
一、配置负载调度器【主服務器】
1、Keepalived的安装与服务控制
2、调整/proc响应参数
3、主服务器配置
【从服務器】
从调度器的配置与主调度器基本相同,也包括全局配置、热备配置、服务器池配置,只需要调整router_id、state、priority参数即可,其余内容完成相同
1、Keepalived的安装与服务控制
2、调整/proc响应参数
3、主服务器配置
二、配置NFS共享存储服务NFS(Network File System网络文件系统)是一种基于TCP/IP传输的网络文件系统协议,最早由SUN公司开发。通过使用NFS协议,客户机可以像访问本地目录一样访问远程服务器中的共享资源。对于大多数群集来说,使用NFS协议来共享数据存储是比较常见的做法,NFS也是NAS存储设备必然支持的一种协议依赖于RPC(远端过程调用)机制,以完成远程到本地的映射:需安装nfs-utils、rpcbind软件包;系统服务:nfs、rpcbind;共享配置文件:/etc/exports
1、安装nfs-utils、rpcbind软件包
三、配置节点服务器(web1)使用DR模式时,节点服务器也需要配置VIP地址,并调整内核的ARP响应参数以阻止更新VIP的MAC地址,避免发生冲突1、配置虚拟IP地址(VIP)
2、调整/proc响应参数
3、安装rpcbind软件包,并启动服务
4、安装httpd,创建测试网页来源(NFS-Server),手动挂载NFS共享目录
5、启动httpd服务,由于网站根目录是运程挂载到本地,所以应……
四、配置节点服务器(web2)Web2的配置与Web1基本相同,不同的只是IP地址有更多的服务器节点也是如此
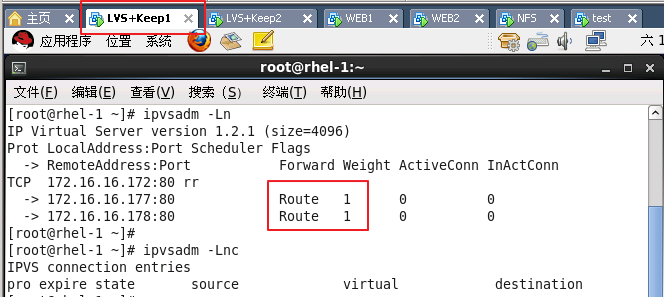
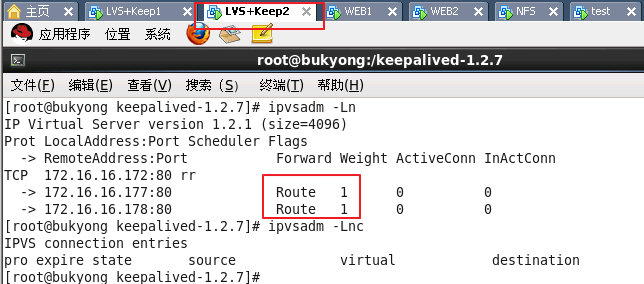
五、LVS+Keepalived集成测试
六、启用邮件通知功能(主、从调度器)1、安装sendmail软件包、启用sendmail服务,为本机提供邮件发送服务
2、在Keepalived的全局配置中添加邮件通知设置,重新加载服务
3、先停止部分节点的WEB服务,过几分钟再恢复,查问通知邮件内容
[r1]主要操作选项
-A 添加虚拟服务器
-t 设置群集地址(VIP,Virtual IP)
-s 指定负载调度算法
-a 添加真实服务器
-d 删除真实服务器
-D 删除整个虚拟服务器
-r 指定真实服务器(Real Server)的地址
-m 使用NAT模式;-g、-i分别对应DR、TUN模式
-w 为节点服务器设置权重默认为1
-L查看LVS虚拟服务器,可以指定只查看某一个VIP地址
-n 以数字形式显示地址、端口等信息,结合其他选项使用
本文出自 “IT足迹--清墨” 博客,请务必保留此出处http://ywlin.blog.51cto.com/4633917/1340626
[/b][/b][/b][b][/b][b][b][b][b][b]【实验任务】[/b][/b][/b][/b][/b][b][b][b][/b][/b][/b]主调度器负责分配客户机请求,若出现故障则由从调度器自动接替服务启用邮件通知功能,以便及时了解各web节点服务器的健康状况
[b]【实验步骤】[/b]
一、配置负载调度器【主服務器】
1、Keepalived的安装与服务控制
| 安装支持软件与ipvsadm管理工具[r1] |
| [root@rhel-1 ~]# ifconfig eth1 172.16.16.173 [root@rhel-1 ~]# yun –y install kernel-devel openssl-devel popt-devel [root@rhel-1 ~]# rpm -ivh /media/RHEL_6.1\ i386\ Disc\ 1/Packages/ipvsadm-1.25-9.el6.i686.rpm warning: /media/RHEL_6.1 i386 Disc 1/Packages/ipvsadm-1.25-9.el6.i686.rpm: Header V3 RSA/SHA256 Signature, key ID fd431d51: NOKEY Preparing... ########################################### [100%] 1:ipvsadm ########################################### [100%] |
| 编译安装Keepalived |
| [root@rhel-1 /]# tar zxvf keepalived-1.2.7.tar.gz [root@rhel-1 /]# cd keepalived-1.2.7 [root@rhel-1 keepalived-1.2.7]# ./configure --prefix=/ --with-kernel-dir=/usr/src/kernels/2.6.32-131.0.15.el6.i686/ [root@rhel-1 ~]# modprobe ip_vs //加载LVS内核模块 [root@rhel-1 /]# make && make install |
| 执行make inatall后,会自动生成/etc/init.d/keepalived脚本文件,但还需要手动添加为系统服务,这样就可以使用service、chkconfig工具来对Keepalived服务程序进行管理 |
| [root@rhel-1 ~]# ls –l /etc/init.d/keepalived [root@rhel-1 ~]# chkconfig --add keepalived [root@rhel-1 ~]# chkconfig keepalived |
| 对于LR群集模式来说,由于LVS负载调度器和各节点需要共用VIP地址,为了避免网络内的ARP解析出现异常,应该关闭linux内核的重定向参数响应 | |
[root@rhel-1 ~]# vim /etc/sysctl.conf
…… net.ipv4.conf.all.send_redirects = 0 net.ipv4.conf.default.send_redirects = 0 net.ipv4.conf.eth1.send_redirects = 0 |
| Keepalived服务的配置目录位于/etc/keepalived/.其中keepalived.conf是主配置文件;另外包括一个子目录samples/,提供了许多配置样例作为参考 在Keepalived配置文件中,[global_defs{…}]区段指定全局参数,使用[vrrp_instance 实例名称 {…}]区段指定VRRP热备参数,注释文字以“!”符号开头 | |
| [root@rhel-1 ~]# cd /etc/keepalived/ [root@rhel-1 keepalived]# cp keepalived.conf keepalived.conf.bak [root@rhel-1 keepalived]# vim keepalived.conf
[root@rhel-1 keepalived]# ip addr show dev eth0 |
| 确认上述配置无误,然后启动Keepalived服务。实际状态为MASTER的主服务器将为eth0 |
| [root@rhel-1 ~]# ip addr show dev eth1 2: eth1: <BROADCAST,MULTICAST,UP,LOWER_UP> mtu 1500 qdisc pfifo_fast state UP qlen 1000 link/ether 00:0c:29:d2:93:5e brd ff:ff:ff:ff:ff:ff inet 172.16.16.173/16 brd 172.16.255.255 scope global eth1 inet 172.16.16.172/32 scope global eth1 inet6 fe80::20c:29ff:fed2:935e/64 scope link valid_lft forever preferred_lft forever |
| 在Keepalived的热备配置基础上,添加【virtual_serverVIP port { …. }】区段来配置虚拟服务器。主要包括对负载调度算法、群集工作模式、健康检查间隔、真实服务器地址等参数的设置 | |
[root@rhel-1 keepalived]# vim keepalived.conf
|
 |
从调度器的配置与主调度器基本相同,也包括全局配置、热备配置、服务器池配置,只需要调整router_id、state、priority参数即可,其余内容完成相同
1、Keepalived的安装与服务控制
| 安装支持软件与ipvsadm管理工具 |
| [root@bukyong ~]# ifconfig eth1 172.16.16.174 [root@bukyong ~]# yun –y install kernel-devel openssl-devel popt-devel [root@bukyong ~]# rpm -ivh /media/RHEL_6.1\ i386\ Disc\ 1/Packages/ipvsadm-1.25-9.el6.i686.rpm warning: /media/RHEL_6.1 i386 Disc 1/Packages/ipvsadm-1.25-9.el6.i686.rpm: Header V3 RSA/SHA256 Signature, key ID fd431d51: NOKEY Preparing... ########################################### [100%] 1:ipvsadm ########################################### [100%] |
| 编译安装Keepalived |
| [root@bukyong /]# tar zxvf keepalived-1.2.7.tar.gz [root@bukyong /]# cd keepalived-1.2.7 [root@bukyong keepalived-1.2.7]# ./configure --prefix=/ --with-kernel-dir=/usr/src/kernels/2.6.32-131.0.15.el6.i686/ [root@bukyong ~]# modprobe ip_vs //加载LVS内核模块 [root@bukyong /]# make && make install |
| 执行make inatall后,会自动生成/etc/init.d/keepalived脚本文件,但还需要手动添加为系统服务,这样就可以使用service、chkconfig工具来对Keepalived服务程序进行管理 |
| [root@bukyong ~]# ls –l /etc/init.d/keepalived [root@bukyong ~]# chkconfig --add keepalived [root@bukyong ~]# chkconfig keepalived |
| 对于LR群集模式来说,由于LVS负载调度器和各节点需要共用VIP地址,为了避免网络内的ARP解析出现异常,应该关闭linux内核的重定向参数响应 | |
[root@bukyong ~]# vim /etc/sysctl.conf
…… net.ipv4.conf.all.send_redirects = 0 net.ipv4.conf.default.send_redirects = 0 net.ipv4.conf.eth1.send_redirects = 0 |
| Keepalived服务的配置目录位于/etc/keepalived/.其中keepalived.conf是主配置文件;另外包括一个子目录samples/,提供了许多配置样例作为参考 在Keepalived配置文件中,[global_defs{…}]区段指定全局参数,使用[vrrp_instance 实例名称 {…}]区段指定VRRP热备参数,注释文字以“!”符号开头 | |
| [root@bukyong ~]# cd /etc/keepalived/ [root@bukyong keepalived]# cp keepalived.conf keepalived.conf.bak [root@bukyong keepalived]# vim keepalived.conf
[root@bukyong keepalived]# ip addr show dev eth1 |
| 确认上述配置无误,然后启动Keepalived服务。实际状态为MASTER的主服务器将为eth0 |
| 2: eth1: <BROADCAST,MULTICAST,UP,LOWER_UP> mtu 1500 qdisc pfifo_fast state UP qlen 1000 link/ether 00:0c:29:d2:93:5e brd ff:ff:ff:ff:ff:ff inet 172.16.16.174/16 brd 172.16.255.255 scope global eth1 inet 172.16.16.172/32 scope global eth1 inet6 fe80::20c:29ff:fed2:935e/64 scope link valid_lft forever preferred_lft forever |
| 在Keepalived的热备配置基础上,添加【virtual_serverVIP port { …. }】区段来配置虚拟服务器。主要包括对负载调度算法、群集工作模式、健康检查间隔、真实服务器地址等参数的设置 | |
[root@bukyong keepalived]# vim keepalived.conf
|
 |
1、安装nfs-utils、rpcbind软件包
| 基本配置、共享源及网页文件、安装、启用等 | |
| [root@rhel-1 ~]# ifconfig eth1 172.16.16.250/16 [root@rhel-1 ~]# echo 'this is LVS+Keepalived web server!!!' > /var/www/html/index.html [root@rhel-1 ~]# rpm -ivh /media/RHEL_6.1\ i386\ Disc\ 1/Packages/nfs-utils-1.2.3-7.el6.i686.rpm warning: /media/RHEL_6.1 i386 Disc 1/Packages/nfs-utils-1.2.3-7.el6.i686.rpm: Header V3 RSA/SHA256 Signature, key ID fd431d51: NOKEY Preparing... ########################################### [100%] package nfs-utils-1:1.2.3-7.el6.i686 is already installed [root@rhel-1 ~]# chkconfig nfs on [root@rhel-1 ~]# chkconfig rpcbind on [root@rhel-1 ~]# vim /etc/exports
[root@rhel-1 ~]# service nfs start 启动 NFS 服务: [确定] 关掉 NFS 配额: [确定] 启动 NFS 守护进程: [确定] 启动 NFS mountd: [确定] [root@rhel-1 ~]# netstat -anpt | grep :111 tcp 0 0 0.0.0.0:111 0.0.0.0:* LISTEN 1596/rpcbind tcp 0 0 127.0.0.1:111 127.0.0.1:917 ESTABLISHED 1596/rpcbind tcp 0 0 127.0.0.1:917 127.0.0.1:111 ESTABLISHED - tcp 0 0 :::111 :::* LISTEN 1596/rpcbind [root@rhel-1 ~]# showmount -e 172.16.16.250 Export list for 172.16.16.250: /var/www/html * |
| 在每个节点服务器,同样需要需要具有VIP地址172.16.16.172,但地址仅用作发送Web响应数据包的源地址,并不需要监听客户机的访问请求(改由调度器监听并分发)。因此使用虚接口lo:0来承载VIP地址,并为本机添加一条路由记录,将访问VIP的数据限制在本地以避免通信紊乱 |
| [root@rhel-1 ~]# ifconfig eth1 172.16.16.177/16 [root@rhel-1 ~]# cat > /etc/sysconfig/network-scripts/ifcfg-lo:0<<end > DEVICE=lo:0 > IPADDR=172.16.16.172 > NETMASK=255.255.255.255 > ONBOOT=yes > end [root@rhel-1 ~]# ifup lo:0 活跃连接状态:激活的 活跃连接路径:/org/freedesktop/NetworkManager/ActiveConnection/2 [root@rhel-1 ~]# ifconfig lo:0 lo:0 Link encap:Local Loopback inet addr:172.16.16.172 Mask:255.255.255.255 UP LOOPBACK RUNNING MTU:16436 Metric:1 [root@rhel-1 ~]# route add -host 172.16.16.172 dev lo:0 //添加VIP本地访问路由生产环境中与入/etc/rc.local文件 |
| 服务状态:“0”表示停用 、“1”表示启用、 “2”表示关闭 | |
[root@rhel-1 ~]# vim /etc/sysctl.conf
………… net.ipv4.conf.all.arp_ignore = 1 net.ipv4.conf.all.arp_announce = 2 net.ipv4.conf.default.arp_ignore = 1 net.ipv4.conf.default.arp_announce = 2 net.ipv4.conf.lo.arp_ignore = 1 net.ipv4.conf.lo.arp_announce = 2 |
| [root@rhel-1 ~]# rpm -ivh /media/RHEL_6.1\ i386\ Disc\ 1/Packages/rpcbind-0.2.0-8.el6.i686.rpm warning: /media/RHEL_6.1 i386 Disc 1/Packages/rpcbind-0.2.0-8.el6.i686.rpm: Header V3 RSA/SHA256 Signature, key ID fd431d51: NOKEY Preparing... ########################################### [100%] package rpcbind-0.2.0-8.el6.i686 is already installed [root@rhel-1 ~]# chkconfig rpcbind on [root@rhel-1 ~]# service rpcbind start |
| 这里已安装httpd服务,就不再安装了 |
| [root@rhel-1 ~]# mount 172.16.16.250:/var/www/html /var/www/html/ [root@rhel-1 ~]# showmount -e 172.16.16.250 Export list for 172.16.16.250: /ywlin * |
| [root@rhel-1 html]# getsebool -a | grep httpd httpd_enable_homedirs --> off httpd_execmem --> off [root@rhel-1 html]# setsebool httpd_enable_homedirs on [root@rhel-1 html]# service httpd start 正在启动 httpd: [确定] |
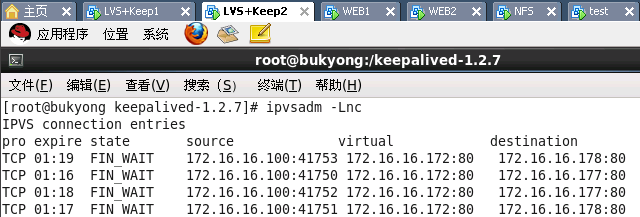
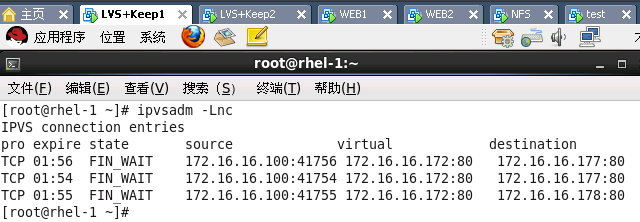
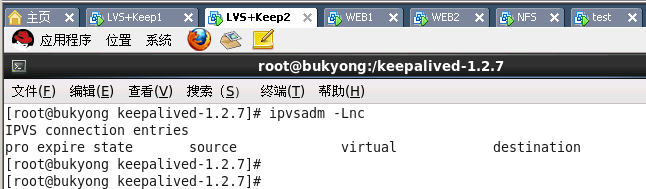
五、LVS+Keepalived集成测试
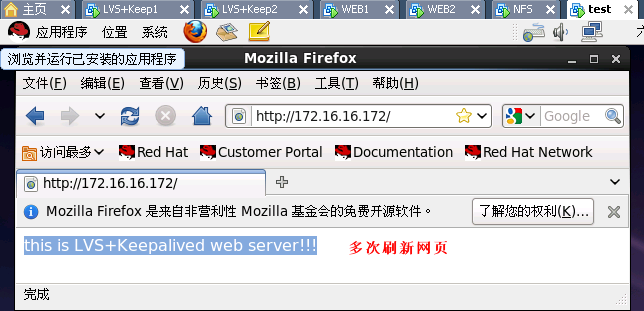
| 在test机上访问LVS-Keep调度服器的虚拟IP地址:172.16.16.172访问网站 |
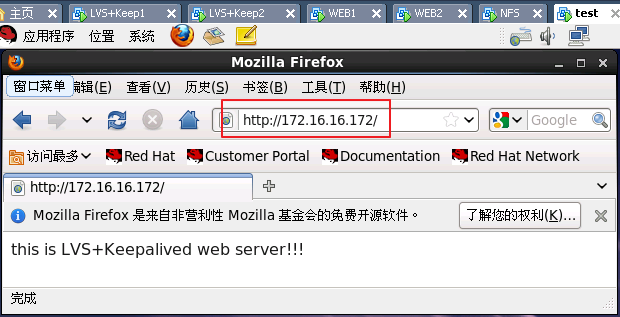 |
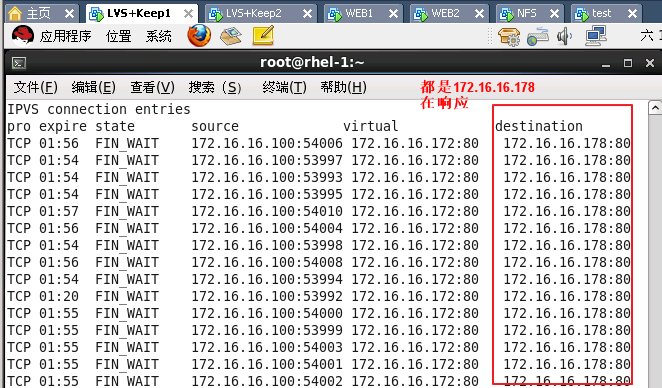
| 验证调度服务器的主、从状态 |
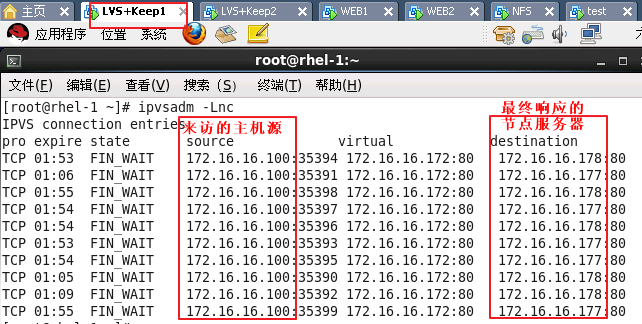 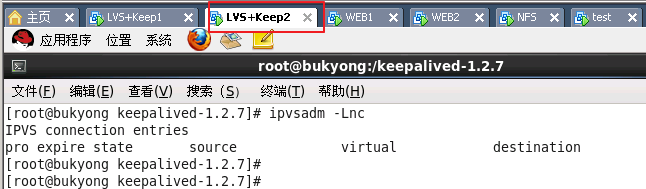 从上两张图记录列表可知,此时LVS+Keep1为主调度服务器,LVS+Keep2为从调度服务器 |
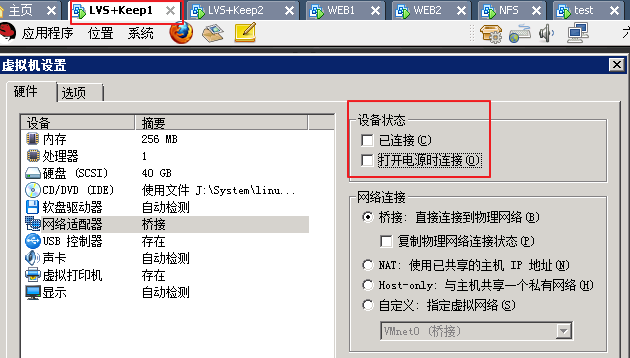
| 禁用主调度服务器eht1网卡,后再从test机上访问VIP |
 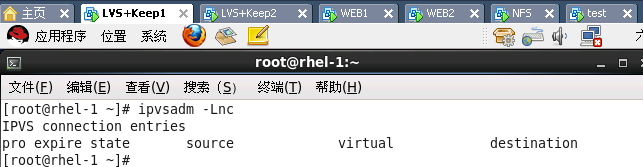  从上两张图记录列表可知,此时LVS+Keep2自动成为了主调度服务器,继续工作 |
| 重新启用主调度服务器eht1网卡,后再从test机上访问VIP |
   从上两张图记录列表可知,此时LVS+Keep1再次自动成为了主调度服务器,LVS+Keep2为从调度服务器 |
| 禁用web服务器池的一部分节点,确认对web群集的访问仍然正常 |
   |
| 这里用YUM安装 |
| [root@rhel-1 ~]# rm -rf /etc/yum.repos.d/* [root@rhel-1 ~]# cat >/etc/yum.repos.d/local.repo<<end > [local] > baseurl=file:///media/RHEL_6.0\ i386\ Disc\ 1/ > enabled=1 > gpgcheck=1 > gpgkey=file:///etc/pki/rpm-gpg/RPM-GPG-KEY-redhat-release > end [root@rhel-1 ~]# yum -y install sendmail Loaded plugins: refresh-packagekit, rhnplugin Repository 'local' is missing name in configuration, using id This system is not registered with RHN. RHN support will be disabled. local | 3.7 kB 00:00 ... local/primary_db | 2.3 MB 00:00 ... Setting up Install Process Resolving Dependencies --> Running transaction check …… |
| [root@rhel-1 ~]# chkconfig --add sendmail [root@rhel-1 ~]# chkconfig sendmail on [root@rhel-1 ~]# service sendmail start 正在启动 sendmail: [确定] 启动 sm-client: [确定] |
[root@rhel-1 ~]# vim /etc/keepalived/keepalived.conf
|
[r1]主要操作选项
-A 添加虚拟服务器
-t 设置群集地址(VIP,Virtual IP)
-s 指定负载调度算法
-a 添加真实服务器
-d 删除真实服务器
-D 删除整个虚拟服务器
-r 指定真实服务器(Real Server)的地址
-m 使用NAT模式;-g、-i分别对应DR、TUN模式
-w 为节点服务器设置权重默认为1
-L查看LVS虚拟服务器,可以指定只查看某一个VIP地址
-n 以数字形式显示地址、端口等信息,结合其他选项使用
本文出自 “IT足迹--清墨” 博客,请务必保留此出处http://ywlin.blog.51cto.com/4633917/1340626

相关文章推荐
- Redhat关闭SELinux和防火墙的办法
- Redhat关闭SELinux和防火墙的办法
- RedHat Enterprise Linux 7关闭防火墙方法
- redhat5关闭防火墙的方法-chkconfig临时关闭iptables
- RedHat Enterprise Linux 7关闭防火墙方法
- Redhat关闭SELinux和防火墙的办法
- RedHat Enterprise Linux 7关闭防火墙方法 在之前的版本中关闭防火墙等服务的命令是 service iptables stop /etc/init.d/iptables st
- RedHat Enterprise Linux 7关闭防火墙方法
- CentOS 6.6永久关闭 SELinux与防火墙 的方法
- Redhat关闭SELinux和防火墙的办法
- redhat7 centos7 关闭SELinux和防火墙的办法
- RedHat Enterprise Linux 7关闭防火墙方法
- RedHat Enterprise Linux 7关闭防火墙方法
- redhat5关闭防火墙的方法-chkconfig临时关闭iptables
- Redhat关闭SELinux和防火墙的办法
- Redhat关闭SELinux和防火墙的办法
- Redhat关闭SELinux和防火墙的办法
- Redhat关闭SELinux和防火墙的办法(转)
- 关闭selinux(防火墙)方法分享
- centos 关闭防火墙以及关闭selinux方法