Android学习之——图形图像处理(Bitmap、BitmapFactory)(一)
2013-08-27 16:05
597 查看
Bitmap是Android系统中的图像处理的最重要的类之一。用它可以获取图像文件信息,对图像进行旋转,剪切,放大,缩小等操作。
Bitmap代表一张位图,使我们在开发中常用的资源,下面就对Bitmap进行简单的介绍。
BItmapDrawbale drawable = new BItmapDrawable(bitmap);
如果要获取BitmapDrawable所包装的Bitmap对象,则可调用BitmapDrawable的getBitmap()方法:
Bitmap bitmap = drawbale.getBitmap();
createScaledBitmap(Bitmap source,int width,ing height,boolean fliter):对源位图进行缩放,缩放称宽width,高heigth的新位图。
createBitmap(int width,int height,Bitmap.Config config):创建一个宽width,高height的可变的新位图。
createBitmap(Bitmap source, int x,int y,int width,int height ,Matrix m,boolean fliter):从源位图source的指定坐标(x,y)开始,挖取宽width,高height的一块来,创建新的Bitmap对象,并按照Matrix指定的规则进行变换。
decodeFIle(String pathName):从pathName指定的文件中解析、创建Bitmap对象。
decodeFileDescriptor(FileDescriptor fd):用于从FileDescriptor对应的文件中解析、创建Bitmap对象。
decodeResource(Resource res,int id):用于根据给定的资源ID从指定的资源文件中解析、创建Bitmap对象。
decodeStream(InputStream is):用于从指定输入流中介解析、创建Bitmap对象。
但是,在系统不断的解析、创建Bitmap的过程中,可能会由于内存小或其他原因,导致程序运行时发生OutOfMemory错误。
为此,Android为Bitmap提供了内存回收方法:
void recycle():强制回收Bitmap对象。
还有用于判断Bitmap 对象是否被回收的方法:
boolean isRecycle();
如果Android应用需要访问系统相册,都需要借助BitmapFactory解析、创建Bitmap对象。点击打开链接这篇文章对此略有涉及。
下面是对Bitmap、BitmapFactory的简单应用。
介绍:对assets目录下的图片资源进行查看。
由于布局文件很简单,在此不给出,源码如下:
另外,在一些游戏中不断移动的背景,比如经典的“雷电”飞机游戏,通过不断的挖取背景图片的一部分,给人感官上造成飞机不断移动的错觉。可以通过createBitmap(Bitmap bitmap,int x,int y,int width,int height)方法来实现。
如下:
所绘制不会提交到画布上。
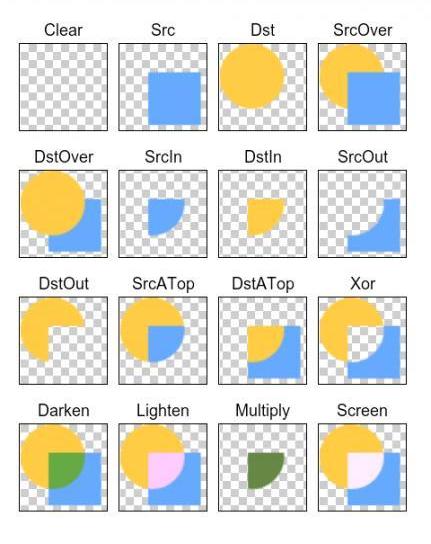
2.PorterDuff.Mode.SRC
显示上层绘制图片
3.PorterDuff.Mode.DST
显示下层绘制图片
4.PorterDuff.Mode.SRC_OVER
正常绘制显示,上下层绘制叠盖。
5.PorterDuff.Mode.DST_OVER
上下层都显示。下层居上显示。
6.PorterDuff.Mode.SRC_IN
取两层绘制交集。显示上层。
7.PorterDuff.Mode.DST_IN
取两层绘制交集。显示下层。
8.PorterDuff.Mode.SRC_OUT
取上层绘制非交集部分。
9.PorterDuff.Mode.DST_OUT
取下层绘制非交集部分。
10.PorterDuff.Mode.SRC_ATOP
取下层非交集部分与上层交集部分
11.PorterDuff.Mode.DST_ATOP
取上层非交集部分与下层交集部分
12.PorterDuff.Mode.XOR
取两层绘制非交集。两层绘制非交集。
13.PorterDuff.Mode.DARKEN
上下层都显示。变暗
14.PorterDuff.Mode.LIGHTEN
上下层都显示。变量
15.PorterDuff.Mode.MULTIPLY
取两层绘制交集
16.PorterDuff.Mode.SCREEN
上下层都显示。
Bitmap代表一张位图,使我们在开发中常用的资源,下面就对Bitmap进行简单的介绍。
Bitmap的获取方法:
1、使用BitmapDrawable
BitmapDrawable里封装的图片就是一个Bitmap对象,我们要把Bitmap包装成BitmapDrawable对象,可以调用BitmapDrawable的构造方法:BItmapDrawbale drawable = new BItmapDrawable(bitmap);
如果要获取BitmapDrawable所包装的Bitmap对象,则可调用BitmapDrawable的getBitmap()方法:
Bitmap bitmap = drawbale.getBitmap();
2、Bitmap提供了一些静态方法来创建Bitmap对象(仅列举几个):
createBitmap(Bitmap source,int x,int y,int width,int height):从原位图source的指定坐标(x,y)开始,从中挖取宽width,高heigtht的一块出来,创建新的Bitmap对象。createScaledBitmap(Bitmap source,int width,ing height,boolean fliter):对源位图进行缩放,缩放称宽width,高heigth的新位图。
createBitmap(int width,int height,Bitmap.Config config):创建一个宽width,高height的可变的新位图。
createBitmap(Bitmap source, int x,int y,int width,int height ,Matrix m,boolean fliter):从源位图source的指定坐标(x,y)开始,挖取宽width,高height的一块来,创建新的Bitmap对象,并按照Matrix指定的规则进行变换。
3、通过对资源文件的解析获取Bitmap对象,在这里就要用到BitmapFactory这个工具类,提供的方法如下:
decodeByteArray(byte[] data, int offset,int length):从指定字节数组的offset位置开始,将长度为length的字节数据解析成Bitmap对象。decodeFIle(String pathName):从pathName指定的文件中解析、创建Bitmap对象。
decodeFileDescriptor(FileDescriptor fd):用于从FileDescriptor对应的文件中解析、创建Bitmap对象。
decodeResource(Resource res,int id):用于根据给定的资源ID从指定的资源文件中解析、创建Bitmap对象。
decodeStream(InputStream is):用于从指定输入流中介解析、创建Bitmap对象。
但是,在系统不断的解析、创建Bitmap的过程中,可能会由于内存小或其他原因,导致程序运行时发生OutOfMemory错误。
为此,Android为Bitmap提供了内存回收方法:
void recycle():强制回收Bitmap对象。
还有用于判断Bitmap 对象是否被回收的方法:
boolean isRecycle();
如果Android应用需要访问系统相册,都需要借助BitmapFactory解析、创建Bitmap对象。点击打开链接这篇文章对此略有涉及。
下面是对Bitmap、BitmapFactory的简单应用。
介绍:对assets目录下的图片资源进行查看。
由于布局文件很简单,在此不给出,源码如下:
public class MainActivity extends Activity {

String[] images = null;
//获取访问assets文件的对象
AssetManager assets = null;
int currentImg = 0;
ImageView img;

@Override
protected void onCreate(Bundle savedInstanceState) {
super.onCreate(savedInstanceState);
setContentView(R.layout.activity_main);

img = (ImageView) findViewById(R.id.img_show);
try {
//获取访问assets下文件的对象
assets = getAssets();
images = assets.list("");
} catch (Exception e) {
e.printStackTrace();
}

Button btn_next = (Button) findViewById(R.id.btn_next);
btn_next.setOnClickListener(new OnClickListener() {

@Override
public void onClick(View v) {
//如果角标越界
if(currentImg>=images.length){
currentImg = 0;

}
//找到下一张图片
while(!images[currentImg].endsWith(".jpg")){
currentImg++;
if(currentImg>=images.length){
currentImg = 0;
}
}
InputStream assetFile = null;

try {
//打开指定资源对应的输入流
assetFile = assets.open(images[currentImg++]);
} catch (Exception e) {
e.printStackTrace();
}

//回收图片
BitmapDrawable bitmapDrawable = (BitmapDrawable) img.getDrawable();
if(bitmapDrawable!=null&&!bitmapDrawable.getBitmap().isRecycled()){
bitmapDrawable.getBitmap().recycle();
}

//显示图片
img.setImageBitmap(BitmapFactory.decodeStream(assetFile));
}
});
}
另外,在一些游戏中不断移动的背景,比如经典的“雷电”飞机游戏,通过不断的挖取背景图片的一部分,给人感官上造成飞机不断移动的错觉。可以通过createBitmap(Bitmap bitmap,int x,int y,int width,int height)方法来实现。
如下:
public class MainActivity extends Activity {

@Override
protected void onCreate(Bundle savedInstanceState) {
super.onCreate(savedInstanceState);
setContentView(new MyView(this));
}

class MyView extends View{

//记录背景位图的实际高度
final int BACK_HEIGHT = 1700;
//背景图片
private Bitmap back;
private Bitmap plane;

//背景图片的开始位置
final int WIDTH = 320;
final int HEIGHT = 440;

private int startY = BACK_HEIGHT -HEIGHT;

public MyView(Context context) {
super(context);

back = BitmapFactory.decodeResource(context.getResources(), R.drawable.back_img);

plane = BitmapFactory.decodeResource(context.getResources(), R.drawable.plane);

final Handler mHandler = new Handler(){
@Override
public void handleMessage(Message msg) {

if(msg.what ==0x123){
//重新开始移动
if(startY<=0){
startY = BACK_HEIGHT - HEIGHT;
}
else
startY -= 3;
}
invalidate();
}
};
new Timer().schedule(new TimerTask() {

@Override
public void run() {
mHandler.sendEmptyMessage(0x123);
}
}, 0,100);

}
@Override
protected void onDraw(Canvas canvas) {
//根据原始位图和Matrix创建新的图片
Bitmap bitmap_2 = Bitmap.createBitmap(back, 0, startY, WIDTH, HEIGHT);

//绘制新位图
canvas.drawBitmap(bitmap_2, 0,0,null);

//绘制飞机
canvas.drawBitmap(plane, 160, 380,null);
}

}

}
//一些图形效果
Matrix matrix = new Matrix();

//镜面效果
matrix.setScale(-1, 1);
matrix.postTranslate(bitmap.getWidth(), 0);

//倒影效果
matrix.setScale(1, -1);
matrix.postTranslate(0, bitmap.getHeight());
//图片合成的效果(android.graphics.PorterDuff.Mode)
//设置重叠部分的效果
paint.setXfermode(new PorterDuffXfermode(android.graphics.PorterDuff.Mode.DST_ATOP));

canvas.drawBitmap(bitmapa, new Matrix(), paint);

canvas.drawBitmap(bitmapb, new Matrix(),paint);
android.graphics.PorterDuff.Mode的一些取值
1.PorterDuff.Mode.CLEAR所绘制不会提交到画布上。
2.PorterDuff.Mode.SRC
显示上层绘制图片
3.PorterDuff.Mode.DST
显示下层绘制图片
4.PorterDuff.Mode.SRC_OVER
正常绘制显示,上下层绘制叠盖。
5.PorterDuff.Mode.DST_OVER
上下层都显示。下层居上显示。
6.PorterDuff.Mode.SRC_IN
取两层绘制交集。显示上层。
7.PorterDuff.Mode.DST_IN
取两层绘制交集。显示下层。
8.PorterDuff.Mode.SRC_OUT
取上层绘制非交集部分。
9.PorterDuff.Mode.DST_OUT
取下层绘制非交集部分。
10.PorterDuff.Mode.SRC_ATOP
取下层非交集部分与上层交集部分
11.PorterDuff.Mode.DST_ATOP
取上层非交集部分与下层交集部分
12.PorterDuff.Mode.XOR
取两层绘制非交集。两层绘制非交集。
13.PorterDuff.Mode.DARKEN
上下层都显示。变暗
14.PorterDuff.Mode.LIGHTEN
上下层都显示。变量
15.PorterDuff.Mode.MULTIPLY
取两层绘制交集
16.PorterDuff.Mode.SCREEN
上下层都显示。

相关文章推荐
- Android学习之——图形图像处理(Bitmap、BitmapFactory)(一)
- Android学习之——图形图像处理(Bitmap、BitmapFactory)(一)
- Android图形图像处理之Bitmap和BitmapFactory
- 2014-11-6Android学习------Android图像处理之Bitmap类
- Android学习16--图形与图像处理
- 初学Android,图形图像之使用Bitmap和BitmapFactory(二十四)
- Android学习之Paint图形图像处理(一)
- Android学习之Paint图形图像处理(二)
- 初学Android,图形图像之使用Bitmap和BitmapFactory(二十四)
- (转)初学Android,图形图像之使用Bitmap和BitmapFactory(二十四)
- Android学习之——图形图像处理(使用Matrix控制变换)(二)
- Android L(5.0)源码之图形与图像处理之简单图片——Bitmap
- 【Android开发】图形图像处理技术-Bitmap和BitmapFactory类
- Android学习之——图形图像处理(使用Matrix控制变换)(二)
- **ANDROID**# 第七章图形与图像处理(静态处理) > Bitmap是有像素点构成的点阵图。 ------ ## 使用简单的图片 ---- * 通过Drawable对象进行访问。
- Android的图形与图像处理之六 SurfaceView实现动画
- android 学习之图像处理系统(一)
- Android绘图机制与处理技巧(三)——Android图像处理之图形特效处理
- Android中图形与图像处理初见面——绘图
- Android图像处理之Bitmap类