Android 布局
2013-08-11 10:33
141 查看
这里我们将描述的是Android应用程序设计用户界面。主要的内容是布局管理器等。
表格8.1.1 布局管理器描述
表8.1.2 LinearLayout布局视图属性
使用举例:
LinearLayout.xml
<LinearLayoutxmlns:android="http://schemas.android.com/apk/res/android"
xmlns:tools="http://schemas.android.com/tools"
android:layout_width="match_parent"
android:layout_height="match_parent"
android:orientation="vertical"
tools:context=".MainActivity">
<Button
android:id="@+id/test1"
android:layout_width="wrap_content"
android:layout_height="wrap_content"
android:text="@string/test1"
/>
<Button
android:id="@+id/test2"
android:layout_width="wrap_content"
android:layout_height="wrap_content"
android:text="@string/test2"
/>
</LinearLayout>
代码片段8.1.1.1 相对布局xml配置文件
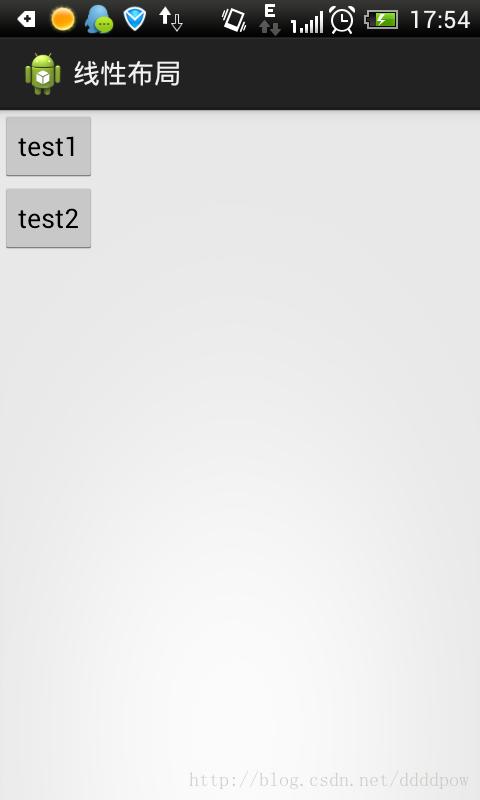
图8.1.1.1 线性布局运行效果
表8.1.3 FrameLayout视图属性
FrameLayout.xml:
<FrameLayoutxmlns:android="http://schemas.android.com/apk/res/android"
xmlns:tools="http://schemas.android.com/tools"
android:layout_width="match_parent"
android:layout_height="match_parent"
tools:context=".MainActivity">
<Button
android:id="@+id/test1"
android:layout_width="match_parent"
android:layout_height="100dp"
android:text="@string/test1"
/>
<Button
android:id="@+id/test2"
android:layout_width="wrap_content"
android:layout_height="wrap_content"
android:text="@string/test2"
/>
</FrameLayout>
代码片段8.1.2.1 FrameLayout的xml配置文件
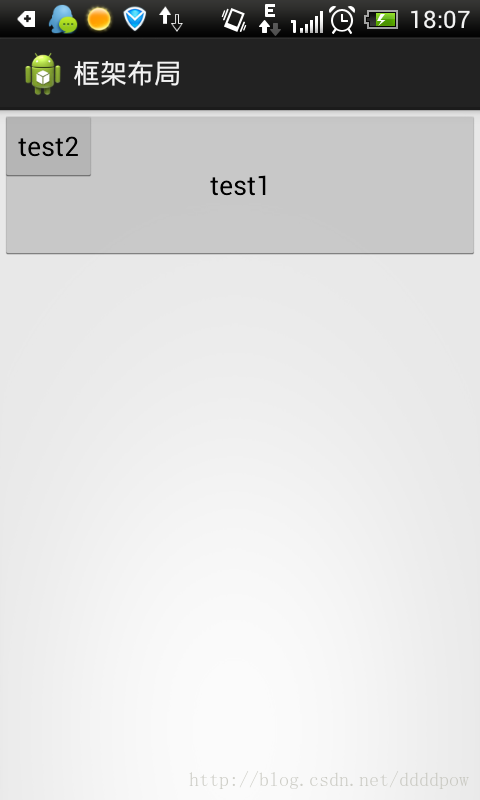
图8.1.2.1 FrameLayout效果图
表8.1.4 TabelLayout的视图属性
TableLayout.xml:
<TableLayoutxmlns:android="http://schemas.android.com/apk/res/android"
xmlns:tools="http://schemas.android.com/tools"
android:layout_width="match_parent"
android:layout_height="match_parent"
tools:context=".MainActivity">
<TableRow
android:id="@+id/tableRow1"
android:layout_width="match_parent"
>
<Button
android:id="@+id/test1"
android:layout_width="match_parent"
android:layout_height="wrap_content"
android:text="@string/test1"
/>
<Button
android:id="@+id/test2"
android:layout_width="match_parent"
android:layout_height="wrap_content"
android:text="@string/test2"
/>
<Button
android:id="@+id/test3"
android:layout_width="wrap_content"
android:layout_height="wrap_content"
android:text="@string/test3"
/>
</TableRow>
<TableRow
android:id="@+id/tableRow2"
android:layout_width="match_parent"
>
<Button
android:id="@+id/test4"
android:layout_width="wrap_content"
android:layout_height="wrap_content"
android:text="@string/test4"
android:layout_span="3"
/>
</TableRow>
<TableRow
android:id="@+id/tableRow3"
android:layout_width="match_parent"
>
<Button
android:id="@+id/test5"
android:layout_width="wrap_content"
android:layout_height="wrap_content"
android:text="@string/test5"
android:layout_column="1"
/>
</TableRow>
</TableLayout>
代码片段8.1.3.1 TabelLayout的xml配置

图8.1.3.1 TableLayout效果图
表8.1.5 RelativeLayout视图属性
RelativeLayout.xml:
<RelativeLayoutxmlns:android="http://schemas.android.com/apk/res/android"
xmlns:tools="http://schemas.android.com/tools"
android:layout_width="match_parent"
android:layout_height="match_parent"
tools:context=".MainActivity">
<Button
android:id="@+id/test1"
android:layout_alignParentLeft="true"
android:layout_marginTop="50dp"
android:layout_width="wrap_content"
android:layout_height="wrap_content"
android:text="@string/test1"
/>
<Button
android:id="@+id/test2"
android:layout_toRightOf="@id/test1"
android:layout_marginLeft="10dp"
android:layout_width="wrap_content"
android:layout_height="wrap_content"
android:text="@string/test2"
/>
</RelativeLayout>
代码片段8.1.4.1 RelativeLayout的xml配置

图8.1.4.1 RelativeLayout效果图
表8.1.6 AbsoluteLayout视图属性
AbsoluteLayout.xml:
<AbsoluteLayoutxmlns:android="http://schemas.android.com/apk/res/android"
xmlns:tools="http://schemas.android.com/tools"
android:layout_width="match_parent"
android:layout_height="match_parent"
tools:context=".MainActivity">
<Button
android:id="@+id/test1"
android:layout_x="20dp"
android:layout_y="20dp"
android:layout_width="wrap_content"
android:layout_height="wrap_content"
android:text="@string/test1"
/>
<Button
android:id="@+id/test2"
android:layout_x="100dp"
android:layout_y="100dp"
android:layout_width="wrap_content"
android:layout_height="wrap_content"
android:text="@string/test2"
/>
</AbsoluteLayout>
代码片段8.1.5.1 AbsoluteLayout的xml配置
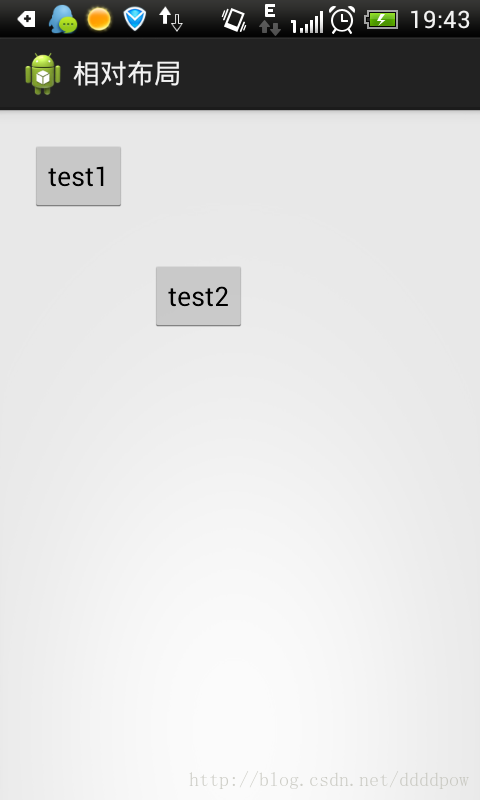
图8.1.5.1 AbsoluteLayout效果图
这些内建的View容器包括以下几类:
1. 列表、网格和“画廊(gallery)”
2. 使用ViewFlipper、ImageSwitcher、TextSwitcher所表示的“开关选型”
3. 使用TabHost和TabControl表示的标签
4. 使用ScrollView和HorizontalScrollView进行滚动
5. 使用SlidingDrawer隐藏或显示内容
Adapter分为两种类型:
1. ArrayAdapter
使用方式:
this.adapter =new ArrayAdapter<String>(this.context,
R.layout.text_one,list);
代码片段8.2.1.1 ArrayAdapter的使用使用
注释:通过获取Array数组来填充容器的数据,this.context为Activtiy实例,R.layout.text_one为列表视图的item布局,list为出入的数组
2. CursorAdapter
使用方式:
this.names =this.context.managedQuery(Contacts.Phones.CONTENT_URI,
null,
null, null,null);
this.context.startManagingCursor(names);
new SimpleCursorAdapter(this.context, R.layout.text_two,names,
new String[] { Contacts.Phones.NAME, Contacts.Phones.NUMBER },
new int[] { R.id.text1, R.id.text2 });
代码片段8.2.1.2 CursorAdapter使用方式
注释:通过数据库的返回Cursor来填充数据,上述是对联系人进行的查询,不过在使用这个的前提为必须声明可查询联系人权限
这些容器被设计以某种方式用来显示重复的View对象
使用方式:
只需要调用setAdapter方法,传入adapter就行。
我们有两种方式编写Tab标签:
1. 继承TabActivity,并且使用getTabHost方法来获取TabHost对象
2. 使用自定义的TabHost在布局文件上定义ID,然后通过查找ID获取组件
这里我们主要讲解的是通过继承的方式来构建一个TabActivity
首先必需要进行的是Tab的xml文件编写:
<?xmlversion="1.0"encoding="utf-8"?>
<TabHostxmlns:android="http://schemas.android.com/apk/res/android"
android:id="@android:id/tabhost"
android:layout_width="fill_parent"
android:layout_height="fill_parent">
<LinearLayout
android:layout_width="fill_parent"
android:layout_height="fill_parent"
android:orientation="vertical">
<TabWidget
android:id="@android:id/tabs"
android:layout_width="fill_parent"
android:layout_height="wrap_content"/>
<FrameLayout
android:id="@android:id/tabcontent"
android:layout_width="fill_parent"
android:layout_height="fill_parent">
<TextView
android:id="@+id/no_team_meetings"
android:layout_width="fill_parent"
android:layout_height="fill_parent"
android:textSize="18sp"/>
<TextView
android:id="@+id/no_team_meeting_stats"
android:layout_width="fill_parent"
android:layout_height="fill_parent"
android:textSize="18sp"/>
</FrameLayout>
</LinearLayout>
</TabHost>
注意:TabWidget和FrameLayout这两个必须要注意的是需要添加ID,且这两个添加的ID必须为系统ID,否则无法找到,会报NULL错误
那么如何获取TabHost,并且添加TabSpec呢?
如下:
tabHost.addTab(tabHost.newTabSpec("tab1").setIndicator("Grid")
.setContent(new Intent(getApplicationContext(),GridViewActivity.class)));
tabHost.addTab(tabHost.newTabSpec("tab2").setIndicator("List").setContent(this));
代码片段8.2.3.1 tabHost添加标签页内容
注意: tabHost添加需要注意的是它有三种方式:
1. 利用Intent转发Activity
2. 利用layout的布局xml文件
3. 利用TabContentFactory接口创建一个TabContent
8.3
本节介绍了一些容器类的内容。
8.1 布局管理器
常用的布局管理器有以下几种:| 布局管理器 | 描述 |
| LinearLayout | 线性布局,所有的组件都按照线性来排列,这个线性可以是水平排列,也可以是垂直排列 |
| FrameLayout | 框架布局,已左上角为基准,所有的对象都在前一个对象的基础上以该左上角点为基准覆盖。 |
| TableLayout | 表格布局,将组件分配到行或列中。每个表格布局由TableRow组成,每个TableRow都定义一个row |
| RleativeLayout | 相对布局则是根据各个组件之间的关系或者组件跟父容器的关系来进行组件的定位。 |
| AbsoluteLayout | 绝对布局,指定组件的x/y坐标,显示在屏幕上。注意:可允许组件之间相互重叠。不过Android不推荐使用绝对布局, 因为在不同的机型上可能导致不同的布局结果,达不到开发者预期的目的。 |
8.1.1 LinearLayout
LinearLayout的重要视图属性如下:| 属性名 | 应用于 | 描述 | 值 |
| android:orientation | 父视图 | 布局为行模式或列模式 | horizontal|vertical |
| android:gravity | 父视图 | 布局中子视图的重力属性 | top|bottom|left|right|center_vertical|fill_vertical| center_horizontal|fill_horizontal|center|fill |
| android:layout_weight | 子视图 | 确定子视图在父控件中的比例 | 所有子控件weight值之和为1 |
使用举例:
LinearLayout.xml
<LinearLayoutxmlns:android="http://schemas.android.com/apk/res/android"
xmlns:tools="http://schemas.android.com/tools"
android:layout_width="match_parent"
android:layout_height="match_parent"
android:orientation="vertical"
tools:context=".MainActivity">
<Button
android:id="@+id/test1"
android:layout_width="wrap_content"
android:layout_height="wrap_content"
android:text="@string/test1"
/>
<Button
android:id="@+id/test2"
android:layout_width="wrap_content"
android:layout_height="wrap_content"
android:text="@string/test2"
/>
</LinearLayout>
代码片段8.1.1.1 相对布局xml配置文件
图8.1.1.1 线性布局运行效果
8.1.2 FrameLayout
FrameLayout的重要视图属性如下:| 属性 | 应用于 | 描述 | 值 |
| android:foreground | 父视图 | 覆盖原来的内容绘图 | 资源 |
| android:foregroundGravity | 父视图 | 前景的权值 | top|bottom|left|right|center_vertical|fill_vertical| center_horizontal|fill_horizontal|center|fill |
| android:measureAllChildren | 父视图 | 限制子控件 | true|false |
| android:layout_gravity | 子视图 | 子控件在父容器中算占位置 | top|bottom|left|right|center_vertical|fill_vertical| center_horizontal|fill_horizontal|center|fill |
FrameLayout.xml:
<FrameLayoutxmlns:android="http://schemas.android.com/apk/res/android"
xmlns:tools="http://schemas.android.com/tools"
android:layout_width="match_parent"
android:layout_height="match_parent"
tools:context=".MainActivity">
<Button
android:id="@+id/test1"
android:layout_width="match_parent"
android:layout_height="100dp"
android:text="@string/test1"
/>
<Button
android:id="@+id/test2"
android:layout_width="wrap_content"
android:layout_height="wrap_content"
android:text="@string/test2"
/>
</FrameLayout>
代码片段8.1.2.1 FrameLayout的xml配置文件
图8.1.2.1 FrameLayout效果图
8.1.3 TableLayout
TableLayout的重要视图属性如下:| 属性 | 应用于 | 描述 | 值 |
| android:collapseColumns | TableLayout | 使用逗号分割的废弃列序号 | 字符换或字符串资源 |
| android:shrinkColums | TableLayout | 使用逗号的收缩列序号表 | 同上 |
| android:stretchColums | TableLayout | 使用逗号分割的伸展列序号表 | 同上 |
| android:layout_colum | TableRow子控件 | 该控件所在的列序号 | 整形或者整形资源 |
| android:layout_span | TabelRow子控件 | 该视图所跨列的列数量 | 不小于1的整形或者整形资源 |
TableLayout.xml:
<TableLayoutxmlns:android="http://schemas.android.com/apk/res/android"
xmlns:tools="http://schemas.android.com/tools"
android:layout_width="match_parent"
android:layout_height="match_parent"
tools:context=".MainActivity">
<TableRow
android:id="@+id/tableRow1"
android:layout_width="match_parent"
>
<Button
android:id="@+id/test1"
android:layout_width="match_parent"
android:layout_height="wrap_content"
android:text="@string/test1"
/>
<Button
android:id="@+id/test2"
android:layout_width="match_parent"
android:layout_height="wrap_content"
android:text="@string/test2"
/>
<Button
android:id="@+id/test3"
android:layout_width="wrap_content"
android:layout_height="wrap_content"
android:text="@string/test3"
/>
</TableRow>
<TableRow
android:id="@+id/tableRow2"
android:layout_width="match_parent"
>
<Button
android:id="@+id/test4"
android:layout_width="wrap_content"
android:layout_height="wrap_content"
android:text="@string/test4"
android:layout_span="3"
/>
</TableRow>
<TableRow
android:id="@+id/tableRow3"
android:layout_width="match_parent"
>
<Button
android:id="@+id/test5"
android:layout_width="wrap_content"
android:layout_height="wrap_content"
android:text="@string/test5"
android:layout_column="1"
/>
</TableRow>
</TableLayout>
代码片段8.1.3.1 TabelLayout的xml配置
图8.1.3.1 TableLayout效果图
8.1.4 RelativeLayout
RelativeLayout的重要视图属性:| 属性 | 应用于 | 描述 | 值 |
| android:gravity | 父视图 | 布局中子控件的位置 | top|bottom|left|right|center_vertical|fill_vertical| center_horizontal|fill_horizontal|center|fill |
| android:layout_centerInParent | 子视图 | 在父视图中水平、垂直均居中 | true|false |
| android:layout_centerHorizontal | 子视图 | 在父视图中水平居中 | true|false |
| android:layout_centerVertical | 子视图 | 在父视图中垂直居中 | true|false |
| android:layout_alignParentBottom/Top/Left/Right | 子视图 | 与父视图下、上、左、右对齐 | true|false |
| andorid:layout_alignBottom|Top|Left|Right | 子视图 | 与指定视图下、上、左、右边对齐 | 视图ID |
| android:above|below|toLeftOf|otRightOf | 子视图 | 将该视图的下边沿放置于知道哪个视图的 上方、下方、左侧、右侧 | 视图ID |
RelativeLayout.xml:
<RelativeLayoutxmlns:android="http://schemas.android.com/apk/res/android"
xmlns:tools="http://schemas.android.com/tools"
android:layout_width="match_parent"
android:layout_height="match_parent"
tools:context=".MainActivity">
<Button
android:id="@+id/test1"
android:layout_alignParentLeft="true"
android:layout_marginTop="50dp"
android:layout_width="wrap_content"
android:layout_height="wrap_content"
android:text="@string/test1"
/>
<Button
android:id="@+id/test2"
android:layout_toRightOf="@id/test1"
android:layout_marginLeft="10dp"
android:layout_width="wrap_content"
android:layout_height="wrap_content"
android:text="@string/test2"
/>
</RelativeLayout>
代码片段8.1.4.1 RelativeLayout的xml配置
图8.1.4.1 RelativeLayout效果图
8.1.5 AbsoluteLayout
AbsoluteLayout的重要视图属性:| 属性 | 应用于 | 描述 | 值 |
| android:layout_x | 子控件 | 设置子控件的x坐标 | 整数型或者整型资源 |
| android:layout_y | 子控件 | 设置子控件的y坐标 | 同上 |
AbsoluteLayout.xml:
<AbsoluteLayoutxmlns:android="http://schemas.android.com/apk/res/android"
xmlns:tools="http://schemas.android.com/tools"
android:layout_width="match_parent"
android:layout_height="match_parent"
tools:context=".MainActivity">
<Button
android:id="@+id/test1"
android:layout_x="20dp"
android:layout_y="20dp"
android:layout_width="wrap_content"
android:layout_height="wrap_content"
android:text="@string/test1"
/>
<Button
android:id="@+id/test2"
android:layout_x="100dp"
android:layout_y="100dp"
android:layout_width="wrap_content"
android:layout_height="wrap_content"
android:text="@string/test2"
/>
</AbsoluteLayout>
代码片段8.1.5.1 AbsoluteLayout的xml配置
图8.1.5.1 AbsoluteLayout效果图
8.2 View容器类
这些容器类不止可以容纳其他简单的View类,而且能够允许以某种标准的方式同其交互。这些内建的View容器包括以下几类:
1. 列表、网格和“画廊(gallery)”
2. 使用ViewFlipper、ImageSwitcher、TextSwitcher所表示的“开关选型”
3. 使用TabHost和TabControl表示的标签
4. 使用ScrollView和HorizontalScrollView进行滚动
5. 使用SlidingDrawer隐藏或显示内容
8.2.1 Adapter
之所以提到Adapter,就是因为接下来的容器,有些是以数据来驱动的。Adapter分为两种类型:
1. ArrayAdapter
使用方式:
this.adapter =new ArrayAdapter<String>(this.context,
R.layout.text_one,list);
代码片段8.2.1.1 ArrayAdapter的使用使用
注释:通过获取Array数组来填充容器的数据,this.context为Activtiy实例,R.layout.text_one为列表视图的item布局,list为出入的数组
2. CursorAdapter
使用方式:
this.names =this.context.managedQuery(Contacts.Phones.CONTENT_URI,
null,
null, null,null);
this.context.startManagingCursor(names);
new SimpleCursorAdapter(this.context, R.layout.text_two,names,
new String[] { Contacts.Phones.NAME, Contacts.Phones.NUMBER },
new int[] { R.id.text1, R.id.text2 });
代码片段8.2.1.2 CursorAdapter使用方式
注释:通过数据库的返回Cursor来填充数据,上述是对联系人进行的查询,不过在使用这个的前提为必须声明可查询联系人权限
8.2.2 ListView、GridView和GlleryView
作用:这些容器被设计以某种方式用来显示重复的View对象
使用方式:
只需要调用setAdapter方法,传入adapter就行。
8.2.3 TabActivity
拥有标签的屏幕布局由一个TabActivity和一个TabHost构成,TabHost由TabSpec构成。我们有两种方式编写Tab标签:
1. 继承TabActivity,并且使用getTabHost方法来获取TabHost对象
2. 使用自定义的TabHost在布局文件上定义ID,然后通过查找ID获取组件
这里我们主要讲解的是通过继承的方式来构建一个TabActivity
首先必需要进行的是Tab的xml文件编写:
<?xmlversion="1.0"encoding="utf-8"?>
<TabHostxmlns:android="http://schemas.android.com/apk/res/android"
android:id="@android:id/tabhost"
android:layout_width="fill_parent"
android:layout_height="fill_parent">
<LinearLayout
android:layout_width="fill_parent"
android:layout_height="fill_parent"
android:orientation="vertical">
<TabWidget
android:id="@android:id/tabs"
android:layout_width="fill_parent"
android:layout_height="wrap_content"/>
<FrameLayout
android:id="@android:id/tabcontent"
android:layout_width="fill_parent"
android:layout_height="fill_parent">
<TextView
android:id="@+id/no_team_meetings"
android:layout_width="fill_parent"
android:layout_height="fill_parent"
android:textSize="18sp"/>
<TextView
android:id="@+id/no_team_meeting_stats"
android:layout_width="fill_parent"
android:layout_height="fill_parent"
android:textSize="18sp"/>
</FrameLayout>
</LinearLayout>
</TabHost>
注意:TabWidget和FrameLayout这两个必须要注意的是需要添加ID,且这两个添加的ID必须为系统ID,否则无法找到,会报NULL错误
那么如何获取TabHost,并且添加TabSpec呢?
如下:
tabHost.addTab(tabHost.newTabSpec("tab1").setIndicator("Grid")
.setContent(new Intent(getApplicationContext(),GridViewActivity.class)));
tabHost.addTab(tabHost.newTabSpec("tab2").setIndicator("List").setContent(this));
代码片段8.2.3.1 tabHost添加标签页内容
注意: tabHost添加需要注意的是它有三种方式:
1. 利用Intent转发Activity
2. 利用layout的布局xml文件
3. 利用TabContentFactory接口创建一个TabContent
8.3
小结
本节介绍了一些容器类的内容。

相关文章推荐
- Android 布局之RelativeLayout
- Swing参照Android采用XML的方式自动布局
- Android软键盘弹出时把布局顶上去的解决方法
- android 加载布局xml文件时报空指针
- android 布局
- Android屏幕适配不同的资源图片、布局
- Android TagFlowLayout完全解析 一款针对Tag的布局
- 让Android屏幕适配开发更简单-我就是传说中的Google百分比布局支持库
- 在Android中处理屏幕布局变化
- 读书笔记--Android布局和UI组件中的布局管理器
- Android 百分比布局库(percent-support-lib) 解析与扩展
- android xml 布局错误
- Android中对于布局的复用
- android笔记-布局
- android---xml---include用法(导入另一个XML文件到本布局中
- android activity显示不出布局
- Android学习记录 - 界面布局
- Android横竖屏切换及其相应布局载入问题
- Android基础总结(3)——UI界面布局
- Android改变窗口标题栏的布局