How to compile WinPcap with Visual Studio 2010?
2013-08-06 15:50
531 查看
转载自:http://www.rhyous.com/2011/11/12/how-to-compile-winpcap-with-visual-studio-2010/
The documentation for WinPcap was pretty poor. The last update for Visual Studio was for 2005, so this hasn’t been updated for Visual Studio 2008 or Visual Studio 2010.
Also, the steps don’t say what type of C++ project was created. This is probably why it missing information, such as the fact that WIN32 must be defined.
So I thought I would get it working and provide a post someone could actually find. I had to read the pcap.h file myself to figure out what was missing in the documentation.
Select Other Languages | Visual C++ | General | Empty Project
Enter a Project name, Location, and Solution Name.
Take note of the solution directory.
Click OK.
This creates the following directory structure:
.\WinPcapExample\WinPcapExample.sdf
.\WinPcapExample\WinPcapExample.sln
.\WinPcapExample\WinPcapExample\
.\WinPcapExample\WinPcapExample\WinPcapExample.vcxproj
.\WinPcapExample\WinPcapExample\WinPcapExample.vcxproj.filters
.\WinPcapExample\WinPcapExample\WinPcapExample.vcxproj.user
Select C++ File (.cpp)
Enter the name as Main.cpp.
Click Ok.
Add the standard main function to the file:
Save the file.
http://www.winpcap.org/devel.htm
Download the latest stable version of WinPcap.
Extract to your solution directory.
In Visual Studio, right-click on your project and choose Properties.
Make the following configuration changes to your project:
Note: If you don’t see the C/C++ option, did you forget to do Step 2 above?
For Additional Include Directories add the relative path:
..\WpdPack\Include

For Preprocessor Definitions, add these three:
WIN32;WPCAP;HAVE_REMOTE.

Important: If you fail to add WIN32, your compile will fail as follows:
For Additional Library Directories enter the following:
..\WpdPack\Lib

For Additional Dependencies, add the following:
winpcap.lib;Packet.lib; //此处改winpcap.lib为"wpcap.lib",否则会出现cannot open file 'winpcap.lib'

Note: I removed the default libraries. You may need some of them:
kernel32.lib;user32.lib;gdi32.lib;winspool.lib;comdlg32.lib;advapi32.lib;shell32.lib;ole32.lib;oleaut32.lib;uuid.lib;odbc32.lib;odbccp32.lib;
Include pcap.h.
Try to compile and it should work.
You are now ready to develop using WinPcap.
Next: How to read a PCap file from Wireshark with C++
Category:
C++ | Comment (RSS)
| Trackback
The documentation for WinPcap was pretty poor. The last update for Visual Studio was for 2005, so this hasn’t been updated for Visual Studio 2008 or Visual Studio 2010.
Also, the steps don’t say what type of C++ project was created. This is probably why it missing information, such as the fact that WIN32 must be defined.
So I thought I would get it working and provide a post someone could actually find. I had to read the pcap.h file myself to figure out what was missing in the documentation.
Prerequisites
It is expected you have Visual Studio 2010 already. It may work the same with Visual C++ 2010.Step 1 – Create a new empty project
In Visual Studio go to File | New | Project.Select Other Languages | Visual C++ | General | Empty Project
Enter a Project name, Location, and Solution Name.
Take note of the solution directory.
Click OK.
This creates the following directory structure:
.\WinPcapExample\WinPcapExample.sdf
.\WinPcapExample\WinPcapExample.sln
.\WinPcapExample\WinPcapExample\
.\WinPcapExample\WinPcapExample\WinPcapExample.vcxproj
.\WinPcapExample\WinPcapExample\WinPcapExample.vcxproj.filters
.\WinPcapExample\WinPcapExample\WinPcapExample.vcxproj.user
Step 2 – Create a main.cpp file
Right-click on the project and choose Add | New Item.Select C++ File (.cpp)
Enter the name as Main.cpp.
Click Ok.
Add the standard main function to the file:
int main(int argc, char *argv[])
{
}
Save the file.
Step 3 – Download and extract WinPCap
Go to the WinPcap developer page:http://www.winpcap.org/devel.htm
Download the latest stable version of WinPcap.
Extract to your solution directory.
Step 4 – Configure the Project properties
Now that the needed resources are in your solution directory, you can configure your project to access them.In Visual Studio, right-click on your project and choose Properties.
Make the following configuration changes to your project:
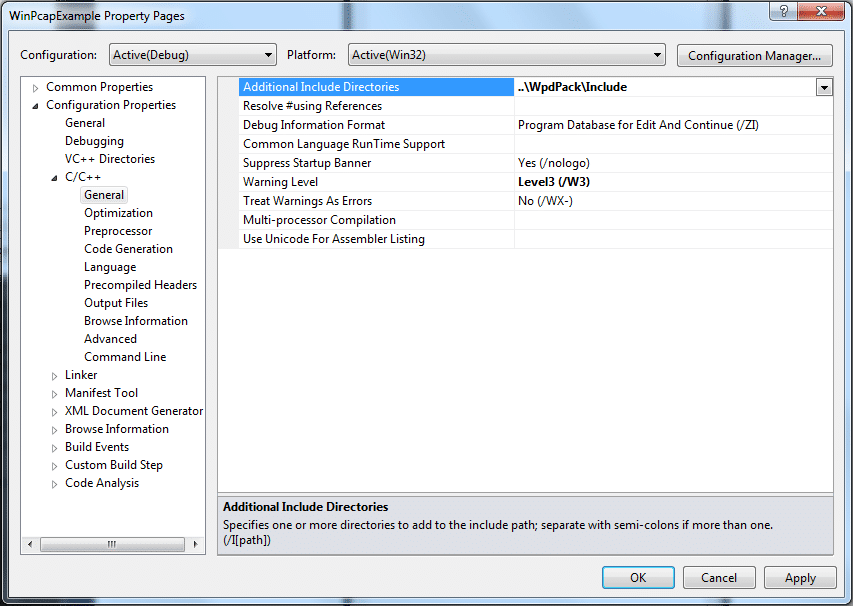
Configuration 1 – Add Additional Include Directories
Go to Configuration Properties | C/C++ | General.Note: If you don’t see the C/C++ option, did you forget to do Step 2 above?
For Additional Include Directories add the relative path:
..\WpdPack\Include

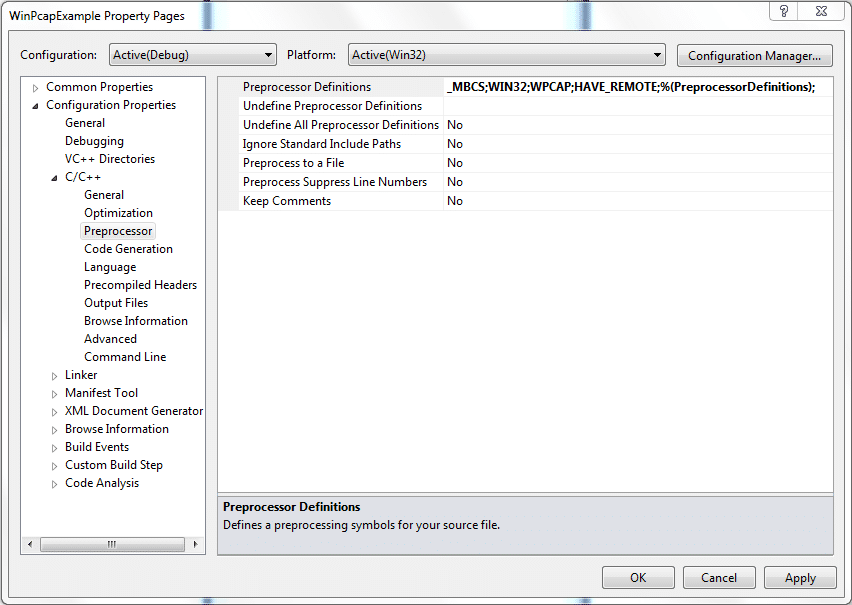
Configuration 2 – Add Preprocessor Definitions
Go to Configuration Properties | C/C++ | Preprocessor.For Preprocessor Definitions, add these three:
WIN32;WPCAP;HAVE_REMOTE.

Important: If you fail to add WIN32, your compile will fail as follows:
Error 1 error C1083: Cannot open include file: 'sys/time.h': No such file or directory c:\users\jared\documents\visual studio 2010\projects\c++\readpcapexample\libs\winpcap-4.1.2\include\pcap\pcap.h 47 1 ReadPCapExample
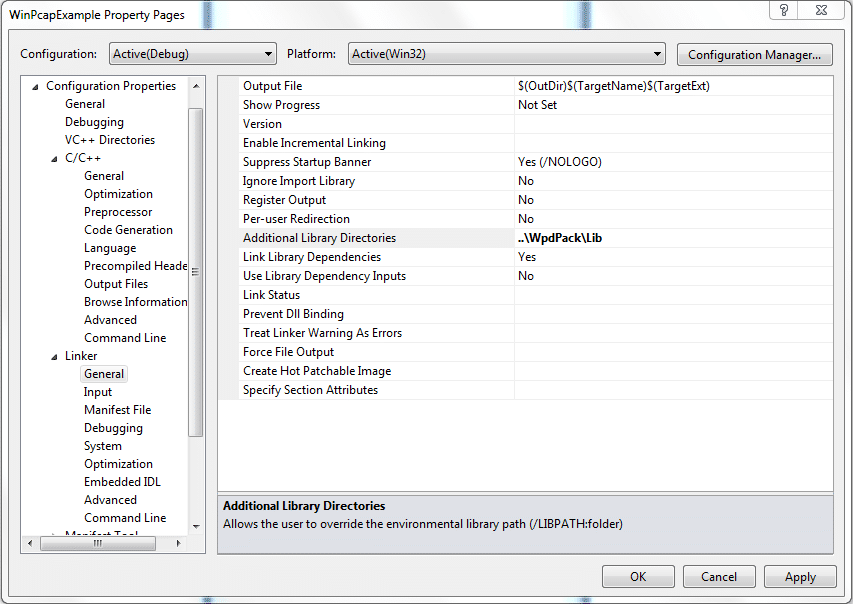
Configuration 3 – Add Additional Library Directories
Go to Configuration Properties | Linker | General.For Additional Library Directories enter the following:
..\WpdPack\Lib

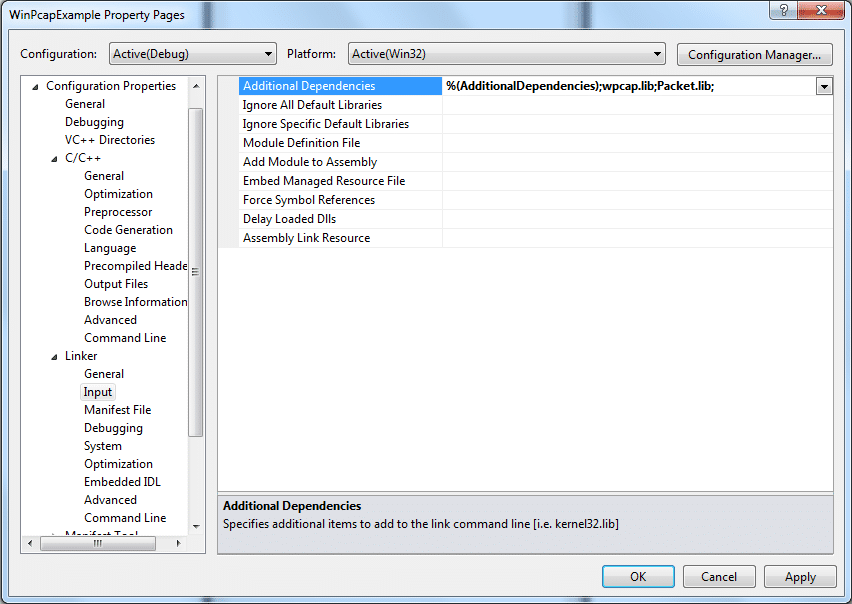
Configuration 4 – Add Additional Dependencies
Go to Configuration Properties | Linker | Input.For Additional Dependencies, add the following:
winpcap.lib;Packet.lib; //此处改winpcap.lib为"wpcap.lib",否则会出现cannot open file 'winpcap.lib'

Note: I removed the default libraries. You may need some of them:
kernel32.lib;user32.lib;gdi32.lib;winspool.lib;comdlg32.lib;advapi32.lib;shell32.lib;ole32.lib;oleaut32.lib;uuid.lib;odbc32.lib;odbccp32.lib;
Step 5 – Include pcap.h
Open the Main.cpp file.Include pcap.h.
#include

int main(int argc, char *argv[])
{
}
Try to compile and it should work.
You are now ready to develop using WinPcap.
Next: How to read a PCap file from Wireshark with C++
Category:
C++ | Comment (RSS)
| Trackback
相关文章推荐
- How To Compile Qt with Visual Studio 2010
- How to compile the IJG JPEG library (libjpeg) for Visual Studio 2010
- How To Compile Qt with Visual Studio
- How to compile a C/C++ DLL for 64 bit with Visual Studio?
- How to create a DLL with SWIG from Visual Studio 2010
- [转]How to Create HTML5 Website and Page Templates for Visual Studio 2010
- How to develop Silverlight 4 using Visual Studio Express 2010
- How to change the default browser to debug with in Visual Studio 2008?
- Deploying Silverlight to a Custom List with Visual Studio 2010
- (F#) How to enable F# template working under Visual Studio 2010 Shell.
- How do I set up a Microsoft Visual Studio project to work with MATLAB Compiler 4.0?
- How to write custom static code analysis rules and integrate them into Visual Studio 2010
- Using Code Analysis with Visual Studio 2010 to Improve Code Quality
- How to import existing projects into TFS Visual Studio with GIT ?
- How to debug c++ console application with argument in visual studio 2012
- How to write custom static code analysis rules and integrate them into Visual Studio 2010
- How To Install Help Files Locally Of Visual Studio 2010
- How to compile PortAudio in Visual Studio
- tesseract3.03:vs2013 + x64 / x86 +win7 + 《How to build tesseract 3.03 with Visual Studio 2013》
- How to create a project with existing folder of files in Visual Studio?
