WCF 学习总结2 -- 配置WCF
2013-07-26 07:58
316 查看
前面一篇文章《WCF 学习总结1 -- 简单实例》一股脑儿展示了几种WCF部署方式,其中配置文件(App.config/Web.config)都是IDE自动生成,省去了我们不少功夫。现在回过头来看看IDE提供的Wcf Service Library项目模板中的默认服务端配置文件——App.config里面究竟有什么秘密。
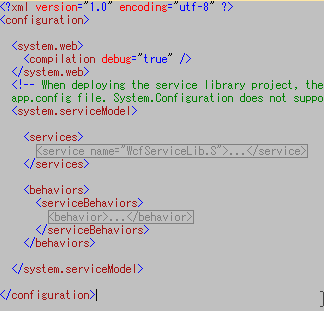
服务端的配置文件主要是对services、bindings、behaviors的配置。在默认的App.config中,使用的是WCF Framework定义好的wsHttpBinding默认配置,所以看不到binding配置节。

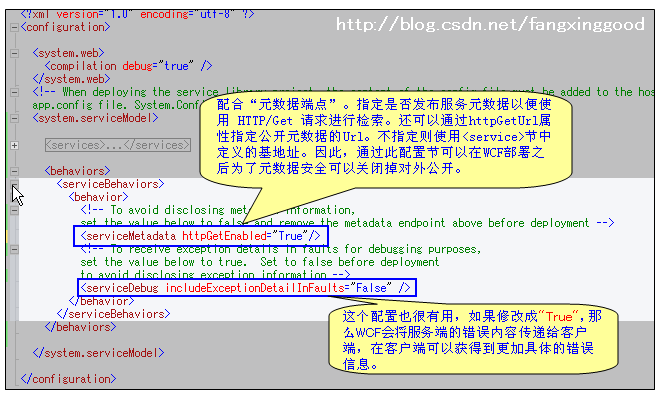
配置节展开如下图:

BTW: "元数据端点”通过WS-MetadataExchange帮我们实现了对服务的描述,提供了WSDL,启动Host之后我们可以通过http://localhost:8732/Design_Time_Addresses/WcfServiceLib/Service1/?wsdl 查看到公开的服务描述。
配置节展开如下图:
关于WCF中的地址和绑定,需要补充一下。
WCF中支持的传输协议包括HTTP、TCP、Peer network(对等网)、IPC(基于命名管道的内部进程通信)以及MSMQ(微软消息队列),每个协议对应一个地址类型:
HTTP地址:http://localhost:8080/
TCP地址: net.tcp://localhost:8080/
IPC地址: net.pipe://localhost/ (适用于跨进程,不能使用于不同机器间)
MSMQ地址: net.msmq://localhost/
对等网地址: net.p2p://localhost/
WCF中提供的绑定有:
BasicHttpBinding: 最简单的绑定类型,通常用于 Web Services。使用 HTTP 协议,Text/XML 编码方式。
WSHttpBinding: 比 BasicHttpBinding 更加安全,通常用于 non-duplex 服务通讯。
WSDualHttpBinding: 和 WSHttpBinding 相比,它支持 duplex 类型的服务。
WSFederationHttpBinding: 支持 WS-Federation 安全通讯协议。
NetTcpBinding: 效率最高,安全的跨机器通讯方式。
NetNamedPipeBinding: 安全、可靠、高效的单机服务通讯方式。
NetMsmqBinding: 使用消息队列在不同机器间进行通讯。
NetPeerTcpBinding: 使用 P2P 协议在多机器间通讯。
MsmqIntegrationBinding: 使用现有的消息队列系统进行跨机器通讯。如 MSMQ。
------ 弱弱的分隔线 -----
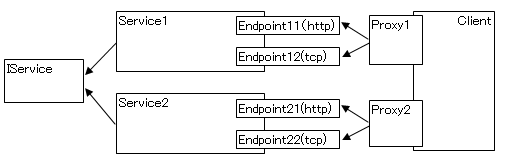
OK,有了上面的基础,就让WCF风暴来的猛烈些吧。做一个多服务,多端点的示例。

1.WcfServiceLib 代码:
[b][b][c-sharp] view plaincopy[/b][/b]
[ServiceContract]
public interface IService
{
[OperationContract]
string GetMessage();
}
public class Service1 : IService
{
public string GetMessage()
{
var address = OperationContext.Current.Channel.LocalAddress.ToString();
return string.Format("From Server1: Hello Client at [{0}]", address);
}
}
public class Service2 : IService
{
public string GetMessage()
{
var address = OperationContext.Current.Channel.LocalAddress.ToString();
return string.Format("来自 Service2: 好 Client at [{0}]", address);
}
}
2.WcfConsoleHost 代码:
[b][b][c-sharp] view plaincopy[/b][/b]
static void Main(string[] args)
{
ServiceHost host1 = new ServiceHost(typeof(WcfServiceLib.Service1));
host1.Open();
Console.WriteLine("Server1 Opened!");
ServiceHost host2 = new ServiceHost(typeof(WcfServiceLib.Service2));
host2.Open();
Console.WriteLine("Server2 Opened!");
Console.Read();
}
3.服务端配置文件:
[b][b][xhtml] view plaincopy[/b][/b]
<?xml version="1.0" encoding="utf-8" ?>
<configuration>
<system.web>
<compilation debug="true" />
</system.web>
<system.serviceModel>
<services>
<service name="WcfServiceLib.Service1">
<host>
<baseAddresses>
<add baseAddress = "http://localhost:9999/WcfStudy3/Service1" />
<add baseAddress = "net.tcp://localhost:8888/WcfStudy3/Service1" />
</baseAddresses>
</host>
<endpoint address ="serviceEN_1" binding="wsHttpBinding" contract="WcfServiceLib.IService" />
<endpoint address ="serviceEN_2" binding="mexTcpBinding" contract="WcfServiceLib.IService" />
<endpoint address="mex" binding="mexHttpBinding" contract="IMetadataExchange"/>
</service>
<service name="WcfServiceLib.Service2">
<host>
<baseAddresses>
<add baseAddress = "http://localhost:9999/WcfStudy3/Service2" />
<add baseAddress = "net.tcp://localhost:8888/WcfStudy3/Service2" />
</baseAddresses>
</host>
<endpoint address ="serviceCH_1" binding="wsHttpBinding" contract="WcfServiceLib.IService" />
<endpoint address ="serviceCH_2" binding="mexTcpBinding" contract="WcfServiceLib.IService" />
<endpoint address="mex" binding="mexHttpBinding" contract="IMetadataExchange"/>
</service>
</services>
<behaviors>
<serviceBehaviors>
<behavior>
<serviceMetadata httpGetEnabled="True"/>
<serviceDebug includeExceptionDetailInFaults="true" />
</behavior>
</serviceBehaviors>
</behaviors>
</system.serviceModel>
</configuration>
4. 启动Host,在Client工程中添加Service Reference
因为有两个Service,所以要添加两次。
(1) WcfSvc1(Url:http://localhost:9999/WcfStudy3/Service1)
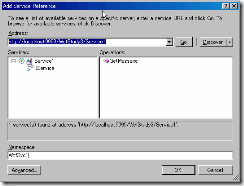
(2) WcfSvc2(Url:http://localhost:9999/WcfStudy3/Service2) 图略
5. 客户端配置文件: 配置节中,生成了4个Endpoint,分别对应服务端的4个Endpoint。通过
name属性区别。
[xhtml] view plaincopy
<client>
<endpoint address="http://localhost:9999/WcfStudy3/Service1/serviceEN_1"
binding="wsHttpBinding" bindingConfiguration="WSHttpBinding_IService"
contract="WcfSvc1.IService" name="WSHttpBinding_IService">
</endpoint>
<endpoint address="net.tcp://localhost:8888/WcfStudy3/Service1/serviceEN_2"
binding="netTcpBinding" bindingConfiguration="MetadataExchangeTcpBinding_IService"
contract="WcfSvc1.IService" name="MetadataExchangeTcpBinding_IService" />
<endpoint address="http://localhost:9999/WcfStudy3/Service2/serviceCH_1"
binding="wsHttpBinding" bindingConfiguration="WSHttpBinding_IService1"
contract="WcfSvc2.IService" name="WSHttpBinding_IService1">
</endpoint>
<endpoint address="net.tcp://localhost:8888/WcfStudy3/Service2/serviceCH_2"
binding="netTcpBinding" bindingConfiguration="MetadataExchangeTcpBinding_IService1"
contract="WcfSvc2.IService" name="MetadataExchangeTcpBinding_IService1" />
</client>
6. 客户端代码:
[b][b][c-sharp] view plaincopy[/b][/b]
static void Main(string[] args)
{
Console.WriteLine("------------");
WcfSvc1.ServiceClient client1_1 = new WcfSvc1.ServiceClient("WSHttpBinding_IService");
Console.WriteLine(client1_1.GetMessage());
Console.WriteLine("------------");
WcfSvc1.ServiceClient client1_2 = new WcfSvc1.ServiceClient("MetadataExchangeTcpBinding_IService");
Console.WriteLine(client1_2.GetMessage());
Console.WriteLine("------------");
WcfSvc2.ServiceClient client2_1 = new WcfSvc2.ServiceClient("WSHttpBinding_IService1");
Console.WriteLine(client2_1.GetMessage());
Console.WriteLine("------------");
WcfSvc2.ServiceClient client2_2 = new WcfSvc2.ServiceClient("MetadataExchangeTcpBinding_IService1");
Console.WriteLine(client2_2.GetMessage());
Console.Read();
}
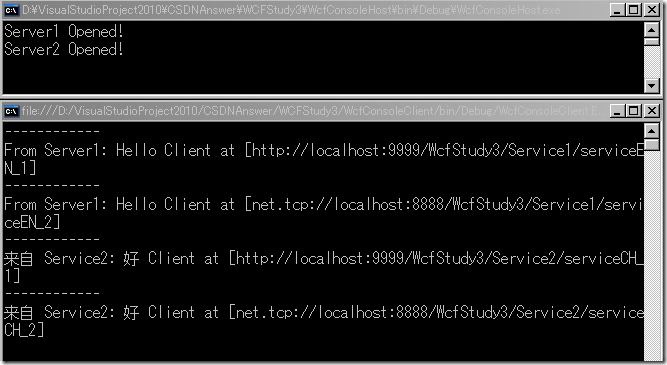
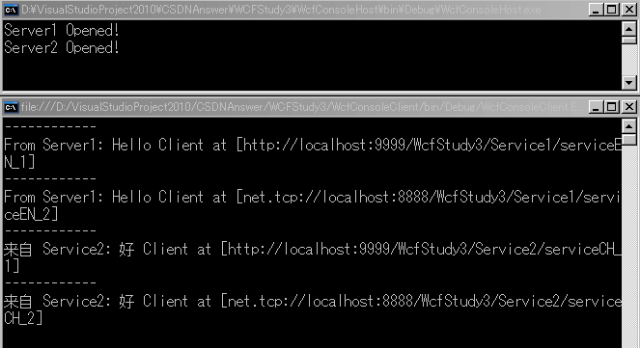
7.运行结果:
服务端的配置文件主要是对services、bindings、behaviors的配置。在默认的App.config中,使用的是WCF Framework定义好的wsHttpBinding默认配置,所以看不到binding配置节。
配置节展开如下图:
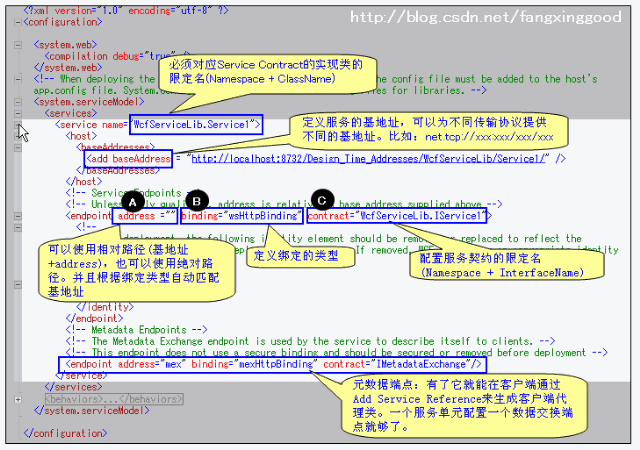
BTW: "元数据端点”通过WS-MetadataExchange帮我们实现了对服务的描述,提供了WSDL,启动Host之后我们可以通过http://localhost:8732/Design_Time_Addresses/WcfServiceLib/Service1/?wsdl 查看到公开的服务描述。
配置节展开如下图:

关于WCF中的地址和绑定,需要补充一下。
WCF中支持的传输协议包括HTTP、TCP、Peer network(对等网)、IPC(基于命名管道的内部进程通信)以及MSMQ(微软消息队列),每个协议对应一个地址类型:
HTTP地址:http://localhost:8080/
TCP地址: net.tcp://localhost:8080/
IPC地址: net.pipe://localhost/ (适用于跨进程,不能使用于不同机器间)
MSMQ地址: net.msmq://localhost/
对等网地址: net.p2p://localhost/
WCF中提供的绑定有:
BasicHttpBinding: 最简单的绑定类型,通常用于 Web Services。使用 HTTP 协议,Text/XML 编码方式。
WSHttpBinding: 比 BasicHttpBinding 更加安全,通常用于 non-duplex 服务通讯。
WSDualHttpBinding: 和 WSHttpBinding 相比,它支持 duplex 类型的服务。
WSFederationHttpBinding: 支持 WS-Federation 安全通讯协议。
NetTcpBinding: 效率最高,安全的跨机器通讯方式。
NetNamedPipeBinding: 安全、可靠、高效的单机服务通讯方式。
NetMsmqBinding: 使用消息队列在不同机器间进行通讯。
NetPeerTcpBinding: 使用 P2P 协议在多机器间通讯。
MsmqIntegrationBinding: 使用现有的消息队列系统进行跨机器通讯。如 MSMQ。
------ 弱弱的分隔线 -----
OK,有了上面的基础,就让WCF风暴来的猛烈些吧。做一个多服务,多端点的示例。
1.WcfServiceLib 代码:
[b][b][c-sharp] view plaincopy[/b][/b]
[ServiceContract]
public interface IService
{
[OperationContract]
string GetMessage();
}
public class Service1 : IService
{
public string GetMessage()
{
var address = OperationContext.Current.Channel.LocalAddress.ToString();
return string.Format("From Server1: Hello Client at [{0}]", address);
}
}
public class Service2 : IService
{
public string GetMessage()
{
var address = OperationContext.Current.Channel.LocalAddress.ToString();
return string.Format("来自 Service2: 好 Client at [{0}]", address);
}
}
2.WcfConsoleHost 代码:
[b][b][c-sharp] view plaincopy[/b][/b]
static void Main(string[] args)
{
ServiceHost host1 = new ServiceHost(typeof(WcfServiceLib.Service1));
host1.Open();
Console.WriteLine("Server1 Opened!");
ServiceHost host2 = new ServiceHost(typeof(WcfServiceLib.Service2));
host2.Open();
Console.WriteLine("Server2 Opened!");
Console.Read();
}
3.服务端配置文件:
[b][b][xhtml] view plaincopy[/b][/b]
<?xml version="1.0" encoding="utf-8" ?>
<configuration>
<system.web>
<compilation debug="true" />
</system.web>
<system.serviceModel>
<services>
<service name="WcfServiceLib.Service1">
<host>
<baseAddresses>
<add baseAddress = "http://localhost:9999/WcfStudy3/Service1" />
<add baseAddress = "net.tcp://localhost:8888/WcfStudy3/Service1" />
</baseAddresses>
</host>
<endpoint address ="serviceEN_1" binding="wsHttpBinding" contract="WcfServiceLib.IService" />
<endpoint address ="serviceEN_2" binding="mexTcpBinding" contract="WcfServiceLib.IService" />
<endpoint address="mex" binding="mexHttpBinding" contract="IMetadataExchange"/>
</service>
<service name="WcfServiceLib.Service2">
<host>
<baseAddresses>
<add baseAddress = "http://localhost:9999/WcfStudy3/Service2" />
<add baseAddress = "net.tcp://localhost:8888/WcfStudy3/Service2" />
</baseAddresses>
</host>
<endpoint address ="serviceCH_1" binding="wsHttpBinding" contract="WcfServiceLib.IService" />
<endpoint address ="serviceCH_2" binding="mexTcpBinding" contract="WcfServiceLib.IService" />
<endpoint address="mex" binding="mexHttpBinding" contract="IMetadataExchange"/>
</service>
</services>
<behaviors>
<serviceBehaviors>
<behavior>
<serviceMetadata httpGetEnabled="True"/>
<serviceDebug includeExceptionDetailInFaults="true" />
</behavior>
</serviceBehaviors>
</behaviors>
</system.serviceModel>
</configuration>
4. 启动Host,在Client工程中添加Service Reference
因为有两个Service,所以要添加两次。
(1) WcfSvc1(Url:http://localhost:9999/WcfStudy3/Service1)

(2) WcfSvc2(Url:http://localhost:9999/WcfStudy3/Service2) 图略
5. 客户端配置文件: 配置节中,生成了4个Endpoint,分别对应服务端的4个Endpoint。通过
name属性区别。
[xhtml] view plaincopy
<client>
<endpoint address="http://localhost:9999/WcfStudy3/Service1/serviceEN_1"
binding="wsHttpBinding" bindingConfiguration="WSHttpBinding_IService"
contract="WcfSvc1.IService" name="WSHttpBinding_IService">
</endpoint>
<endpoint address="net.tcp://localhost:8888/WcfStudy3/Service1/serviceEN_2"
binding="netTcpBinding" bindingConfiguration="MetadataExchangeTcpBinding_IService"
contract="WcfSvc1.IService" name="MetadataExchangeTcpBinding_IService" />
<endpoint address="http://localhost:9999/WcfStudy3/Service2/serviceCH_1"
binding="wsHttpBinding" bindingConfiguration="WSHttpBinding_IService1"
contract="WcfSvc2.IService" name="WSHttpBinding_IService1">
</endpoint>
<endpoint address="net.tcp://localhost:8888/WcfStudy3/Service2/serviceCH_2"
binding="netTcpBinding" bindingConfiguration="MetadataExchangeTcpBinding_IService1"
contract="WcfSvc2.IService" name="MetadataExchangeTcpBinding_IService1" />
</client>
6. 客户端代码:
[b][b][c-sharp] view plaincopy[/b][/b]
static void Main(string[] args)
{
Console.WriteLine("------------");
WcfSvc1.ServiceClient client1_1 = new WcfSvc1.ServiceClient("WSHttpBinding_IService");
Console.WriteLine(client1_1.GetMessage());
Console.WriteLine("------------");
WcfSvc1.ServiceClient client1_2 = new WcfSvc1.ServiceClient("MetadataExchangeTcpBinding_IService");
Console.WriteLine(client1_2.GetMessage());
Console.WriteLine("------------");
WcfSvc2.ServiceClient client2_1 = new WcfSvc2.ServiceClient("WSHttpBinding_IService1");
Console.WriteLine(client2_1.GetMessage());
Console.WriteLine("------------");
WcfSvc2.ServiceClient client2_2 = new WcfSvc2.ServiceClient("MetadataExchangeTcpBinding_IService1");
Console.WriteLine(client2_2.GetMessage());
Console.Read();
}
7.运行结果:

相关文章推荐
- WCF 学习总结2 -- 配置WCF
- WCF 学习总结2 -- 配置WCF
- WCF 学习总结2 -- 配置WCF
- WCF 学习总结2 -- 配置WCF
- WCF 学习总结2 -- 配置WCF
- WCF 学习总结2 -- 配置WCF
- Solr学习总结(二)Solr的安装与配置
- WCF学习笔记(1配置)
- WCF学习总结(一)
- jsf学习总结(web.xml,content.xml,faces-config.xml等相关配置)
- Maven学习总结(19)——深入理解Maven相关配置
- Spring学习总结(20)——Spring加载多个项目properties配置文件问题解决
- 对haproxy配置学习过程中几个点进行总结
- WCF学习总结
- java学习第一节知识点总结(配置环境等)
- Spring学习总结(7)——applicationContext.xml 配置文详解
- win7 64位 旗舰版 环境配置(多方学习的小总结)
- 在配置WCF服务的时候出现的错误总结
- MyBatis学习总结(3)——优化MyBatis配置文件中的配置
- Android学习总结之开发工具AndroidStudio的安装与配置