HPUX11.31U ia64安装配置详细过程文档
2013-07-18 16:16
513 查看
1安装规划
1.1目录空间规划
| 文件系统 | 分配容量 | 挂载点 | 所属卷组 | 磁盘归属 |
| /dev/vg00/lvol1 | 20G | /stand | vg00 | 本地磁盘 |
| /dev/vg00/lvol2 | 70G | swap | ||
| /dev/vg00/lvol3 | 20G | / | ||
| /dev/vg00/lvol4 | 20G | /home | ||
| /dev/vg00/lvol5 | 27G | /opt | ||
| /dev/vg00/lvol6 | 20G | /tmp | ||
| /dev/vg00/lvol7 | 22G | /usr | ||
| /dev/vg00/lvol8 | 70G | /var | ||
| /dev/vg01/lvol1 | 358G | /oracle/data | vg01 | 外接磁阵 |
| /dev/vg02/lvol1 | 358G | /oracle/arch | vg02 | |
| /dev/vg03/lvol1 | 476G | /oracle/back | vg03 |
1.2多路径新老路径对应关系
| 新路径 | 老路径 | 磁盘归属 |
| /dev/rdisk/disk1 | /dev/rdsk/c0t0d0 | 本地磁盘 |
| /dev/rdisk/disk1_p1 | /dev/rdsk/c0t0d0s1 | |
| /dev/rdisk/disk1_p2 | /dev/rdsk/c0t0d0s2 | |
| /dev/rdisk/disk1_p3 | /dev/rdsk/c0t0d0s3 | |
| /dev/rdisk/disk10 | /dev/rdsk/c3t0d0 | |
| /dev/rdsk/c2t0d0 | 外接磁阵 | |
| /dev/rdisk/disk12 | /dev/rdsk/c2t0d1 | |
| /dev/rdsk/c3t0d1 | ||
| /dev/rdisk/disk14 | /dev/rdsk/c2t0d2 | |
| /dev/rdsk/c3t0d2 |
1.3网络配置规划
| IP地址: | 192.168.1.100 |
| 子网掩码: | 255.255.255.0 |
| 默认网关: | 192.168.1.1 |
| 主机名: | dbtest |
| APA实例接口: | lan800 |
2MP初始化配置
2.1修改引导顺序
主机加电,放入光盘→用串口线连接主机串口→查看MP端口的IP地址→网线连接到主机MP口→进入[a]MP:CM> →输入co 进入控制窗口→选择internal bootable dvd 启动[a] MP:CM>
MP MAIN MENU:
CO: Console
VFP: Virtual Front Panel
CM: Command Menu
SMCLP: Server Management Command LineProtocol
CL: Console Log
SL: Show Event Logs
HE: Main Help Menu
X: Exit Connection
[a] MP> co
[Use Ctrl-B or ESC-( to return to MPmain menu.]
- - - - - - - - - -Prior Console Output - - - - - - - - - -
HPUX>
HPUX>
HPUX> 开始安装,(此时会输出主机的硬件信息)
- - - - - - - - - -- - Live Console - - - - - - - - - - - -
***********************************************************
* ROM Version :04.03
* ROM Date : 04/08/2008
* BMC Version: 05.23
***********************************************************
0 0 0x0015B20x0000000023232801 boot time event
1 0 0x0000A4 0x0000000000000000 start memoryconfiguration
提示输入语言
Enter thenumber of the language you want: 26
[a] MP:CM> help ---à进入帮助
HE
==== MP Help: MainMenu =======================================================
Hardware RevisionS0 Firmware Revision F.02.17 Oct 5 2007,16:53:04
IntegratedLights-Out for HP Integrity - Management Processor (MP)
MP Help System
Use Ctrl-B to exit MP command interface andreturn to the main MP menu.
Enter a command at the help prompt:
OVerview : Launch the help overview
LIst : Show the list of MP Command Menucommands
<COMMAND> : Enter the commandname for help on individual command
TOPics : Show all MP Help topics and commands
HElp : Display this screen
Q : Quit help
====
MP:HE>
MP MAIN MENU:
CO: Console
VFP: Virtual Front Panel
CM: Command Menu
SMCLP: Server Management Command LineProtocol
CL: Console Log
SL: Show Event Logs
HE: Main Help Menu
X: Exit Connection
[a] MP> cm
(Use Ctrl-B to return to MP main menu.)
[a] MP:CM> pe
2.2电源开关控制
[a] MP:CM> pePC
Current SystemPower State: On
Power Control Menu:
C - Power Cycle
ON - Power On
OFF - Power Off
G - Graceful Shutdown
Enter menu item or[Q] to Quit: off
off
System will bepowered off.
You must shut down the OS manually beforethis command is executed.
Failure to do this can cause problems whenthe OS is restarted.
Confirm? (Y/
): y
y
-> System is being powered off.
[a] MP:CM> pe
PC
Current SystemPower State: Off
Power Control Menu:
C -Power Cycle
ON - Power On
OFF - Power Off
G - Graceful Shutdown
Enter menu item or[Q] to Quit: on
on
System will bepowered on.
Confirm? (Y/
): y
y
-> System is being powered on.
2.3修改MP的IP
[a] MP:CM> helpHE
==== MP Help: MainMenu =======================================================
Hardware RevisionS0 Firmware Revision F.02.17 Oct 5 2007,16:53:04
IntegratedLights-Out for HP Integrity - Management Processor (MP)
MP Help System
Use Ctrl-B to exit MP command interface andreturn to the main MP menu.
Enter a command at the help prompt:
OVerview : Launch the help overview
LIst : Show the list of MP Command Menucommands
<COMMAND> : Enter the commandname for help on individual command
TOPics : Show all MP Help topics and commands
HElp : Display this screen
Q : Quit help
====
MP:HE> list
list
==== MP Help:Command Menu List =============================================
BP : Reset BMC Passwords PC : Remote Power Control
CA : Configure asynch/serial ports PM :Remote Power Mode Control
DATE: DisplayDate PR : Power Restore Policy Config.
DC : Default Configuration PS :Power management module Status
DF : Display FRU Information RB :Reset BMC
DI : DIsconnect users RS : Reset System through RST signal
DNS : ConfigureDHCP and DNS SA : Set MP Access
FW : Upgrade MP firmware SNMP: Configure SNMPparameters
HE : Display Help SO :Security Options
ID : System Information SS :System processors Status
IT : Modify MP inactivity timeouts SYSREV: Display System firmware Revs.
LC : Configure LAN, SSH and Web ports TC : Reset system via INIT
LDAP: ConfigureDirectory parameters TE :TEll- send a msg. to other users
LM : License Management UC : User Configuration
LOC : Locator LEDdisplay WHO : Displayconnected MP users
LS : LAN Status XD : Diagnostics and reset of MP
====
MP:HE> LC →先将dhcp设为disable→重启→设置MP ip地址
3系统安装步骤
============================================3.1安装前的准备
准备HPUX的系统安装介质<系统安装盘>,以及配有光驱的性能稳定的目标主机<小型机或工作站>。3.2安装具体过程
上电开机后,把安装盘放入光驱<分内置和外置光驱>a、在主机自检过程结束后,10秒中断,如下所示:
FirmwareVersion 43.43
DuplexConsole IO Dependent Code (IODC) revision 1
------------------------------------------------------------------------------
(c) Copyright 1995-2002, Hewlett-PackardCompany, All rights reserved
------------------------------------------------------------------------------
Processor Speed State CoProcessor State CacheSize
Number State Inst Data
--------- -------- ------------------ ----------------- ------------
1 550 MHz Active Functional 512 KB 1 MB
Central Bus Speed (in MHz) : 133
Available Memory : 2097152 KB
Good Memory Required : 31408 KB
Primary boot path: 0/0/2/1.6
Alternate boot path: 0/0/2/1.6
Console path: 0/0/4/0.0
Keyboard path: 0/0/4/0.0
Processor isbooting from first available device.
Todiscontinue, press any key within 10 seconds.
b、在此处,按键盘任何健,中断系统的正常引导,进入PDC环境,如下所示:
Main Menu: Enter command or menu >
在这个环境下可以做很多工作,做系统安装在这里需要找到光驱的路径,敲入sea命令
Main Menu: Entercommand or menu > sea
Searching forpotential boot device(s)
This may takeseveral minutes.
To discontinuesearch, press any key (termination may not be immediate).
IODC
Path# Device Path (dec) Device Path(mnem) Device Type Rev
----- ----------------- ------------------ ----------- ----
P0 0/0/1/0.4 extscsi.4 Random access media 1
P1 0/0/2/0.6 intscsia.6 Random access media 1
P2 0/0/2/1.6 intscsib.6 Random access media 1
Main Menu: Enter command or menu >
这里我们看到的是外置的光驱extscsi.4<光驱和内置硬盘的设备类型都是Random access media,磁带机的设备类型为Sequential access media,区分光驱和应该可以根据路径现在从光驱启动,两种方法,如下所示:>
c、Main Menu: Enter command or menu> bo p0 <或者bo 0/0/0.4>
Interact with IPL(Y, N, or Cancel)?> n
Booting...
Boot IO DependentCode (IODC) revision 1
HARD Booted.
ISL Revision A.00.43 Apr 12, 2000
ISL booting hpux (;0):INSTALL
Boot
: disk(0/0/1/0.4.0.0.0.0.0;0):WINSTALL
11763712 + 1970264+ 2628048 start 0x200ae8
alloc_pdc_pages:Relocating PDC from 0xffff800000 to 0x7fa00000.
gate64:sysvec_vaddr = 0xc0002000 for 2 pages
NOTICE:nfs3_link(): File system was registered at index 4.
NOTICE:autofs_link(): File system was registered at index 6.
NOTICE:cachefs_link(): File system was registered at index 7.
System Console is on the Built-In SerialInterface
Swap device table: (start & size given in 512-byte blocks)
entry 0 - auto-configured on rootdevice; ignored - no room
WARNING: no swapdevice configured, so dump cannot be defaulted to primary swap.
WARNING: No dumpdevices are configured. Dump isdisabled.
Starting theSTREAMS daemons-phase 1
Create STCP devicefiles
$Revision: vmunix: vw: -proj selectors: CUPI80_BL2000_1108 -c 'Vw for CUPI80_BL2000_1108 build' --cupi80_bl2000_110
8 'CUPI80_BL2000_1108' Wed Nov 8 19:24:56 PST 2000 $
Memory Information:
physical page size = 4096 bytes, logicalpage size = 4096 bytes
Physical: 2097152 Kbytes, lockable: 1555264 Kbytes,available: 1801372 Kbytes
d、以上显示内容是从光驱引导的提示信息,直到出现如下界面
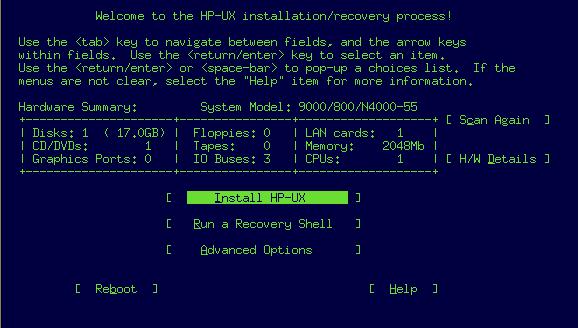
在这个界面中,选中Install HP-UX选项,点击回车键,进入下个界面

这个界面中,User Interface Options选项使用的较多的只有两个
一是:GuidedInstallation,如果默认安装可以直接选择OK,下面的都是选择Next,直接到底不用任何干涉,只要换盘就可以了,等系统安装完成后按照提示设置一些系统的相关配置信息即可。二是:AdvancedInstallation,一般都是选择这个,因为通过这个可以预定好多系统的相关属性和信息,如软件包以及文件系统等等,下面详细介绍每一步:
上一界面中移动Tab键到AdvancedInstallation,并按Space选中,然后选择ok,进入下一界面,这里将对每一个选项卡中的相关内容做一定的解释和说明<Basic –Software—System—FileSystem--Advanced>
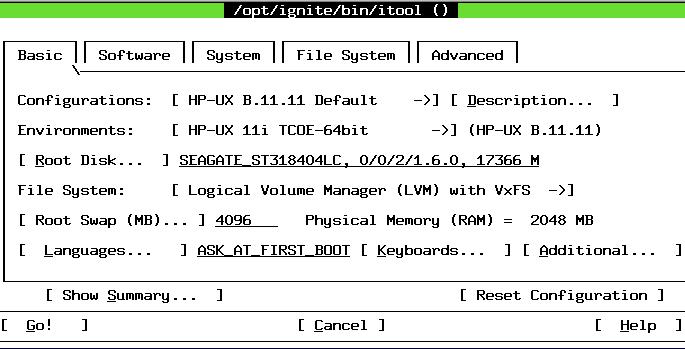
在上图所示Basic选项卡中,可以设置系统的基本配置、运行环境<32bit or 64bit>、安装的Root Disk、FileSystem的类型、Swap区的大小<一定要改。默认为物理内存大小的两倍>,以及设置系统语言环境等等,一般在本页不做任何修改。确认后,使用Tab键移到并选择Software或其他选项卡进行其他设置
选CDE/ignite/
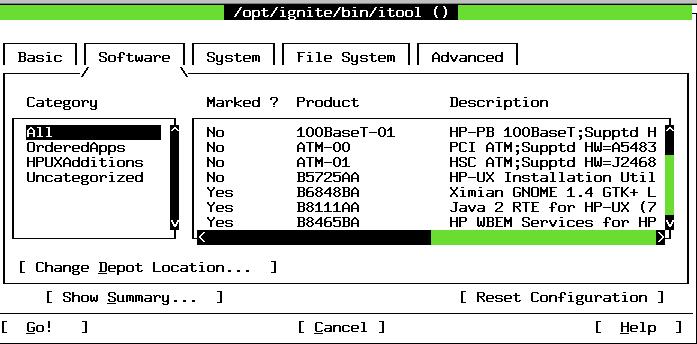
在如上所示Software选项卡中,可以选择一些必要的补丁或软件包。需要安装的只要使相关记录的Marked?属性变为Yes<为No的不安装>,方法是使用Tab键进入右边列表框,上下方向键选择相关记录,Space键进行Yes和No的切换。确认完后,使用Tab键移到并选择System或其他选项卡进行其他设置。

在如上所示System选项卡中,可以设置主机名、网络相关配置、时间相关设置以及root用户密码等,借助Tab键及上下左右方向键选择相关参数并进行设置。当然也可以选择安装系统后设置这些信息,修改Final System Parameters即可。确认完后,使用Tab键移到并选择File System或其他选项卡进行其他设置。
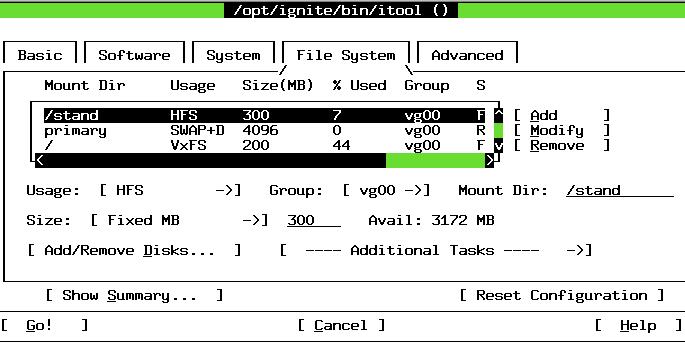
在如上所示File System选项卡中,可以设置 /var、/tmp、/home等文件系统的大小、类型<HFS、VxFS等>,选择文件系统所属VG,VG进行扩容等等。其中/stand默认大小为300MB以及/Swap的默认大小为物理内存的两倍<不建议修改,除非有特殊许需求>。借助Tab键及上下左右方向键选择相关参数并进行设置。确认完后,使用Tab键移到并选择Advanced或其他选项卡进行其他设置。

在如上所示Advanced选项卡中,可以设置一些脚本<一般不做设置>。确认完后<可以查看汇总,选择Show Sumary即可>,使用Tab键移到并选择其他选项卡进行其他设置,或者选择GO进行安装。
以下所要做的就是等待、换盘,当安装结束后可能需要进行一些简单的配置<如没有先预定义的话>,该例中系统以及网络相关先前全部配置完成。You can payattention to the detail process as follows!
4APA端口聚合配置
使用SMH工具对网络接口聚合,SMH访问方式:http://192.168.1.100:2301
本实例将LAN0与LAN2聚合成LAN900实例,配置比较简单,如下图
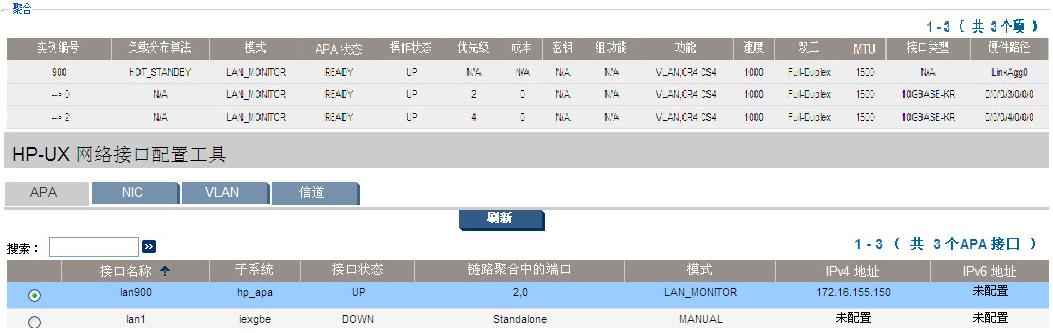

以上是配置完成后的信息
4.1查看网络接口状态
bash-4.2# nwmgrName/ Interface Station Sub- Interface Related
ClassInstance State Address system Type Interface
======================= ============== ======== ============== =========
lan0 UP 0x009C0229FD7C iexgbe 10GBASE-KR lan900
lan1 DOWN 0x009C0229FD80 iexgbe 10GBASE-KR
lan2 UP 0x009C0229FD84 iexgbe 10GBASE-KR lan900
lan3 DOWN 0x009C0229FD88 iexgbe 10GBASE-KR
lan900 UP 0x009C0229FD84 hp_apa hp_apa
lan901 DOWN 0x000000000000 hp_apa hp_apa
lan902 DOWN 0x000000000000 hp_apa hp_apa
lan903 DOWN 0x000000000000 hp_apa hp_apa
lan904 DOWN 0x000000000000hp_apa hp_apa
测试底层物理连通性linkloop –i 2 0x009C0229FD7C
4.2查看LAN900实例信息
bash-4.2#nwmgr –Sapa –I 900 –v
lan900 currentvalues:
Speed = 1 Gbps Full Duplex
MTU = 1500
Virtual Maximum Transmission Unit = 32160
MAC Address = 0x009c0229fd84
Network Management ID = 6
Features = Linkagg Interface
IPV4 Recv CKO
IPV4 Send CKO
VLAN Support
VLAN Tag Offload
64Bit MIB Support
IPV4 TCP Segmentation Offload
Load Distribution Algorithm = LB_HS
Mode = LAN_MONITOR
Parent PPA = -
APA State = Up
Membership = 2,0
Active Port(s) = 2
Ready Port(s) = 0
Not Ready Port(s) = -
Connected Port(s) = 0
Polling Interval = 10000000
Dead Count = 3
Rapid ARP = on
Rapid ARP Interval = 1.0 second(s)
Rapid ARP Count = 10
Failover Policy = PRIORITY_BASED
Fixed Mac Address = off
4.3查看网络接口IP
bash-4.2# netstat-inName Mtu Network Address Ipkts Ierrs Opkts Oerrs Coll
lo0 32808 127.0.0.0 127.0.0.1 4073 0 4073 0 0
lan900 1500192.168.0.0 192.168.0.82 5561 0 978 0 0
4.4APA相关配置文件目录
/etc/rc.config.d/hp_apaconfig/etc/rc.config.d/hp_apaportconfig
/etc/lanmon/lanconfig.ascii
/etc/rc.config.d/netconf
4.5APA启停控制
/sbin/init.d/hplmstop/sbin/init.d/hpapastop
/sbin/init.d/hpapastart
/sbin/init.d/hplmstart
5存储多路径配置
HPUX11.3默认应该已经安装了存储多路径软件,如果没有安装需从官网下载并安装,安装完成后可以自动识别并配置多路径。5.1查看新旧路径对应关系
# ioscan -m dsfPersistent DSF Legacy DSF(s)
========================================
/dev/rdisk/disk1 /dev/rdsk/c0t0d0
/dev/rdisk/disk1_p1 /dev/rdsk/c0t0d0s1
/dev/rdisk/disk1_p2 /dev/rdsk/c0t0d0s2
/dev/rdisk/disk1_p3 /dev/rdsk/c0t0d0s3
/dev/rdisk/disk9 /dev/rdsk/c3t0d0
/dev/rdsk/c2t0d0
/dev/rdisk/disk10 /dev/rdsk/c2t0d1
/dev/rdsk/c3t0d1
/dev/rdisk/disk14 /dev/rdsk/c2t0d2
/dev/rdsk/c3t0d2
其中/dev/rdisk/目录为多路径对应的字符设备,创建PV需要用字符设备。/dev/disk/目录下的设备为块设备,创建VG需要使用块设备
5.2查看磁盘设备的详细信息
diskinfo/dev/rdsk/c2t0d06网络配置
#vi/etc/rc.config.d/netconfHOSTNAME="danbao"
OPERATING_SYSTEM=HP-UX
LOOPBACK_ADDRESS=127.0.0.1
-----------------------------------------------------------------------------
INTERFACE_NAME[0]=lan900
IP_ADDRESS[0]=172.16.155.150
SUBNET_MASK[0]=255.255.255.0
BROADCAST_ADDRESS[0]=""
INTERFACE_STATE[0]="up"
DHCP_ENABLE[0]=0
INTERFACE_MODULES[0]=""
INTERFACE_SKIP[0]=""
ROUTE_DESTINATION[0]=default
ROUTE_GATEWAY[0]=172.16.155.200
ROUTE_COUNT[0]=1
停止网络服务
/sbin/init.d/netstop
启动网络服务
/sbin/init.d/netstart
7SSH/FTP/TELNET服务配置
7.1配置SSH服务
#cat /sbin/init.d/secsh #secsh代表secure shell, 就是ssh的启动脚本。会看到如下信息:
WHAT_PATH=/opt/ssh/sbin/sshd #启动ssh服务目录
WHAT_PID=/var/run/sshd.pid #ssh运行时的进程号
WHAT_CONFIG=/etc/rc.config.d/sshd #ssh配置文件所目录
7.2打开FTP与TELNET服务
7.2.1修改/etc/inetd.conf文件
用vi编辑器打开文件/etc/inetd.conf,找到如下三行:#ftp stream tcp6 nowait root/usr/lbin/ftpd ftpd -l
#telnet stream tcp6 nowait root /usr/lbin/telnetd telnetd
#login stream tcp6 nowait root/usr/lbin/rlogind rlogind
取消前面的注释符。
7.2.2重启inetd服务
#/sbin/init.d/inetdstopInternetServices stopped
#/sbin/init.d/inetdstart
InternetServices started
inetd服务重启之后,ftp和telnet服务就应该打开了。
7.2.3屏蔽防火墙功能
假如不屏蔽防火墙功能,在外界使用“ping”命令来测试会有无法ping通的情况发生。这个时候,需要将防火墙功能取消,具体命令如下:#/sbin/init.d/ipfbootstop
取消之后,立即进行ping测试,可通过,如果不需要可将ipfboot文件删除。
7.2.4移动/etc/securetty文件
移动这个文件的目的在于,在进行了第三步之后,ping没问题了,telnet也可以正常访问,但是无论怎样输入root的密码都无法登陆,如果是普通用户倒无妨,看来root用户密码在某些地方被限制了,所以输入就无效。这个时候需要移动/etc下的securetty文件,删除,或者重命名。为了稳妥起见,这里采用重命名的方式,即使之后需要的时候还能够更改过来。# mv/etc/securetty /etc/securetty.old
7.2.5打开root的ftp功能
默认情况下,root用户的ftp功能是被禁用掉的,这个主要跟/etc/ftpd目录下的ftpusers文件相关,在这个文件下默root用户被禁用,将root注释掉即可。8LVM磁盘管理配置
8.1创建PV
pvcreate/dev/rdisk/disk98.2确认唯一次号
ll/dev/*/group8.3创建VG控制文件
mkdir/dev/vg01mkdir/dev/vg02
mkdir/dev/vg03
mknod/dev/vg01/group c 64 0x010000
mknod/dev/vg02/group c 64 0x020000
mknod/dev/vg03/group c 64 0x030000
8.4创建与显示VG
vgcreate–s 64 /dev/vg01 /dev/disk/disk9vgcreate–s 64 /dev/vg02 /dev/disk/disk10
vgcreate–s 64 /dev/vg03 /dev/disk/disk24
vgdisplay–v vg01
vgdisplay–v vg02
vgdisplay–v vg03
8.5激活与去激活VG
vgchange–a y vg01vgchange–a n vg01
8.6创建LV
lvcreate–L 358400 –n lvol1 /dev/vg01lvcreate–L 358400 –n lvol1 /dev/vg02
lvcreate–L 476032 –n lvol1 /dev/vg03
8.7创建文件系统
newfs –Fvxfs /dev/vg01/lvol1newfs –Fvxfs /dev/vg02/lvol1
newfs –Fvxfs /dev/vg03/lvol1
8.8扩展LV
lvextend –L 指定大小/dev/vg01/lvol18.9挂载文件系统
mount/dev/vg01/lvol1 /oracle/datamount/dev/vg02/lvol1 /oracle/arch
mount/dev/vg03/lvol1 /oracle/back
8.10重启自动挂载
#vi/etc/fstab/dev/vg01/lvol1/oracle/data vxfs delaylog 0 2
/dev/vg02/lvol1/oracle/arch vxfs delaylog 0 2
/dev/vg03/lvol1/oracle/back vxfs delaylog 0 2
本文出自 “清枫拂面” 博客,请务必保留此出处http://crazy123.blog.51cto.com/1029610/1252111

相关文章推荐
- HPUX11.31U ia64安装配置详细过程文档
- Ubuntu和CentOS下安装配置samba服务详细过程(超级简单的smb.conf)
- CentOS下独立SVN服务器的安装与配置详细过程
- PL/SQL 客户端安装配置文档(超详细多图)
- 写一篇博文,详细描述从规划、域名注册或配置、系统安装、网站构建等完整过程
- 3、CentOS 6.5系统安装配置Tomcat 8详细过程
- android 最新 NDK r8 在window下开发环境搭建 安装配置与使用 详细图文讲解,完整实际配置过程记录
- lamp安装配置详细过程(把以前的笔记贴上来)
- Redhat cacti安装配置详细过程
- 安装配置OPENCMS的Replication cluster(从)详细过程
- 负载均衡(lvs+keepalive 比较详细的安装配置文档)
- 详细图解IIS6安装与配置.net 2.0的过程
- ceph 对象存储网关radosgw和S3接口详细安装配置测试文档
- mysql学习(1):win_64位下载,安装,配置mysql-5-winx64详细步骤
- Linux + Oracle 11g R2 RAC 安装配置详细过程
- lvs+keepalive 比较详细的安装配置文档
- 在CentOS下安装配置VNC详细过程
- gvim配置及相关插件安装(过程详细,附图)
- LFS目标系统其他基础软件包的安装和配置详细过程(1)
- gvim配置及相关插件安装(过程详细,附图)