视图编程指南View Programming Guide for iOS-2
2013-07-09 09:31
579 查看
三、Views 视图
(一) 创建和配置视图对象 Creating and Configuring View Objects
1, 使用IB创建视图对象 Creating View Object Using Interface Builder:
所见即所得,你在一个nib file中保存这些live objects,nib file是一个资源文件,它保存了你的对象的配置和状态。一般nib file的最高级视图是一个单独的视图,代表viewController’s view属性(ViewController本身是nib file的File’s Owner)。 顶级View应该根据目标设备设置适当的尺寸,并包含所有其他的视图 . 很少使用一个nib file只存储你的view controller’s view的一部分结构。
如果你的nib file没有和一个viewController关联,你可以通过一个NSBundle or UINib对象来手动加载他。
2,通过代码创建视图 Creating View Objects Programmatically
你可以使用标准的allocation/initialization 格式。默认的初始化方法是 initWIthFrame:
如下:
CGRect viewRect = CGRectMake(0, 0, 100, 100);
UIView* myView = [[UIView alloc] initWithFrame:viewRect];
3,设置视图的属性 Setting the Properties of a View:
UIView有一些声明的属性来控制view的外观和行为。你也可以在IB中的Inspector window修改这些属性。
属性alpha,hidden,opaque的使用:
属性bounds,frame,center,transform的使用:
属性autoresizingMask,autoresizesSubviews的使用:
属性contentMode,contentStretch,contentScaleFactor的使用:
属性gestureRecognizers,userInteractionEnabled,multipleTouchEnabled,exclusiveTouch的使用:这些属性影响view如何处理触摸事件。
属性backgroundColor,subviews,drawRect:method,layer,(layerClass method)的使用:
4,设置视图的tag属性 Tagging View for Future Identification:
使用view的tag属性来唯一标识view。该属性默认为0,是一个int值。 使用viewWithTag:方法来根据tag值查找view。这个方法使用depth-first查找目标和他的subviews,他不查找superview和其他的view。(二)创建和管理视图架构 Creating and Managing a View Hierarchy
1,添加和移除子视图 Adding and Removing Subviews:
1) addSubview:方法来添加一个subview2) insertSubview:…
3) 重新排列:bringSubviewToFront: sendSubviewToBack
或者 exchangeSubviewAtIndex:withSubviewAtIndex:
4) removeFromSuperview
当添加一个subview到他的父view,subview的当前frame矩形指示他的初始位置为相对于其父视图的坐标。如果他的frame在他的superview的可见bounds之外,默认地不被clipped,如果想被clipped,则设置superview的clipsToBounds属性为YES。(但是父view外面的部分的触摸事件永远不会被传递)。
一般在
application:didFinishLaunchingWithOptions:方法中给window对象addSubview
或者在loadView或viewDidLoad方法中给自定义的view添加subview。
当你添加一个subview到另一个view中,UIKit通知both the parent and the child views of the change.如果你实现了自定义的视图,你可以***这些通知后面的方法中的一个或多个: willMoveToSuperview: willMoveToWindow: willRemoveSubview: didAddSubview: didMoveToSuperview or didMoveToWindow 方法。你可以利用这些通知来更新任何状态信息和其他附加操作。
每个视图的window属性表示他们正在哪个窗口中被显示。因为视图层次结构中的root view没有父,所以他的superview属性为nil. 对于屏幕上的views来说,window对象是视图层次结构的根视图(root view)
2,隐藏视图 Hiding Views:
设置hidden属性为YES或更改alpha值为0.0。一个被隐藏的视图不接受触摸事件。然而,隐藏的视图却参与autoresizing和其他的布局操作。因此,经常隐藏一个视图,而不是移除一个视图 。尤其是你计划过会再次显示view时。重要提示:如果你隐藏的view是当前第一响应者,view不会自动回收他的first responder状态。以first responder为目标的事件仍然传递给被隐藏的view。为了避免这样的事情发生,你应该在隐藏视图时,强制收回其第一响应者状态。
如果你想动画,你需要设置view的alpha属性,hidden属性不是动画属性。
3,Locating Views in a View Hierarchy 定位view
有两种方法定位view1)把相关view的指针存储在合适的位置,例如存储在拥有view的viewController中。
2)为每一个view的tag属性指定一个唯一的integer值,并且使用viewWithTag:方法来定位。
第一种方法最常使用。
4,转换、缩放和旋转视图 Translating,Scaling,and Rotating Views
每个View都有一个相关的affine transform,你可以用他来translate,scale,or rotate the view’s content。UIView的transform属性包含一个CGAffineTransform结构 with the transformations to apply。默认地,这个属性被设置为identity transform(标准矩阵),不修改view的外观。你可以在任何时候指定一个新的transform。例如,要旋转一个view 45度,你可以使用下面的代码:
CGAffineTransform xform = CGAffineTransformMakeRotation(M_PI/4.0);
self.view.transform = xform;
应用上面的代码到一个view,他会沿中心点顺时针旋转view。
当应用多个transformations到一个view上,添加顺序是关键的。所有的动画都是以view的中心点为基础的。
5,Converting Coordinates in the View Hierarchy 转换坐标系
例如,触摸事件报告每个触摸的位置—以window’s的坐标系统为基准。但是view对象经常需要 在视图内的本地坐标信息。UIView定义了下面的方法来转换坐标到视图的本地坐标。(或将本地坐标转换为另外一个视图的坐标):convertPoint:fromView:
convertRect:fromView:
convertPoint:toView:
convertRect:toView:
如果指定view参数为nil,则表示将坐标转换为包含view的windowconvert to or from the window that contains the view。
除了UIView 转换方法之外,UIWindow类也定义了一些方法。
convertPoint:fromWindow:
convertRect:fromWindow:
convertPoint:toWIndow:
convertRect:toWIndow:
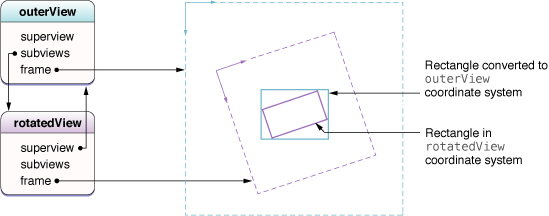
当在被旋转的view中转换坐标,UIKit converts rectangles under the assumption(假定,设想) that you want the returned rectangle to reflect the screen area covered by the source rectangle. Figure 3-3 shows an example of how rotations can cause the size of the rectangle to change
during a conversion.在图中,外部的parent view包含一个被旋转的subview。转换在subview的坐标系中的rectangle到他的parent坐标系中产生了一个更大的rectangle。这个大的rectangle实际上是outerView的最小rectangle—包含the rotated rectangle的最小rectangle。
(二)Adjusting the Size and Position of Views at Runtime:调整大小和位置
1,Being Prepared for Layout Changes: 下列事件发生时,布局将发生更改发生:
1)view的bounds的size发生变化2)界面方向发生变化,这通常导致root view的bounds的rectangle发生变化
3)视图的layer的sublayer的Core Animation set发生更改并且需要布局时。
4)你的程序通过调用视图的SetNeedsLayout或layoutIfNeeded方法强迫其layout发生
5)你的程序调用视图下面的layer对象的setNeedsLayout方法强迫布局layout发生
2,通过Autoresizing Mask处理布局更改 Handling Layout Changes Automatically Using Autoresizing Rules
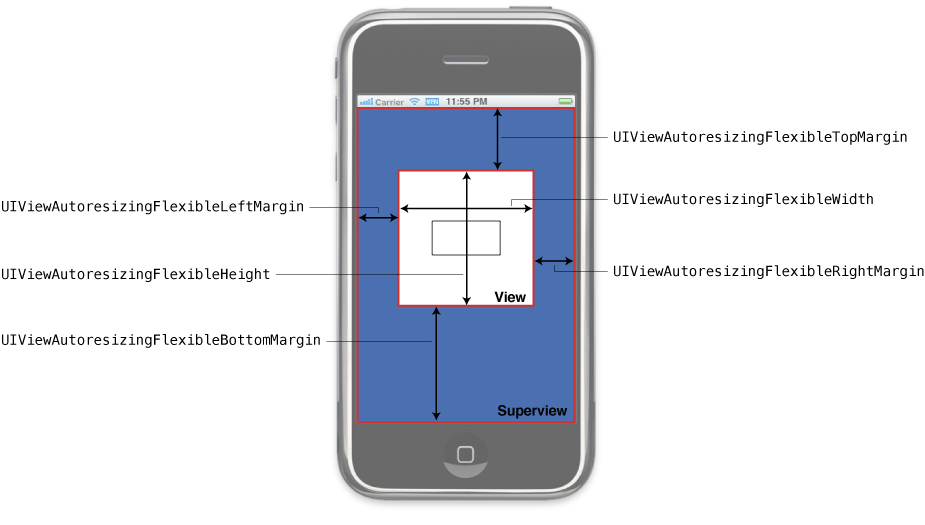
使用superview的autoresizesSubviews属性来决定是否调整视图的大小。如果这个属性是YES,superview使用subview的autoresizingMask属性来决定如何size和position subview。AutoresizeMask常量:
UIViewAutoresizingNone: 不进行autoresize。
UIViewAutoresizingFlexibleHeight: The view’s height changes when the superview’s height changes. If this constant is not included, the view’s height does not change.
UIViewAutoresizingFlexibleWidth: The view’s width changes when the superview's width changes. If this constant is not included, the view’s width does not change.
UIViewAutoresizingFlexibleLeftMargin: The distance between the view’s left edge and the superview’s left edge grows or shrinks as needed. If this constant is not included, the view’s left edge remains a fixed distance from the left edge
of the superview.
UIViewAutoresizingFlexibleRightMargin:The distance between the view’s right edge and the superview’s right edge grows or shrinks as needed. If this constant is not included, the view’s right edge remains a fixed distance from the right edge
of the superview.
UIViewAutoresizingFlexibleBottomMargin:
UIViewAutoresizingFlexibleTopMargin:
最早的方法配置autoresizing rules 是使用IB 中的Size Inspector.然而,the behavior and use of margin indicators is effectively reversed。
3,Tweaking (扭,捏) the layout of your views Manually(手动地)
当view的size发生变化时,UIKit应用autoresizing行为到subview,然后调用view的layoutSubviews方法进行手动的更改。当autoresizing行为不能满足你的要求时,你可以在自定义view中实现这个方法。你可以做下面的事情:1)调整任何immediate subviews的size和position
2)添加或移除subviews或Core Animation Layers
3) 通过调用setNeedsDisplay或setNeedsDisplayInRect:方法强迫subview重绘。
应用程序在实现一个大的可滚动区域的时候经常手动地指定子视图 。因为为可滚动的内容只准备一个大的视图是不现实的,应用经常实现一个root view,包含很多小的tile views(瓦片视图)。每个瓦片代表scrollable content的一部分。当一个scroll event发生时,root view调用他的setNeedsLayout方法来发起一个布局的改变。他的layoutSubviews方法然后基于发生的滚动重新放置瓦片视图。对于滑出可视区域的tile view,layoutSubviews方法移动瓦片到
the incoming edge,replacing their contents in the process.
当你写layout code时,确保测试你的代码使用下面的方法:
1)改变你的view的方向,来确保在所有支持的界面和方向布局看起来都是正确的。
2)确保你的代码正确响应status bar的高度的变化。当打电话时,the status bar 的高度增长,打完电话后,the status bar 的高度降低。
(三)在运行时修改视图 Modifying Views at Runtime:
1)在一个视图控制器中 In a View Controller:
a)viewController在view显示之前创建他们,当view不再需要时,他负责除掉他们。B)当设备更改方向时,viewController可能会调整视图的尺寸和位置。作为调整的一部分,他可能会显示或隐藏一些view
C)当viewController管理可编辑的内容,他可能会在进入或离开编辑模式时调整view结构。例如,他可能会添加额外的button或其他控制来帮助编辑各种不同的内容点。这可能会需要resizing已经存在的views来适应附加的控制。
2)在动画块中 In Animation blocks:
a)当你想transition(过渡,转变) between different sets of views in your user interface,you hide some views and show others from inside an animation block.
b)当实现特定的效果时,你可能使用动画块修改view的许多属性。例如,动画view的尺寸时,你会更改他的frame rectangle的尺寸。
3)Other ways:
a)当触摸事件或gesture(手势)发生,your interface might respond by loading a new set of views or changing the current set of views.
B)当用户与一个scroll view交互时,a large scrollable area might hide and show tile subviews.
c)当键盘显示时,你可能需要reposition or resize views so that 他们不显示在键盘下面.
ViewController是初始化你的view的更改的普通位置。他基本上负责发生在view上的所有事情。如果你支持edit mode,viewController的setEditing:animated:方法给你机会在进入editable模式时更改你的view。
动画块是另外一个初始化view的更改的位置。UIView内置的动画支持使得动画view的属性变化变得容易。你可以使用
transitionWithView:duration:options:animations:completion: 或
transitionFromView:toView:duration:options:completion: 方法to swap out entire sets of views for new ones。
(四)与Core Animation Layers 交互 Interacting with Core Animation Layers:
每个view都有一个dedicated(专用的,专注的) Core Animation Layer。使用view’s layer属性获得。1,Changing the Layer Class Associated with a View
在view创建之后,他的layer类型就不能再被更改。因此,每个view使用layerClass 类方法来指定他的layer对象的类。此方法的默认实现返回CALayer类,并且唯一更改这个值的方法是 子类化并且override方法,并返回一个不同的值。你可能会想更改这个值in the following circumstances(环境,情况,遭遇):1)你的应用使用OpenGL ES绘图,layer必须是CAEAGLLayer class。
2)你的view使用tiling(瓦片)来显示一个large scrollable area,这时你可能会想使用CATiledLayer
代码如下:
+ (Class)layerClass
{
return [CAEAGLLayer class];
}
每个View在被初始化时调用这个方法,并使用返回的class创建他的layer object。另外,view总是指定自身为他的layer object的delegate。这时,view拥有他的layer且view和layer之间的关系不能更改。你不可以指定同一个view作为另一个layer object的delegate。更改这种关系会导致绘图问题并很可能使你的应用崩溃。
2,视图中内嵌的Layer对象 Embedding Layer Object in a View:
如果你选择主要使用layer object替代view来工作,你可以incorporate(合并) custom layer object into your view hierarchy as needed。 A custom layer object is any instance of CALayer that is not owned by a view。You typically create custom layers programmatically and incorporate thenusing Core Animation routines(惯例).Custom Layers 不接收事件或参与响应链,但是确实绘制自身并响应size changes in their parent view or layer according to the Core Animation rules。
下面的代码显示 view controller that creates a custom layer object and adds it to its root view。The layer is used to display a static image that is animated.instead of adding the layer to the view itself,you add it to the view’s underlying layer。
- (void)viewDidLoad {
[super viewDidLoad];
// Create the layer.
CALayer* myLayer = [[CALayer alloc] init];
// Set the contents of the layer to a fixed image. And set
// the size of the layer to match the image size.
UIImage layerContents = [[UIImage imageNamed:@"myImage"] retain];
CGSize imageSize = layerContents.size;
myLayer.bounds = CGRectMake(0, 0, imageSize.width, imageSize.height);
myLayer = layerContents.CGImage;
// Add the layer to the view.
CALayer* viewLayer = self.view.layer;
[viewLayer addSublayer:myLayer];
// Center the layer in the view.
CGRect viewBounds = backingView.bounds;
myLayer.position = CGPointMake(CGRectGetMidX(viewBounds), CGRectGetMidY(viewBounds));
// Release the layer, since it is retained by the view's layer
[myLayer release];
}
你可以添加任意数量的sublayer并且安排他们进入sublayer层次结构(hierarchy)。这些layers必须附属于view的layer object。
(五)Difining a Custom View
1,custome view
custome view的工作是展示内容和管理交互。成功的实现不仅包括绘图和处理事件,下面的checklist(清单)包括了更多重要的方法你可以override:1)Define the appropriate initialization methods for your view:
a)initWithFrame: 通过代码创建时需要的方法
b)initWithCoder: 通过nib创建时需要的方法.
2)dealloc 方法负责清理操作
3)drawRect: 负责绘图
4) 设置autoresizingMask属性
5)如果你的view管理一个或多个integral(积分的,完整的,整体的) subviews,
a)在你的view的初始化序列中创建这些subviews
b)设置他们的autoresizingMask
c)如果你的subviews需要custom layout,override the layoutSubviews方法并实现你的layoutCode
6)处理基于触摸的事件:
a)附加任何适当的手势识别到view上,通过使用addGestureRecognizer:方法。
B)如果你想自己处理触摸,覆盖 touchesBegan:withEvent:, touchesMovedWithEvent:, touchesEndedLwithEvent:, and touchesCancelled:WithEvent:方法。
7)如果你想在打印的时候看起来不同,实现drawRect:forViewPrintFormatter:方法.
对于overriding methods的补充是,别忘了你可以使用view的已经存在的属性做很多事情,例如,contentMode和contentStretch属性。还有CALayer object等。
2,Initalizing Your Custom View:
你应该至少定义一个initWithFrame:初始化方法.- (id)initWithFrame:(CGRect)aRect {
self = [super initWithFrame:aRect];
if (self) {
// setup the initial properties of the view
...
}
return self;
}
如果你想使用nib file加载你的view,你应该使用initWithCoder:方法,并遵循NSCoding协议.
即使你采用了NSCoding协议,IB仍然不知道你的view的自定义属性,因此不能encode(编码)这些属性到nib file中。结果是,你的initWithCoder:方法should perform whatever initialization code it can to put the view into a known state。你还可以实现awakeFromNib方法,并且使用这个方法执行附加初始化。
3,Implementing Your Drawing Code:
示例代码:A Drawing Method- (void)drawRect:(CGRect)rect {
CGContextRef context = UIGraphicsGetCurrentContext();
CGRect myFrame = self.bounds;
// Set the line width to 10 and inset the rectangle by
// 5 pixels on all sides to compensate for the wider line.
CGContextSetLineWidth(context, 10);
CGRectInset(myFrame, 5, 5);
[[UIColor redColor] set];
UIRectFrame(myFrame);
}
如果你知道view的绘图代码覆盖整个view的surface with opaque content,你可以改进系统性能by setting view的 opaque属性为YES.
另一个way to improve drawing 性能,特别是during scrolling,是设置view的clearsContextBeforeDrawing属性为YES。此时,UIKit自动填充区域 to be updated by your drawRect:方法 with 透明的黑色 before calling your method。
4,Responding to Events
除了直接处理触摸事件,你可以使用addGestureRecognizer:方法。The gesture recognizer然后调用你的action method when the corresponding gesture occurs。如果你选择直接处理触摸事件,你可以实现
touchesBegan touchesMoved touchesEnded touchesCancelled
view默认响应only one touch at a time。如果你使用两个手指,系统会忽略触摸事件并且不报告事件给你的view。如果你打算跟踪多手指探测,你需要设置view的multipleTouchEnabled属性为YES。
一些view,如labels or images,禁用事件处理 altogether initially.你可以控制一个view是否接收触摸事件—通过更改view的userInteractionEnabled属性。你可能会临时设置其为NO来组织处理事件在你的view处理一个耗时操作时组织事件到达你的view,你还可以使用UIApplication的beginIgnoringInteractionEvents和endIgnoringInteractionEvents方法。这些方法影响整个application。
注意:UIView的动画方法禁用触摸事件—在动画正在进行中。你可以override这个行为通过设置animation appropriately.参看 “Animations”
As it handles touch events,UIKit使用UIView的hitTest:withEvent:和pointInside:withEvent:方法来决定是否一个触摸事件发生在给定的view的bounds内部。虽然你很少需要override这些方法,但是你可以这么做使得implement custom touch behaviors for your view。例如,你可以override这些方法来阻止subviews处理触摸事件。
5,Cleaning up after your view
四、动画 Animations
(一)What can be animated?
UIKit和Core Animation都提供了对动画的支持,但是the level of support provided by each technology varies。在UIKit中,animations通过UIView对象执行。
下表列出了可动画的属性—UIView类的内建的动画支持。可动画不表示动画会自动执行。为了动画这些属性改变,你必须更改这些属性在inside an animation block。
可动画的属性
frame
bounds
center
transform
alpha
backgroundColor
contentStretch
如果你想执行更复杂的动画,或UIView不支持的动画,你可以使用core animation和view的underlying layer来创建动画。因为view和layer对象混乱地结合在一起,更改view的layer影响view本身。使用Core Animation,你可以动画下列类型的更改 for your view’s layer:
1)the size and position of the layer
2)the center point used when performing transformations
3)Transformations to the layer or its sublayer in 3D space
4)The addition or removal of a layer from the layer hierarchy
5)the layer’s Z-order relative to other sibling layers
6)The layer’s shadow
7)the layer’s border(including whether the layer’s corners are rounded)
8)The portion of the layer that stretches during resizing operations
9)the layer’s opacity
10)The clipping behavior for sublayers that lie outside the layer’s bounds
11)the current contents of the layer
12)the rasterization(光栅化) behavior of the layer
(二)Animating Property Changes in a view:
你必须wrap(包裹)这些更改到一个动画块内。The term animation block is used in the generic sense to refer to any code that designates animatable changes。在iOS4以后,你使用block objects创建一个动画块。在早期版本中,你标志一个动画块的起始和结束—使用UIView的特定类方法。
1,Starting Animations Using the Block-Based Methods
有几个block-based方法提供了不同级别的动画块的配置。他们是animateWithDuration:animations:
animateWithDuration:animations:completion:
animateWithDuration:delay:options:animations:completion:
因为他们是类方法,所以这些动画块are not tied to a single view。因此,你可以使用这些防范创建一个单独的动画 that involves changes to multiple views。如下面的代码所示:
[UIView animateWithDuration:1.0 animations:^{
firstView.alpha = 0.0;
secondView.alpha = 1.0;
}];
上面的动画会立即执行一次,如果你想更改默认参数,你必须使用animateWithDuration:delay:options:animations:completion:,你可以自定义下面的参数:
1)delay
2)The type of timing curve(使弯曲) to use during the animation
3) 重复次数
4)动画是否reverse itself automatically when it reaches the end
5)是否触摸事件传递给views 在动画执行中
6)是否动画应该打断正在执行的动画还是等待他们完成再开始。
另外一个事情--- animateWithDuration:animations:completion:和animateWithDuration:delay:options:animations:completion:都支持的是指定一个completion handler block(动画执行完之后的block)。你可能会使用这个block来告诉你的应用动画已经执行完毕。Completion Handler也是连接单独的动画到一起的方法。
下面是示例代码:
- (IBAction)showHideView:(id)sender
{
// Fade out the view right away
[UIView animateWithDuration:1.0
delay: 0.0
options: UIViewAnimationOptionCurveEaseIn
animations:^{
thirdView.alpha = 0.0;
}
completion:^(BOOL finished){
// Wait one second and then fade in the view
[UIView animateWithDuration:1.0
delay: 1.0
options:UIViewAnimationOptionCurveEaseOut
animations:^{
thirdView.alpha = 1.0;
}
completion:nil];
}];
}
2,Starting Animations Using the Begin/Commit Methods
在iOS 3.2及更早期版本中,你必须使用UIView的beginAnimations:context:和commitAnimations类方法来定义你的动画块。在这些方法之间的任何可动画的属性更改被动画 after you call commitAnimations方法。动画执行在另一个线程中。下面是示例代码:
[UIView beginAnimations:@"ToggleViews" context:nil];
[UIView setAnimationDuration:1.0];
// Make the animatable changes.
firstView.alpha = 0.0;
secondView.alpha = 1.0;
// Commit the changes and perform the animation.
[UIView commitAnimations];
默认地,在一个动画块内的所有可动画属性更改一起被动画。如果你想只动画一些属性,使用setAnimationsEnabled:方法来临时禁用动画,然后做出你不想动画的属性更改,然后再次调用setAnimationsEnabled:方法来启用动画。你可以使用areAnimationsEnabled类方法来确定动画是否当前启用。
3,Configuring the Parameters for Begin/Commit Animations
方法setAnimationStartDate: setAnimationDelay: 设置动画何时开始执行,默认值是0方法setAnimationDuration: 动画执行时间
方法setAnimationCurve: 设置动画时间曲线,是线性执行还是在某一时间改变速度
方法setAnimationRepeatCount: setAnimationRepeatAutoreverses: 设置动画重复次数还是来回执行
方法 setAnimationDelegate: setAnimationWIllStartSelector: setAnimationDidStopSelector: 设置动画执行前和执行后的方法
方法setAnimationBeginsFromCurrentState: 使用这个方法立即停止所有之前的动画并且从停止点开始新动画,如果你设置NO替代YES,则新的动画等待之前的动画执行完才开始。
示例代码:
// This method begins the first animation.
- (IBAction)showHideView:(id)sender
{
[UIView beginAnimations:@"ShowHideView" context:nil];
[UIView setAnimationCurve:UIViewAnimationCurveEaseIn];
[UIView setAnimationDuration:1.0];
[UIView setAnimationDelegate:self];
[UIView setAnimationDidStopSelector:@selector(showHideDidStop:finished:context:)];
// Make the animatable changes.
thirdView.alpha = 0.0;
// Commit the changes and perform the animation.
[UIView commitAnimations];
}
// Called at the end of the preceding animation.
- (void)showHideDidStop:(NSString *)animationID finished:(NSNumber *)finished context:(void *)context
{
[UIView beginAnimations:@"ShowHideView2" context:nil];
[UIView setAnimationCurve:UIViewAnimationCurveEaseOut];
[UIView setAnimationDuration:1.0];
[UIView setAnimationDelay:1.0];
thirdView.alpha = 1.0;
[UIView commitAnimations];
}
4,Configuring an Animation Delegate:
setAnimationDelegate: setAnimationWillStartSelector: setAnimationDidStopSelector:delegate方法是:
- (void)animationWillStart:(NSString *)animationID context:(void *)context;
- (void)animationDidStop:(NSString *)animationID finished:(NSNumber *)finished context:(void *)context;
animationID和context参数是你传递给beginAnimations:context:方法的参数.
setAnimationDidStopSelector: selector方法有一个附加的参数,一个布尔值,YES表示动画执行完,如果NO表示动画要么被cancel了要么过早地被另外一个动画停止了。
5,Nesting(筑巢) Animation Blocks
把一个动画加入到另一个动画中,nested动画继承其父动画的属性,也可以override,动画同时执行。示例代码:
[UIView animateWithDuration:1.0
delay: 1.0
options:UIViewAnimationOptionCurveEaseOut
animations:^{
aView.alpha = 0.0;
// Create a nested animation that has a different
// duration, timing curve, and configuration.
[UIView animateWithDuration:0.2
delay:0.0
options: UIViewAnimationOptionOverrideInheritedCurve |
UIViewAnimationOptionCurveLinear |
UIViewAnimationOptionOverrideInheritedDuration |
UIViewAnimationOptionRepeat |
UIViewAnimationOptionAutoreverse
animations:^{
[UIView setAnimationRepeatCount:2.5];
anotherView.alpha = 0.0;
}
completion:nil];
}
completion:nil];
如果你正在使用begin/commit 方法创建动画,nesting works几乎使用相同的方法。Each successive(连续地,继承地)call to beginAnimations:context: within an already open animation block creates a new nested animation block that you can configure as needed。所有的animation blocks必须被commitAnimations关闭在动画被提交和执行之前。
6,Implementing Animations That Reverse Themselves
当使用repeat count创建可逆的(reversible)动画时,考虑指定一个非整型值给repeat count。对于一个autoreversing animation, each complete cycle of the animation involves animating from the original value to the new value and back again.If you want your animation to end on the new value,adding0.5 to the repeat count causes the animation to complete the extra half cycle needed to end at the new value.If you do not include this half step,your animation will animate to the original value and then snap quickly to the new value,which may not be the
visual effect you want.
就是repeatCount设置为n.5。
(三)Creating Animated Transitions Between Views
1)Change the visible subviews of an existing view.2) Replace one view in your view hierarchy with a different view.
1,Changing the subviews of a view:
更改view的subviews允许你make moderate(稳健的) changes to the view.例如,你可能添加或删除subviews来切换superview的不同状态。动画完成时,显示相同的view,但是他的内容发生变化了。在iOS4以后,你使用transitionWithView:duration:options:animations:completion:方法来初始化view的转换动画。如果你需要动画其他更改,你可以包括 UIViewAnimationOptionAllowAnimatedContent选项when calling the method。包括那个选项阻止viewfrom creating snapshots and animates all changes directly。
下面的代码例子 如何使用transition animation来使得一个新的text entry page 被添加。在这个例子中,main view有连个不同的text views。一个一直显示,另一个一直隐藏。当用户点击按钮来创建一个新页时,方法切换两个view的显示状态,结果在一个新的空白页中的一个空白的text view准备好接受text。Transition完毕后,the view保存旧页中的内容并且重置现在隐藏的text view以便将来再次使用。
- (IBAction)displayNewPage:(id)sender
{
[UIView transitionWithView:self.view
duration:1.0
options:UIViewAnimationOptionTransitionCurlUp
animations:^{
currentTextView.hidden = YES;
swapTextView.hidden = NO;
}
completion:^(BOOL finished){
// Save the old text and then swap the views.
[self saveNotes:temp];
UIView* temp = currentTextView;
currentTextView = swapTextView;
swapTextView = temp;
}];
}
如果你需要在iOS 3.2之前的版本执行transitions,你可以使用 setAnimationTransition:forView:cache: 方法来指定transition的参数。下面的代码显示了你需要创建的基本动画结构。
[UIView beginAnimations:@"ToggleSiblings" context:nil];
[UIView setAnimationTransition:UIViewAnimationTransitionCurlUp forView:self.view cache:YES];
[UIView setAnimationDuration:1.0];
// Make your changes
[UIView commitAnimations];
2,Replacing a View With a Different View:
iOS4以后使用 transitionFromView:toView:duration:options:completion: 方法。方法实际上移除掉firstView并加入另一个view。因此你需要保留一个firstview的reference,如果你希望在以后使用他。如果你想隐藏views代替移除出view结构,传递 UIViewAnimationOptionShowHideTransitionViews key as one of the options.- (IBAction)toggleMainViews:(id)sender {
[UIView transitionFromView:(displayingPrimary ? primaryView : secondaryView)
toView:(displayingPrimary ? secondaryView : primaryView)
duration:1.0
options:(displayingPrimary ? UIViewAnimationOptionTransitionFlipFromRight :
UIViewAnimationOptionTransitionFlipFromLeft)
completion:^(BOOL finished) {
if (finished) {
displayingPrimary = !displayingPrimary;
}
}];
}
(四)Linking Multiple Animations Together:
1)如果你使用block-based animations,使用completion handler2)如果你使用begin/commit animations,使用delegate object
或者使用nested animations with different display factors .
(五)Animating View and Layer Changes Together
应用程序可以自由地混合view-based和layer-based动画代码,但是配置你的动画参数的过程取决于谁拥有layer。更改一个view-owned layer和更改view本身一样。与你自己创建的layer不同。自定义layer对象忽略view-based动画块参数,并且使用默认的Core Animation 参数。如果你想为你创建的layer自定义动画参数,你必须使用Core Animation。经典地,animating layers using Core Animation involves creating a CABasicAnimation object or some other concrete(混凝土的,具体的,有形的) subclass of CAAnimation. You then add animation to the corresponding layer. You can apply
the animation from either inside or outside a view-based animation block。
示例代码:
[UIView animateWithDuration:1.0
delay:0.0
options: UIViewAnimationOptionCurveLinear
animations:^{
// Animate the first half of the view rotation.
CGAffineTransform xform = CGAffineTransformMakeRotation(DEGREES_TO_RADIANS(-180));
backingView.transform = xform;
// Rotate the embedded CALayer in the opposite direction.
CABasicAnimation* layerAnimation = [CABasicAnimation animationWithKeyPath:@"transform"];
layerAnimation.duration = 2.0;
layerAnimation.beginTime = 0; //CACurrentMediaTime() + 1;
layerAnimation.valueFunction = [C***alueFunction functionWithName:kC***alueFunctionRotateZ];
layerAnimation.timingFunction = [CAMediaTimingFunction
functionWithName:kCAMediaTimingFunctionLinear];
layerAnimation.fromValue = [NSNumber numberWithFloat:0.0];
layerAnimation.toValue = [NSNumber numberWithFloat:DEGREES_TO_RADIANS(360.0)];
layerAnimation.byValue = [NSNumber numberWithFloat:DEGREES_TO_RADIANS(180.0)];
[manLayer addAnimation:layerAnimation forKey:@"layerAnimation"];
}
completion:^(BOOL finished){
// Now do the second half of the view rotation.
[UIView animateWithDuration:1.0
delay: 0.0
options: UIViewAnimationOptionCurveLinear
animations:^{
CGAffineTransform xform = CGAffineTransformMakeRotation(DEGREES_TO_RADIANS(-359));
backingView.transform = xform;
}
completion:^(BOOL finished){
backingView.transform = CGAffineTransformIdentity;
}];
}];
if precise(精确的) timing(定时,时间选择,调速) between your view and layer based animations is required,推荐 you create all of the animations using Core Animation. 你可能发现一些动画使用Core Animation更容易实现。例如,the view-based rotation (上面的例子) requires a multistep sequence for rotations
of more than 180 degrees,但在Core Animation部分使用了一个rotation value function that rotates from start to finish through a middle value.

相关文章推荐
- View Programming Guide for iOS ---- iOS 视图编程指南(三)---Windows
- 视图编程指南View Programming Guide for iOS-1
- View Programming Guide for iOS 视图编程指南 - iOS
- View Programming Guide for iOS ---- iOS 视图编程指南(一)
- View Programming Guide for iOS ---- iOS 视图编程指南(二)---View and Window Architecture
- View Programming Guide for iOS ---- iOS 视图编程指南(四)---Views
- 翻译_iOS视图编程指南(View Programming Guide for iOS)之介绍
- View Programming Guide for iOS ---- iOS 视图编程指南(五)---Animations
- [译]iOS视图编程指南(View-Programming-Guide-for-iOS)之介绍
- iOS 地址簿编程指南(Address Book Programming Guide for iOS)
- View Controller Programming Guide for iOS--(一)
- View Programming Guide for iOS 学习笔记_1
- iOS 笔记 《View Programming Guide for iOS:Introduction》
- Collection View Programming Guide for iOS---(一)----About iOS Collection Views
- View Controller Programming Guide for iOS--(二)
- View Controller Programming Guide for iOS---(四)---Creating Custom Content View Controllers
- View Programming Guide for iOS 摘要
- Collection View Programming Guide for iOS---(四)---Using the Flow Layout
- 《View Controller Programming Guide for iOS》笔记
- Table View Programming Guide for iOS---(三)----Overview of the Table View API