iPhone团购信息客户端的开发
2013-07-04 10:37
337 查看
转自
http://blog.csdn.net/kangkangz4/article/details/7714140 http://blog.csdn.net/kangkangz4/article/details/7714722 http://blog.csdn.net/kangkangz4/article/details/7715376 http://blog.csdn.net/kangkangz4/article/details/7774098
因为工作的原因,已经很久没有更新博客了,这次我们就来完成一个稍显复杂的一个团购信息客户端,主要整合了ASIHTTPREQUEST,KISSXML,AQGridView,MBProgressHUD这几个主要流行的IOS开发库,我们先来看一下效果图


首先我们新建一个IOS工程,暂时就取名为Tuan1吧,如图下


好,工程新建完后我们就要加入框架了,首先加入ASIHTTPREQUEST库,首先我们从https://github.com/pokeb/asi-http-request/tree下载压缩包

点ZIP按钮就行了,会全部将文件下载下来,好,我们接着就将它加入我们的工程中,首先找到我们新建工程的那个Tuan1的文件夹,在底下新建一个ASIHttpRequest的文件夹

接着把我们下载的ASIHttpRequest中的几个文件夹拷入我们新建的文件夹内,我们主要拷的是下载包中class文件夹下的内容

将所有文件拷入我们自己新建的文件夹内,除了一个Test文件夹哦,这个是测试文件,我们用不到,所以不用拷了。
还有一个也需要我们拷到新建的文件夹内的,就是下载ASIHttpRequest下的External/Reachability文件夹,这个不能忘哦,不然运行的时候会报错。
接着就是加入我们的工程中了,在File下有一个Add File To 'Tuan1'这个选项

点击我们选择我们新建的ASIHttpRequest文件夹,将所有文件导入当前的工程中

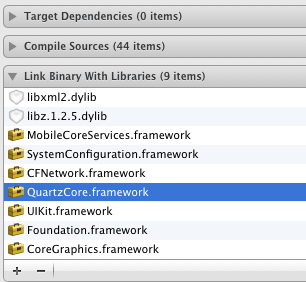
接下来就是加Framework了,要运行ASIHttpRequest,我们需要以下几个Framework,CFNetwork.framework,SystemConfiguration.framework,MobileCoreServices.framework,libz.1.2.5.dylib,libxml2.dylib,最后如下图

接下来还有最重要的一件事哦,就是我们得告诉系统到哪找libxml2这个库
在Build Setting中Header Search Paths设置/usr/include/libxml2

因为ASIHttpRequest暂时不支持ARC模式,而我们的工程是使用ARC模式的,就需要将ASIHttpRequest下的所有文件不用ARC模式编绎

经过以上步骤,我们的ASIHttpRequest应该可以运行了,我们在工程中导入#import "ASIHttpRequest.h"试着运行一下,看有没有错误,没有错误的话,我们ASIHttpRequest就添加成功了,接下来第二篇,我们再介绍如何导入KissXML,MBProgressHUD和AGridView这几个库。
接上一篇,这篇我们对我们的客户端加入KissXML,MBProgressHUD,AQridView这几个库,首先我们先加入KissXML,这是XML解析库,支持Xpath,可以方便添加更改任何节点。先从官方网站上下载KissXML这个库
https://github.com/robbiehanson/KissXML
接下来,将KissXML库中的KissXML文件夹拷入我们的工程中,如图
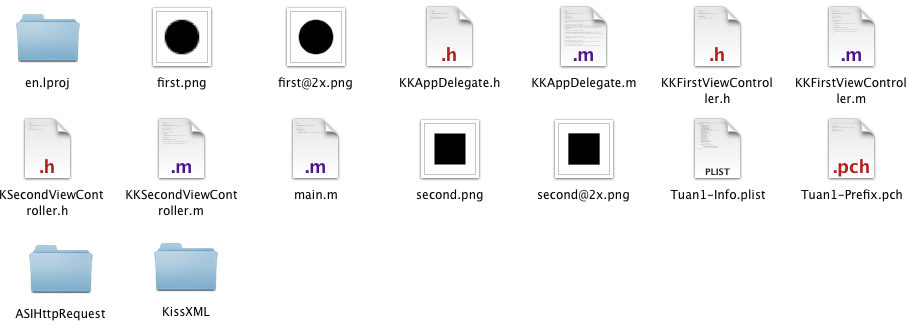
然后跟上次一样,我们通过File/Add File to "Tuan1"这个选项加入到我们的工程中,我们以同样的方法分别加入MBProgressHUD和AGridView这两个库
在Framework中加入QuartzCore.framework,因为AGridView需要用到。
接着我们在代码中加入
#import"MBProgressHUD.h"
#import"DDXML.h"
这二行,运行一下,如果没有报错的话,那这几个库我们就加入成功了。
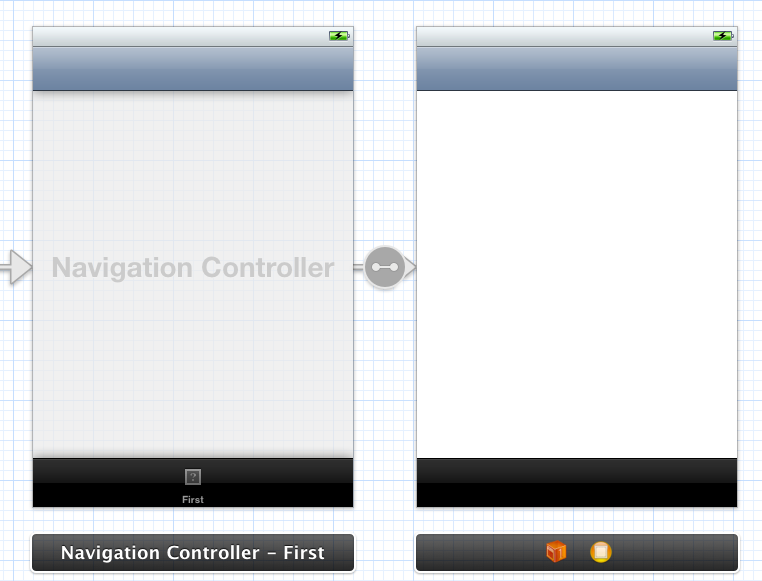
接着我们更改一下storybord,将FirstViewController这个视图加入NavigationController,选中FirstViewController在主菜单Editor/Embed In/Navigation Controller,系统自动为我们加入NavigationController。

下面,我们将FirstViewController中清空,所有内容都删除
好了,到这一步,我们的视图基本都完成了,接下来就是编码了,首先我们来解析美团网团购信息
FirstViewController.h
[plain] view
plaincopy
#import <UIKit/UIKit.h>
#import "ASIHTTPRequest.h"
@interface KKFirstViewController : UIViewController<ASIHTTPRequestDelegate>
@end
FirstViewController.m
[plain] view
plaincopy
#import "KKFirstViewController.h"
#import "MBProgressHUD.h"
#import "DDXML.h"
#import "DDXMLElementAdditions.h"
@interface KKFirstViewController (){
MBProgressHUD *hud;
NSMutableArray *arrays;
}
@end
@implementation KKFirstViewController
- (void)viewDidLoad
{
[super viewDidLoad];
self.navigationItem.title = @"美团";
//背景
UIImage *bgImage = [UIImage imageNamed:@"bg-app.png"];
self.view.backgroundColor = [UIColor colorWithPatternImage:bgImage];
//HUD提示框
hud = [[MBProgressHUD alloc] init];
hud.labelText = @"载入数据...";
//网址
NSString *urlString = @"http://www.meituan.com/api/v2/beijing/deals";
[hud showWhileExecuting:@selector(startHttpRequest:) onTarget:self withObject:urlString animated:YES];
//因为hud需要显示在最前面,所以我们在NavigationController中加入
[self.navigationController.view addSubview:hud];
arrays = [NSMutableArray array];
}
//请求URL
-(void)startHttpRequest:(NSString *)url{
ASIHTTPRequest *httpRequest = [[ASIHTTPRequest alloc] initWithURL:[NSURL URLWithString:url]];
httpRequest.delegate = self;
[httpRequest startSynchronous];
}
- (void)viewDidUnload
{
[super viewDidUnload];
// Release any retained subviews of the main view.
}
- (BOOL)shouldAutorotateToInterfaceOrientation:(UIInterfaceOrientation)interfaceOrientation
{
return (interfaceOrientation != UIInterfaceOrientationPortraitUpsideDown);
}
//请求结束
-(void)requestFinished:(ASIHTTPRequest *)request{
//移除提示框
[hud removeFromSuperview];
//返回解析后的数据,每一个Array包括一个字典
arrays = [self xmlParser:[request responseData]];
NSLog(@"%@", arrays);
}
//解析结点
static NSString *kXPath_Item = @"//data";
static NSString *kName_Deal = @"deal";
static NSString *kName_Title = @"deal_title";
static NSString *kName_Url = @"deal_url";
static NSString *kName_Img = @"deal_img";
static NSString *kName_Desc = @"deal_desc";
static NSString *kName_Tips = @"deal_tips";
//XML解析
-(NSMutableArray *)xmlParser:(NSData *)data{
NSMutableArray *array = [NSMutableArray array];
//文档开始
DDXMLDocument *xmlDoc = [[DDXMLDocument alloc] initWithData:data options:0 error:nil];
//返回<data>中的所有元素
NSArray *items = [xmlDoc nodesForXPath:kXPath_Item error:nil];
//遍历每个元素
for (DDXMLElement *item in items) {
NSMutableDictionary *dict = [NSMutableDictionary dictionary];
//返回<deal>中的所有元素
NSArray *deals = [item elementsForName:kName_Deal];
for (DDXMLElement *deal in deals) {
//<deal_title>
DDXMLElement *title = [deal elementForName:kName_Title];
if (title) {
[dict setObject:[title stringValue] forKey:kName_Title];
}
//<deal_url>
DDXMLElement *url = [deal elementForName:kName_Url];
if (url) {
[dict setObject:[url stringValue] forKey:kName_Url];
}
//<deal_img>
DDXMLElement *img = [deal elementForName:kName_Img];
if (img) {
[dict setObject:[img stringValue] forKey:kName_Img];
}
//<deal_desc>
DDXMLElement *desc = [deal elementForName:kName_Desc];
if (desc) {
[dict setObject:[desc stringValue] forKey:kName_Desc];
}
//<deal_tips>
DDXMLElement *tips = [deal elementForName:kName_Tips];
if (tips) {
[dict setObject:[tips stringValue] forKey:kName_Tips];
}
}
[array addObject:dict];
}
return array;
}
//请求中止(出错)
-(void)requestFailed:(ASIHTTPRequest *)request{
[hud removeFromSuperview];
NSError *error = [request error];
NSLog(@"RequestError : %@", [error description]);
}
@end
这里面最重要的就是解析返回的XML数据,代码里面的注释也写得比较详细了,我想大家也应该能看得懂,取得数据后我们就可以显示在AQGridView中去了。这个内容我们放到第三篇中做详细介绍。
接上二篇的内容,今天我们就来介绍一下如何将解析出来的数据放入AQGridView中显示出来,因为我们的工程中已经将AQGridView导入了,所以我们在KKFirstViewController中直接可以引用
[plain] view
plaincopy
#import <UIKit/UIKit.h>
#import "ASIHTTPRequest.h"
#import "AQGridView.h"
@interface KKFirstViewController : UIViewController<ASIHTTPRequestDelegate, AQGridViewDelegate, AQGridViewDataSource>
@property(nonatomic, retain)AQGridView *gridView;
@end
这里加入了AQGridViewDelegate和AQGridViewDataSource这两个委托,简单一点我们可以把AQGridView看成UITableView,同样的道理,一个是数据源的方法,一个就是选中的方法
然后就是
在-(void)viewDidLoad这个方法中,我们加入了
[plain] view
plaincopy
self.gridView = [[AQGridView alloc] initWithFrame:CGRectMake(0, 0, 320, 460)];
self.gridView.autoresizingMask = UIViewAutoresizingFlexibleWidth | UIViewAutoresizingFlexibleHeight;
self.gridView.autoresizesSubviews = YES;
self.gridView.delegate = self;
self.gridView.dataSource = self;
[self.view addSubview:gridView];
将当前的gridView加入主视图中
接着还有两个方法一定需要实现的
[plain] view
plaincopy
#pragma mark AQGridViewDataSource
//总共有的Item
-(NSUInteger)numberOfItemsInGridView:(AQGridView *)gridView{
return [arrays count];
}
//每个Item
-(AQGridViewCell *)gridView:(AQGridView *)aGridView cellForItemAtIndex:(NSUInteger)index{
static NSString *identifier = @"PlainCell";
GridViewCell *cell = (GridViewCell *)[aGridView dequeueReusableCellWithIdentifier:identifier];
if(cell == nil){
cell = [[GridViewCell alloc] initWithFrame:CGRectMake(0, 0, 160, 123) reuseIdentifier:identifier];
}
//取得每一个字典
NSDictionary *dict = [arrays objectAtIndex:index];
[cell.captionLabel setText:[dict objectForKey:kName_Title]];
return cell;
}
//每个显示框大小
-(CGSize)portraitGridCellSizeForGridView:(AQGridView *)gridView{
return CGSizeMake(160, 123);
}
这里还少一个类,就是GridView,这个类继承了AQGridViewCell,里面就是我们单独要显示的一个Item
[plain] view
plaincopy
#import "AQGridViewCell.h"
@interface GridViewCell : AQGridViewCell
@property(nonatomic, retain)UIImageView *imageView;
@property(nonatomic, retain)UILabel *captionLabel;
@end
图片显示的是团购信息中的图片,还有一个是文本
[plain] view
plaincopy
#import "GridViewCell.h"
@implementation GridViewCell
@synthesize imageView,captionLabel;
- (id)initWithFrame:(CGRect)frame reuseIdentifier:(NSString *)reuseIdentifier
{
self = [super initWithFrame:frame reuseIdentifier:reuseIdentifier];
if (self) {
UIView *mainView = [[UIView alloc] initWithFrame:CGRectMake(0, 0, 160, 123)];
[mainView setBackgroundColor:[UIColor clearColor]];
UIImageView *frameImageView = [[UIImageView alloc] initWithFrame:CGRectMake(9, 4, 142, 117)];
[frameImageView setImage:[UIImage imageNamed:@"tab-mask.png"]];
self.imageView = [[UIImageView alloc] initWithFrame:CGRectMake(13, 8, 135, 84)];
self.captionLabel = [[UILabel alloc] initWithFrame:CGRectMake(13, 92, 127, 21)];
[captionLabel setFont:[UIFont systemFontOfSize:14]];
[mainView addSubview:imageView];
[mainView addSubview:frameImageView];
[mainView addSubview:captionLabel];
[self.contentView addSubview:mainView];
}
return self;
}
@end
这里面定义了三个控件,两个控件是我们要传入的数据,一个图片,一个文本,还有一个就是我们单独Item的背景
做完这一些,运行一下,我们就可以看到有文字信息的效果了,但还没有加入图片显示功能,从这里我们就要考虑了,图片是我们划动的时候再加载呢还是一次性加载呢,考虑到效果和数据流量,我们还是用异步来加载数据,这就需要加入缓存的功能了,我们用一个NSMutableArray来实现缓存。
看一下代码呢,这代码也是参考了别人写的
[plain] view
plaincopy
//缓存图片
-(UIImage *)cachedImageForUrl:(NSURL *)url{
id cacheObject = [self.cachedImage objectForKey:url];
if (cacheObject == nil) {
//添加占位符
[self.cachedImage setObject:@"Loading..." forKey:url];
ASIHTTPRequest *picRequest = [ASIHTTPRequest requestWithURL:url];
picRequest.delegate = self;
picRequest.didFinishSelector = @selector(didFinishRequestImage:);
picRequest.didFailSelector = @selector(didFailRequestImage:);
//加入队列
[self.queue addOperation:picRequest];
[UIApplication sharedApplication].networkActivityIndicatorVisible = YES;
}else if(![cacheObject isKindOfClass:[UIImage class]]){
cacheObject = nil;
}
return cacheObject;
}
//完成图片下载,并加入缓存
-(void)didFinishRequestImage:(ASIHTTPRequest *)request{
NSData *imageData = [request responseData];
UIImage *image = [UIImage imageWithData:imageData];
if (image != nil) {
[self.cachedImage setObject:image forKey:request.url];
[self.gridView reloadData];
}
[UIApplication sharedApplication].networkActivityIndicatorVisible = NO;
}
//下载失败
-(void)didFailRequestImage:(ASIHTTPRequest *)request{
NSLog(@"Error download Image %@", [request error]);
//从当前缓存中移除
[self.cachedImage removeObjectForKey:request.url];
[UIApplication sharedApplication].networkActivityIndicatorVisible = NO;
}
最后我们在Cell中加入显示图片的代码就可以了,就实现了异步加载图片
[plain] view
plaincopy
//利用缓存保存图片
[cell.imageView setImage:[self cachedImageForUrl:[NSURL URLWithString:[dict objectForKey:kName_Img]]]];
好了,这个程序中主要介绍了AQGridView库,MBProgressHUD,KissXML,ASIHttpRequest这几个库,综合利用各个类库将可以使我们的程序美观,也可以缩短我们的开发周期。好了,谢谢大家有耐心看完。这里提供了源码下载
程序源码
我们对团购客户端进行了重构,来看一下效果图呢


这里因为美团提供了地图坐标,所以我们也加入了MapKit来显示店铺所在位置,但只有美团有,其他几个网站都没有提供。
我们把源码放出:谢谢大家一如既往的支持。
http://blog.csdn.net/kangkangz4/article/details/7714140 http://blog.csdn.net/kangkangz4/article/details/7714722 http://blog.csdn.net/kangkangz4/article/details/7715376 http://blog.csdn.net/kangkangz4/article/details/7774098
因为工作的原因,已经很久没有更新博客了,这次我们就来完成一个稍显复杂的一个团购信息客户端,主要整合了ASIHTTPREQUEST,KISSXML,AQGridView,MBProgressHUD这几个主要流行的IOS开发库,我们先来看一下效果图
首先我们新建一个IOS工程,暂时就取名为Tuan1吧,如图下
好,工程新建完后我们就要加入框架了,首先加入ASIHTTPREQUEST库,首先我们从https://github.com/pokeb/asi-http-request/tree下载压缩包
点ZIP按钮就行了,会全部将文件下载下来,好,我们接着就将它加入我们的工程中,首先找到我们新建工程的那个Tuan1的文件夹,在底下新建一个ASIHttpRequest的文件夹
接着把我们下载的ASIHttpRequest中的几个文件夹拷入我们新建的文件夹内,我们主要拷的是下载包中class文件夹下的内容
将所有文件拷入我们自己新建的文件夹内,除了一个Test文件夹哦,这个是测试文件,我们用不到,所以不用拷了。
还有一个也需要我们拷到新建的文件夹内的,就是下载ASIHttpRequest下的External/Reachability文件夹,这个不能忘哦,不然运行的时候会报错。
接着就是加入我们的工程中了,在File下有一个Add File To 'Tuan1'这个选项
点击我们选择我们新建的ASIHttpRequest文件夹,将所有文件导入当前的工程中
接下来就是加Framework了,要运行ASIHttpRequest,我们需要以下几个Framework,CFNetwork.framework,SystemConfiguration.framework,MobileCoreServices.framework,libz.1.2.5.dylib,libxml2.dylib,最后如下图
接下来还有最重要的一件事哦,就是我们得告诉系统到哪找libxml2这个库
在Build Setting中Header Search Paths设置/usr/include/libxml2
因为ASIHttpRequest暂时不支持ARC模式,而我们的工程是使用ARC模式的,就需要将ASIHttpRequest下的所有文件不用ARC模式编绎
经过以上步骤,我们的ASIHttpRequest应该可以运行了,我们在工程中导入#import "ASIHttpRequest.h"试着运行一下,看有没有错误,没有错误的话,我们ASIHttpRequest就添加成功了,接下来第二篇,我们再介绍如何导入KissXML,MBProgressHUD和AGridView这几个库。
接上一篇,这篇我们对我们的客户端加入KissXML,MBProgressHUD,AQridView这几个库,首先我们先加入KissXML,这是XML解析库,支持Xpath,可以方便添加更改任何节点。先从官方网站上下载KissXML这个库
https://github.com/robbiehanson/KissXML
接下来,将KissXML库中的KissXML文件夹拷入我们的工程中,如图
然后跟上次一样,我们通过File/Add File to "Tuan1"这个选项加入到我们的工程中,我们以同样的方法分别加入MBProgressHUD和AGridView这两个库
在Framework中加入QuartzCore.framework,因为AGridView需要用到。
接着我们在代码中加入
#import"MBProgressHUD.h"
#import"DDXML.h"
这二行,运行一下,如果没有报错的话,那这几个库我们就加入成功了。
接着我们更改一下storybord,将FirstViewController这个视图加入NavigationController,选中FirstViewController在主菜单Editor/Embed In/Navigation Controller,系统自动为我们加入NavigationController。
下面,我们将FirstViewController中清空,所有内容都删除
好了,到这一步,我们的视图基本都完成了,接下来就是编码了,首先我们来解析美团网团购信息
FirstViewController.h
[plain] view
plaincopy
#import <UIKit/UIKit.h>
#import "ASIHTTPRequest.h"
@interface KKFirstViewController : UIViewController<ASIHTTPRequestDelegate>
@end
FirstViewController.m
[plain] view
plaincopy
#import "KKFirstViewController.h"
#import "MBProgressHUD.h"
#import "DDXML.h"
#import "DDXMLElementAdditions.h"
@interface KKFirstViewController (){
MBProgressHUD *hud;
NSMutableArray *arrays;
}
@end
@implementation KKFirstViewController
- (void)viewDidLoad
{
[super viewDidLoad];
self.navigationItem.title = @"美团";
//背景
UIImage *bgImage = [UIImage imageNamed:@"bg-app.png"];
self.view.backgroundColor = [UIColor colorWithPatternImage:bgImage];
//HUD提示框
hud = [[MBProgressHUD alloc] init];
hud.labelText = @"载入数据...";
//网址
NSString *urlString = @"http://www.meituan.com/api/v2/beijing/deals";
[hud showWhileExecuting:@selector(startHttpRequest:) onTarget:self withObject:urlString animated:YES];
//因为hud需要显示在最前面,所以我们在NavigationController中加入
[self.navigationController.view addSubview:hud];
arrays = [NSMutableArray array];
}
//请求URL
-(void)startHttpRequest:(NSString *)url{
ASIHTTPRequest *httpRequest = [[ASIHTTPRequest alloc] initWithURL:[NSURL URLWithString:url]];
httpRequest.delegate = self;
[httpRequest startSynchronous];
}
- (void)viewDidUnload
{
[super viewDidUnload];
// Release any retained subviews of the main view.
}
- (BOOL)shouldAutorotateToInterfaceOrientation:(UIInterfaceOrientation)interfaceOrientation
{
return (interfaceOrientation != UIInterfaceOrientationPortraitUpsideDown);
}
//请求结束
-(void)requestFinished:(ASIHTTPRequest *)request{
//移除提示框
[hud removeFromSuperview];
//返回解析后的数据,每一个Array包括一个字典
arrays = [self xmlParser:[request responseData]];
NSLog(@"%@", arrays);
}
//解析结点
static NSString *kXPath_Item = @"//data";
static NSString *kName_Deal = @"deal";
static NSString *kName_Title = @"deal_title";
static NSString *kName_Url = @"deal_url";
static NSString *kName_Img = @"deal_img";
static NSString *kName_Desc = @"deal_desc";
static NSString *kName_Tips = @"deal_tips";
//XML解析
-(NSMutableArray *)xmlParser:(NSData *)data{
NSMutableArray *array = [NSMutableArray array];
//文档开始
DDXMLDocument *xmlDoc = [[DDXMLDocument alloc] initWithData:data options:0 error:nil];
//返回<data>中的所有元素
NSArray *items = [xmlDoc nodesForXPath:kXPath_Item error:nil];
//遍历每个元素
for (DDXMLElement *item in items) {
NSMutableDictionary *dict = [NSMutableDictionary dictionary];
//返回<deal>中的所有元素
NSArray *deals = [item elementsForName:kName_Deal];
for (DDXMLElement *deal in deals) {
//<deal_title>
DDXMLElement *title = [deal elementForName:kName_Title];
if (title) {
[dict setObject:[title stringValue] forKey:kName_Title];
}
//<deal_url>
DDXMLElement *url = [deal elementForName:kName_Url];
if (url) {
[dict setObject:[url stringValue] forKey:kName_Url];
}
//<deal_img>
DDXMLElement *img = [deal elementForName:kName_Img];
if (img) {
[dict setObject:[img stringValue] forKey:kName_Img];
}
//<deal_desc>
DDXMLElement *desc = [deal elementForName:kName_Desc];
if (desc) {
[dict setObject:[desc stringValue] forKey:kName_Desc];
}
//<deal_tips>
DDXMLElement *tips = [deal elementForName:kName_Tips];
if (tips) {
[dict setObject:[tips stringValue] forKey:kName_Tips];
}
}
[array addObject:dict];
}
return array;
}
//请求中止(出错)
-(void)requestFailed:(ASIHTTPRequest *)request{
[hud removeFromSuperview];
NSError *error = [request error];
NSLog(@"RequestError : %@", [error description]);
}
@end
这里面最重要的就是解析返回的XML数据,代码里面的注释也写得比较详细了,我想大家也应该能看得懂,取得数据后我们就可以显示在AQGridView中去了。这个内容我们放到第三篇中做详细介绍。
接上二篇的内容,今天我们就来介绍一下如何将解析出来的数据放入AQGridView中显示出来,因为我们的工程中已经将AQGridView导入了,所以我们在KKFirstViewController中直接可以引用
[plain] view
plaincopy
#import <UIKit/UIKit.h>
#import "ASIHTTPRequest.h"
#import "AQGridView.h"
@interface KKFirstViewController : UIViewController<ASIHTTPRequestDelegate, AQGridViewDelegate, AQGridViewDataSource>
@property(nonatomic, retain)AQGridView *gridView;
@end
这里加入了AQGridViewDelegate和AQGridViewDataSource这两个委托,简单一点我们可以把AQGridView看成UITableView,同样的道理,一个是数据源的方法,一个就是选中的方法
然后就是
在-(void)viewDidLoad这个方法中,我们加入了
[plain] view
plaincopy
self.gridView = [[AQGridView alloc] initWithFrame:CGRectMake(0, 0, 320, 460)];
self.gridView.autoresizingMask = UIViewAutoresizingFlexibleWidth | UIViewAutoresizingFlexibleHeight;
self.gridView.autoresizesSubviews = YES;
self.gridView.delegate = self;
self.gridView.dataSource = self;
[self.view addSubview:gridView];
将当前的gridView加入主视图中
接着还有两个方法一定需要实现的
[plain] view
plaincopy
#pragma mark AQGridViewDataSource
//总共有的Item
-(NSUInteger)numberOfItemsInGridView:(AQGridView *)gridView{
return [arrays count];
}
//每个Item
-(AQGridViewCell *)gridView:(AQGridView *)aGridView cellForItemAtIndex:(NSUInteger)index{
static NSString *identifier = @"PlainCell";
GridViewCell *cell = (GridViewCell *)[aGridView dequeueReusableCellWithIdentifier:identifier];
if(cell == nil){
cell = [[GridViewCell alloc] initWithFrame:CGRectMake(0, 0, 160, 123) reuseIdentifier:identifier];
}
//取得每一个字典
NSDictionary *dict = [arrays objectAtIndex:index];
[cell.captionLabel setText:[dict objectForKey:kName_Title]];
return cell;
}
//每个显示框大小
-(CGSize)portraitGridCellSizeForGridView:(AQGridView *)gridView{
return CGSizeMake(160, 123);
}
这里还少一个类,就是GridView,这个类继承了AQGridViewCell,里面就是我们单独要显示的一个Item
[plain] view
plaincopy
#import "AQGridViewCell.h"
@interface GridViewCell : AQGridViewCell
@property(nonatomic, retain)UIImageView *imageView;
@property(nonatomic, retain)UILabel *captionLabel;
@end
图片显示的是团购信息中的图片,还有一个是文本
[plain] view
plaincopy
#import "GridViewCell.h"
@implementation GridViewCell
@synthesize imageView,captionLabel;
- (id)initWithFrame:(CGRect)frame reuseIdentifier:(NSString *)reuseIdentifier
{
self = [super initWithFrame:frame reuseIdentifier:reuseIdentifier];
if (self) {
UIView *mainView = [[UIView alloc] initWithFrame:CGRectMake(0, 0, 160, 123)];
[mainView setBackgroundColor:[UIColor clearColor]];
UIImageView *frameImageView = [[UIImageView alloc] initWithFrame:CGRectMake(9, 4, 142, 117)];
[frameImageView setImage:[UIImage imageNamed:@"tab-mask.png"]];
self.imageView = [[UIImageView alloc] initWithFrame:CGRectMake(13, 8, 135, 84)];
self.captionLabel = [[UILabel alloc] initWithFrame:CGRectMake(13, 92, 127, 21)];
[captionLabel setFont:[UIFont systemFontOfSize:14]];
[mainView addSubview:imageView];
[mainView addSubview:frameImageView];
[mainView addSubview:captionLabel];
[self.contentView addSubview:mainView];
}
return self;
}
@end
这里面定义了三个控件,两个控件是我们要传入的数据,一个图片,一个文本,还有一个就是我们单独Item的背景
做完这一些,运行一下,我们就可以看到有文字信息的效果了,但还没有加入图片显示功能,从这里我们就要考虑了,图片是我们划动的时候再加载呢还是一次性加载呢,考虑到效果和数据流量,我们还是用异步来加载数据,这就需要加入缓存的功能了,我们用一个NSMutableArray来实现缓存。
看一下代码呢,这代码也是参考了别人写的
[plain] view
plaincopy
//缓存图片
-(UIImage *)cachedImageForUrl:(NSURL *)url{
id cacheObject = [self.cachedImage objectForKey:url];
if (cacheObject == nil) {
//添加占位符
[self.cachedImage setObject:@"Loading..." forKey:url];
ASIHTTPRequest *picRequest = [ASIHTTPRequest requestWithURL:url];
picRequest.delegate = self;
picRequest.didFinishSelector = @selector(didFinishRequestImage:);
picRequest.didFailSelector = @selector(didFailRequestImage:);
//加入队列
[self.queue addOperation:picRequest];
[UIApplication sharedApplication].networkActivityIndicatorVisible = YES;
}else if(![cacheObject isKindOfClass:[UIImage class]]){
cacheObject = nil;
}
return cacheObject;
}
//完成图片下载,并加入缓存
-(void)didFinishRequestImage:(ASIHTTPRequest *)request{
NSData *imageData = [request responseData];
UIImage *image = [UIImage imageWithData:imageData];
if (image != nil) {
[self.cachedImage setObject:image forKey:request.url];
[self.gridView reloadData];
}
[UIApplication sharedApplication].networkActivityIndicatorVisible = NO;
}
//下载失败
-(void)didFailRequestImage:(ASIHTTPRequest *)request{
NSLog(@"Error download Image %@", [request error]);
//从当前缓存中移除
[self.cachedImage removeObjectForKey:request.url];
[UIApplication sharedApplication].networkActivityIndicatorVisible = NO;
}
最后我们在Cell中加入显示图片的代码就可以了,就实现了异步加载图片
[plain] view
plaincopy
//利用缓存保存图片
[cell.imageView setImage:[self cachedImageForUrl:[NSURL URLWithString:[dict objectForKey:kName_Img]]]];
好了,这个程序中主要介绍了AQGridView库,MBProgressHUD,KissXML,ASIHttpRequest这几个库,综合利用各个类库将可以使我们的程序美观,也可以缩短我们的开发周期。好了,谢谢大家有耐心看完。这里提供了源码下载
程序源码
我们对团购客户端进行了重构,来看一下效果图呢
这里因为美团提供了地图坐标,所以我们也加入了MapKit来显示店铺所在位置,但只有美团有,其他几个网站都没有提供。
我们把源码放出:谢谢大家一如既往的支持。

相关文章推荐
- iPhone团购信息客户端的开发
- [iPhone中级]iPhone团购信息客户端的开发 (二)
- [iPhone中级] iPhone团购信息客户端的开发 (四)
- [iPhone中级] iPhone团购信息客户端的开发 (一)
- [iPhone中级] iPhone团购信息客户端的开发 (三)
- [iPhone中级] iPhone团购信息客户端的开发 (三)
- 糯米团—重制“iPhone团购信息客户端”(四)
- [iPhone开发项目] 团购信息
- 糯米团—重制“iPhone团购信息客户端”(零)源代码与跳的那些坑和思考
- 糯米团—重制“iPhone团购信息客户端”(一)
- 糯米团—重制“iPhone团购信息客户端”(二)
- 糯米团—重制“iPhone团购信息客户端”(三)
- iPhone开发笔记(9)ASIHttpRequest和json-framework实现json解析(iOS客户端)
- iphone开发我的新浪微博客户端-用户登录准备篇(1.1)
- iphone开发 UIDevice获取设备信息
- XMPP框架 微信项目开发之XMPP配置(二)——安装配置客户端(Adium)和配置系统自带的信息程序,并对聊天进行测试
- iPhone客户端开发笔记(二)
- iPhone客户端开发笔记(六)
- iOS AutoLayout自动布局中级开发教程(6)-淘宝客户端iPhone 6/6 Plus 设计·适配方案
- Windows客户端开发--使用控制台窗口显示调试信息(打log)