Android倚天剑之Notification之动感地带
2013-06-09 20:38
309 查看
转摘自:http://blog.csdn.net/leverage_1229/article/details/9060555
上文我们介绍怎样管理和删除通知,以及怎样实现保存用户预期导航体验的通知。本文作为Android平台Notification的最终章,我们将会给通知融入更多DIY的元素,大胆地在这把“倚天剑”上烙下自己的印记^-^。在此之前,先来看下如何在通知中显示一个进度条。
一、显示进度的通知
通知可以包括一个动画进度指示器以显示用户正在运行的操作的进度状态。如果你能估计这种操作需要花费多长时间,可以使用“determinate”形式的指示器(一个progress bar)。如果你不能估计花费的时间,那就使用“indeterminate”形式的指示器。
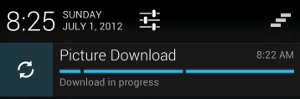
1.显示一个固定的时间进度指示器
(1).技术要点
调用setProgress()方法添加进度指示器到你的通知中。
(2).代码陈列
[java] view
plaincopyprint?
final NotificationCompat.Builder builder = new NotificationCompat.Builder(this)
.setContentInfo(String.valueOf(++progressNum))
.setContentTitle("Picture Download")
.setContentText("Download in progress")
.setDefaults(Notification.DEFAULT_ALL)
.setLargeIcon(icon)
.setSmallIcon(R.drawable.stat_notify_gmail)
.setTicker("Progress Notification")
.setOngoing(true);
// Start a lengthy operation in a background thread
new Thread(new Runnable() {
@Override
public void run() {
int incr;
// Do the "lengthy" operation 20 times
for (incr = 0; incr <= 100; incr+=5) {
builder.setProgress(100, incr, false);
mNotiMgr.notify(PROGRESS_NOTI_ID, builder.build());
try {
Thread.sleep(1000);
} catch (InterruptedException e) {
Log.d(TAG, "sleep failure");
}
}
builder.setContentText("Download complete")
.setProgress(0, 0, false)
.setOngoing(false);
mNotiMgr.notify(PROGRESS_NOTI_ID, builder.build());
}
}).start();
(3).效果展示

2.显示一个持续的Activity指示器
(1).技术要点
调用setProgress(0, 0, true)添加Activity指示器到你的通知中,前面两个参数可以忽略。
(2).代码陈列
[java] view
plaincopyprint?
builder.setProgress(100, incr, false);
mNotiMgr.notify(0, mBuilder.build());
(3).效果展示
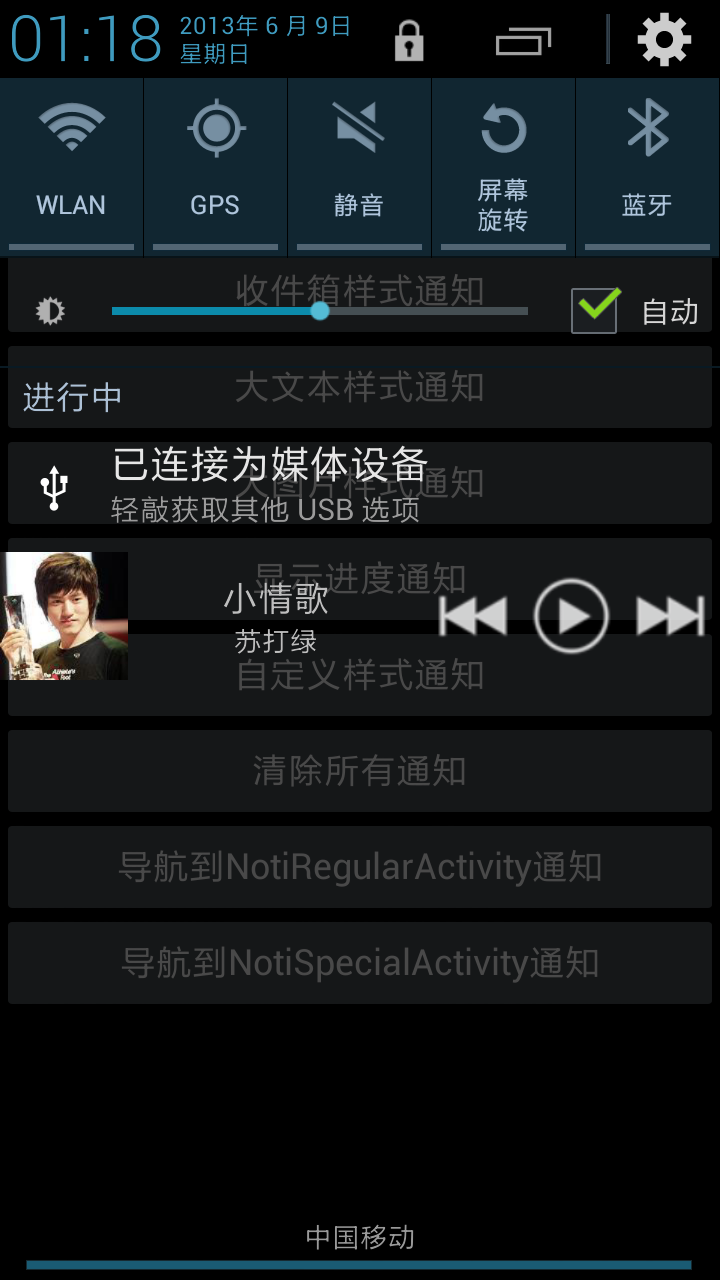
二、自定义样式的通知
通知框架允许你自定义通知布局,它在一个RemoteViews对象中定义了通知的布局。自定义布局通知和正常的通知类似,它们都是基于一个RemoteViews定义在一个XML布局文件中。自定义通知的可用高度取决于通知view的布局。正常view布局限制为64dp,展开view布局限制为256dp。自定义通知布局,通过实例化一个RemoteViews对象然后inflates一个xml布局文件启动。不再调用setContentTitle()方法,而使用setContent()方法来设置自定义通知的内容细节。使用这个方法在RemoteViews中来设置view子类的值。
1.技术要点
(1).为通知创建一个单独的xml布局文件。
(2).在你的应用程序中,使用RemoteViews方法来定义你通知的icon和文本。调用setContent()方法put这个RemoteViews对象到你的NotificationCompat.Builder中。避免正在RemoteViews对象中设置Drawable背景,因为你的文本颜色可能会变的看不清。
2.代码陈列
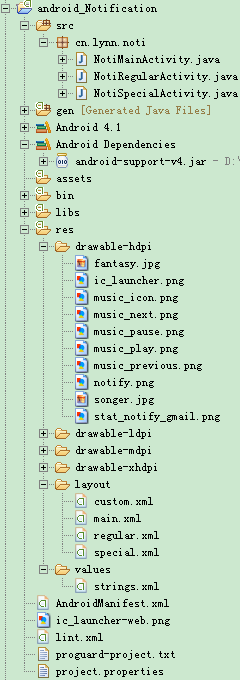
工程包目录
自定义样式通知创建和发布方法:showCustomNoti()
[java] view
plaincopyprint?
/**
* 自定义样式通知
*/
private void showCustomNoti() {
RemoteViews views = new RemoteViews(getPackageName(), R.layout.custom);
Intent intent = new Intent(INTENT_ACTION);
intent.putExtra("isPlay", true);
PendingIntent pendingIntent = PendingIntent.getBroadcast(this, 0, intent, 0);
views.setOnClickPendingIntent(R.id.play_pause_music, pendingIntent);
NotificationCompat.Builder builder = new NotificationCompat.Builder(this)
.setContent(views)
.setDefaults(Notification.DEFAULT_ALL)
.setLargeIcon(icon)
.setSmallIcon(R.drawable.music_icon)
.setTicker("Custom Notification")
.setOngoing(true);
mNotiMgr.notify(CUSTOM_NOTI_ID, builder.build());
}
自定义通知布局文件:custom.xml
[html] view
plaincopyprint?
<?xml version="1.0" encoding="utf-8"?>
<LinearLayout xmlns:android="http://schemas.android.com/apk/res/android"
android:layout_width="match_parent"
android:layout_height="match_parent"
android:gravity="center_vertical" >
<ImageView
android:id="@+id/songer"
android:layout_width="64dp"
android:layout_height="64dp"
android:src="@drawable/songer" />
<LinearLayout
android:layout_width="0dp"
android:layout_height="match_parent"
android:gravity="center_vertical"
android:orientation="vertical"
android:layout_weight="1">
<TextView
android:layout_width="match_parent"
android:layout_height="wrap_content"
android:text="@string/song_name"
android:textSize="18sp"
android:gravity="center_horizontal" />
<TextView
android:layout_width="match_parent"
android:layout_height="wrap_content"
android:text="@string/songer_name"
android:textSize="14sp"
android:gravity="center_horizontal" />
</LinearLayout>
<LinearLayout
android:layout_width="0dp"
android:layout_height="match_parent"
android:gravity="center_vertical"
android:layout_weight="1" >
<ImageView
android:id="@+id/last_music"
android:layout_width="0dp"
android:layout_height="48dp"
android:layout_weight="1"
android:src="@drawable/music_previous" />
<ImageView
android:id="@+id/play_pause_music"
android:layout_width="0dp"
android:layout_height="48dp"
android:layout_weight="1"
android:src="@drawable/music_play" />
<ImageView
android:id="@+id/next_music"
android:layout_width="0dp"
android:layout_height="48dp"
android:layout_weight="1"
android:src="@drawable/music_next" />
</LinearLayout>
</LinearLayout>
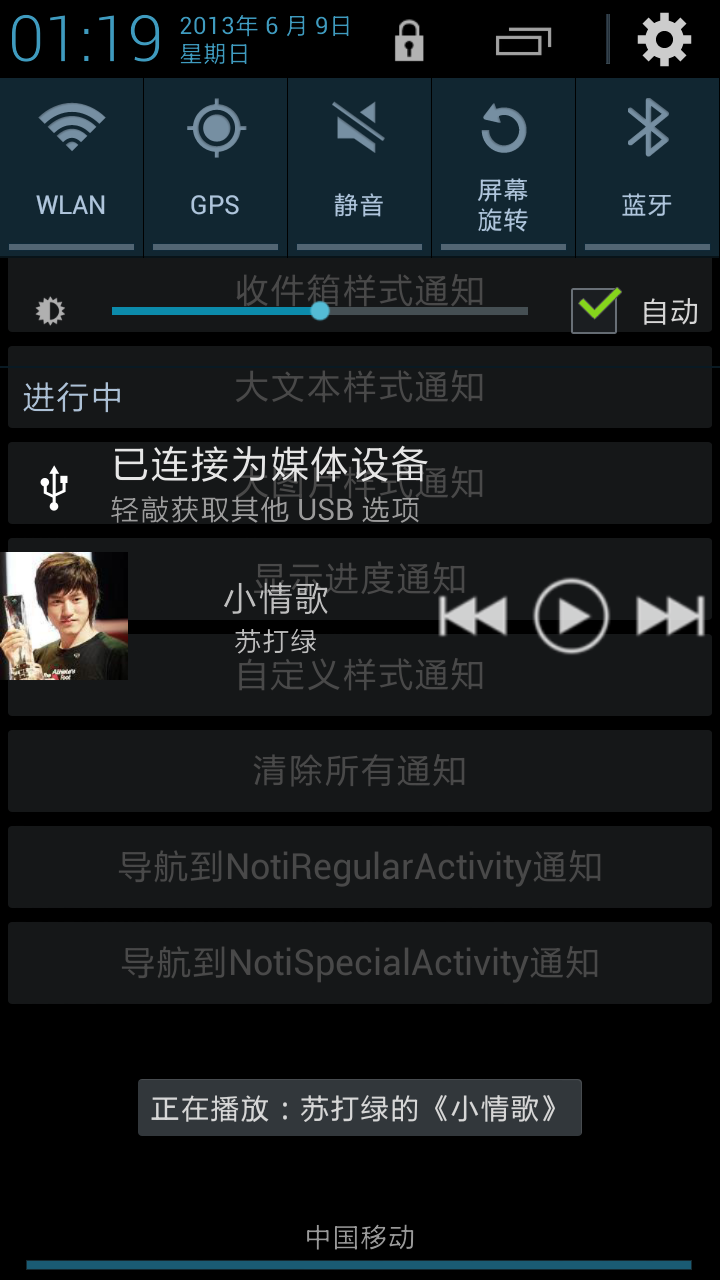
3.效果展示
4.源码下载
点击下载源码
上文我们介绍怎样管理和删除通知,以及怎样实现保存用户预期导航体验的通知。本文作为Android平台Notification的最终章,我们将会给通知融入更多DIY的元素,大胆地在这把“倚天剑”上烙下自己的印记^-^。在此之前,先来看下如何在通知中显示一个进度条。
一、显示进度的通知
通知可以包括一个动画进度指示器以显示用户正在运行的操作的进度状态。如果你能估计这种操作需要花费多长时间,可以使用“determinate”形式的指示器(一个progress bar)。如果你不能估计花费的时间,那就使用“indeterminate”形式的指示器。
1.显示一个固定的时间进度指示器
(1).技术要点
调用setProgress()方法添加进度指示器到你的通知中。
(2).代码陈列
[java] view
plaincopyprint?
final NotificationCompat.Builder builder = new NotificationCompat.Builder(this)
.setContentInfo(String.valueOf(++progressNum))
.setContentTitle("Picture Download")
.setContentText("Download in progress")
.setDefaults(Notification.DEFAULT_ALL)
.setLargeIcon(icon)
.setSmallIcon(R.drawable.stat_notify_gmail)
.setTicker("Progress Notification")
.setOngoing(true);
// Start a lengthy operation in a background thread
new Thread(new Runnable() {
@Override
public void run() {
int incr;
// Do the "lengthy" operation 20 times
for (incr = 0; incr <= 100; incr+=5) {
builder.setProgress(100, incr, false);
mNotiMgr.notify(PROGRESS_NOTI_ID, builder.build());
try {
Thread.sleep(1000);
} catch (InterruptedException e) {
Log.d(TAG, "sleep failure");
}
}
builder.setContentText("Download complete")
.setProgress(0, 0, false)
.setOngoing(false);
mNotiMgr.notify(PROGRESS_NOTI_ID, builder.build());
}
}).start();
(3).效果展示
2.显示一个持续的Activity指示器
(1).技术要点
调用setProgress(0, 0, true)添加Activity指示器到你的通知中,前面两个参数可以忽略。
(2).代码陈列
[java] view
plaincopyprint?
builder.setProgress(100, incr, false);
mNotiMgr.notify(0, mBuilder.build());
(3).效果展示
二、自定义样式的通知
通知框架允许你自定义通知布局,它在一个RemoteViews对象中定义了通知的布局。自定义布局通知和正常的通知类似,它们都是基于一个RemoteViews定义在一个XML布局文件中。自定义通知的可用高度取决于通知view的布局。正常view布局限制为64dp,展开view布局限制为256dp。自定义通知布局,通过实例化一个RemoteViews对象然后inflates一个xml布局文件启动。不再调用setContentTitle()方法,而使用setContent()方法来设置自定义通知的内容细节。使用这个方法在RemoteViews中来设置view子类的值。
1.技术要点
(1).为通知创建一个单独的xml布局文件。
(2).在你的应用程序中,使用RemoteViews方法来定义你通知的icon和文本。调用setContent()方法put这个RemoteViews对象到你的NotificationCompat.Builder中。避免正在RemoteViews对象中设置Drawable背景,因为你的文本颜色可能会变的看不清。
2.代码陈列
工程包目录
自定义样式通知创建和发布方法:showCustomNoti()
[java] view
plaincopyprint?
/**
* 自定义样式通知
*/
private void showCustomNoti() {
RemoteViews views = new RemoteViews(getPackageName(), R.layout.custom);
Intent intent = new Intent(INTENT_ACTION);
intent.putExtra("isPlay", true);
PendingIntent pendingIntent = PendingIntent.getBroadcast(this, 0, intent, 0);
views.setOnClickPendingIntent(R.id.play_pause_music, pendingIntent);
NotificationCompat.Builder builder = new NotificationCompat.Builder(this)
.setContent(views)
.setDefaults(Notification.DEFAULT_ALL)
.setLargeIcon(icon)
.setSmallIcon(R.drawable.music_icon)
.setTicker("Custom Notification")
.setOngoing(true);
mNotiMgr.notify(CUSTOM_NOTI_ID, builder.build());
}
自定义通知布局文件:custom.xml
[html] view
plaincopyprint?
<?xml version="1.0" encoding="utf-8"?>
<LinearLayout xmlns:android="http://schemas.android.com/apk/res/android"
android:layout_width="match_parent"
android:layout_height="match_parent"
android:gravity="center_vertical" >
<ImageView
android:id="@+id/songer"
android:layout_width="64dp"
android:layout_height="64dp"
android:src="@drawable/songer" />
<LinearLayout
android:layout_width="0dp"
android:layout_height="match_parent"
android:gravity="center_vertical"
android:orientation="vertical"
android:layout_weight="1">
<TextView
android:layout_width="match_parent"
android:layout_height="wrap_content"
android:text="@string/song_name"
android:textSize="18sp"
android:gravity="center_horizontal" />
<TextView
android:layout_width="match_parent"
android:layout_height="wrap_content"
android:text="@string/songer_name"
android:textSize="14sp"
android:gravity="center_horizontal" />
</LinearLayout>
<LinearLayout
android:layout_width="0dp"
android:layout_height="match_parent"
android:gravity="center_vertical"
android:layout_weight="1" >
<ImageView
android:id="@+id/last_music"
android:layout_width="0dp"
android:layout_height="48dp"
android:layout_weight="1"
android:src="@drawable/music_previous" />
<ImageView
android:id="@+id/play_pause_music"
android:layout_width="0dp"
android:layout_height="48dp"
android:layout_weight="1"
android:src="@drawable/music_play" />
<ImageView
android:id="@+id/next_music"
android:layout_width="0dp"
android:layout_height="48dp"
android:layout_weight="1"
android:src="@drawable/music_next" />
</LinearLayout>
</LinearLayout>
3.效果展示
4.源码下载
点击下载源码

相关文章推荐
- Android倚天剑之Notification之动感地带
- Android倚天剑之Notification之动感地带
- Android倚天剑之Notification之城管三千
- Android倚天剑之Notification之江南style
- Android倚天剑之Notification之城管三千
- Android倚天剑之Notification之江南style
- Android倚天剑之Notification之亮剑IOS
- Android倚天剑之Notification之亮剑IOS
- Android倚天剑之Notification之江南style
- [置顶] Android倚天剑之Notification之江南style
- Android开发学习之路--Notification之初体验
- Androidn Notification的使用,解决找不到setLatestEventInfo方法
- Android8.1_SystemUI_notification_notificationGuts
- Android7.1_SystemUI_Notification:添加_源码分析
- android 组件Notification实例
- android Notification 使用
- 使用 Android 自定义通知Notification时遇到的问题
- Android Notification状态栏通知
- 【Android】状态栏通知Notification、NotificationManager详解
- Android Notification通知栏开发详解