CentOS 6 最小化安装VNC Server
2013-05-31 13:20
465 查看
How to install VNC server on CentOS 6
VNC is a protocol that is used to share the desktop with other users/computers over the network/Internet.In order to share a desktop, VNC server must be install and configure on the computer and VNC client must be run on the computer that will access the shareddesktop.
When we install the minimal copy of CentOS Server, it only gives us the “Command Line” interface.

But some people prefer GUI instead and for this they install Full version of Gnome on CentOS. Actually there is a better way and that is to install VNC. VNC provides a lightweight virtual desktop than full blown version of Gnome.
To run the VNC Server on CentOS, we have to install these required packages:
sudo yum groupinstall Desktop

sudo yum install tigervnc-server

sudo yum install xorg-x11-fonts-Type1

This is optional:
sudo yum install vnc

To start VNC Server on boot
sudo chkconfig vncserver on

To setup users’ VNC password:
vncpasswd

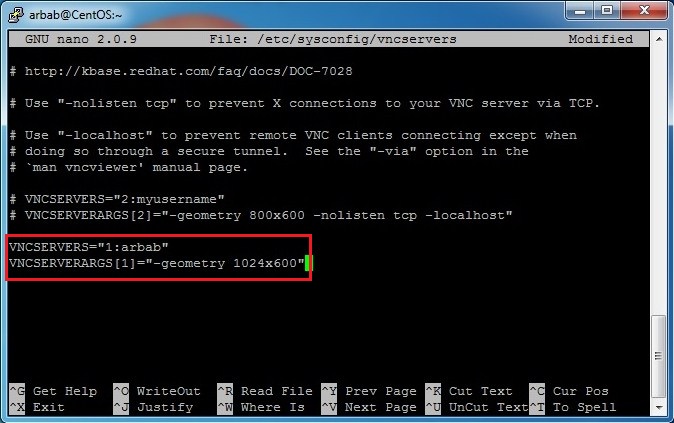
Edit the /etc/sysconfig/vncservers file:
sudo nano /etc/sysconfig/vncservers

Add the following to the end of the file:
VNCSERVERS="1:arbab"
VNCSERVERARGS[1]="-geometry 1024x600"
The iptables rules need to be amended to open the VNC ports:
sudo iptables -I INPUT 5 -m state --state NEW -m tcp -p tcp -m multiport --dports 5901:5903,6001:6003 -j ACCEPT
sudo service iptables save
sudo service iptables restart

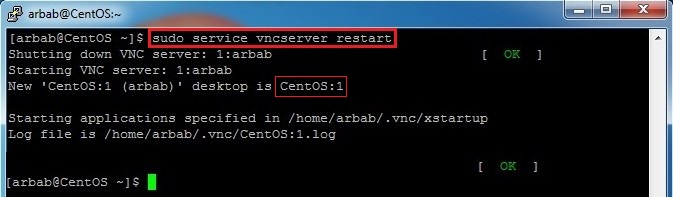
Restart the VNC Server:
sudo service vncserver restart
Now kill the VNC Server:
vncserver -kill :1

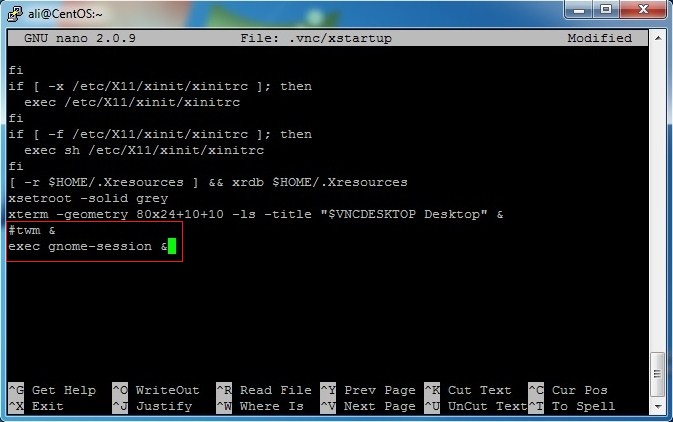
Edit the xstartup file in .vnc directory:
nano .vnc/xstartup

Comment the last line and run the Gnome:
#twm &
exec gnome-session &

Restart the service:
sudo service vncserver restart
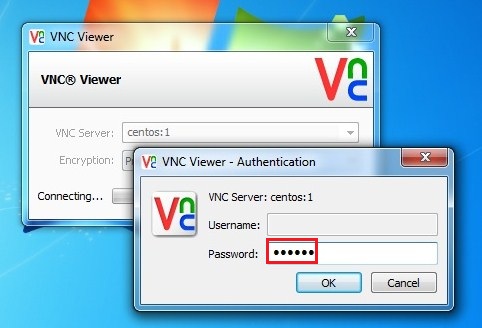
Now, download VNCViewer onto
our desktop computer from which we want to access the shared desktop. Connect using ServerIP/Name:1 (:1 is for the VNC server window), In my case it is centos:1.

Enter the password that we created using the vncpasswd command:
We now have GUI access to our server.

Ability to connect for multiple users:
Create a local user, using the following command:
sudo adduser ali

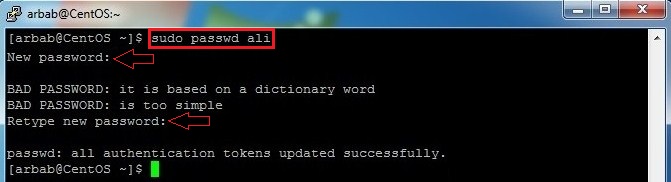
Create a password for newly created user:
sudo passwd ali
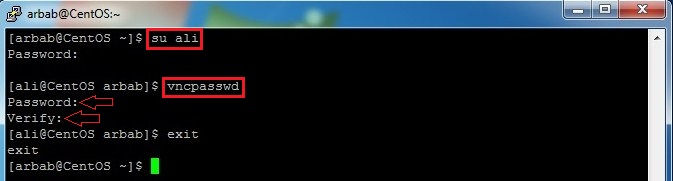
Switch to the newly created user and run vncpasswd command for it:
su ali
vncpasswd
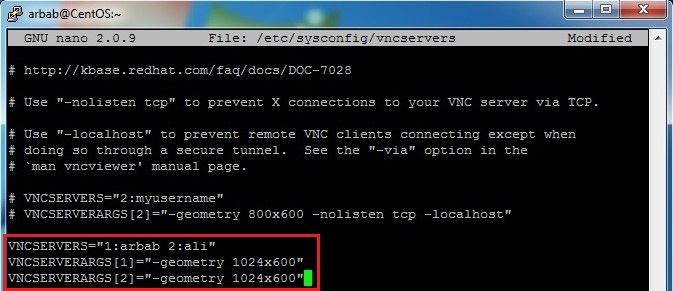
Edit the /etc/sysconfig/vncservers file:
sudo nano /etc/sysconfig/vncservers

Add these lines for new user:
VNCSERVERS="1:arbab 2:ali"
VNCSERVERARGS[1]="-geometry 1024x600"
VNCSERVERARGS[2]="-geometry 1024x600"
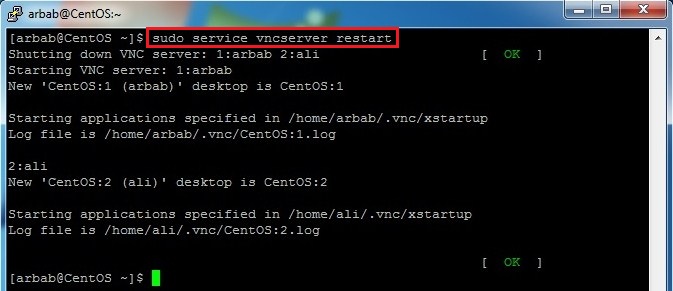
Restart the VNC service:
sudo service vncserver restart
Kill the vncserver session for new user and edit the xstartup file:
su ali
vncserver -kill :2
cd ~
nano .vnc/xstartup
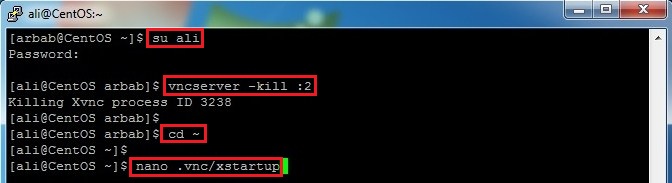
Modify the file so it looks like this:
#twm &
exec gnome-session &
Restart the VNC service:
sudo service vncserver restart

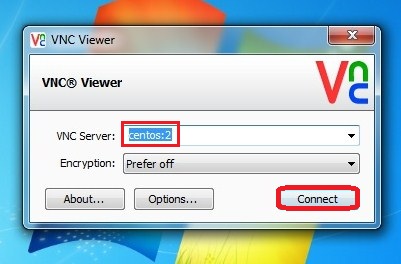
Connect with newly created user using centos:2, Where centos is my server name:
Enter the password that we created using the vncpasswd command:

We now have GUI access to our server for newly created user.

Hope this will help you!
Please Remember me in your prayers!
Enjoy

相关文章推荐
- CentOS 7最小化安装后找不到‘ifconfig’命令——修复小提示
- CentOS 7 最小化安装后 没有安装ifconfig命令的解决方法
- Centos最小化安装
- 安装完最小化 RHEL/CentOS 7 后需要做的 30 件事情(二)转载自码农网
- CentOS最小化安装后,增加GNOME桌面
- 安装完最小化RHEL/CentOS 7后需要做的30件事情
- CentOS 6.0 Minimal最小化安装后VMware虚拟机联网详解
- CentOS 6 最小化安装找不到setup的解决办法
- CentOS 5.2最小化安装及常用工具添加
- CentOS最小化安装系统开启网卡
- 最小化安装CentOS 6.3
- centos 6.X minimal 系列最小化安装完成后,安装mono和jexus过程小记录
- CentOS 最小化安装系统安装图形界面
- centos 7 安装 最小化 碰到的问题
- RHEL/CentOS 7最小化安装后需做的30件事情
- CentOS6.4最小化安装部署MemAdmin
- RHEL/CentOS 7最小化安装后需做的30件事情
- 安装完最小化 RHEL/CentOS 7 后需要做的 30 件事情(六)
- 安装完最小化 RHEL/CentOS 7 后需要做的 30 件事情(四)
- centos7 双网卡双ip内外网设置最小化安装