Android ActionBar+ViewPager 实现左右滑动Tab
2013-05-23 19:33
851 查看
最近公司数据抓取工作接近尾声了,我也终于回归Android岗位了。在Google官方文档上看了 Creating Swipe Views with Tabs这篇文章,看完之后自己想实践一下,于是乎折腾了一番,终于实现了。
这里用到了Support Library 中的support-v4 包,具体请参看官方文档。
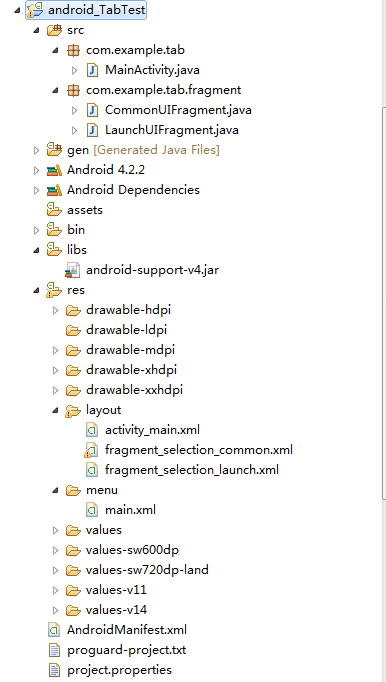
工程目录结构如下:
首先看主界面Activity的布局文件 activity_main.xml
主界面 MainActivity.java
LaunchUIFragment.java
LaunchUIFragment 的布局文件 fragment_selection_launch.xml
CommonUIFragment.java
CommonUIFragment 的布局文件 fragment_selection_common.xml
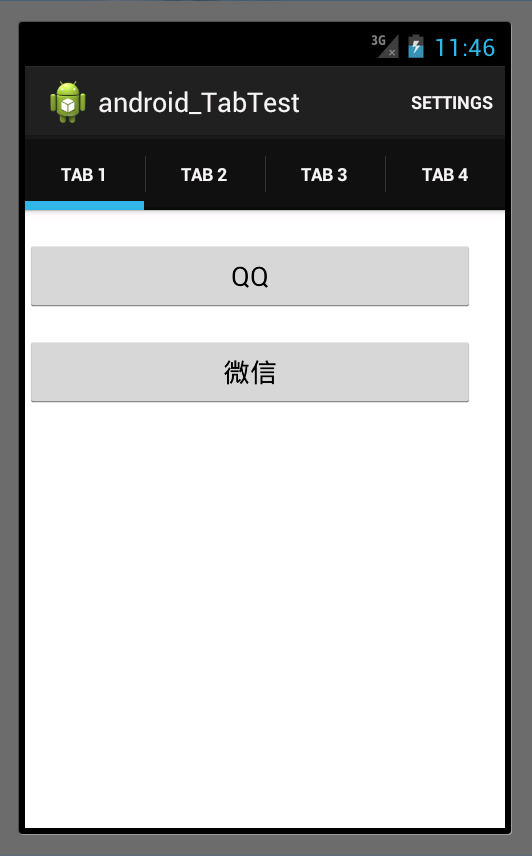
模拟器环境下运行效果图如下:
二、FragmentPagerAdapter和FragmentStatePagerAdapter的区别
官方API文档上的说明
FragmentPagerAdapter
Implementation of
represents each page as a
is persistently kept in the fragment manager as long as the user can return to the page.
This version of the pager is best for use when there are a handful of typically more static fragments to be paged through, such as a set of tabs. The fragment of each page the user visits will be kept in memory, though its view hierarchy may be destroyed when
not visible. This can result in using a significant amount of memory since fragment instances can hold on to an arbitrary amount of state. For larger sets of pages, consider
FragmentStatePagerAdapter
Implementation of
uses a
class also handles saving and restoring of fragment's state.
This version of the pager is more useful when there area large number of pages, working more like a list view. When pages are not visible
to the user, their entire fragment may be destroyed, only keeping the saved state of that fragment. This allows the pager to hold on to much less memory associated with each visited page as compared to
the cost of potentially more overhead when switching between pages.
当我们的应用 有很多个页面(Fragment)的时候,推荐使用FragmentStatePagerAdapter。
这里用到了Support Library 中的support-v4 包,具体请参看官方文档。
工程目录结构如下:
首先看主界面Activity的布局文件 activity_main.xml
<RelativeLayout xmlns:android="http://schemas.android.com/apk/res/android"
xmlns:tools="http://schemas.android.com/tools"
android:layout_width="match_parent"
android:layout_height="match_parent"
tools:context=".MainActivity" >

<android.support.v4.view.ViewPager
android:id="@+id/pager"
android:layout_width="match_parent"
android:layout_height="match_parent" />

</RelativeLayout>
主界面 MainActivity.java
package com.example.tab;

import android.app.ActionBar;
import android.app.ActionBar.Tab;
import android.app.ActionBar.TabListener;
import android.app.FragmentTransaction;
import android.os.Bundle;
import android.support.v4.app.Fragment;
import android.support.v4.app.FragmentActivity;
import android.support.v4.app.FragmentManager;
import android.support.v4.app.FragmentPagerAdapter;
import android.support.v4.view.ViewPager;
import android.support.v4.view.ViewPager.OnPageChangeListener;
import android.view.Menu;
import com.example.android_tabtest.R;
import com.example.tab.fragment.CommonUIFragment;
import com.example.tab.fragment.LaunchUIFragment;

public class MainActivity extends FragmentActivity implements TabListener {

private ViewPager mViewPager;
public static final int MAX_TAB_SIZE = 4;
public static final String ARGUMENTS_NAME = "args";
private TabFragmentPagerAdapter mAdapter;

@Override
protected void onCreate(Bundle savedInstanceState) {
super.onCreate(savedInstanceState);
setContentView(R.layout.activity_main);

findViewById();
initView();
}

private void findViewById() {
mViewPager = (ViewPager) this.findViewById(R.id.pager);
}

private void initView() {

final ActionBar mActionBar = getActionBar();

mActionBar.setDisplayHomeAsUpEnabled(false);

mActionBar.setNavigationMode(ActionBar.NAVIGATION_MODE_TABS);

mAdapter = new TabFragmentPagerAdapter(getSupportFragmentManager());
mViewPager.setAdapter(mAdapter);
mViewPager.setOnPageChangeListener(new OnPageChangeListener() {

@Override
public void onPageSelected(int arg0) {

mActionBar.setSelectedNavigationItem(arg0);
}

@Override
public void onPageScrolled(int arg0, float arg1, int arg2) {

}

@Override
public void onPageScrollStateChanged(int arg0) {

}
});

//初始化 ActionBar
for(int i=0;i<MAX_TAB_SIZE;i++){
Tab tab = mActionBar.newTab();
tab.setText(mAdapter.getPageTitle(i)).setTabListener(this);
mActionBar.addTab(tab);
}
}

public static class TabFragmentPagerAdapter extends FragmentPagerAdapter{

public TabFragmentPagerAdapter(FragmentManager fm) {
super(fm);
}

@Override
public Fragment getItem(int arg0) {
Fragment ft = null;
switch (arg0) {
case 0:
ft = new LaunchUIFragment();
break;

default:
ft = new CommonUIFragment();

Bundle args = new Bundle();
args.putString(ARGUMENTS_NAME, "TAB"+(arg0+1));
ft.setArguments(args);

break;
}
return ft;
}

@Override
public int getCount() {

return MAX_TAB_SIZE;
}
@Override
public CharSequence getPageTitle(int position) {
return "TAB " + (position + 1);
}
}

@Override
public boolean onCreateOptionsMenu(Menu menu) {
// Inflate the menu; this adds items to the action bar if it is present.
getMenuInflater().inflate(R.menu.main, menu);
return true;
}

@Override
public void onTabSelected(Tab tab, FragmentTransaction ft) {
mViewPager.setCurrentItem(tab.getPosition());
}

@Override
public void onTabUnselected(Tab tab, FragmentTransaction ft) {

}

@Override
public void onTabReselected(Tab tab, FragmentTransaction ft) {

}

}
LaunchUIFragment.java
package com.example.tab.fragment;

import android.os.Bundle;
import android.support.v4.app.Fragment;
import android.view.LayoutInflater;
import android.view.View;
import android.view.ViewGroup;

import com.example.android_tabtest.R;

public class LaunchUIFragment extends Fragment {

@Override
public View onCreateView(LayoutInflater inflater, ViewGroup container,
Bundle savedInstanceState) {

View rootView = inflater.inflate(R.layout.fragment_selection_launch, container, false);

return rootView;
}
@Override
public void onActivityCreated(Bundle savedInstanceState) {
// TODO Auto-generated method stub
super.onActivityCreated(savedInstanceState);
}

}
LaunchUIFragment 的布局文件 fragment_selection_launch.xml
<?xml version="1.0" encoding="utf-8"?>
<LinearLayout xmlns:android="http://schemas.android.com/apk/res/android"
android:layout_width="match_parent"
android:layout_height="match_parent"
android:orientation="vertical" >

<Button android:id="@+id/bt_external"
android:layout_width="300dp"
android:layout_height="wrap_content"
android:layout_marginTop="20dp"
android:layout_marginBottom="16dp"
android:text="@string/main_qq"/>

<Button android:id="@+id/bt_internal"
android:layout_width="300dp"
android:layout_height="wrap_content"
android:layout_marginBottom="16dp"
android:text="@string/main_wx"/>

</LinearLayout>
CommonUIFragment.java
package com.example.tab.fragment;

import com.example.android_tabtest.R;
import com.example.tab.MainActivity;

import android.os.Bundle;
import android.support.v4.app.Fragment;
import android.view.LayoutInflater;
import android.view.View;
import android.view.ViewGroup;
import android.widget.TextView;

public class CommonUIFragment extends Fragment {

@Override
public View onCreateView(LayoutInflater inflater, ViewGroup container,
Bundle savedInstanceState) {

View rootView = inflater.inflate(R.layout.fragment_selection_common, container, false);

TextView tv_tabName = (TextView) rootView.findViewById(R.id.tv_tabName);

Bundle bundle = getArguments();

tv_tabName.setText(bundle.getString(MainActivity.ARGUMENTS_NAME, ""));

return rootView;
}
@Override
public void onActivityCreated(Bundle savedInstanceState) {
// TODO Auto-generated method stub
super.onActivityCreated(savedInstanceState);
}

}
CommonUIFragment 的布局文件 fragment_selection_common.xml
<?xml version="1.0" encoding="utf-8"?>
<LinearLayout xmlns:android="http://schemas.android.com/apk/res/android"
android:layout_width="match_parent"
android:layout_height="match_parent"
android:orientation="vertical" >

<TextView
android:id="@+id/tv_tabName"
android:layout_width="wrap_content"
android:layout_height="30dp"
android:gravity="center"
android:textSize="20sp"
/>

</LinearLayout>
模拟器环境下运行效果图如下:
二、FragmentPagerAdapter和FragmentStatePagerAdapter的区别
官方API文档上的说明
FragmentPagerAdapter
Implementation of
PagerAdapterthat
represents each page as a
Fragmentthat
is persistently kept in the fragment manager as long as the user can return to the page.
This version of the pager is best for use when there are a handful of typically more static fragments to be paged through, such as a set of tabs. The fragment of each page the user visits will be kept in memory, though its view hierarchy may be destroyed when
not visible. This can result in using a significant amount of memory since fragment instances can hold on to an arbitrary amount of state. For larger sets of pages, consider
FragmentStatePagerAdapter.
FragmentStatePagerAdapter
Implementation of
PagerAdapterthat
uses a
Fragmentto manage each page. This
class also handles saving and restoring of fragment's state.
This version of the pager is more useful when there area large number of pages, working more like a list view. When pages are not visible
to the user, their entire fragment may be destroyed, only keeping the saved state of that fragment. This allows the pager to hold on to much less memory associated with each visited page as compared to
FragmentPagerAdapterat
the cost of potentially more overhead when switching between pages.
当我们的应用 有很多个页面(Fragment)的时候,推荐使用FragmentStatePagerAdapter。

相关文章推荐
- Android典型界面设计(6)——ActionBar Tab+ViewPager+Fagment实现滑动导航
- Android典型界面设计(6)——ActionBar Tab+ViewPager+Fagment实现滑动导航
- Android开发之ViewPager+ActionBar+Fragment实现响应式可滑动Tab
- Android开发之ViewPager+ActionBar+Fragment实现响应式可滑动Tab
- Android开发之ViewPager+ActionBar+Fragment实现响应式可滑动Tab
- 利用ViewPager+Fragment+actionbar实现可左右滑动的Action Tab
- ActionBar + ViewPager实现左右滑动切换Tab页效果
- Android RadioGroup+ViewPager+ActionBar实现仿微信6.0界面(底部滑动菜单栏+导航栏)
- ActionBar(5) ActionBar+ViewPager+PagerTitleStrip 实现可左右滑动的Tab页布局
- Android UI 详解之ActionBar+ViewPager+Fragment 实现滑动Tab
- 利用ViewPager+Fragment+actionbar实现可左右滑动的Action Tab
- 利用ViewPager+Fragment+actionbar实现可左右滑动的Action Tab
- ActionBar(6) ActionBar+ViewPager 实现可左右滑动的Tab页布局
- ViewPagerIndicator系列之--ViewPager+ActionBar+Fragment实现响应式可滑动Tab
- ActionBar(7) ActionBar+ViewPager+Fragment 实现可左右滑动的Tab页布局
- Android 使用ViewPager实现左右循环滑动图片
- Android Tablayout 结合ViewPager实现滑动界面
- Android 使用ViewPager实现左右循环滑动图片
- Android 使用ViewPager实现左右循环滑动图片
- Android实现左右滑动指引效果(使用ViewPager)