Building a Jabber Client for iOS: Interface Setup
2013-05-21 15:18
471 查看
http://mobile.tutsplus.com/tutorials/iphone/building-a-jabber-client-for-ios-interface-setup/
In this tutorial we will build a Jabber Client for iOS. The application developed in this series will enable users to sign in, add buddies, and send messages. This tutorial will focus on setting up the user interface for the sample chat client.
The core of our Jabber application is built around the XMPP capabilities. We will store these functionalities in the main application delegate, which will implement a custom protocol to dispatch events like logging in and sending messages. The application we
are going to build is based around three views: login, buddy list, and chat.
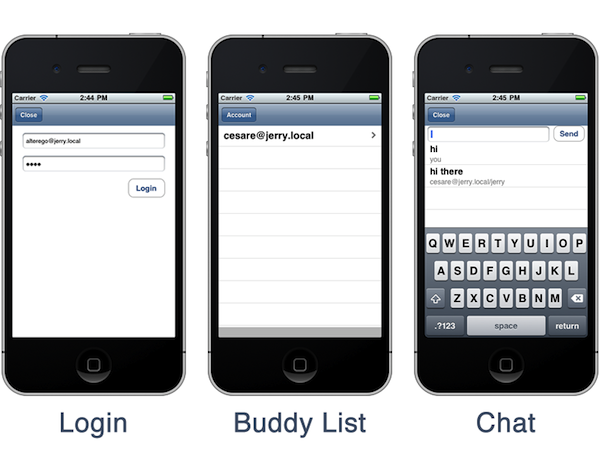
The buddy list is the default view, which is shown when the application starts up. It shows the list of online buddies. The login view will appear only if there are no credentials previously stored on the device. A button named “Account” will show the login
view from the buddy list, to enable changing login credentials when needed. The chat view is displayed when an online buddy is tapped, to initiate a chat. We will build a view controller for each of these views. Controllers will implement a simple protocol
to receive notifications dispatched by the application delegate. To keep things simple, login and a chat view will appear as a modal view controller. If you like, you can rework the application to use a navigation controller instead.
Let’s open Xcode and start a new project. We will choose a simple view based application and we will name it “JabberClient”. To interact with the server, we will adopt a handy library for iOS which is called XMPP
framework. This library is compatible with both Mac and iOS applications and will help us in implementing the low-level functionalities to connect with XMPP server and manage message exchanges through sockets. Since the repository does not feature any
download link you need to have git installed (see here for
more information). Once you have installed git, you can issue the following command in the console:
Once the download has completed we should end up with a folder like the following:
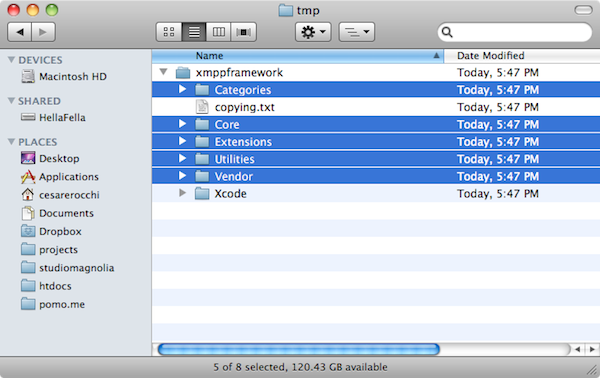
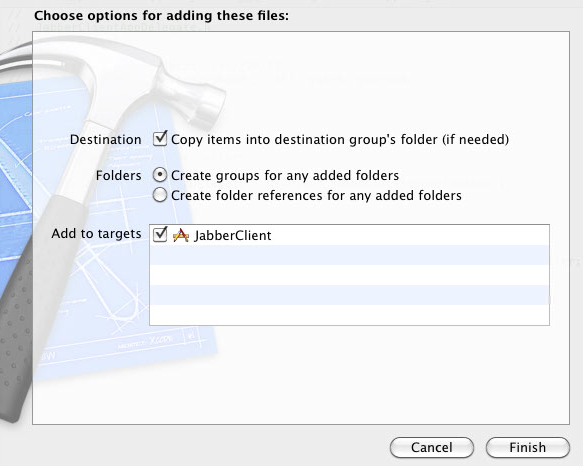
We need only the folders highlighted in the picture. Once selected, we drag them over the project to include them. Just remember to check “Copy items into destination group’s folder (if needed)”.
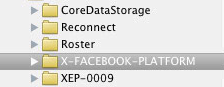
We don’t need the integration with Facebook, so in the “Extensions” group we can delete the “X-FACEBOOK-PLATFORM” folder.
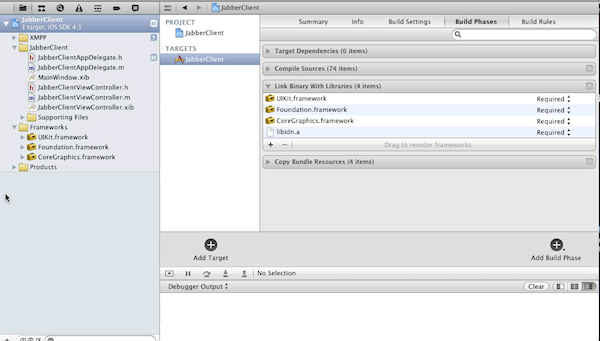
Now let’s add the frameworks needed. We select the project in the navigator, then we select the target and we open “Link Binary With Libraries” as shown in the figure.
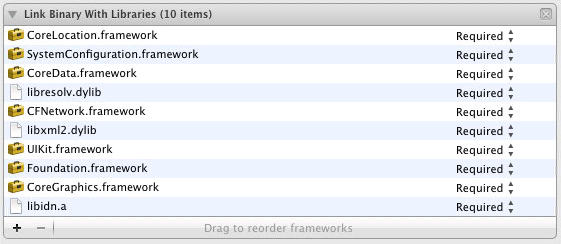
We have to add lots of framework as shown in the following figure:
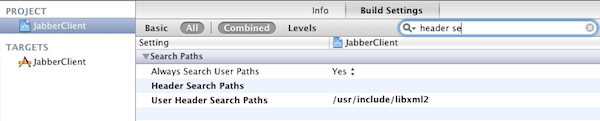
Finally, to compile a project we have to tweak some build settings. Changes have to be added to both the project and the target. First, we find the “User Header Search Paths” and we specify the library needed to parse xml: ‘/usr/include/libxml2′
Then we select “Other Linker Flags” and the add the following flag: “-lxml2″.

The project is now set up correctly and you should be able to build it without errors or warnings.
The buddy list contains a table view which shows a list of online contacts. When one is tapped it shows the corresponding chat view. The project wizard has already created a view controller, which we will rename “BuddyListViewController” for sake of consistency.
This controller will have a
contacts. It will also have an
in case the user wants to switch account. Moreover it will implement table view delegates. So we update the implementation file as follows.
In the implementation file we syntesize the property and we add the standard methods to manage
the table view.
The corresponding xib file will have a table view, and a toolbar with a bar button item as in the following figure:
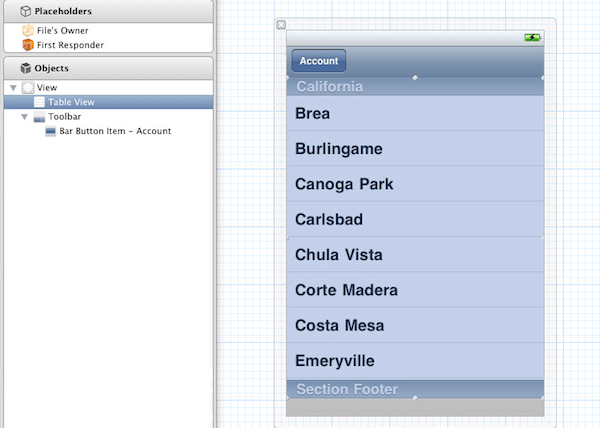
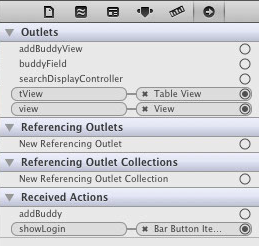
We should remember to link the table view and the
to their corresponding outlets as shown below:
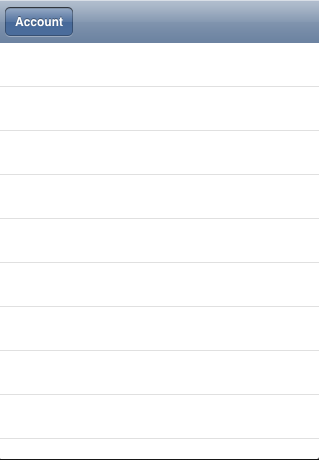
If we run the application we should see an empty table as in the following screenshot:
We can suspend the implementation of this class for awhile. We will integrate the XMPP features when ready. For now, let’s move to the login.
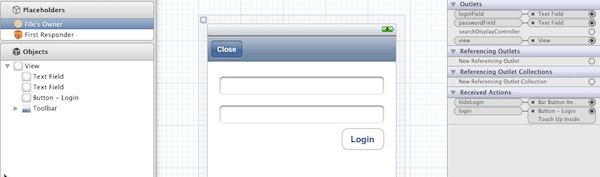
This view shows up when the user has not yet entered login credentials or when the “Account” button is tapped. It is made of two input fields and a button. An additional action will enable the user to hide the view without changes.
The implementation is pretty straightforward. When the login action is triggered data in the textfields is stored in
two keys “userID” and “userPassword”. This data will be used by the XMPP engine and sent to the server.
As above we should remember to link text fields and actions in the XIB file.
Now we can update the BuddyList controller to show the login view when needed. We import the corresponding class and we update the action as follows.
We also implement the
login view when no data is stored.
If we compile the application we should see that the login view appears as expected or when the user taps the button.
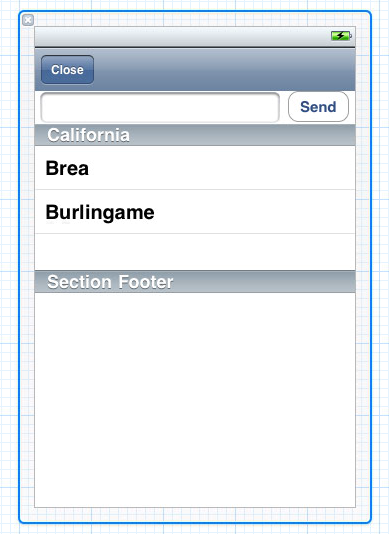
The chat view features four visual elements:
a toolbar with a button to close the view
a textfield to type in messages
a button to send messages
a table view to display sent and received messages
The header file is the following:
Like the buddy view this class implements table delegates. It keeps track of the received by means of the string variable
features two actions,
The corresponding implementation is the following.
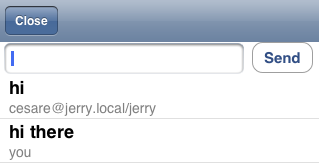
When the view has loaded we show the keyboard. The table part is pretty similar to the buddy view. Here we use a slightly different type of table cell to display both the message and the name. Below is the intended result when the application is ready:
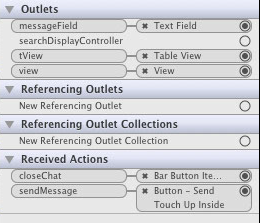
We should remember to connect the
buttons as usual.
The visual part of out application is ready! Now we are left with the core functionality of messaging, and that will be covered in the next part of this series!
The complete source code for this project can be found on GitHub here.
In this tutorial we will build a Jabber Client for iOS. The application developed in this series will enable users to sign in, add buddies, and send messages. This tutorial will focus on setting up the user interface for the sample chat client.
Overview of the iOS Client
The core of our Jabber application is built around the XMPP capabilities. We will store these functionalities in the main application delegate, which will implement a custom protocol to dispatch events like logging in and sending messages. The application weare going to build is based around three views: login, buddy list, and chat.
The buddy list is the default view, which is shown when the application starts up. It shows the list of online buddies. The login view will appear only if there are no credentials previously stored on the device. A button named “Account” will show the login
view from the buddy list, to enable changing login credentials when needed. The chat view is displayed when an online buddy is tapped, to initiate a chat. We will build a view controller for each of these views. Controllers will implement a simple protocol
to receive notifications dispatched by the application delegate. To keep things simple, login and a chat view will appear as a modal view controller. If you like, you can rework the application to use a navigation controller instead.
Project Setup
Let’s open Xcode and start a new project. We will choose a simple view based application and we will name it “JabberClient”. To interact with the server, we will adopt a handy library for iOS which is called XMPPframework. This library is compatible with both Mac and iOS applications and will help us in implementing the low-level functionalities to connect with XMPP server and manage message exchanges through sockets. Since the repository does not feature any
download link you need to have git installed (see here for
more information). Once you have installed git, you can issue the following command in the console:
git clone https://code.google.com/p/xmppframework/ xmppframework
Once the download has completed we should end up with a folder like the following:
We need only the folders highlighted in the picture. Once selected, we drag them over the project to include them. Just remember to check “Copy items into destination group’s folder (if needed)”.
We don’t need the integration with Facebook, so in the “Extensions” group we can delete the “X-FACEBOOK-PLATFORM” folder.
Now let’s add the frameworks needed. We select the project in the navigator, then we select the target and we open “Link Binary With Libraries” as shown in the figure.
We have to add lots of framework as shown in the following figure:
Finally, to compile a project we have to tweak some build settings. Changes have to be added to both the project and the target. First, we find the “User Header Search Paths” and we specify the library needed to parse xml: ‘/usr/include/libxml2′
Then we select “Other Linker Flags” and the add the following flag: “-lxml2″.
The project is now set up correctly and you should be able to build it without errors or warnings.
Creating the Buddy List View
The buddy list contains a table view which shows a list of online contacts. When one is tapped it shows the corresponding chat view. The project wizard has already created a view controller, which we will rename “BuddyListViewController” for sake of consistency.This controller will have a
UITableViewand an array to store online
contacts. It will also have an
IBActionto show the login view,
in case the user wants to switch account. Moreover it will implement table view delegates. So we update the implementation file as follows.
the table view.
We should remember to link the table view and the
showLoginaction
to their corresponding outlets as shown below:
If we run the application we should see an empty table as in the following screenshot:
We can suspend the implementation of this class for awhile. We will integrate the XMPP features when ready. For now, let’s move to the login.
Building the Login User Interface
This view shows up when the user has not yet entered login credentials or when the “Account” button is tapped. It is made of two input fields and a button. An additional action will enable the user to hide the view without changes.NSUSerDefaultswith
two keys “userID” and “userPassword”. This data will be used by the XMPP engine and sent to the server.
Now we can update the BuddyList controller to show the login view when needed. We import the corresponding class and we update the action as follows.
viewDidAppearfunction so that it shows the
login view when no data is stored.
Creating the Chat View
The chat view features four visual elements:a toolbar with a button to close the view
a textfield to type in messages
a button to send messages
a table view to display sent and received messages
The header file is the following:
chatWithUserand
features two actions,
closeChatand
sendMessage.
The corresponding implementation is the following.
We should remember to connect the
IBActionproperties with the corresponding
buttons as usual.
The visual part of out application is ready! Now we are left with the core functionality of messaging, and that will be covered in the next part of this series!
Source Code
The complete source code for this project can be found on GitHub here.

相关文章推荐
- Building a Jabber Client for iOS: Interface Setup
- Building a Jabber Client for iOS: Server Setup
- Building a Jabber Client for iOS: Server Setup
- Building a Jabber Client for iOS: XMPP Setup
- Building a Jabber Client for iOS: Server Setup
- Building a Jabber Client for iOS: Custom Chat View and Emoticons
- 转:Jabber Client for iOS: Interface Setup
- 安装 ppsycopg2报错, Error: You need to install postgresql-server-dev-X.Y for building a server-side extension or libpq-dev for building a client-side application
- Generated AOT code is wrong when building for iOS on Windows
- Android API Guide for Media Apps(五)——构建媒体浏览客户端(Building a Media Browser Client)
- [iOS 报错]Duplicate Interface definition for class 'xxxxxx'
- WWDC笔记:2013 Session 201 Building User Interfaces for iOS 7
- 转:Jabber Client for iOS: Server Setup
- 《iOS Human Interface Guidelines》——Designing for iOS
- Building the Best Facebook Login Experience for People on iOS 9
- Building librtmp for iOS
- iOS error no visible @interface for '***' declares the selector '***
- xmppframework for iOS client(二) 连接服务器
- iOS[正解] - no visible @interface for XXXXXX 解决方案
- BES10 Client for Android and iOS