在Unity中创建可远程加载的.unity3d包
2013-05-20 15:45
267 查看
首发:http://blog.csdn.net/u010732148/article/details/8950552
--------------------------------------------------------------------------------------------------------
在一个Unity项目中,发布包本身不一定要包括所有的Asset(译为资产或组件),其它的部分可以单独发布为.unity3d,再由程序从本地/远程加载执行,这部分不在本文讨论范围。虽然Unity并没有直接提供.unity3d的导出功能,但可以通过其手册了解到一些,并打开菜单项。
翻看Unity关于AssetBundle的手册,有相关的链接:
BuildPipeline.BuildAssetBundle
Building AssetBundles
【注意】导出.unity3d格式需要pro版本,非pro版本可以打开菜单项,但导出时会提示错误:

我们可以使用Untiy提供的现成的脚本打开两个导出.unity3d的菜单项,也可以使用API根据自己的需求来写。当项目变得越来越大时,手工导出AssetBundle会越来越吃力,这时可能就需要自己来开发导出功能,自动创建AssetBundle了。
打开菜单项
在Unity中创建名为ExprotAssetBundles的C#脚本,放到Editor目录下(必须是这
4000
个目录,以便在编辑器中生效)。把下面的代码复制到ExprotAssetBundles脚本中(可以在Building
AssetBundles中找到这段代码)
这时,在Assets菜单下可以看到两个新的菜单项:
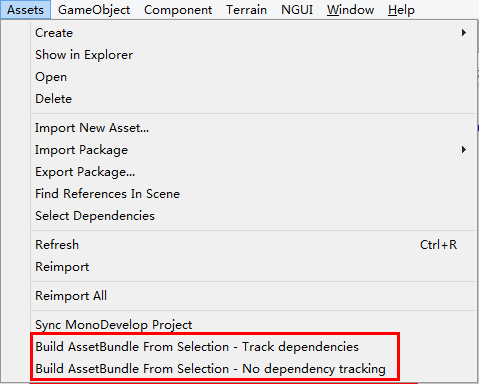
1. Build AssetBundle From Selection - Track dependencies
这个选项会把当前对象打包到一个asset bundle中,并包含所有依赖。
2. Build AssetBundle From Selection - No dependency tracking
与前一个相反的选项,只包含所选的asset
例:创建一个Cube,拖拽生成一个预置体。右键点击预置体,选择"Build AssetBundle From Selection - Track dependencies",这时可以看到.unity3d的保存窗口。在项目中创建一个名为AssetBundles的目录,并把选中的预置体存为Cube.unity3d,可以看到窗口显示如下:
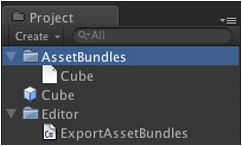
现在,就可以把Cube.unity3d放到任意位置,或自己的服务器上。
如何在创建组件包时修改属性
可以在调用 BuildPipeline.BuildAssetBundle以后使用 AssetDatabase.ImportAsset来强制导入组件,然后用 AssetPostprocessor.OnPreprocessTexture来设置需要的属性。
下面的示例来展示构建组件包时如何设置不同的纹理贴图。
也可以使用AssetDatabase.ImportAssetOptions.来控制如何导入组件。
【注】远程加载.unity3d包,可以使用WWW类
--------------------------------------------------------------------------------------------------------
在一个Unity项目中,发布包本身不一定要包括所有的Asset(译为资产或组件),其它的部分可以单独发布为.unity3d,再由程序从本地/远程加载执行,这部分不在本文讨论范围。虽然Unity并没有直接提供.unity3d的导出功能,但可以通过其手册了解到一些,并打开菜单项。
翻看Unity关于AssetBundle的手册,有相关的链接:
BuildPipeline.BuildAssetBundle
Building AssetBundles
【注意】导出.unity3d格式需要pro版本,非pro版本可以打开菜单项,但导出时会提示错误:
我们可以使用Untiy提供的现成的脚本打开两个导出.unity3d的菜单项,也可以使用API根据自己的需求来写。当项目变得越来越大时,手工导出AssetBundle会越来越吃力,这时可能就需要自己来开发导出功能,自动创建AssetBundle了。
打开菜单项
在Unity中创建名为ExprotAssetBundles的C#脚本,放到Editor目录下(必须是这
4000
个目录,以便在编辑器中生效)。把下面的代码复制到ExprotAssetBundles脚本中(可以在Building
AssetBundles中找到这段代码)
// C# Example
// Builds an asset bundle from the selected objects in the project view.
// Once compiled go to "Menu" -> "Assets" and select one of the choices
// to build the Asset Bundle

using UnityEngine;
using UnityEditor;
public class ExportAssetBundles {
[MenuItem("Assets/Build AssetBundle From Selection - Track dependencies")]
static void ExportResource () {
// Bring up save panel
string path = EditorUtility.SaveFilePanel ("Save Resource", "", "New Resource", "unity3d");
if (path.Length != 0) {
// Build the resource file from the active selection.
Object[] selection = Selection.GetFiltered(typeof(Object), SelectionMode.DeepAssets);
BuildPipeline.BuildAssetBundle(Selection.activeObject, selection, path, BuildAssetBundleOptions.CollectDependencies | BuildAssetBundleOptions.CompleteAssets);
Selection.objects = selection;
}
}
[MenuItem("Assets/Build AssetBundle From Selection - No dependency tracking")]
static void ExportResourceNoTrack () {
// Bring up save panel
string path = EditorUtility.SaveFilePanel ("Save Resource", "", "New Resource", "unity3d");
if (path.Length != 0) {
// Build the resource file from the active selection.
BuildPipeline.BuildAssetBundle(Selection.activeObject, Selection.objects, path);
}
}
}
这时,在Assets菜单下可以看到两个新的菜单项:
1. Build AssetBundle From Selection - Track dependencies
这个选项会把当前对象打包到一个asset bundle中,并包含所有依赖。
2. Build AssetBundle From Selection - No dependency tracking
与前一个相反的选项,只包含所选的asset
例:创建一个Cube,拖拽生成一个预置体。右键点击预置体,选择"Build AssetBundle From Selection - Track dependencies",这时可以看到.unity3d的保存窗口。在项目中创建一个名为AssetBundles的目录,并把选中的预置体存为Cube.unity3d,可以看到窗口显示如下:
现在,就可以把Cube.unity3d放到任意位置,或自己的服务器上。
如何在创建组件包时修改属性
可以在调用 BuildPipeline.BuildAssetBundle以后使用 AssetDatabase.ImportAsset来强制导入组件,然后用 AssetPostprocessor.OnPreprocessTexture来设置需要的属性。
下面的示例来展示构建组件包时如何设置不同的纹理贴图。
// Builds an asset bundle from the selected objects in the project view,
// and changes the texture format using an AssetPostprocessor.

using UnityEngine;
using UnityEditor;

public class ExportAssetBundles {

// Store current texture format for the TextureProcessor.
public static TextureImporterFormat textureFormat;

[MenuItem("Assets/Build AssetBundle From Selection - PVRTC_RGB2")]
static void ExportResourceRGB2 () {
textureFormat = TextureImporterFormat.PVRTC_RGB2;
ExportResource();
}

[MenuItem("Assets/Build AssetBundle From Selection - PVRTC_RGB4")]
static void ExportResourceRGB4 () {
textureFormat = TextureImporterFormat.PVRTC_RGB4;
ExportResource();
}

static void ExportResource () {
// Bring up save panel.
string path = EditorUtility.SaveFilePanel ("Save Resource", "", "New Resource", "unity3d");

if (path.Length != 0) {
// Build the resource file from the active selection.
Object[] selection = Selection.GetFiltered(typeof(Object), SelectionMode.DeepAssets);

foreach (object asset in selection) {
string assetPath = AssetDatabase.GetAssetPath((UnityEngine.Object) asset);
if (asset is Texture2D) {
// Force reimport thru TextureProcessor.
AssetDatabase.ImportAsset(assetPath);
}
}

BuildPipeline.BuildAssetBundle(Selection.activeObject, selection, path, BuildAssetBundleOptions.CollectDependencies | BuildAssetBundleOptions.CompleteAssets);
Selection.objects = selection;
}
}
}
// Changes the texture format when building the Asset Bundle.
using UnityEngine;
using UnityEditor;
public class TextureProcessor : AssetPostprocessor
{
void OnPreprocessTexture() {
TextureImporter importer = assetImporter as TextureImporter;
importer.textureFormat = ExportAssetBundles.textureFormat;
}
}也可以使用AssetDatabase.ImportAssetOptions.来控制如何导入组件。
【注】远程加载.unity3d包,可以使用WWW类

相关文章推荐
- [原]在Unity中创建可远程加载的.unity3d包
- unity动态加载远程资源
- Unity动态加载远程资源
- Unity远程加载到本地,本地加载到游戏中
- Unity动态加载远程资源
- Unity创建Assetbundle与加载
- Unity远程加载到本地,本地加载到游戏中
- unity动态加载远程资源
- unity创建和加载AssetBundle
- [原创]远程导出视图在本地创建
- Unity中的资源加载方法
- springMVC加载远程freemarker模板文件
- Android Handler 异步消息处理机制的妙用 创建强大的图片加载类
- 遍历创建进程、创建线程、加载模块的回调函数
- git克隆远程项目并创建本地对应分支
- git使用笔记3(在github上创建远程仓库)
- 【Unity】4.5 树木创建器
- Linux操作系统分析(2)- 进程的创建与可执行程序的加载
- git 查看远程分支、本地分支、创建分支、把分支推到远程repository、删除本地分支
- unityTaidou(一)NGUI之列表的创建与使用