www服务的高级配置(用户验证,访问控制,虚拟主机等)
2013-05-18 10:03
1301 查看
操作环境RedHat5.8 这里面是会说到httpd服务器的用户页面验证,目录容器+访问控制,错误页面提示,用户的个人空间,还有基于端口,ip,和域名的虚拟主机,关于基础的部分,可以看上一篇博客www(apache)服务器的常规配
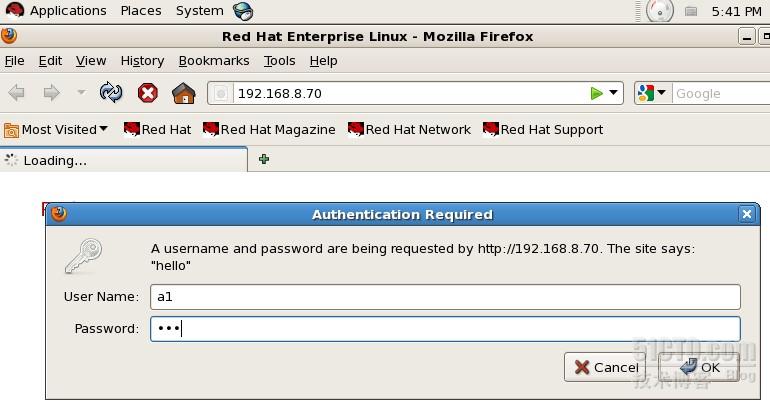
一.httpd的用户验证 给apache目录加访问控制 必须输入用户名密码才能访问首先要开启Apache mod_auth 模块 或者 auth_basic //默认是开启的1.[root@tx1 ~]# vim /etc/httpd/conf/httpd.conf 327 AllowOverride None //是否开启验证(类型:1.all:全部的权限均可被复写, 2.authconfig: 仅有网页认证(账号密码)可复写,3.indexes:仅允许indexes方面的复写,4,limits:允许用户利用allow,deny与order管理可浏览的权限,none:不可复写,即.htaccess文件失效)328 authname "hello" //验证的名字329 authtype basic //验证的类型330 authuserfile "/var/www/html/.htpasswd" //验证时要读的文件331 require valid-user //只有保存在文件中的用户才是合法的注:如果在主配置文件/etc/httpd/conf/httpd.conf中,这样编写无论AllowOverride all/none,验证都会实现,如果没有在主配置文件里写这个,而采用其他文件验证,只有当AllowOverride all时成立[root@tx1 html]# htpasswd -c .htpasswd a1 //创建一个用户,第一需要加上-c选项,为创建一个加密的文件New password: Re-type new password: Adding password for user a1[root@tx1 html]# htpasswd .htpasswd a2 //第二次就可以去掉这个-c的选项了New password: Re-type new password: Adding password for user a2[root@tx1 html]# cat .htpasswd a1:p20QloCycdD1.a2:CT5QlTslMlmV2[root@tx1 html]# echo nihao > index.html[root@tx1 html]# service httpd restartStopping httpd: [FAILED]Starting httpd: [ OK ]测试:

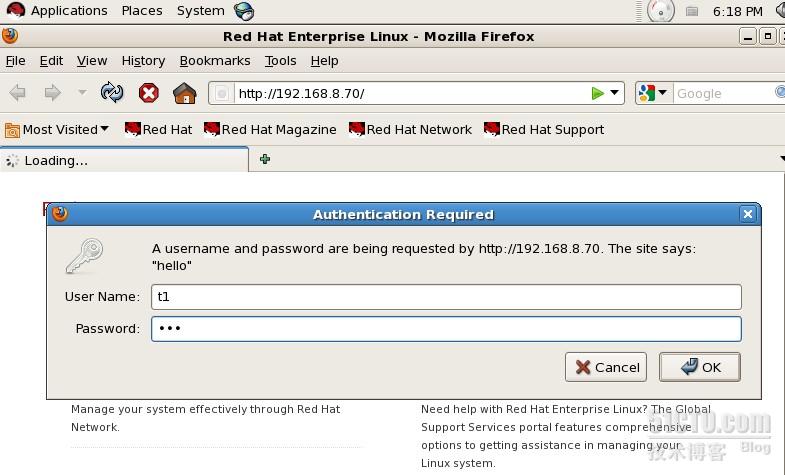
2.使用其他文件验证[root@tx1 ~]# vim /etc/httpd/conf/httpd.conf 327 AllowOverride all //记住这里要开启哦!之前做的删掉402 AccessFileName .htaccess //这里指的是验证的文件名[root@tx1 html]# vim .htaccessauthname "hello"authtype basicauthuserfile "/var/www/html/.htpasswd"require valid-user
[root@tx1 html]# rm .htpasswd rm: remove regular file `.htpasswd'? y[root@tx1 html]# htpasswd -c .htpasswd t1New password: Re-type new password: Adding password for user t1[root@tx1 html]# service httpd restart测试:

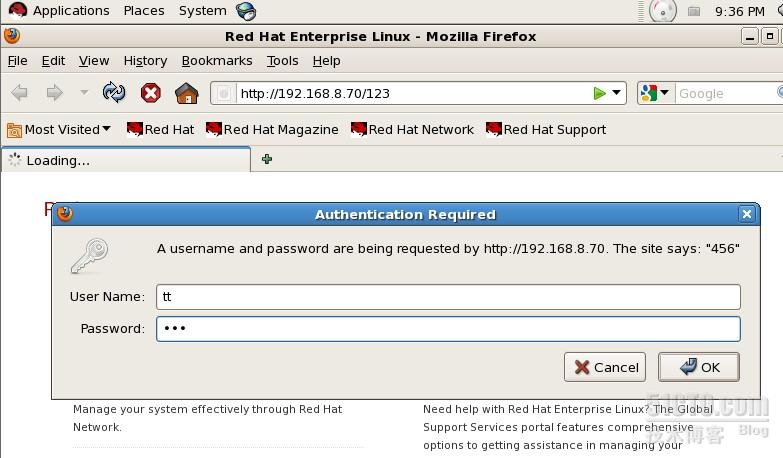
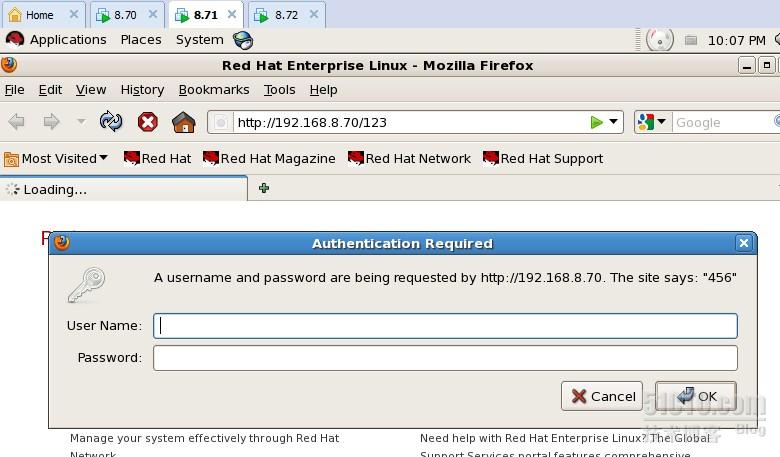
二.目录容器+访问控制 1. 好处:方便管理, 网站中的所有网页和相关文件都要存放在主目录下,为了对文件进行归类整理,也可以在主目录下面建立子文件夹,分别存放不同内容的文件自定义一个目录容器:[root@tx1 html]# vim /etc/httpd/conf/httpd.conf<directory "/var/www/html/123"> options indexes authname "456" authtype basic authuserfile "/var/www/html/123/.htpasswd" require valid-user order allow,deny allow from all</directory>[root@tx1 123]# pwd/var/www/html/123[root@tx1 123]# htpasswd -c .htpasswd ttNew password: Re-type new password: Adding password for user tt测试:
2.访问控制order allow,denyallow from allallow 允许deny 拒绝allow,deny :以allow指定的客户端能够访问,没有允许的全部deny-拒绝访问deny,allow :以deny指定的客户端拒绝访问,没有拒绝的客户端allow-都能访问(1)黑名单:order deny,allowdeny from 拒绝的客户端(2)白名单:order allow,denyallow from 允许的客户端
例:根据上一个目录容器添加一个访问控制[root@tx1 123]# vim /etc/httpd/conf/httpd.conf<directory "/var/www/html/123"> options indexes authname "456" authtype basic authuserfile "/var/www/html/123/.htpasswd" require valid-user order allow,deny allow from 127.0.0.1 192.168.8.71</directory>[root@tx1 123]# service httpd restartStopping httpd: [ OK ]Starting httpd: [ OK ]测试:192.168.8.71
192.168.8.72

(1)白名单order allow,denyallow from 127.0.0.1 192.168.8.71只有本机和192.168.8.71可以访问192.168.8.71192.168.8.72(2)黑名单:order deny,allowdeny from 127.0.0.1 192.168.8.71只有本机和192.168.8.71不可以访问,这里就不做测试了
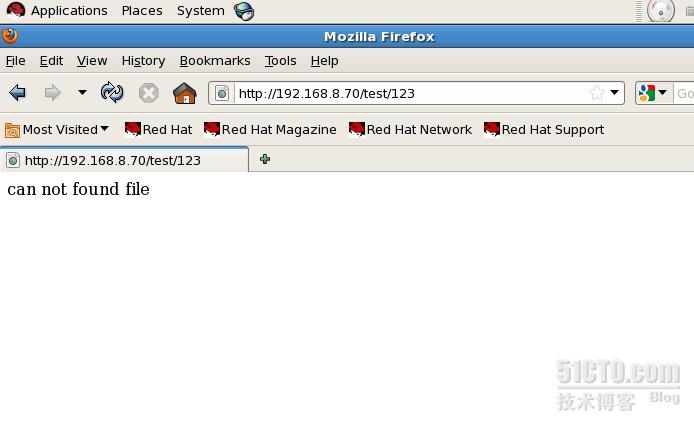
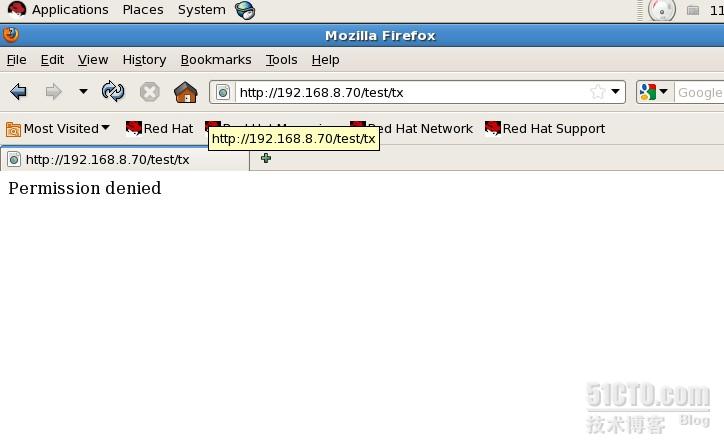
三.错误页面提示1xx 请求被接受,临时响应2xx 成功3xx 客户端与服务器建立连接的时候,还需要输入一些其他的内容4xx 客户端请求的时候出现错误 ××××5xx 服务器的内部错误 ××××例:403 是没有权限404 是文件找不到更详细的某网友的总结http://www.cnblogs.com/hanf/articles/1554467.html[root@tx1 html]# vim /etc/httpd/conf/httpd.conf<directory "/var/www/html/test"> options indexes errordocument 404 /error/404.html errordocument 403 /error/403.html order allow,deny allow from all</directory>837 Alias /error/ "/var/www/error/" //错误文件的位置[root@tx1 test]# cd /var/www/error/[root@tx1 error]# vim 403.html Permission denied[root@tx1 error]# vim 404.html can not found file[root@tx1 html]# mkdir test[root@tx1 html]# cd test[root@tx1 test]# lstx[root@tx1 test]# chmod 440 tx[root@tx1 test]# echo nihao > tx测试:
另外还可以添加图片的错误提示,这个目录下保存着图片

[root@tx1 html]# vim /etc/httpd/conf/httpd.conf<directory "/var/www/html/test"> options indexes #errordocument 404 /error/404.html errordocument 404 /icons/world2.png errordocument 403 /error/403.html order allow,deny allow from all</directory>[root@tx1 html]# service httpd restartStopping httpd: [ OK ]Starting httpd: [ OK ]测试:

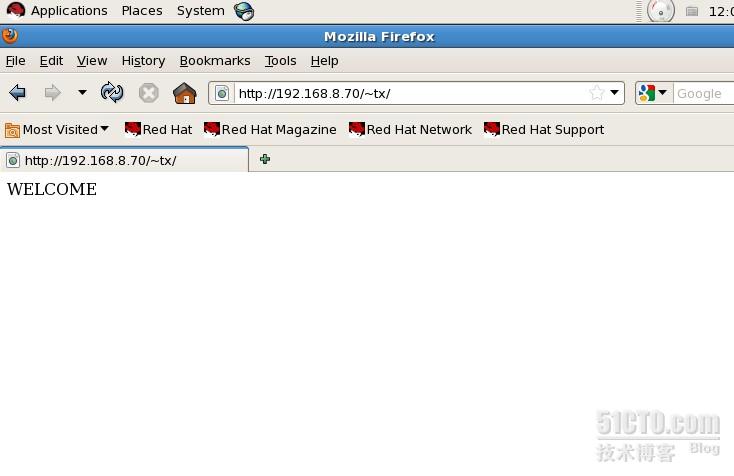
四.用户的个人空间 实现用户个人主页的功能是通过UserDir来实现的[root@tx1 html]# vim /etc/httpd/conf/httpd.conf357 <IfModule mod_userdir.c> 358 # 359 # UserDir is disabled by default since it can confirm the presence 360 # of a username on the system (depending on home directory 361 # permissions). 362 # 363 UserDir public_html //默认是关闭的,开启 364 <directory "/home/u1/public_html"> 365 options indexes 366 order allow,deny 367 allow from all //真是环境相要做好访问控制,这里做个试验 368 </directory>[root@tx1 ~]# useradd tx[root@tx1 ~]# cd ~tx[root@tx1 tx]# mkdir public_html[root@tx1 tx]# cd public_html/[root@tx1 public_html]# echo WELCOME > index.html[root@tx1 public_html]# service httpd restartStopping httpd: [ OK ]Starting httpd: [ OK ]启动的同时监控一下日志[root@tx1 httpd]# cd /var/log/httpd/[root@tx1 httpd]# tail -0f error_log [Wed Feb 06 05:35:34 2013] [error] [client 192.168.8.71] (13)Permission denied: access to /~tx/ denied这里说明httpd用户不能够进入[root@tx1 tx]# chmod +x . //修改tx家目录的权限,让用户能够进入[root@tx1 tx]# service httpd restartStopping httpd: [ OK ]Starting httpd: [ OK ]测试
五.基于三种方式的虚拟主机(ip,端口,域名(最常用的)) 虚拟主机是在网络服务器上划分出一定的磁盘空间供用户放置站点、应用组件等,提供必要的站点功能、数据存放和传输功能。所谓虚拟主机,也叫“网站空间”,就是把一台运行在互联网上的服务器划分成多个“虚拟”的服务器,每一个虚拟主机都具有独立的域名和完整的Internet服务器(支持WWW、FTP、E-mail等)功能。
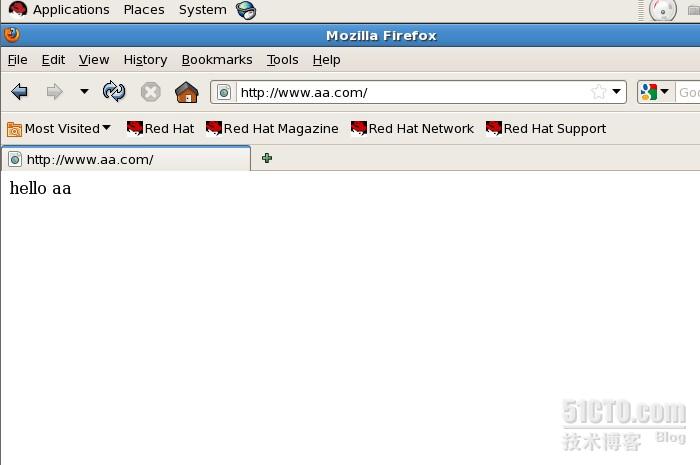
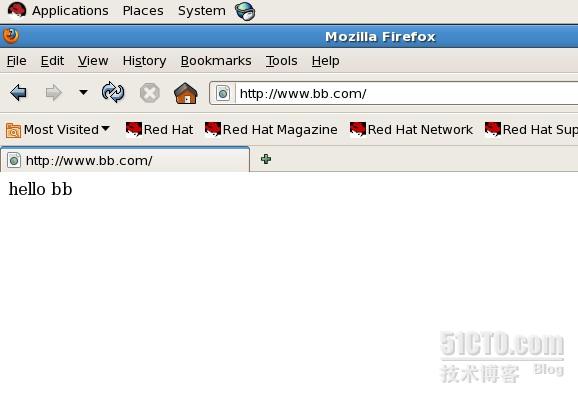
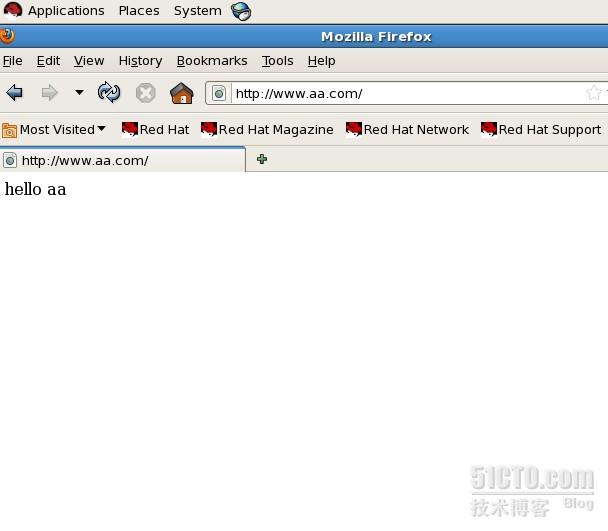
(1)基于ip的[root@tx1 ~]# ifconfig eth0:0 192.168.8.80 netmask 255.255.255.0[root@tx1 ~]# mkdir -pv /tmp/{aa,bb}创建两个目录,作为虚拟主机的documentroot[root@tx1 ~]# vim /etc/httpd/conf/httpd.conf 972 NameVirtualHost 192.168.8.70:80 973 NameVirtualHost 192.168.8.80:80<VirtualHost 192.168.8.70:80> ServerAdmin root@localhost //管理员邮箱 DocumentRoot /tmp/aa //页面发布目录 ServerName www.aa.comFQDN ErrorLog logs/aa.com-error_log //错误日志 CustomLog logs/aa.com-access_log common //访问日志 <directory "/tmp/aa"> options indexes order allow,deny allow from all </directory></VirtualHost><VirtualHost 192.168.8.80:80> ServerAdmin root@localhost DocumentRoot /tmp/bb ServerName www.bb.com ErrorLog logs/bb.com-error_log CustomLog logs/bb.com-access_log common <directory "/tmp/bb"> options indexes order allow,deny allow from all </directory></VirtualHost>[root@tx1 ~]# echo “hello aa”> /tmp/aa/index.html[root@tx1 ~]# echo "hello bb" > /tmp/bb/index.html编辑这个文件,代替DNS正向解析:(关于DNS可以看本人的前几篇博客详解)[root@tx2 ~]# vim /etc/hosts192.168.8.70 www.aa.com192.168.8.80 www.bb.com测试:
(2)基于端口的使用一个没有被占用的端口 vim /etc/services[root@tx1 ~]# vim /etc/httpd/conf/httpd.conf 134 Listen 80 135 listen 880NameVirtualHost 192.168.8.70:80NameVirtualHost 192.168.8.70:880<VirtualHost 172.16.1.2:80> 内容 同上</VirtualHost><VirtualHost 172.16.1.2:880> 内容 同上</VirtualHost>[root@tx2 ~]#cat /etc/hosts192.168.8.70 www.aa.com192.168.8.70 www.bb.com测试:firefox http://www.aa.com:80会出现:hello aafirefox http://www.bb.com:880会出现:hello bb
(3)基于域名的(最常用的)[root@tx1 ~]# vim /etc/httpd/conf/httpd.conf NameVirtualHost 192.168.8.70:80NameVirtualHost *:80 //代表任何ip<VirtualHost *:80> ServerAdmin root@localhost DocumentRoot /tmp/aa ServerName www.aa.com ErrorLog logs/aa.com-error_log CustomLog logs/aa.com-access_log common <directory "/tmp/aa"> options indexes order allow,deny allow from all </directory></VirtualHost><VirtualHost *:80> ServerAdmin root@localhost DocumentRoot /tmp/bb ServerName www.bb.com ErrorLog logs/bb.com-error_log CustomLog logs/bb.com-access_log common <directory "/tmp/bb"> options indexes order allow,deny allow from all </directory></VirtualHost>[root@tx2 ~]#cat /etc/hosts192.168.8.70 www.aa.com192.168.8.70 www.bb.com真实环境要搭建DNS的,这里做一下试验测试:

本文出自 “tanxin” 博客,谢绝转载!
一.httpd的用户验证 给apache目录加访问控制 必须输入用户名密码才能访问首先要开启Apache mod_auth 模块 或者 auth_basic //默认是开启的1.[root@tx1 ~]# vim /etc/httpd/conf/httpd.conf 327 AllowOverride None //是否开启验证(类型:1.all:全部的权限均可被复写, 2.authconfig: 仅有网页认证(账号密码)可复写,3.indexes:仅允许indexes方面的复写,4,limits:允许用户利用allow,deny与order管理可浏览的权限,none:不可复写,即.htaccess文件失效)328 authname "hello" //验证的名字329 authtype basic //验证的类型330 authuserfile "/var/www/html/.htpasswd" //验证时要读的文件331 require valid-user //只有保存在文件中的用户才是合法的注:如果在主配置文件/etc/httpd/conf/httpd.conf中,这样编写无论AllowOverride all/none,验证都会实现,如果没有在主配置文件里写这个,而采用其他文件验证,只有当AllowOverride all时成立[root@tx1 html]# htpasswd -c .htpasswd a1 //创建一个用户,第一需要加上-c选项,为创建一个加密的文件New password: Re-type new password: Adding password for user a1[root@tx1 html]# htpasswd .htpasswd a2 //第二次就可以去掉这个-c的选项了New password: Re-type new password: Adding password for user a2[root@tx1 html]# cat .htpasswd a1:p20QloCycdD1.a2:CT5QlTslMlmV2[root@tx1 html]# echo nihao > index.html[root@tx1 html]# service httpd restartStopping httpd: [FAILED]Starting httpd: [ OK ]测试:
2.使用其他文件验证[root@tx1 ~]# vim /etc/httpd/conf/httpd.conf 327 AllowOverride all //记住这里要开启哦!之前做的删掉402 AccessFileName .htaccess //这里指的是验证的文件名[root@tx1 html]# vim .htaccessauthname "hello"authtype basicauthuserfile "/var/www/html/.htpasswd"require valid-user
[root@tx1 html]# rm .htpasswd rm: remove regular file `.htpasswd'? y[root@tx1 html]# htpasswd -c .htpasswd t1New password: Re-type new password: Adding password for user t1[root@tx1 html]# service httpd restart测试:
二.目录容器+访问控制 1. 好处:方便管理, 网站中的所有网页和相关文件都要存放在主目录下,为了对文件进行归类整理,也可以在主目录下面建立子文件夹,分别存放不同内容的文件自定义一个目录容器:[root@tx1 html]# vim /etc/httpd/conf/httpd.conf<directory "/var/www/html/123"> options indexes authname "456" authtype basic authuserfile "/var/www/html/123/.htpasswd" require valid-user order allow,deny allow from all</directory>[root@tx1 123]# pwd/var/www/html/123[root@tx1 123]# htpasswd -c .htpasswd ttNew password: Re-type new password: Adding password for user tt测试:
2.访问控制order allow,denyallow from allallow 允许deny 拒绝allow,deny :以allow指定的客户端能够访问,没有允许的全部deny-拒绝访问deny,allow :以deny指定的客户端拒绝访问,没有拒绝的客户端allow-都能访问(1)黑名单:order deny,allowdeny from 拒绝的客户端(2)白名单:order allow,denyallow from 允许的客户端
例:根据上一个目录容器添加一个访问控制[root@tx1 123]# vim /etc/httpd/conf/httpd.conf<directory "/var/www/html/123"> options indexes authname "456" authtype basic authuserfile "/var/www/html/123/.htpasswd" require valid-user order allow,deny allow from 127.0.0.1 192.168.8.71</directory>[root@tx1 123]# service httpd restartStopping httpd: [ OK ]Starting httpd: [ OK ]测试:192.168.8.71
192.168.8.72
(1)白名单order allow,denyallow from 127.0.0.1 192.168.8.71只有本机和192.168.8.71可以访问192.168.8.71192.168.8.72(2)黑名单:order deny,allowdeny from 127.0.0.1 192.168.8.71只有本机和192.168.8.71不可以访问,这里就不做测试了
三.错误页面提示1xx 请求被接受,临时响应2xx 成功3xx 客户端与服务器建立连接的时候,还需要输入一些其他的内容4xx 客户端请求的时候出现错误 ××××5xx 服务器的内部错误 ××××例:403 是没有权限404 是文件找不到更详细的某网友的总结http://www.cnblogs.com/hanf/articles/1554467.html[root@tx1 html]# vim /etc/httpd/conf/httpd.conf<directory "/var/www/html/test"> options indexes errordocument 404 /error/404.html errordocument 403 /error/403.html order allow,deny allow from all</directory>837 Alias /error/ "/var/www/error/" //错误文件的位置[root@tx1 test]# cd /var/www/error/[root@tx1 error]# vim 403.html Permission denied[root@tx1 error]# vim 404.html can not found file[root@tx1 html]# mkdir test[root@tx1 html]# cd test[root@tx1 test]# lstx[root@tx1 test]# chmod 440 tx[root@tx1 test]# echo nihao > tx测试:
另外还可以添加图片的错误提示,这个目录下保存着图片
[root@tx1 html]# vim /etc/httpd/conf/httpd.conf<directory "/var/www/html/test"> options indexes #errordocument 404 /error/404.html errordocument 404 /icons/world2.png errordocument 403 /error/403.html order allow,deny allow from all</directory>[root@tx1 html]# service httpd restartStopping httpd: [ OK ]Starting httpd: [ OK ]测试:
四.用户的个人空间 实现用户个人主页的功能是通过UserDir来实现的[root@tx1 html]# vim /etc/httpd/conf/httpd.conf357 <IfModule mod_userdir.c> 358 # 359 # UserDir is disabled by default since it can confirm the presence 360 # of a username on the system (depending on home directory 361 # permissions). 362 # 363 UserDir public_html //默认是关闭的,开启 364 <directory "/home/u1/public_html"> 365 options indexes 366 order allow,deny 367 allow from all //真是环境相要做好访问控制,这里做个试验 368 </directory>[root@tx1 ~]# useradd tx[root@tx1 ~]# cd ~tx[root@tx1 tx]# mkdir public_html[root@tx1 tx]# cd public_html/[root@tx1 public_html]# echo WELCOME > index.html[root@tx1 public_html]# service httpd restartStopping httpd: [ OK ]Starting httpd: [ OK ]启动的同时监控一下日志[root@tx1 httpd]# cd /var/log/httpd/[root@tx1 httpd]# tail -0f error_log [Wed Feb 06 05:35:34 2013] [error] [client 192.168.8.71] (13)Permission denied: access to /~tx/ denied这里说明httpd用户不能够进入[root@tx1 tx]# chmod +x . //修改tx家目录的权限,让用户能够进入[root@tx1 tx]# service httpd restartStopping httpd: [ OK ]Starting httpd: [ OK ]测试
五.基于三种方式的虚拟主机(ip,端口,域名(最常用的)) 虚拟主机是在网络服务器上划分出一定的磁盘空间供用户放置站点、应用组件等,提供必要的站点功能、数据存放和传输功能。所谓虚拟主机,也叫“网站空间”,就是把一台运行在互联网上的服务器划分成多个“虚拟”的服务器,每一个虚拟主机都具有独立的域名和完整的Internet服务器(支持WWW、FTP、E-mail等)功能。
(1)基于ip的[root@tx1 ~]# ifconfig eth0:0 192.168.8.80 netmask 255.255.255.0[root@tx1 ~]# mkdir -pv /tmp/{aa,bb}创建两个目录,作为虚拟主机的documentroot[root@tx1 ~]# vim /etc/httpd/conf/httpd.conf 972 NameVirtualHost 192.168.8.70:80 973 NameVirtualHost 192.168.8.80:80<VirtualHost 192.168.8.70:80> ServerAdmin root@localhost //管理员邮箱 DocumentRoot /tmp/aa //页面发布目录 ServerName www.aa.comFQDN ErrorLog logs/aa.com-error_log //错误日志 CustomLog logs/aa.com-access_log common //访问日志 <directory "/tmp/aa"> options indexes order allow,deny allow from all </directory></VirtualHost><VirtualHost 192.168.8.80:80> ServerAdmin root@localhost DocumentRoot /tmp/bb ServerName www.bb.com ErrorLog logs/bb.com-error_log CustomLog logs/bb.com-access_log common <directory "/tmp/bb"> options indexes order allow,deny allow from all </directory></VirtualHost>[root@tx1 ~]# echo “hello aa”> /tmp/aa/index.html[root@tx1 ~]# echo "hello bb" > /tmp/bb/index.html编辑这个文件,代替DNS正向解析:(关于DNS可以看本人的前几篇博客详解)[root@tx2 ~]# vim /etc/hosts192.168.8.70 www.aa.com192.168.8.80 www.bb.com测试:
(2)基于端口的使用一个没有被占用的端口 vim /etc/services[root@tx1 ~]# vim /etc/httpd/conf/httpd.conf 134 Listen 80 135 listen 880NameVirtualHost 192.168.8.70:80NameVirtualHost 192.168.8.70:880<VirtualHost 172.16.1.2:80> 内容 同上</VirtualHost><VirtualHost 172.16.1.2:880> 内容 同上</VirtualHost>[root@tx2 ~]#cat /etc/hosts192.168.8.70 www.aa.com192.168.8.70 www.bb.com测试:firefox http://www.aa.com:80会出现:hello aafirefox http://www.bb.com:880会出现:hello bb
(3)基于域名的(最常用的)[root@tx1 ~]# vim /etc/httpd/conf/httpd.conf NameVirtualHost 192.168.8.70:80NameVirtualHost *:80 //代表任何ip<VirtualHost *:80> ServerAdmin root@localhost DocumentRoot /tmp/aa ServerName www.aa.com ErrorLog logs/aa.com-error_log CustomLog logs/aa.com-access_log common <directory "/tmp/aa"> options indexes order allow,deny allow from all </directory></VirtualHost><VirtualHost *:80> ServerAdmin root@localhost DocumentRoot /tmp/bb ServerName www.bb.com ErrorLog logs/bb.com-error_log CustomLog logs/bb.com-access_log common <directory "/tmp/bb"> options indexes order allow,deny allow from all </directory></VirtualHost>[root@tx2 ~]#cat /etc/hosts192.168.8.70 www.aa.com192.168.8.70 www.bb.com真实环境要搭建DNS的,这里做一下试验测试:
本文出自 “tanxin” 博客,谢绝转载!

相关文章推荐
- Nginx提供网站服务应用包括(虚拟主机、用户访问控制、用户验证、nginx平滑升级、防盗链)的配置
- httpd虚拟主机、站点访问控制、基于用户的访问控制、持久链接等应用配置实例
- 搭建web服务实现多个虚拟主机.基于主机/用户的访问控制
- httpd高级配置(虚拟主机,https,访问控制)
- nginx的高级配置(1)——为某个虚拟主机添加用户验证
- httpd服务之虚拟主机、访问控制、https配置
- Nginx作为WEB服务相关配置(性能优化,网络连接,访问控制,虚拟主机,https等等)
- httpd服务之虚拟主机、访问控制、https配置详解
- Apache基础服务之Web访问控制(身份验证、虚拟目录、虚拟主机)
- httpd虚拟主机配置及基于用户的访问控制
- **HTTP配置文件详解(访问控制、虚拟主机、DEFLATE、HTTPS配置)**
- http2.2常用配置(虚拟主机,访问控制,压缩,缓存,压力测试)
- Openssh服务配置:控制用户登录 构建密钥对验证ssh
- linux系统之apache基本配置及语言支持及虚拟主机 访问控制
- Ngingx自学手册(二)常用配置虚拟主机,访问控制,认证和状态信息
- nginx-虚拟主机,访问控制,防盗链,代理服务
- 默认虚拟主机,用户认证,域名跳转,访问日志,缓存时间,防盗链,访问控制
- vsftpd服务虚拟用户访问配置
- Linux运维笔记-文档总结-Apache基本配置的介绍和语言支持,虚拟主机,访问控制的实现
- 构建httpd网站服务器(二) -- httpd服务的访问控制和基于域名、IP、端口的虚拟主机